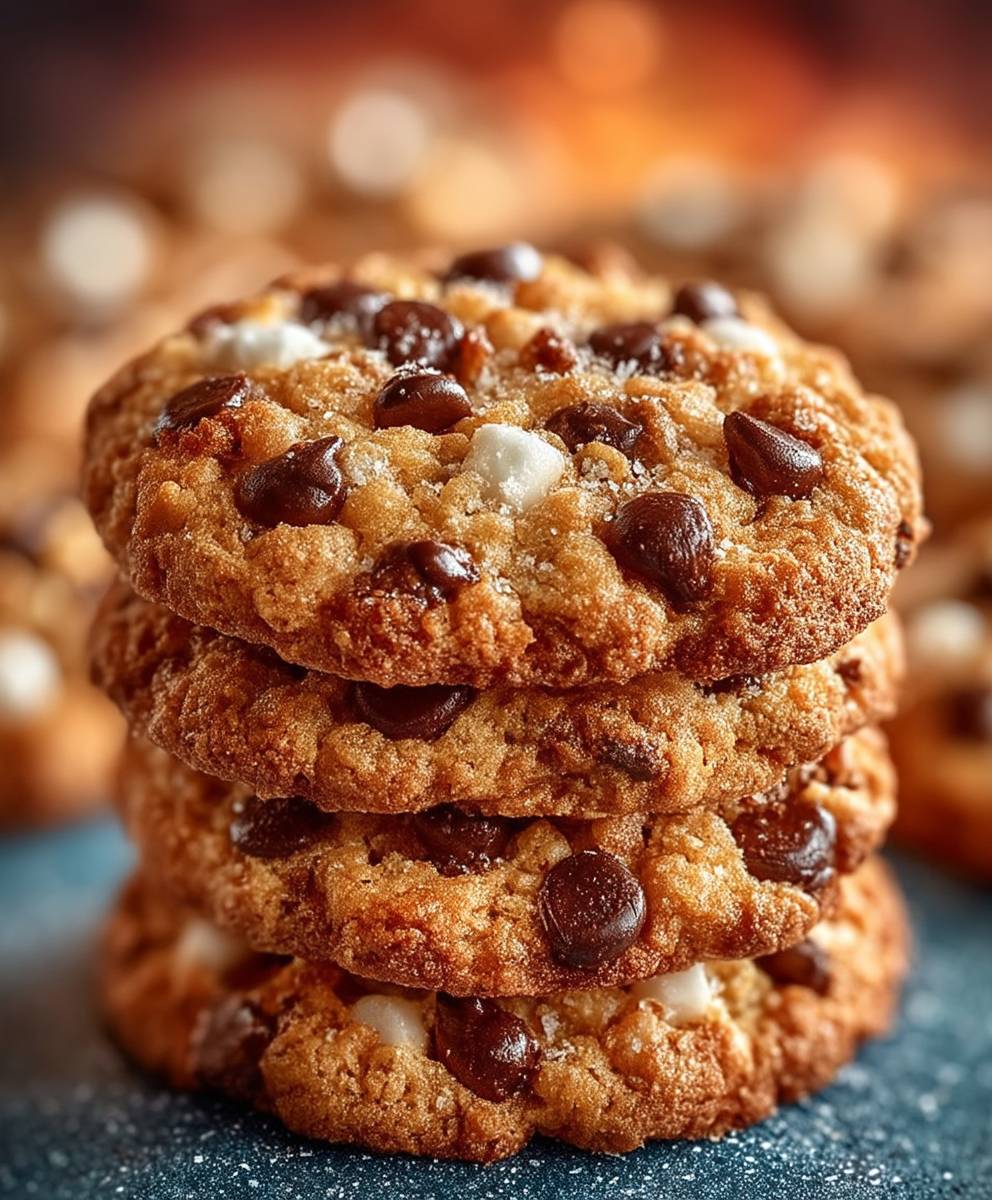
Chocolate Chip Rice Krispie Cookies: Prepare to have your world rocked! Imagine the nostalgic crunch of a Rice Krispie treat, but elevated to a whole new level of deliciousness with the warm, comforting embrace of chocolate chips. These aren’t your grandma’s Rice Krispie treats (unless your grandma is a culinary genius, of course!). We’re taking a beloved childhood classic and giving it a modern, irresistible twist.
While the exact origins of combining Rice Krispies cereal with marshmallows are debated, the Kellogg Company certainly popularized the treat in the early 20th century. But the addition of chocolate chips? That’s where the magic truly happens! It’s a delightful fusion of textures and flavors that appeals to both kids and adults alike. The slight chewiness of the marshmallow, the satisfying snap of the Rice Krispies, and the melty pockets of chocolate create a symphony in your mouth.
People adore these Chocolate Chip Rice Krispie Cookies for so many reasons. They’re incredibly easy to make, requiring minimal ingredients and no baking! This makes them perfect for a quick dessert, a fun activity with the kids, or a last-minute treat when unexpected guests arrive. Plus, the combination of familiar flavors is simply irresistible. Who can say no to the comforting taste of marshmallows, the playful crunch of Rice Krispies, and the decadent sweetness of chocolate chips? Get ready to experience a cookie that’s both nostalgic and utterly addictive!

Ingredients:
- 1 cup (2 sticks) unsalted butter, softened
- ¾ cup granulated sugar
- ¾ cup packed light brown sugar
- 2 large eggs
- 1 teaspoon vanilla extract
- 2 ¼ cups all-purpose flour
- 1 teaspoon baking soda
- 1 teaspoon salt
- 2 cups Rice Krispies cereal
- 2 cups chocolate chips (milk, semi-sweet, or dark, your choice!)
- Optional: ½ cup chopped nuts (walnuts, pecans, or macadamia nuts work well)
Preparing the Dough:
- Cream the Butter and Sugars: In a large bowl, or the bowl of your stand mixer, cream together the softened butter, granulated sugar, and brown sugar until light and fluffy. This usually takes about 3-5 minutes on medium speed. Make sure to scrape down the sides of the bowl occasionally to ensure everything is evenly mixed. The mixture should be pale and airy.
- Add Eggs and Vanilla: Beat in the eggs one at a time, mixing well after each addition. Then, stir in the vanilla extract. Don’t overmix at this stage, just combine until the eggs are fully incorporated.
- Combine Dry Ingredients: In a separate medium bowl, whisk together the all-purpose flour, baking soda, and salt. Whisking helps to evenly distribute the baking soda and salt throughout the flour, which is crucial for proper leavening and flavor.
- Gradually Add Dry Ingredients to Wet Ingredients: Gradually add the dry ingredients to the wet ingredients, mixing on low speed until just combined. Be careful not to overmix, as this can lead to tough cookies. Overmixing develops the gluten in the flour, resulting in a chewier, less tender cookie.
- Fold in Rice Krispies and Chocolate Chips: Gently fold in the Rice Krispies cereal and chocolate chips until they are evenly distributed throughout the dough. If you’re using nuts, fold them in at this stage as well. Be gentle to avoid crushing the Rice Krispies.
- Chill the Dough (Important!): Cover the bowl with plastic wrap and chill the dough in the refrigerator for at least 30 minutes, or up to 2 hours. Chilling the dough helps to prevent the cookies from spreading too much during baking and also allows the flavors to meld together. This step is crucial for achieving the perfect texture.
Baking the Cookies:
- Preheat Oven: Preheat your oven to 375°F (190°C). Make sure your oven rack is positioned in the center of the oven for even baking.
- Prepare Baking Sheets: Line baking sheets with parchment paper or silicone baking mats. This will prevent the cookies from sticking and make cleanup easier. Parchment paper also helps to ensure even baking.
- Scoop Dough: Use a cookie scoop or spoon to drop rounded tablespoons of dough onto the prepared baking sheets, leaving about 2 inches between each cookie. This allows for spreading during baking.
- Bake: Bake for 9-11 minutes, or until the edges are golden brown and the centers are set. The baking time may vary depending on your oven, so keep a close eye on the cookies.
- Cool: Remove the baking sheets from the oven and let the cookies cool on the baking sheets for a few minutes before transferring them to a wire rack to cool completely. This allows the cookies to firm up slightly and prevents them from breaking when you move them.
Tips and Variations:
- Soft Butter is Key: Make sure your butter is softened to room temperature before creaming it with the sugars. This will ensure that the butter incorporates properly and creates a light and fluffy dough.
- Don’t Overmix: Overmixing the dough can lead to tough cookies. Mix the dry ingredients into the wet ingredients until just combined.
- Chill the Dough: Chilling the dough is essential for preventing the cookies from spreading too much during baking.
- Use High-Quality Chocolate: Using high-quality chocolate chips will enhance the flavor of the cookies.
- Add-Ins: Feel free to add other ingredients to the dough, such as chopped nuts, dried fruit, or sprinkles.
- Experiment with Flavors: Try adding different extracts, such as almond extract or peppermint extract, to the dough for a unique flavor.
- Storage: Store the cookies in an airtight container at room temperature for up to 3 days.
- Freezing: You can freeze the cookie dough for up to 2 months. Simply scoop the dough onto a baking sheet and freeze until solid. Then, transfer the frozen dough balls to a freezer bag. When you’re ready to bake, simply bake the frozen dough balls as directed, adding a few extra minutes to the baking time. You can also freeze baked cookies in an airtight container for up to 2 months.
Troubleshooting:
- Cookies Spreading Too Much: If your cookies are spreading too much during baking, it could be due to several factors. Make sure your butter is not too soft, and that you are chilling the dough for at least 30 minutes. You can also try adding a tablespoon or two of flour to the dough.
- Cookies Too Dry: If your cookies are too dry, it could be due to overbaking. Reduce the baking time by a minute or two. You can also try adding a tablespoon or two of milk to the dough.
- Cookies Too Hard: If your cookies are too hard, it could be due to overmixing the dough. Be careful not to overmix the dough, and make sure your butter is softened to room temperature.
- Cookies Not Spreading Enough: If your cookies are not spreading enough, it could be due to using too much flour. Measure the flour carefully, and make sure you are not packing it into the measuring cup. You can also try adding a tablespoon or two of milk to the dough.
Serving Suggestions:
These Chocolate Chip Rice Krispie Cookies are delicious on their own, but they can also be served with a variety of accompaniments. Here are a few serving suggestions:
- With a Glass of Milk: A classic pairing!
- With Ice Cream: Crumble the cookies over vanilla ice cream for a delicious dessert.
- With Coffee or Tea: Enjoy a cookie with your morning coffee or afternoon tea.
- In a Cookie Sandwich: Sandwich a scoop of ice cream between two cookies for a fun and tasty treat.
- As a Gift: Package the cookies in a decorative tin or box and give them as a gift to friends and family.
Nutritional Information (Approximate):
Please note that the nutritional information is an estimate and may vary depending on the specific ingredients used.
- Calories: Approximately 150-200 per cookie
- Fat: 8-12 grams per cookie
- Saturated Fat: 5-7 grams per cookie
- Cholesterol: 30-40 milligrams per cookie
- Sodium: 80-120 milligrams per cookie
- Carbohydrates: 18-25 grams per cookie
- Sugar: 10-15 grams per cookie
- Protein: 1-2 grams per cookie
Why This Recipe Works:
This recipe is a winner because it combines the classic flavors of chocolate chip cookies with the fun, crispy texture of Rice Krispies cereal. The addition of Rice Krispies adds a unique crunch that sets these cookies apart from traditional chocolate chip cookies. The recipe is also easy to follow and customizable, allowing you to adjust the ingredients to your liking. The chilling step is crucial for preventing the cookies from spreading too much and ensuring a chewy texture. The use of both granulated sugar and brown sugar creates a perfect balance of sweetness and moisture. Overall, this recipe is a guaranteed crowd-pleaser!
Variations for Dietary Needs:
- Gluten-Free: Substitute the all-purpose flour with a gluten-free all-purpose flour blend. Make sure the blend contains xanthan gum or guar gum for binding.
- Dairy-Free: Use a dairy-free butter substitute and dairy-free chocolate chips.
- Vegan: Use a vegan butter substitute, dairy-free chocolate chips, and a flax egg (1 tablespoon ground flaxseed mixed with 3 tablespoons water, let sit for 5 minutes to thicken) in place of the eggs.
- Lower Sugar: Reduce the amount of granulated sugar and brown sugar by ¼ cup each. You can also use a sugar substitute, but be aware that this may affect the texture of the cookies.
Equipment
Conclusion:
So there you have it! These Chocolate Chip Rice Krispie Cookies are truly a must-try for anyone who loves a delightful combination of textures and flavors. The chewy, gooey marshmallow base, the satisfying crunch of the Rice Krispies, and the melty pockets of chocolate chips create a symphony in every bite. I promise, these aren’t your average cookies; they’re a fun, easy, and incredibly delicious treat that will have everyone asking for more.
What makes these cookies so special? It’s the simplicity! You don’t need any fancy equipment or complicated techniques. Just a few pantry staples and a little bit of love, and you’ll be rewarded with a batch of cookies that are perfect for any occasion. Whether you’re baking for a bake sale, a holiday gathering, or simply a sweet treat for yourself, these cookies are guaranteed to be a hit.
But the best part? They’re incredibly versatile! Feel free to experiment with different variations to suit your taste.
Serving Suggestions and Variations:
* Ice Cream Sandwich: Take two cooled cookies and sandwich a scoop of your favorite ice cream in between. Vanilla, chocolate, or even mint chocolate chip would be amazing!
* Drizzle with Chocolate: Once the cookies are cooled, drizzle them with melted dark, milk, or white chocolate for an extra touch of decadence.
* Add Nuts: Mix in chopped walnuts, pecans, or almonds for added crunch and flavor.
* Sprinkle with Sea Salt: A sprinkle of flaky sea salt on top of the cookies before they cool enhances the sweetness and creates a delightful salty-sweet contrast.
* Peanut Butter Chips: Swap out some of the chocolate chips for peanut butter chips for a peanut butter and chocolate explosion.
* Espresso Powder: Add a teaspoon of espresso powder to the batter for a mocha-flavored twist.
* Different Cereals: While Rice Krispies are the star, you could experiment with other cereals like Cocoa Krispies or Fruity Pebbles for a different flavor and color profile.
* Holiday Sprinkles: Decorate with festive sprinkles for a holiday-themed treat.
* S’mores Cookies: Add mini marshmallows and a piece of graham cracker to the top of each cookie before baking for a s’mores-inspired treat.
I truly believe that this recipe for Chocolate Chip Rice Krispie Cookies will become a new favorite in your household. It’s a fun and easy way to get creative in the kitchen, and the results are always delicious.
So, what are you waiting for? Gather your ingredients, preheat your oven, and get ready to bake up a batch of these irresistible cookies. I’m confident that you’ll love them as much as I do.
And most importantly, I’d love to hear about your experience! Did you try any of the variations? Did you make any modifications of your own? Share your photos and stories in the comments below. I can’t wait to see what you create! Happy baking! Let me know if you have any questions, and I’ll do my best to help. Enjoy these delightful Chocolate Chip Rice Krispie Cookies!
Chocolate Chip Rice Krispie Cookies: The Ultimate Guide & Recipe
Classic chocolate chip cookies with a fun, crispy twist! Rice Krispies add a delightful crunch to these chewy, delicious treats.
Ingredients
Instructions
Recipe Notes
- Soft Butter is Key: Make sure your butter is softened to room temperature before creaming it with the sugars.
- Don’t Overmix: Overmixing the dough can lead to tough cookies. Mix the dry ingredients into the wet ingredients until just combined.
- Chill the Dough: Chilling the dough is essential for preventing the cookies from spreading too much during baking.
- Use High-Quality Chocolate: Using high-quality chocolate chips will enhance the flavor of the cookies.
- Add-Ins: Feel free to add other ingredients to the dough, such as chopped nuts, dried fruit, or sprinkles.
- Experiment with Flavors: Try adding different extracts, such as almond extract or peppermint extract, to the dough for a unique flavor.
- Storage: Store the cookies in an airtight container at room temperature for up to 3 days.
- Freezing: You can freeze the cookie dough for up to 2 months. Simply scoop the dough onto a baking sheet and freeze until solid. Then, transfer the frozen dough balls to a freezer bag. When you’re ready to bake, simply bake the frozen dough balls as directed, adding a few extra minutes to the baking time. You can also freeze baked cookies in an airtight container for up to 2 months.