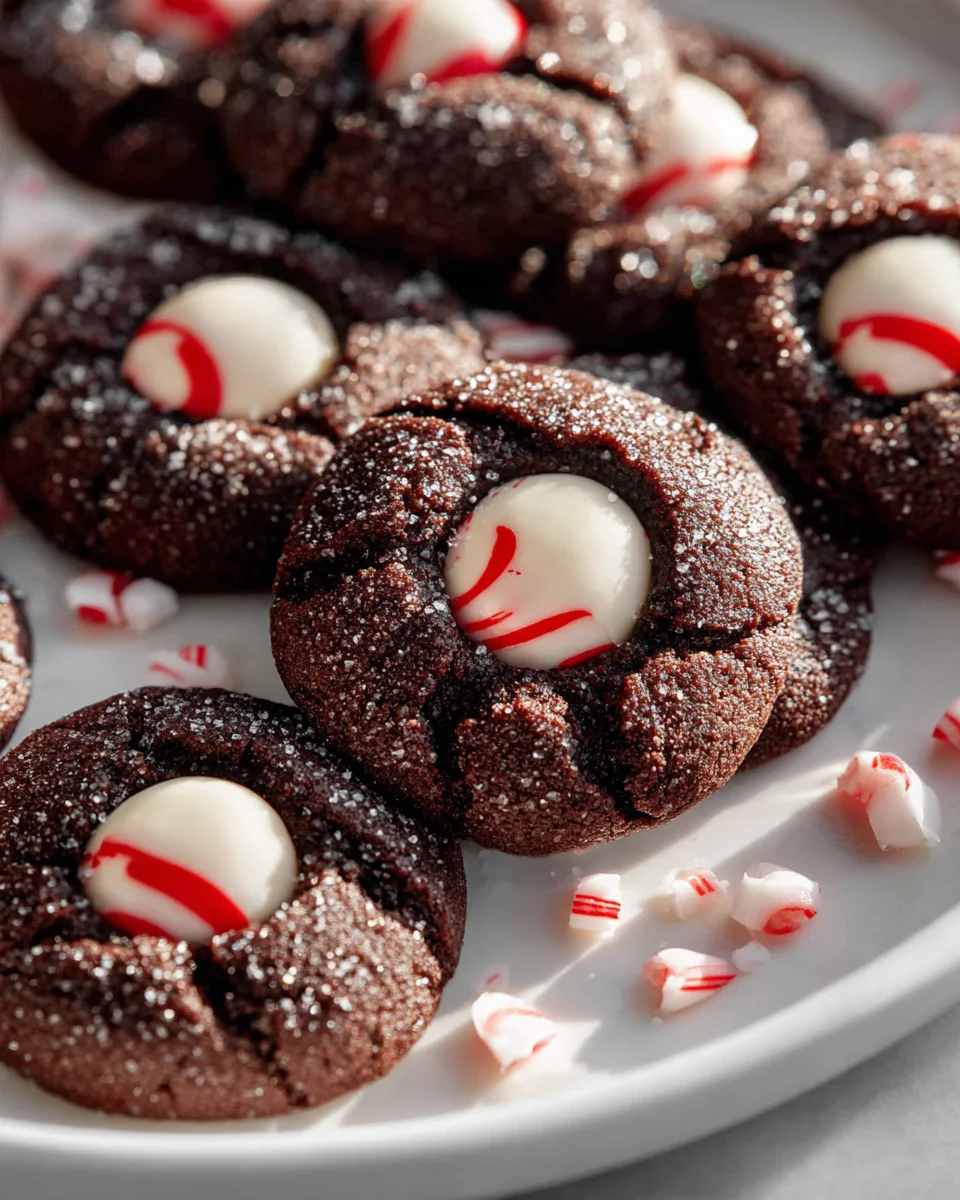
Chocolate Peppermint Blossoms are truly a festive marvel, bringing an undeniable cheer to any holiday gathering or cozy winter evening. I am absolutely thrilled to share the recipe for these exquisite cookies with you today, as they encapsulate everything wonderful about seasonal baking. Imagine a deeply rich, chewy chocolate cookie base, perfectly complemented by the cool, refreshing burst of peppermint in every bite. This delightful twist on the classic blossom cookie, traditionally known for its peanut butter base, elevates a beloved concept into a winter wonderland treat.
While the original peanut butter blossom cookie has a long-standing place in American baking traditions, especially around the holidays, this peppermint-infused version offers a fresh, modern take on that cherished nostalgia. People adore these Chocolate Peppermint Blossoms not just for their stunning visual appeal – that vibrant red or white candy kiss nestled in dark chocolate – but for the harmonious dance of flavors and textures. The combination of intense chocolate and crisp peppermint is a match made in heaven, making each cookie an irresistible blend of comfort and holiday spirit. They are surprisingly simple to make, yet always impress, proving that some of the most memorable treats are also the most accessible. Get ready to fill your home with the enchanting aroma of chocolate and peppermint!

Ingredients:
- 1 cup (2 sticks) unsalted butter, softened to room temperature
- 1 ¾ cups granulated sugar, divided
- ¼ cup packed light brown sugar
- 2 large eggs
- 2 teaspoons pure vanilla extract
- 1 teaspoon pure peppermint extract
- 2 cups all-purpose flour
- ¾ cup unsweetened cocoa powder (Dutch-processed or natural, your preference!)
- 1 teaspoon baking soda
- ½ teaspoon salt
- ½ cup powdered sugar, for rolling
- 20-24 Hershey’s Peppermint Kisses, unwrapped (or similar peppermint chocolate candies)
- Optional: Crushed peppermint candies (like candy canes) for extra garnish
Preparing the Chocolate Peppermint Blossom Dough
- Begin by preheating your oven and preparing your baking sheets. While this step might seem a little early, it’s always good to have things ready and organized in the kitchen. Set your oven to a precise 350°F (175°C). Ensure it’s fully preheated before you even think about putting cookies in, as consistent oven temperature is vital for even baking. Line several baking sheets with parchment paper or silicone baking mats. This crucial step prevents sticking, ensures easy cleanup, and promotes uniform heat distribution for our beloved Chocolate Peppermint Blossoms. Trust me, nobody likes a cookie stuck to the pan!
- Cream together the butter and sugars until light and fluffy. In a large mixing bowl, using an electric mixer (a stand mixer with the paddle attachment is ideal, but a good hand mixer will also work wonders), beat the softened unsalted butter with 1 ¼ cups of the granulated sugar and the ¼ cup of light brown sugar on medium-high speed. This creaming process is more than just mixing; it’s about incorporating air into the butter and sugar, which creates a lighter texture in the final cookie. It should take about 2-3 minutes. You’re looking for a mixture that is significantly paler in color, noticeably increased in volume, and has a wonderfully light, airy texture, almost like a fluffy cloud. Remember to stop and scrape down the sides of the bowl midway through, and again at the end, to ensure everything is thoroughly combined and no pockets of uncreamed butter remain. This aeration is absolutely key to a tender, melt-in-your-mouth cookie!
- Incorporate the eggs and extracts. Once your butter and sugar mixture is beautifully creamed and airy, add the large eggs one at a time. After adding each egg, beat well on medium speed until it is fully integrated into the mixture before adding the next. This ensures emulsification and prevents a curdled appearance. Then, stir in the pure vanilla extract for that classic warmth, and, importantly for our “Chocolate Peppermint Blossoms,” the pure peppermint extract. Be mindful not to overdo the peppermint extract; a little goes a long way to provide that refreshing, cool zing without overpowering the rich chocolate. Mix until just combined, being careful not to overbeat after the eggs are incorporated.
- Whisk together the dry ingredients. In a separate, medium-sized bowl, whisk together the all-purpose flour, unsweetened cocoa powder (whether you choose Dutch-processed for a darker, milder chocolate or natural for a fruitier, more intense flavor is up to your palate!), baking soda, and salt. Whisking these ingredients thoroughly together ensures that they are evenly distributed, meaning no pockets of unmixed baking soda, and helps to aerate the flour, preventing lumps in your final dough. This step is often overlooked but contributes significantly to the consistency and texture of your cookies. It’s a small effort with a big payoff!
- Combine the wet and dry ingredients. Gradually add the dry ingredient mixture to the wet mixture, starting on low speed and increasing slightly as the flour incorporates, beating until just combined. It’s absolutely vital not to overmix at this stage. Overmixing can overdevelop the gluten in the flour, which will lead to tough, dense cookies – and we want our “Chocolate Peppermint Blossoms” to be perfectly tender, chewy, and fudgy! Stop mixing as soon as no streaks of flour remain visible. The dough will be quite thick, dark, and fudgy-looking, which is exactly what we want.
- Chill the dough (if time permits). While not strictly mandatory if you’re in an absolute rush and the dough feels firm enough, chilling the dough for at least 30 minutes (or up to 2 hours) in the refrigerator can make a noticeable difference in the final product. Chilling helps the butter solidify, preventing the cookies from spreading too much during baking and maintaining their shape. It also allows the flavors to deepen and meld beautifully, creating a more complex taste. Furthermore, a chilled dough is much easier to handle and roll into perfect balls. If your dough feels too soft or sticky to roll comfortably, definitely give it some chill time – it’s a small investment for a much better cookie!
Baking the Chocolate Peppermint Blossoms
- Prepare for rolling. As your dough chills (or if you’re skipping the chill, right after mixing), prepare your rolling stations. Place the remaining ¼ cup of granulated sugar in one shallow bowl and the ½ cup of powdered sugar in another shallow bowl. These two sugars will create a lovely, crackled finish and an extra touch of sweetness and visual appeal that is characteristic of blossom cookies, perfect for our “Chocolate Peppermint Blossoms.”
- Scoop and roll the dough. Using a small cookie scoop (about 1.5 tablespoons capacity) or by hand, roll the dough into uniform balls. Aim for consistency in size so that all your cookies bake evenly – nobody wants a half-baked cookie next to an overbaked one! First, roll each dough ball in the granulated sugar, ensuring it’s lightly coated all over. This initial sugar coating helps the powdered sugar adhere better in the next step and adds a subtle textural crunch to the finished cookie.
- Coat in powdered sugar. After rolling in granulated sugar, generously roll each dough ball in the powdered sugar. Make sure they are thoroughly coated – think of them like little snowballs that have just rolled through a fresh dusting of snow! Don’t be shy here; a thick coating of powdered sugar is what gives these “Chocolate Peppermint Blossoms” their characteristic “blossom” or beautifully crinkled, cracked appearance as they bake and expand. Place the coated dough balls about 2 inches apart on your prepared baking sheets, allowing ample space for them to spread slightly without merging.
- Bake the cookies. Carefully transfer the baking sheets to your preheated 350°F (175°C) oven. Bake for 9-11 minutes. The exact baking time can vary slightly depending on your oven’s calibration and the size of your cookies, so keep a close eye on them. You’re looking for cookies that are set around the edges but still appear slightly soft and puffy in the center. They will puff up in the oven and then fall slightly as they cool, which helps create those beautiful cracks in the powdered sugar coating, revealing the dark chocolate beneath. Do not overbake! This is a crucial tip for any chewy cookie. Overbaking will result in dry, crumbly cookies, and we want these “Chocolate Peppermint Blossoms” to be wonderfully moist, fudgy, and chewy.
- Prepare your peppermint kisses. While the cookies are baking, quickly unwrap all your Hershey’s Peppermint Kisses or your chosen peppermint chocolate candies. Having them ready and easily accessible is key, as you’ll need to work swiftly once the cookies come out of the oven. If you’re adding optional crushed peppermint candies for an extra flourish, now is a good time to lightly crush them using a rolling pin or a food processor – aim for small, irregular pieces, not a fine dust, to provide pleasant texture and visual appeal.
Decorating and Finishing Your Chocolate Peppermint Blossoms
- Press in the peppermint kisses. As soon as the cookies come out of the oven, while they are still piping hot and pliable, immediately take one unwrapped Hershey’s Peppermint Kiss (or your chosen candy) and gently press it into the center of each warm cookie. The residual warmth of the cookie will slightly melt the base of the chocolate, helping it adhere firmly to the cookie as it cools. Be careful not to press too hard, or the warm, soft cookie might crumble or flatten excessively. If a cookie cracks a bit around the edges when you press, don’t worry too much; the melted chocolate will usually fill it in and cover it up! This is the signature step that truly transforms them into festive and irresistible “Chocolate Peppermint Blossoms.”
- Allow to cool and set. Let the cookies cool on the baking sheets for about 5-10 minutes. During this initial cooling period, the chocolate will begin to set, and the cookies will firm up slightly, making them easier to handle. Then, carefully transfer the cookies, ideally using a thin metal spatula, to a wire rack to cool completely. Allowing them to cool fully on a wire rack ensures good air circulation all around the cookie, which prevents soggy bottoms and allows the chocolate kisses to firm up completely and securely. Patience here means a perfectly set cookie!
- Optional: Garnish with crushed peppermint. If you’re feeling extra festive and want to enhance both the peppermint visual and flavor, here’s a delightful touch: once the chocolate kisses are pressed into the warm cookies (but before they fully set and harden), you can lightly sprinkle some of your crushed peppermint candies around the base of the chocolate kiss or even over the entire cookie. The slight melt from the chocolate and the warmth of the cookie will help the crushed peppermint stick, adding a wonderful sparkle, an extra burst of vibrant color, and an additional layer of refreshing peppermint flavor that truly elevates these “Chocolate Peppermint Blossoms” to a gourmet level.
- Storage and enjoyment. Once completely cooled, your exquisite “Chocolate Peppermint Blossoms” are ready to be enjoyed! Store them in an airtight container at room temperature for up to 5 days to maintain their freshness and chewiness. To preserve them for longer, they can be frozen for up to 2-3 months. Just layer them carefully between sheets of parchment paper in a freezer-safe container to prevent them from sticking together. When you’re ready to indulge, simply thaw them at room temperature. These cookies are absolutely perfect for holiday gatherings, festive cookie exchanges, or simply as a delightful, celebratory treat to brighten any cold winter day. The contrast of the rich, fudgy chocolate cookie with the cool, refreshing peppermint is an absolutely irresistible combination that will leave everyone wanting more.
- Troubleshooting Tip: Cookies Spreading Too Much? If you find that your “Chocolate Peppermint Blossoms” are spreading more than desired and losing their beautiful shape, a few factors could be at play. Your butter might have been too soft (it should be pliable, not melted or greasy), the dough might not have been chilled sufficiently, or your oven temperature could be off. Next time, ensure your butter is truly just softened, definitely chill the dough for at least 30 minutes, and consider investing in an inexpensive oven thermometer to verify the accuracy of your oven’s thermostat. Sometimes, adding a tablespoon or two more flour to the dough can also help slightly firm up the dough and reduce spread. But don’t despair! Even slightly spread “Chocolate Peppermint Blossoms” will still taste absolutely amazing, so enjoy them regardless!
- Flavor Enhancement Idea: Dark Chocolate Peppermint Blossoms. For those who truly love a deeper, more intense chocolate flavor profile, consider a few subtle additions to your “Chocolate Peppermint Blossoms.” Use a high-quality dark unsweetened cocoa powder (like a good Dutch-processed cocoa which has a smoother, less bitter profile) and even add a tiny pinch of espresso powder (about ½ teaspoon) to your dry ingredients. Espresso powder is a secret weapon that enhances chocolate flavor dramatically without making your cookies taste like coffee. This subtle addition will make your “Chocolate Peppermint Blossoms” even more decadent, rich, and sophisticated, truly a treat for the discerning palate.
- Presentation Perfect: Gift-Worthy Treats. Beyond their incredible taste, these “Chocolate Peppermint Blossoms” are incredibly beautiful and make fantastic, thoughtful gifts during the festive holiday season. Arrange them elegantly in decorative tins or festive boxes, perhaps layered with festive tissue paper or small cupcake liners to protect them. You can even tie a small festive ribbon around each individual cookie or a cluster of cookies for an extra special, personalized touch. The vibrant white powdered sugar coating, coupled with the festive red and white swirls of the peppermint kisses, makes them visually striking and a truly welcome, homemade addition to any holiday cookie platter. Sharing these homemade treats is a wonderful way to spread joy, warmth, and cheer to friends, family, and neighbors.
Conclusion:
And there you have it! We’ve journeyed together through the delightful process of creating what I truly believe is a holiday classic in the making, or perhaps, a year-round treat that simply begs to be savored. This recipe isn’t just about baking; it’s about crafting moments, infusing your home with an intoxicating aroma, and sharing pure joy. I can’t stress enough why this particular dessert is an absolute must-try for anyone who appreciates the magical pairing of rich, deep chocolate with the cool, invigorating whisper of peppermint. It strikes that perfect balance – not overly sweet, but utterly decadent, with a tender, melt-in-your-mouth cookie base that gives way to that iconic blossom “kiss” on top.
Why This Recipe Steals the Show
What truly sets this recipe apart is its captivating simplicity paired with an undeniably sophisticated flavor profile. You’re not just making a cookie; you’re creating a little piece of edible art that looks as festive as it tastes. The contrast in textures, from the soft, chewy cookie to the slightly firmer chocolate candy on top, provides a delightful experience with every bite. It’s the kind of treat that elicits oohs and aahs, making it perfect for impressing guests at a holiday gathering, bringing a smile to a friend’s face as a thoughtful gift, or simply treating yourself to a well-deserved moment of bliss. Trust me, once you experience the harmonious blend of flavors and the sheer ease of bringing these to life, you’ll understand why I’m so passionate about them. They transform ordinary ingredients into something truly extraordinary, embodying the spirit of comfort and indulgence that we all crave, and frankly, deserve. These cookies aren’t just a dessert; they’re a celebration in miniature, a testament to how simple ingredients can yield truly magnificent results with just a little bit of care and creativity.
Now that you’ve mastered the basics, let’s talk about making these beauties even more versatile. While perfect straight out of the oven and cooled, there are so many wonderful ways to enjoy and adapt them. Imagine serving a plate of these alongside a steaming mug of hot cocoa or a robust cup of coffee – the flavors complement each other beautifully, enhancing the entire experience. They are also phenomenal with a tall glass of cold milk, bringing a touch of nostalgic comfort that instantly transports you back to simpler, happier times. For a more elegant presentation, arrange them on a tiered dessert stand at your next party; they’re guaranteed to be the first to disappear and spark conversations among your guests!
Creative Twists and Serving Suggestions
Don’t be afraid to experiment and make this recipe your own! If you’re a dark chocolate aficionado, consider using a higher percentage cocoa chocolate for the cookie dough or opting for a dark chocolate “kiss” on top for an intensely rich, less sweet flavor profile. For those with a sweeter tooth, milk chocolate chips in the dough or a white chocolate ganache drizzle post-bake could be a delightful variation, adding an extra layer of sweetness and visual appeal. You could even swap out the peppermint extract for a touch of almond or orange extract if you’re feeling adventurous, creating an entirely new flavor profile while maintaining the beloved blossom structure and delightful texture. For an extra festive touch during the holiday season, roll the cookie dough balls in a mix of granulated sugar and crushed candy canes before baking to add a sparkling, crunchy exterior and an extra burst of peppermint that truly sings. Or, once cooled, dip half of each cookie in melted white chocolate and adorn with festive sprinkles for an even more celebratory look.
Thinking outside the cookie box, imagine these flavors in different forms! With a slight adjustment to the dough consistency, it could potentially be pressed into a baking pan to create a delightful bar cookie, perfect for cutting into squares for a larger crowd. Or perhaps crumbled over vanilla bean ice cream for an ultimate dessert sundae experience that combines creamy, cool sweetness with crunchy, chocolatey goodness. The possibilities are truly endless once you have this incredible flavor foundation established. These variations allow you to tailor the treat to different occasions, dietary preferences, or simply your current mood, ensuring that these cookies remain a beloved staple in your baking repertoire throughout the year. The core delightful experience remains, but the presentation and nuanced flavors can be endlessly tweaked to keep things exciting and fresh.
So, my fellow bakers, I wholeheartedly encourage you to roll up your sleeves and give these wonderful cookies a try. Whether you’re a seasoned pro in the kitchen or just starting your baking journey, I promise you that the process is incredibly rewarding, and the results are absolutely divine. There’s something incredibly satisfying about pulling a tray of perfectly formed, glistening Chocolate Peppermint Blossoms from the oven, knowing you’ve created something truly special with your own hands.
Share Your Culinary Adventures!
I can’t wait to hear about your experience! Please, after you’ve baked your batch, indulged in their irresistible taste, and perhaps shared them with loved ones, come back and tell me how it went. What variations did you try? Who did you share them with? Did they become an instant hit in your household? Your feedback and shared experiences inspire me and our entire community of food lovers. Baking is a journey of discovery and joy, and it’s always better when we share our successes and even our learning moments. Go forth, create some magic in your kitchen, and let these Chocolate Peppermint Blossoms bring a little extra sparkle and joy into your life and the lives of those around you! Happy baking, and don’t forget to savor every single delicious bite!
Chocolate Peppermint Blossoms
Chocolate Peppermint Blossoms are a festive twist on the classic blossom cookie, featuring a rich, chewy chocolate base with a refreshing burst of peppermint from a candy kiss. They are surprisingly simple to make, yet always impress with their harmonious dance of flavors and textures, perfect for holiday gatherings or a cozy winter evening.
Ingredients
Instructions
Important Information
Nutrition Facts (Per Serving)
It is important to consider this information as approximate and not to use it as definitive health advice.
Allergy Information
Please check ingredients for potential allergens and consult a health professional if in doubt.