Chocolate Peppermint Cookies
Chocolate Peppermint Cookies! Oh my goodness, if there’s one cookie that screams ‘joy’ to me, it’s these delightful Chocolate Peppermint Cookies. I’m so excited to share this recipe with you because it perfectly captures that magical blend of rich, decadent chocolate and the cool, invigorating rush of peppermint. What makes this recipe truly special is the way these two classic flavors come together in such a harmonious dance – you get the deep, satisfying warmth of a chewy chocolate cookie, immediately followed by the crisp, refreshing zing of peppermint. It’s not just a cookie; it’s an experience, a little moment of bliss that brightens any day.
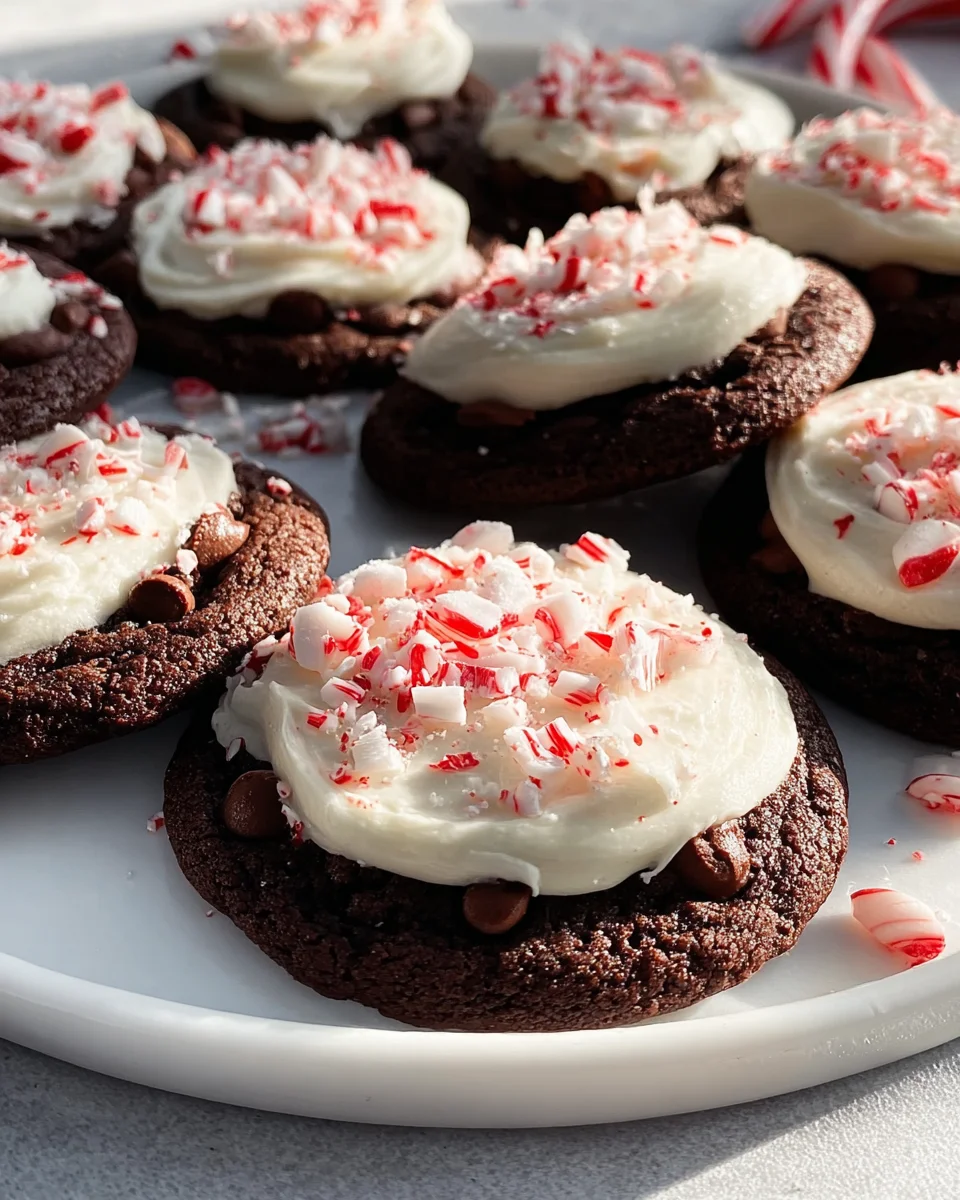
You, my friend, are going to absolutely adore these cookies! Imagine biting into a soft, intensely chocolatey cookie, generously studded with vibrant pieces of crushed peppermint candy, maybe even drizzled with a sweet, minty glaze. They’re incredibly satisfying, wonderfully festive, and seriously addictive. Whether you’re looking for the ultimate holiday treat to share with loved ones, a cozy comfort food for a quiet evening in, or just a fantastic way to satisfy a chocolate-mint craving, these cookies hit all the right notes. They’re visually stunning with their dark chocolate backdrop and pops of red and white, making them perfect for gift-giving or gracing any dessert platter.
In essence, we’re talking about a batch of wonderfully chewy chocolate cookies, deeply flavored with cocoa, and infused with the bright, cool essence of peppermint. We’ll be using peppermint extract to get that perfect minty kick, and often, a sprinkle of crushed candy canes for both flavor and a delightful textural crunch. Get ready to bake something truly spectacular that will have everyone asking for the recipe!

Ingredient Notes
Crafting the perfect batch of Chocolate Peppermint Cookies really comes down to a few key ingredients, each playing a vital role in achieving that rich, festive flavor and delightful texture. Here’s what I’ve learned makes all the difference:
- Cocoa Powder: For these cookies, I strongly recommend using a good quality Dutch-processed cocoa powder. It gives the cookies a wonderfully dark, almost black hue that contrasts beautifully with the white and red peppermint, and its flavor is rich and mellow, providing a fantastic base for the peppermint. Natural cocoa powder can be used in a pinch, but the color will be lighter, and the flavor a bit more acidic, which might slightly alter the balance with the mint.
- Peppermint Extract: This is where the magic happens! I can’t stress enough how important it is to use a high-quality peppermint extract, and to measure it carefully. Peppermint extract is very potent, and a little goes a long way. Too much can make your cookies taste like toothpaste, while just the right amount delivers that refreshing burst. I always opt for a pure peppermint extract, which is naturally a non-alcohol based flavoring, ensuring a clean, vibrant minty taste without any harsh undertones. If you only have mint extract, check if it’s peppermint or spearmint; spearmint is quite different and won’t give you the same holiday feel.
- Chocolate: Beyond the cocoa powder, I love to add chocolate chips or chunks into the dough. Semi-sweet chocolate chips are my go-to, as their sweetness balances the bitterness of the cocoa and the intensity of the peppermint. You could also use dark chocolate chips for a more intense chocolate flavor, or even milk chocolate chips if you prefer a sweeter cookie, but I find semi-sweet hits that perfect middle ground.
- Butter: As with most cookies, unsalted butter is best, allowing you to control the amount of salt in the recipe. Make sure it’s at room temperature – this is crucial for creaming it properly with the sugars, which creates air pockets for a lighter, tender cookie.
- Sugars: I usually use a combination of granulated sugar and light brown sugar. Granulated sugar provides crispness and spread, while brown sugar adds moisture, chewiness, and a subtle molasses flavor that complements the chocolate beautifully.
- Crushed Peppermint Candies/Candy Canes: These are essential for both flavor and visual appeal. I typically crush mine just before baking or immediately after for the topping. The crunch and additional burst of peppermint really tie the whole cookie together. If you’re out, a drizzle of white chocolate can be a nice substitute for the visual, though you’ll miss the crunchy mint texture.
- Flour, Eggs, Leavening, Salt: Standard all-purpose flour for structure, large eggs for binding and moisture (also at room temperature!), baking soda for lift and chewiness, and a touch of salt to enhance all the flavors and prevent them from tasting flat.
Step-by-Step Instructions
Making Chocolate Peppermint Cookies is a delightful process, and if you follow these steps, you’ll have a batch of festive, chewy, and perfectly minty treats ready in no time. I always find a well-organized kitchen makes baking so much more enjoyable!
- Prepare Your Workspace: First things first, I preheat my oven to 350°F (175°C). Then, I line a couple of baking sheets with parchment paper or silicone baking mats. This makes cleanup a breeze and helps prevent sticking.
- Combine Dry Ingredients: In a medium bowl, I whisk together my all-purpose flour, Dutch-processed cocoa powder, baking soda, and salt. Whisking ensures everything is evenly distributed, which is important for consistent cookie texture. I set this bowl aside.
- Cream Butter and Sugars: In a large mixing bowl (or the bowl of a stand mixer fitted with the paddle attachment), I beat the room temperature unsalted butter until it’s smooth and creamy, usually for about a minute. Then, I add both the granulated sugar and light brown sugar. I beat these together on medium speed until the mixture is light, fluffy, and pale, which typically takes 2-3 minutes. This creaming step incorporates air, contributing to the cookies’ final texture.
- Add Eggs and Peppermint Extract: Next, I crack in one large egg at a time, beating well after each addition until fully incorporated. After the eggs, I add the critical ingredient: the peppermint extract. Remember, measure carefully! I beat for another minute or so until everything is smooth and well combined.
- Combine Wet and Dry: With the mixer on low speed, I gradually add the dry ingredient mixture to the wet ingredients, mixing just until almost combined. It’s crucial not to overmix here; overmixing can lead to tough cookies.
- Fold in Chocolate Chips: Once the dough is just about mixed, I fold in the semi-sweet chocolate chips by hand using a rubber spatula. I mix until they are evenly distributed throughout the dark chocolate dough.
- Chill the Dough (Optional but Recommended): For thicker, chewier cookies and to prevent excessive spreading, I sometimes chill the dough for 30 minutes to an hour. This step isn’t strictly necessary if you’re in a hurry, but it does improve the texture.
- Scoop and Bake: Using a cookie scoop (about 1.5 tablespoons), I drop rounded balls of dough onto the prepared baking sheets, spacing them about 2 inches apart. I avoid flattening them.
- Bake to Perfection: I pop the baking sheets into the preheated oven and bake for 9-11 minutes. The cookies will look slightly puffed and set at the edges but may still appear soft in the center. That’s exactly what you want for a chewy cookie! They will firm up as they cool.
- Add Peppermint Topping: Immediately after removing the cookies from the oven, I sprinkle a generous amount of crushed peppermint candies over the tops. The residual heat will help them adhere.
- Cool: I let the cookies cool on the baking sheets for 5-10 minutes before transferring them to a wire rack to cool completely. This helps them set up and prevents them from breaking.
Tips & Suggestions
Having baked countless batches of Chocolate Peppermint Cookies, I’ve gathered a few insights that I think really elevate these holiday treats. Here are my favorite tips and suggestions to ensure your cookies are nothing short of spectacular:
- Don’t Overmix Your Dough: This is a golden rule for most cookie recipes, and it’s especially true for these. Once you add the flour mixture, mix only until just combined. Overmixing develops the gluten in the flour, which can lead to tough, dense cookies instead of the soft, chewy ones we’re aiming for.
- Quality of Ingredients Matters: Since chocolate and peppermint are the stars here, investing in good quality cocoa powder and pure peppermint extract truly makes a difference in the final flavor. A cheap extract can leave a less pleasant aftertaste, and a good cocoa powder delivers a deeper, richer chocolate experience.
- Measure Peppermint Extract Carefully: I mentioned this in the ingredient notes, but it bears repeating. Peppermint extract is incredibly potent. Start with the recommended amount, and if you’re unsure, slightly underdo it the first time. You can always adjust in future batches, but you can’t take it out once it’s in!
- Chill Your Dough for Best Results: While it adds a little time, chilling the dough for at least 30 minutes (or even overnight) does wonders. It allows the flavors to meld, prevents the cookies from spreading too much, and results in a thicker, chewier cookie with a more concentrated flavor. If your kitchen is warm, or if your dough seems too soft, chilling is a must.
- Don’t Overbake: These cookies are meant to be soft and chewy. They might look slightly underbaked when you pull them out of the oven, but they will continue to cook and firm up as they cool on the hot baking sheet. Taking them out when the edges are just set and the centers are still a bit soft ensures that perfect chewy texture.
- Crushing Peppermint Candies: For the topping, I find the easiest way to crush candy canes or peppermint candies is to place them in a sturdy freezer bag, seal it, and then gently tap them with a rolling pin or the flat side of a meat mallet. Avoid pulverizing them into a fine powder; you want some small crunchy pieces for texture.
- Dress Them Up: For an extra festive touch, consider drizzling the cooled cookies with melted white chocolate before sprinkling on the crushed peppermint. It adds another layer of flavor and makes them look even more professional.
- Consider White Chocolate Chips: If you want to add another layer of flavor and a beautiful contrast, you can swap out half of the semi-sweet chocolate chips for white chocolate chips in the dough. The creamy white chocolate pairs wonderfully with the dark chocolate and crisp peppermint.
Storage
Once you’ve baked a batch of these delicious Chocolate Peppermint Cookies, you’ll want to make sure they stay fresh and delightful for as long as possible. Here’s how I like to store them, whether you plan to enjoy them in the next few days or save some for later:
- At Room Temperature (Short-Term):
Once your cookies have completely cooled down, I recommend storing them in an airtight container at room temperature. A cookie jar or a plastic container with a tight-fitting lid works perfectly. I usually place a piece of parchment paper between layers if I’m stacking them, just to prevent any sticking or the crushed peppermint from shedding too much. Stored this way, my Chocolate Peppermint Cookies will stay fresh, soft, and chewy for about 4-5 days. After that, they might start to dry out a bit, but they’ll still be tasty!
- Freezing Baked Cookies (Long-Term):
These cookies freeze beautifully, which is fantastic for holiday baking or simply having a stash ready for unexpected guests. Once the cookies are completely cool, I arrange them in a single layer on a baking sheet and pop them into the freezer for about an hour, or until they’re solid. This “flash freezing” prevents them from sticking together. After they’re solid, I transfer them to a freezer-safe airtight container or a heavy-duty freezer bag, making sure to press out as much air as possible. You can stack them in layers with parchment paper in between. Frozen Chocolate Peppermint Cookies will maintain their quality for up to 3 months. When you’re ready to enjoy them, simply take out as many as you need and let them thaw at room temperature for about an hour. They’ll taste almost as good as freshly baked!
- Freezing Cookie Dough:
If you like to bake fresh cookies on demand, freezing the dough is a brilliant option. After you’ve mixed the dough and before baking, scoop out portions (the same size you’d bake) and arrange them on a parchment-lined baking sheet. Flash freeze them until solid, then transfer the frozen dough balls to a freezer-safe bag or container. They will last for up to 2-3 months. When you’re ready to bake, you can either let them thaw in the refrigerator overnight and bake as usual, or bake them directly from frozen. If baking from frozen, you might need to add an extra 2-4 minutes to the baking time.
- Reviving Slightly Stale Cookies:
If your cookies have been sitting out for a little too long and are starting to lose their softness, don’t despair! You can often revive them by placing them in the microwave for 10-15 seconds. The warmth will soften them right up. Alternatively, you can place them in a sealed container with a slice of bread (that you’re willing to sacrifice) overnight; the cookies will absorb moisture from the bread and regain some of their tenderness.
Final Thoughts
There’s just something truly special about the combination of rich, decadent chocolate and the cool, invigorating burst of peppermint, isn’t there? These Chocolate Peppermint Cookies are so much more than just a dessert; they’re a delightful celebration in every bite.
From the moment the sweet, minty aroma starts to fill your kitchen, you’ll know you’re creating something extraordinary. I find the way the deep cocoa flavor perfectly harmonizes with that unmistakable peppermint kick creates a taste sensation that simply screams “comfort” and “joy.” Whether you’re looking for the perfect treat to share during the holidays, a special indulgence for yourself, or just a simple way to brighten any day, these cookies consistently deliver that perfect blend of deliciousness and cheer.
I truly believe these Chocolate Peppermint Cookies are an absolute must-try. They’re wonderfully straightforward to bake, incredibly rewarding to eat, and guaranteed to bring a happy smile to anyone lucky enough to get one. Trust me, you’re going to love them!

Chocolate Peppermint Cookies Recipe – Easy & Festive!
- Total Time: 26 minutes
- Yield: 24 cookies 1x
Description
These Chocolate Peppermint Cookies are a delightful blend of rich chocolate and refreshing peppermint, perfect for the holiday season. Enjoy a chewy, festive treat that will brighten any day!
Ingredients
- 1 1/2 cups all-purpose flour
- 1/2 cup Dutch-processed cocoa powder
- 1 teaspoon baking soda
- 1/4 teaspoon salt
- 1/2 cup unsalted butter, at room temperature
- 1/2 cup granulated sugar
- 1/2 cup light brown sugar
- 1 large egg, at room temperature
- 1 teaspoon peppermint extract
- 1 cup semi-sweet chocolate chips
- 1/2 cup crushed peppermint candies/candy canes
Instructions
- Preheat the oven to 350°F (175°C) and line baking sheets with parchment paper or silicone baking mats.
- In a medium bowl, whisk together the all-purpose flour, Dutch-processed cocoa powder, baking soda, and salt. Set aside.
- In a large mixing bowl, beat the room temperature unsalted butter until smooth and creamy, about 1 minute. Add the granulated sugar and light brown sugar, and beat until light and fluffy, about 2-3 minutes.
- Add the large egg, beating well after each addition. Then add the peppermint extract and beat until smooth.
- Gradually add the dry ingredient mixture to the wet ingredients on low speed, mixing just until almost combined.
- Fold in the semi-sweet chocolate chips by hand using a rubber spatula until evenly distributed.
- Chill the dough for 30 minutes to an hour for thicker cookies, if desired.
- Using a cookie scoop, drop rounded balls of dough onto the prepared baking sheets, spacing them about 2 inches apart.
- Bake for 9-11 minutes until slightly puffed and set at the edges but soft in the center.
- Immediately sprinkle crushed peppermint candies over the tops of the cookies after removing them from the oven.
- Let the cookies cool on the baking sheets for 5-10 minutes before transferring them to a wire rack to cool completely.
- Prep Time: 15 mins
- Cook Time: 11 mins
- Category: Dessert
- Method: Baking
- Cuisine: American
Nutrition
- Serving Size: 1 cookie
- Calories: 150
- Sugar: 10 g
- Sodium: 50 mg
- Fat: 7 g
- Saturated Fat: 4 g
- Unsaturated Fat: 2 g
- Trans Fat: 0 g
- Carbohydrates: 20 g
- Fiber: 1 g
- Protein: 2 g
- Cholesterol: 20 mg
Keywords: Don't overmix the dough to avoid tough cookies. Use high-quality cocoa powder and peppermint extract for the best flavor. Chilling the dough improves texture and prevents spreading.