Christmas Red Velvet Cheesecake Recipe Festive Delicious is more than just a dessert; it’s a magnificent centerpiece destined to captivate hearts and palates at your holiday gatherings.
Imagine presenting a dessert that not only tastes like pure holiday magic but also boasts an undeniable visual appeal, with its vibrant red hues contrasting beautifully against a creamy white topping. This isn’t just any cheesecake; it’s a carefully crafted indulgence, blending the classic charm of a velvety red cake with the irresistible tang and smoothness of a rich cheesecake.
The origins of red velvet cake carry a fascinating, sometimes debated, history, often associated with elegant Southern kitchens and its rise to fame in the mid-20th century. When combined with the ancient dessert art of cheesecake, which traces its lineage back to Greek antiquity, we create something truly special and deeply satisfying. People adore this dish because it offers the best of both worlds: the tender, slightly cocoa-kissed cake layer provides a comforting base, while the dense, luxurious cream cheese filling delivers that signature melt-in-your-mouth experience everyone craves. It’s a harmonious blend of textures and flavors that feels both familiar and excitingly new.
Preparing this particular Christmas Red Velvet Cheesecake Recipe Festive Delicious ensures every slice is a joyous celebration, perfectly encapsulating the spirit of the season. It’s a showstopper that promises to be the crowning glory of your Christmas feast, leaving a lasting impression on all who taste it.

Ingredients:
- For the Graham Cracker Crust:
- 1 ½ cups (about 180g) graham cracker crumbs (approximately 12-14 full graham cracker sheets, finely crushed)
- ¼ cup (about 50g) granulated sugar
- ½ teaspoon ground cinnamon (optional, but I love the warmth it adds for a Christmas Red Velvet Cheesecake Recipe Festive Delicious touch!)
- 6 tablespoons (about 85g) unsalted butter, melted
- For the Red Velvet Cheesecake Filling:
- 3 (8-ounce / 226g each) packages full-fat cream cheese, softened at room temperature
- 1 ½ cups (about 300g) granulated sugar
- 4 large eggs, at room temperature
- ½ cup (about 120ml) full-fat sour cream, at room temperature
- 2 tablespoons (about 30ml) unsweetened cocoa powder (natural or Dutch-processed)
- 2 teaspoons vanilla extract
- 1 teaspoon white vinegar (don’t worry, you won’t taste it, but it helps activate the red color!)
- 1 teaspoon red gel food coloring (I prefer gel for a vibrant, rich red)
- ½ teaspoon salt
- For the Cream Cheese Frosting/Topping:
- 1 (8-ounce / 226g) package full-fat cream cheese, softened at room temperature
- ½ cup (about 113g) unsalted butter, softened at room temperature
- 4 cups (about 480g) powdered sugar (confectioners’ sugar), sifted
- 2 teaspoons vanilla extract
- 2-4 tablespoons (about 30-60ml) heavy cream or milk, as needed for desired consistency
- For Garnish (Optional, but highly recommended for a festive look!):
- White chocolate shavings or curls
- Fresh cranberries or sugared cranberries
- Rosemary sprigs (to mimic pine needles for a delightful Christmas Red Velvet Cheesecake Recipe Festive Delicious presentation)
- Extra graham cracker crumbs or red velvet cake crumbs
Preparing the Crust:
Let’s get started on our incredible Christmas Red Velvet Cheesecake Recipe Festive Delicious journey by creating the perfect foundation for our cheesecake – a buttery graham cracker crust. A sturdy, flavorful crust is absolutely essential for a delightful cheesecake experience, providing a wonderful textural contrast to the creamy filling.
- First things first, preheat your oven to 350°F (175°C). While the oven is heating, grab a 9-inch springform pan. I always like to lightly grease the bottom and sides of the pan with baking spray or butter to ensure easy release later.
- In a medium-sized bowl, combine your graham cracker crumbs, granulated sugar, and that optional but highly recommended ground cinnamon. Give it a good stir with a fork or a whisk until all the dry ingredients are evenly distributed. The cinnamon really adds a subtle warmth that complements the red velvet flavor so beautifully, making it even more fitting for a festive occasion.
- Next, pour in your melted unsalted butter. Now, using your hands or a spoon, mix everything together until the crumbs are thoroughly moistened and resemble wet sand. You want to make sure every crumb has a chance to soak up some of that delicious butter; this is what helps your crust hold together perfectly.
- Press the mixture evenly into the bottom of your prepared springform pan. I like to use the bottom of a flat-bottomed glass or a measuring cup to really compact the crumbs tightly. The tighter you press, the less likely your crust is to crumble when you slice into your magnificent cheesecake later. Make sure it’s an even layer across the entire bottom.
- Bake the crust in your preheated oven for about 8-10 minutes. This quick bake helps to set the crust, making it firm and slightly golden, and prevents it from becoming soggy once the cheesecake filling is added.
- Once baked, remove the crust from the oven and let it cool completely on a wire rack while you prepare the cheesecake filling. It’s crucial that the crust is cool to the touch before you add the filling, otherwise, it could slightly melt the butter in the filling and affect the texture.
Making the Red Velvet Cheesecake Filling:
Now for the star of the show! This is where the magic truly happens, transforming simple ingredients into a rich, creamy, and vibrantly red cheesecake that will be the centerpiece of your holiday dessert table. This Christmas Red Velvet Cheesecake Recipe Festive Delicious filling is smooth, tangy, and boasts that signature subtle cocoa flavor we all adore.
- Reduce your oven temperature to 325°F (160°C). This lower temperature is key for baking cheesecakes as it helps prevent cracks and ensures a creamy texture. You’re aiming for a slow, gentle bake.
- In a large mixing bowl, using an electric mixer (either a stand mixer with a paddle attachment or a handheld mixer), beat the softened cream cheese on medium speed until it’s completely smooth and creamy. This is a very important step! Ensure there are absolutely no lumps at this stage, as it’s harder to get rid of them once other ingredients are added. Scrape down the sides of the bowl frequently to ensure everything is incorporated.
- Gradually add the granulated sugar to the cream cheese, beating on medium speed until well combined and light and fluffy, about 2-3 minutes. Continue to scrape down the sides of the bowl to ensure even mixing. The mixture should be airy and uniform.
- In a separate small bowl, whisk together the cocoa powder, vanilla extract, white vinegar, and red gel food coloring until a smooth, thick paste forms. The vinegar helps intensify that beautiful red hue and activates the cocoa powder, giving it that classic red velvet depth. Don’t be shy with the red food coloring; you want a truly deep, vibrant red that shouts “Christmas!”
- Add this vivid red paste to the cream cheese mixture and beat on low speed until just combined. Be careful not to overmix here. The goal is to distribute the color evenly throughout the batter, creating that iconic red velvet look for your Christmas Red Velvet Cheesecake Recipe Festive Delicious treat.
- One at a time, beat in the eggs on low speed, mixing just until each egg is incorporated. Do not overmix! Overmixing after adding the eggs can incorporate too much air into the batter, which can lead to cracks in your cheesecake during baking. Scrape down the bowl after each egg addition to ensure everything is fully combined.
- Finally, gently fold in the full-fat sour cream and salt until just combined. The sour cream adds an extra layer of richness and a beautiful tanginess that balances the sweetness of the cheesecake, contributing significantly to its incredibly creamy texture.
- Prepare for the water bath (bain-marie): This is an absolutely essential step for a crack-free cheesecake! Wrap the bottom and sides of your springform pan tightly with several layers of heavy-duty aluminum foil. You want to make sure it’s completely sealed to prevent any water from seeping in.
- Pour the red velvet cheesecake filling over the cooled graham cracker crust in the foil-wrapped springform pan. Gently tap the pan on the counter a few times to release any large air bubbles.
- Place the foil-wrapped springform pan into a larger roasting pan. Carefully pour hot water into the roasting pan until it comes about halfway up the sides of the springform pan. The water bath creates a moist, even baking environment that helps the cheesecake bake slowly and prevents cracking.
- Carefully transfer the roasting pan with the cheesecake to your preheated 325°F (160°C) oven.
- Bake for 60-75 minutes, or until the edges are set but the center still jiggles slightly when you gently shake the pan. The center should look like a large, soft jello. Resist the urge to open the oven door too often!
- Once baked, turn off the oven, crack the oven door open slightly, and leave the cheesecake in the oven for another hour. This slow cooling process is critical for preventing cracks caused by sudden temperature changes.
- After an hour in the cooling oven, carefully remove the cheesecake from the water bath (be very careful with the hot water!) and unwrap the foil. Let it cool completely on a wire rack at room temperature for another 1-2 hours.
- Once it’s completely cooled to room temperature, cover the cheesecake loosely with plastic wrap and refrigerate for at least 6-8 hours, or preferably overnight. This chilling time is non-negotiable! It allows the cheesecake to firm up properly, develop its full flavor, and makes it much easier to slice. Trust me, it’s worth the wait for this Christmas Red Velvet Cheesecake Recipe Festive Delicious masterpiece.
Crafting the Cream Cheese Frosting and Assembling:
Now that our gorgeous red velvet cheesecake has chilled to perfection, it’s time for the crowning glory – a rich, tangy cream cheese frosting that beautifully complements the red velvet base. This topping is essential for our Christmas Red Velvet Cheesecake Recipe Festive Delicious treat, adding another layer of flavor and a beautiful canvas for festive decoration.
- About an hour before you plan to serve, begin preparing your cream cheese frosting. In a large mixing bowl, beat the softened cream cheese and softened unsalted butter together with an electric mixer on medium speed until very smooth and creamy. Just like with the cheesecake batter, make sure there are no lumps here.
- Gradually add the sifted powdered sugar, one cup at a time, beating on low speed until combined after each addition. Once all the sugar is in, increase the speed to medium-high and beat for another 2-3 minutes until the frosting is light, fluffy, and smooth. Sifting the powdered sugar is really important to avoid a lumpy frosting!
- Beat in the vanilla extract. If your frosting seems too thick, add heavy cream or milk, one tablespoon at a time, beating until you reach your desired spreadable consistency. I like my frosting to be thick enough to pipe but still very smooth and easy to spread over the cheesecake.
- Once your cheesecake has thoroughly chilled and the frosting is ready, carefully run a thin knife around the edge of the springform pan before releasing and removing the sides. This ensures a clean release and protects the sides of your beautiful cheesecake.
- Now, it’s time to frost! Spread a generous layer of the cream cheese frosting evenly over the top of the chilled red velvet cheesecake. You can use an offset spatula for a smooth finish, or if you’re feeling fancy, you can pipe decorative swirls or rosettes around the edges.
- For the festive finishing touches: This is where you can truly make your Christmas Red Velvet Cheesecake Recipe Festive Delicious dessert shine! Sprinkle white chocolate shavings or curls over the top to mimic snow. Arrange fresh or sugared cranberries in a festive pattern, perhaps a circle around the edge or in the center. Tuck small sprigs of fresh rosemary amongst the cranberries to give the illusion of pine branches – it adds a stunning visual appeal and a lovely aroma. You can even crumble a few extra graham crackers or leftover red velvet cake crumbs around the base for an extra textural element.
- Slice your stunning Christmas Red Velvet Cheesecake Recipe Festive Delicious creation with a sharp, warm knife (run it under hot water and wipe dry between slices for the cleanest cuts). Serve immediately and enjoy the oohs and aahs from your guests!
Tips for a Perfect Christmas Red Velvet Cheesecake:
To ensure your Christmas Red Velvet Cheesecake Recipe Festive Delicious turns out absolutely perfect every single time, I’ve got a few extra tips and tricks up my sleeve. These small details can make a big difference in the final outcome, ensuring a smooth, creamy texture and a stunning presentation that will impress everyone.
- Room Temperature Ingredients are Key: I cannot stress this enough, especially for the cream cheese, eggs, and sour cream. Room temperature ingredients emulsify much better, resulting in a smoother, lump-free batter. Cold cream cheese will lead to lumps, and cold eggs won’t incorporate as well, which can affect the cheesecake’s texture. Plan ahead and take these items out of the fridge at least an hour or two before you start baking.
- Don’t Overmix the Batter: Once you add the eggs, mix only until just combined. Overmixing incorporates too much air into the batter, which expands during baking and then collapses as the cheesecake cools, leading to unsightly cracks. A gentle hand is best here.
- The Water Bath is Your Best Friend: Seriously, if you want a crack-free, perfectly creamy cheesecake, do not skip the water bath. It provides a moist, even heat source that bakes the cheesecake gently, preventing the edges from baking too quickly and cracking. Make sure your springform pan is wrapped very securely with heavy-duty foil to prevent any water from seeping in!
- Slow Cooling Prevents Cracks: Sudden temperature changes are the enemy of cheesecake. After baking, turn off the oven, prop the door open slightly, and let the cheesecake cool gradually inside the oven for an hour. Then, cool it completely at room temperature before chilling in the refrigerator. This slow transition is crucial.
- Chilling Time is Essential: Patience is a virtue when making cheesecake! An adequately chilled cheesecake (at least 6-8 hours, preferably overnight) not only firms up beautifully for easy slicing but also allows the flavors to fully develop and meld together, enhancing that truly festive delicious experience.
- Clean Slices for Presentation: For those picture-perfect slices, always use a long, sharp knife. For the cleanest cuts, run the knife under hot water, wipe it dry, and then slice. Repeat this process for each slice. This prevents the cheesecake from sticking to the knife and tearing, ensuring every piece looks as good as it tastes.
- Storage: Store your leftover Christmas Red Velvet Cheesecake Recipe Festive Delicious in an airtight container in the refrigerator for up to 5-7 days. While it’s best enjoyed fresh, it actually tastes pretty amazing the next day too, as the flavors continue to deepen.
Conclusion:
And there you have it, friends! We’ve journeyed through every step of creating what I genuinely believe will become a new holiday tradition in your home. This isn’t just any dessert; it’s a showstopper, a conversation starter, and a true labor of love that rewards you with an incredibly rich, decadent, and visually stunning treat. The vibrant crimson layers of moist red velvet cake, perfectly complemented by the tangy, creamy embrace of a classic cheesecake filling, all nestled upon a crisp, buttery graham cracker crust, make for an unforgettable culinary experience. It’s a dessert that perfectly balances indulgence with an undeniable sense of occasion, making it utterly irresistible and impressively elegant without being overly complicated to achieve. Trust me, the sheer delight on your loved ones’ faces when they see, and then taste, this masterpiece is a reward in itself, making every moment spent in the kitchen utterly worthwhile.
Why is this recipe an absolute must-try this season? Beyond its undeniable aesthetic appeal and the luxurious combination of textures and flavors, it embodies the spirit of festive indulgence. It’s comforting yet sophisticated, familiar yet excitingly new. Imagine the anticipation as you slice into its deep red and cream layers, a vibrant contrast that practically screams “celebration!” It’s the kind of dessert that feels special, whether you’re serving it at a grand holiday dinner or simply enjoying a slice with a loved one on a cozy winter evening. This particular Christmas Red Velvet Cheesecake Recipe Festive Delicious isn’t just about ingredients; it’s about crafting memories and adding a touch of magic to your celebrations. It’s designed to impress, delight, and satisfy even the most discerning sweet tooth, ensuring your festive table is adorned with something truly spectacular.
Serving Suggestions and Variations to Elevate Your Creation:
Once your beautiful cheesecake has chilled to perfection, the possibilities for serving are wonderfully open-ended. While it’s absolutely divine on its own, a dollop of freshly whipped cream, perhaps infused with a hint of vanilla bean or a dash of almond extract, makes for a classic and irresistible pairing. For an extra touch of decadence, consider a light drizzle of melted white chocolate or a scattering of dark chocolate curls over each slice. A handful of fresh cranberries or raspberries, vibrant against the red and cream, not only adds a burst of tartness to cut through the richness but also enhances its festive visual appeal. For those who enjoy a bit of sparkle, a very light dusting of edible glitter can truly make it shimmer on your holiday dessert platter. Pair a slice with a warm cup of coffee, a robust espresso, or even a glass of sparkling wine to complete the ultimate indulgent experience. Consider serving individual slices on small dessert plates, perhaps with a sprig of fresh mint for an added pop of color.
Feeling adventurous? This recipe is incredibly adaptable! You could experiment with the crust, perhaps using crushed Oreo cookies for a chocolatey twist, or ginger snaps for a spicy, warming undertone. For an even more intense red velvet experience, try adding a few drops of peppermint extract to the cheesecake layer for a subtle holiday mint flavor, or a touch of orange zest to the red velvet cake batter to brighten the overall profile. If you prefer individual portions, this recipe can easily be adapted into mini cheesecakes baked in muffin tins lined with paper cups, simply adjust baking times accordingly. These mini versions are fantastic for potlucks or as thoughtful edible gifts. You could even swirl a little raspberry jam or cherry pie filling into the cheesecake batter before baking for an extra fruity dimension. Don’t be afraid to make it your own; these slight variations can personalize this already incredible dessert.
Your Turn to Create and Share!
Now, dear reader, the stage is set, and the recipe is in your hands. I wholeheartedly encourage you to carve out some time this holiday season, gather your ingredients, and immerse yourself in the delightful process of bringing this magnificent creation to life. It’s more than just baking; it’s an act of generosity, a way to show love, and a fantastic opportunity to create something truly memorable. Don’t be intimidated by its impressive appearance; I promise you, the steps are straightforward, and the result is profoundly rewarding. Once you’ve baked, chilled, and proudly presented your stunning dessert, I would absolutely love to hear about your experience! Did you stick to the original recipe, or did you venture into exciting variations? How did your friends and family react? Please share your photos, your tips, and your triumphs in the comments or on social media. Your feedback and creativity inspire us all! Go forth, bake with joy, and let this beautiful cheesecake be the star of your next festive gathering. Happy baking, and happy holidays!
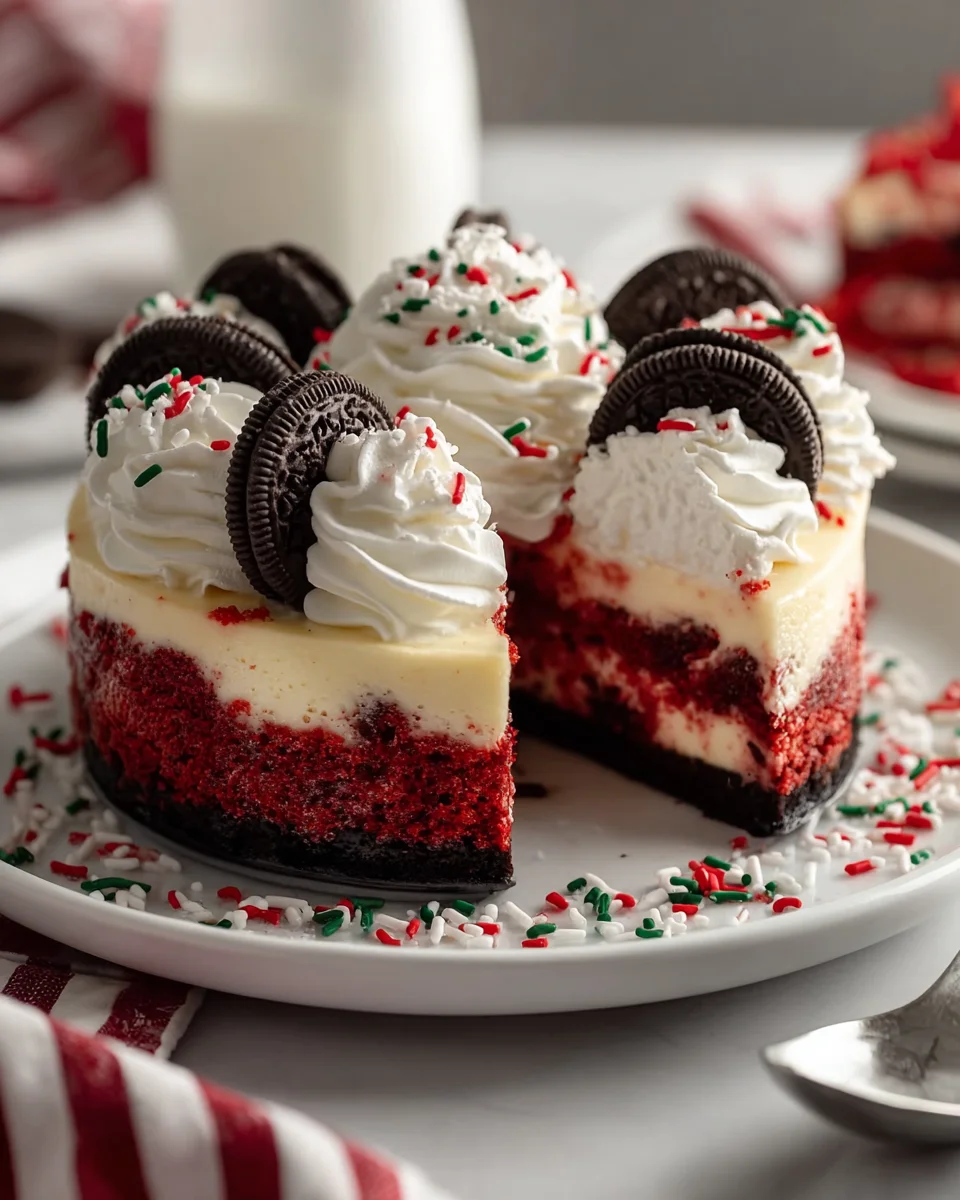
Christmas Red Velvet Cheesecake Recipe Festive Delicious
A magnificent festive dessert blending a vibrant red velvet cheesecake with an Oreo crust, topped with creamy whipped cream and festive Christmas garnishes. Perfect for captivating hearts and palates at your holiday gatherings.
Ingredients
Instructions
Important Information
Nutrition Facts (Per Serving)
It is important to consider this information as approximate and not to use it as definitive health advice.
Allergy Information
Please check ingredients for potential allergens and consult a health professional if in doubt.