
Christmas Tree Cake Pops are more than just a dessert; they are miniature beacons of holiday cheer, transforming any festive gathering into a winter wonderland of edible delight. Imagine tiny, perfectly formed cake pops, meticulously decorated to resemble adorable Christmas trees, each one a bite-sized piece of magic that captivates both young and old. While the cake pop itself is a relatively modern culinary innovation, the joy of crafting beautiful, shareable treats during the holiday season is a cherished tradition that spans generations, bringing families together in the kitchen and around the dessert table to create delicious memories.
I find immense joy in seeing the smiles these festive creations bring to everyone’s faces. People absolutely adore these delightful treats not only for their irresistibly moist and tender cake interior, perfectly enveloped in a crisp, sweet candy coating, but also for their stunning visual appeal and the sheer convenience they offer. They are the ultimate party dessert, easy to serve, mess-free, and individually portioned, making them a brilliant alternative to traditional cakes for any festive spread. Preparing these charming Christmas Tree Cake Pops is a truly delightful experience, and I promise, the enchanting results are well worth the effort, adding a touch of personalized whimsy to your holiday celebrations.

Ingredients:
- For the Cake:
- 1 box (15.25 ounces) yellow or vanilla cake mix (plus ingredients called for on the box, typically eggs, water, and oil) OR your favorite homemade cake recipe (enough for a 9×13 inch pan or two 8-inch round cakes)
- (Optional) 1 teaspoon vanilla extract, if using a box mix, to enhance flavor
- For the Frosting:
- 1 can (16 ounces) pre-made vanilla frosting OR 1 batch homemade buttercream frosting (enough for a two-layer cake)
- (Optional) 1-2 drops green gel food coloring, if you want a subtle green tint in your cake pop dough
- For the Coating:
- 24 ounces green candy melts (or white candy melts with green oil-based food coloring) – this is crucial for our “Christmas Tree Cake Pops”!
- 4 ounces white candy melts (for snow effect or drizzles, and for attaching stars)
- (Optional) 1-2 tablespoons paramount crystals or vegetable shortening (like Crisco, for thinning coating)
- For Decorating:
- 36-40 edible gold or silver star sprinkles (for the tree topper)
- Assorted Christmas sprinkles (e.g., green and red nonpareils, jimmies, snowflake shapes, edible glitter)
- Red and white royal icing (pre-made tubes with fine tips work great, or make your own from scratch)
- (Optional) Edible pearl dust or glitter (for extra sparkle)
- Equipment:
- 36-40 lollipop sticks (6-inch preferred)
- Styrofoam block or cake pop stand for drying (a tall glass filled with rice or sugar can also work in a pinch)
- Large mixing bowls
- Baking sheet lined with parchment paper or wax paper
- Microwave-safe bowls or a double boiler
- Squeeze bottles or piping bags with small round tips (e.g., Wilton 1 or 2, for icing details)
- Small cookie scoop (approximately 1.5 tablespoons capacity)
- Toothpicks (for air bubbles or small adjustments)
Phase 1: Baking and Crushing the Cake
-
Bake Your Cake: First things first, we need a delicious cake base for our “Christmas Tree Cake Pops”! If you’re using a box cake mix, follow the package instructions carefully for a 9×13 inch pan. I usually opt for a yellow or vanilla cake mix because it provides a neutral canvas for all our festive flavors and colors. For an extra boost of flavor, I like to add an additional teaspoon of good quality vanilla extract to the batter, even if the box mix already contains some vanilla – it really makes a significant difference in the final taste of your cake pops!
If you’re making your cake from scratch, use your favorite recipe for a standard 9×13 inch cake or two 8-inch round cakes. Ensure you bake it fully according to the recipe’s instructions and then allow it to cool completely on a wire rack. This step is absolutely crucial: the cake must be thoroughly cooled before you proceed, otherwise, any lingering warmth will create steam and make your cake pop dough too moist and sticky. A warm cake will also melt the frosting prematurely as you mix, leading to a greasy, oily, and difficult-to-work-with consistency that is almost impossible to shape properly. Patience is truly key here, my friends, so resist the urge to rush this cooling process!
-
Crumble the Cooled Cake: Once your cake is thoroughly cooled, it’s time for the fun (and slightly messy) part! Grab a large, sturdy mixing bowl. Take the cooled cake and begin to crumble it into very fine crumbs directly into the bowl. You can do this with your clean hands, which is my preferred method as it allows me to feel for any larger lumps and break them down thoroughly. This tactile approach ensures you get a consistently fine crumb. Alternatively, you can use a sturdy fork to mash it, or even a stand mixer fitted with the paddle attachment on low speed. If using a mixer, be careful not to overmix; we want fluffy crumbs, not a dense, pasty mush.
Aim for a consistent, fine crumb texture throughout the entire batch. Any larger pieces of cake will make it significantly harder to form smooth “Christmas Tree Cake Pops” later on and can also lead to unsightly cracks in your delicate candy coating. Imagine the texture of fine, dry sand – that’s the ideal consistency we’re striving for. Break down every single chunk until it’s uniform.
Phase 2: Creating the Cake Pop Dough
-
Add the Frosting: Now for the magical binder that transforms crumbs into delicious cake dough! Take your can of pre-made vanilla frosting (or your homemade buttercream). Start by adding about half to three-quarters of the frosting to your crumbled cake. I always recommend starting with less frosting and incrementally adding more as needed, because the precise amount of frosting required can vary slightly depending on the initial moisture content of your cake and the humidity in your kitchen. You absolutely do not want to add too much frosting from the start, as an overly wet and sticky dough will be incredibly challenging to shape and prone to falling off the lollipop sticks.
If you’d like your “Christmas Tree Cake Pops” to have a delightful, subtle green tint on the inside (which adds a lovely surprise when someone bites into them!), this is the perfect time to add 1-2 drops of green gel food coloring directly to the frosting before you mix it in with the cake crumbs. While not strictly necessary since the outside will be green, it certainly enhances the festive theme.
-
Mix and Knead: Using your hands (I often wear food-safe gloves for cleanliness and to prevent my hands from getting sticky or stained green!), begin to thoroughly mix the frosting into the cake crumbs. Squeeze and knead the mixture together firmly, almost as if you’re making bread dough or play-doh. The ultimate goal is to combine the cake and frosting until you have a dense, cohesive “cake dough” that holds its shape perfectly when squeezed in your hand. It should feel pliable, like a firm play-doh – strong enough to mold without crumbling, but not at all sticky or greasy.
If, after mixing, the mixture still feels too dry and crumbly, gradually add more frosting, one tablespoon at a time, and continue mixing and kneading until it reaches that desired, perfect consistency. If, by chance, it feels a little too wet and sticky, you can try to salvage it by adding a few tablespoons of crushed vanilla wafer cookies or even a little extra crumbled plain cake to help absorb some of the excess moisture. However, it’s always best practice to avoid getting to this point by exercising caution and adding the frosting incrementally. Achieving the perfect consistency here is paramount for perfectly structured, stable, and easy-to-handle Christmas Tree Cake Pops.
-
Chill the Dough: Once your cake dough is mixed to perfection and has that ideal play-doh consistency, cover the bowl tightly with plastic wrap and refrigerate it for at least 30 minutes. This chilling period is super important, so don’t skip it! It allows the flavors of the cake and frosting to meld beautifully, and more importantly, it firms up the dough significantly. This firming makes it much, much easier to shape without crumbling or breaking, and it ensures the cake pop remains stable when you insert the lollipop sticks. It also helps the finished cake pops maintain their shape perfectly during the crucial dipping process, preventing them from deforming in the warm coating.
Phase 3: Shaping Our Christmas Tree Cake Pops
-
Prepare for Shaping: Line a large baking sheet with parchment paper or wax paper. This will be the temporary home where your freshly shaped “Christmas Tree Cake Pops” will rest before their final chilling and dipping stages. Take the well-chilled cake dough out of the refrigerator – it should feel noticeably firmer now.
-
Portion the Dough: Now, let’s start making our adorable Christmas tree shapes! Using a small cookie scoop (one with a capacity of about 1.5 tablespoons is ideal) or simply using your hands, scoop out uniform portions of the cake dough. Each portion should be roughly the size of a golf ball or slightly larger, depending on how big you envision your finished Christmas trees to be. Aim for as much consistency in size as possible across all your portions; this will ensure uniform appearance, baking (if applicable, though not for cake pops), and dipping results.
-
Form the Christmas Trees: This is where the artistry truly begins for your “Christmas Tree Cake Pops”! Take one portion of dough and gently roll it between your palms to form a smooth, somewhat elongated ball. Then, with gentle pressure, begin to pinch and taper one end to gradually create a distinct cone shape, while keeping the opposite end (the base) wider and flat enough to stand on its own if desired (though they will eventually be on sticks). Think of a classic Christmas tree silhouette – wider and stable at the bottom, gracefully tapering to a delicate point at the top. You can gently press the wider base flat against your clean work surface to ensure a stable bottom for your tree shape, which helps them stand upright when drying. Spend a moment on each to make it as smooth and tree-like as possible.
If the dough begins to feel too warm and sticky as you are shaping, pop it back into the fridge for 10-15 minutes to firm up again. It is significantly easier and less frustrating to work with slightly chilled dough than with soft, pliable dough. Place each perfectly shaped Christmas tree onto your prepared baking sheet as you complete it, leaving a little space between each one.
-
Chill Shaped Cake Pops: Once all your “Christmas Tree Cake Pops” are beautifully shaped and lined up on the baking sheet, place the entire sheet back into the refrigerator for at least 30 minutes. For even faster and more effective firming, I often recommend placing them in the freezer for about 15-20 minutes. This firming up process is absolutely essential for the structural integrity of your cake pops. It ensures the cake pop holds its precious shape when dipped into the warm candy coating and, crucially, helps prevent it from crumbling, deforming, or falling apart or spinning on the stick during the dipping process. Don’t skip this chilling step!
Phase 4: Coating and Decorating the Christmas Tree Cake Pops
-
Melt the Green Candy Melts: While your shaped “Christmas Tree Cake Pops” are chilling thoroughly, it’s time to prepare our vibrant green coating. In a microwave-safe bowl (I prefer a deep, narrow bowl for easier dipping), melt the green candy melts according to package directions. I find it best to melt them in short 30-second intervals, stirring extremely well after each interval, until the candy melts are smooth, fully melted, and completely lump-free. Alternatively, you can use a double boiler for a more controlled and gentle melting process, which helps prevent overheating. Be very, very careful not to overheat the candy melts, as this can cause them to seize (become thick, grainy, and unusable) or burn, ruining the texture and taste. If you’re using white candy melts and oil-based food coloring (never water-based with candy melts!), add the coloring a few drops at a time after the melts are fully liquid, stirring until you achieve your desired festive shade of green.
If your melted candy is too thick for smooth dipping, you can add paramount crystals or a teaspoon of vegetable shortening (like Crisco) at a time, stirring meticulously until it reaches a pourable, smooth, and easily flowing consistency. It should be fluid enough to coat the cake pops without being overly thin and transparent, or too thick and clumpy – imagine the consistency of warm paint, not thick syrup. This slight thinness is incredibly crucial for achieving a smooth, professional, and even coating on your “Christmas Tree Cake Pops.”
-
Prepare for Dipping: Have your Styrofoam block or cake pop stand readily available and within arm’s reach. Take out your thoroughly chilled “Christmas Tree Cake Pops” from the fridge or freezer – they should be very firm and cold to the touch. Get all your lollipop sticks organized and ready for use.
-
Insert the Sticks: Take one lollipop stick and dip its very tip, about 1/2 inch, into the melted green candy coating. Immediately insert this coated tip into the flat bottom of a chilled Christmas tree cake pop, gently pushing it about halfway through the cake pop. The melted candy acts as a strong edible “glue,” effectively securing the stick to the cake pop. Repeat this process for all your cake pops. Then, carefully place the cake pops back onto the parchment-lined baking sheet or into the Styrofoam block, allowing the candy ‘glue’ to set for about 5-10 minutes in the refrigerator. This brief chilling step ensures the stick is firmly anchored before the main dip.
-
Dip the Cake Pops: Now for the magical transformation! One by one, take a “Christmas Tree Cake Pop” firmly by its stick. Dip the entire cake pop straight down into the melted green candy coating. Submerge it completely, making sure that absolutely no cake shows through the coating. Gently and steadily tap the stick against the edge of the bowl, allowing any excess coating to drip off back into the bowl. Slowly rotate the cake pop as you tap to encourage an even drip and to ensure a perfectly smooth, unblemished finish. It’s important not to twist the cake pop too aggressively, as this can cause it to loosen or even fall off the stick. Work swiftly, as the cold cake pop will cause the warm coating to set quite fast.
If, during the dipping process, the coating starts to get too thick, reheat it gently in the microwave for a few seconds (10-15 seconds at most), stirring extremely well. If you notice any small air bubbles forming on the surface of your coated cake pop, gently pop them with a clean toothpick before the coating has a chance to fully set. The goal is a pristine, smooth green surface for your “Christmas Tree Cake Pops.”
-
First Layer of Decoration (Sprinkles): Immediately after dipping each “Christmas Tree Cake Pop,” and while the vibrant green coating is still wet and tacky, generously sprinkle it with your chosen assortment of festive Christmas sprinkles. This is your fantastic chance to add that essential festive sparkle and texture! You can use classic green and red nonpareils, shimmering edible glitter, tiny snowflake sprinkles, festive jimmies, or whatever your holiday heart truly desires to make your trees unique. You can gently roll the coated cake pop in a shallow bowl of sprinkles or carefully shower them over the pop with your fingers. As soon as you’ve applied the sprinkles, place the decorated cake pop upright into your Styrofoam block or specialized cake pop stand to dry and set completely. This usually takes about 15-20 minutes at room temperature, or you can expedite the process by popping them back into the fridge for faster setting.
-
Add the Star Topper: Once the green coating on your “Christmas Tree Cake Pops” has fully set (it should be firm and dry to the touch, with no stickiness), it’s time to add the iconic star topper. Melt your white candy melts in a small microwave-safe bowl (a very small amount, just enough for dipping). Dip the very bottom edge of an edible star sprinkle into the melted white candy. Gently but firmly attach the star to the very top, pointed tip of your green Christmas tree cake pop. Hold it in place for a few seconds until the small amount of white candy sets, effectively acting as an edible glue to secure the star. Alternatively, you can use a tiny dot of royal icing to adhere the star, which also works wonderfully.
-
Fine Detail Decoration (Optional): Now for the intricate details that will truly make these “Christmas Tree Cake Pops” shine and stand out! If you wish to add delicate garlands, strings of lights, or tiny ornaments, now is the time to use your royal icing. Fill a piping bag fitted with a very small round tip (such as a Wilton 1 or 2) or a fine-tipped squeeze bottle with red or white royal icing. Carefully pipe thin, delicate lines in a zigzag pattern down your green Christmas tree, artfully mimicking festive tinsel or charming strings of holiday lights. You can also pipe tiny dots to represent colorful ornaments. Let your creativity run wild and personalize each tree! Allow the royal icing to dry completely before handling or packaging – this can take anywhere from 30 minutes to an hour, or potentially longer depending on the humidity levels in your environment.
For an extra enchanting touch of “snow,” you can also drizzle some of the leftover melted white candy melts over the green trees after the main green coating has completely set. Use a fork to flick thin strands, or a piping bag with a tiny snip off the end to create delicate, random drizzles. Let this white drizzle set completely as well.
Important Tip for Perfection: To achieve crisp, professional-looking designs, always make sure that each layer of coating, sprinkles, or icing is fully and completely set before you add the next decorative element. This meticulous approach prevents any smudging, blending, or unintended mixing of colors, ensuring truly beautiful and pristine designs on your custom “Christmas Tree Cake Pops.”
-
Final Setting and Storage: Once all your “Christmas Tree Cake Pops” are fully decorated, and all the candy coatings and royal icing details have completely set and hardened, they are ready to be admired, shared, and of course, devoured! Store them in an airtight container at cool room temperature for up to 2-3 days to maintain their freshness and texture. If you need to store them for a longer period, they can be kept in the refrigerator for up to a week. If refrigerated, for the absolute best taste and texture, allow them to come back to room temperature for about 15-20 minutes before serving. They not only make a stunning centerpiece for your holiday dessert table but also fantastic, thoughtful, and delicious edible gifts for friends and family!
Congratulations, you’ve successfully created a truly delightful and wonderfully festive batch of “Christmas Tree Cake Pops” that are absolutely sure to be the star attraction of any holiday gathering or festive celebration!
Welcome to the delightful culmination of our journey into creating something truly magical and utterly delicious! You’ve walked through the steps, you’ve gathered your ingredients, and now it’s time to reflect on why this particular recipe isn’t just another dessert; it’s an experience waiting to happen. I truly believe this recipe is a must-try for anyone looking to add a sprinkle of joy and a burst of flavor to their celebrations, or simply to treat themselves to a whimsical homemade delight. What makes these treats so irresistible, you ask? It’s their perfect combination of a moist, tender cake interior, enrobed in a smooth, sweet candy shell, and adorned with decorations that are as fun to create as they are to admire. They’re individual portions of pure bliss, making them ideal for gatherings as they are easy to serve and even easier to enjoy. The vibrant colors and playful designs truly capture the spirit of festivity, making them a centerpiece on any dessert table or a cherished gift for loved ones. They’re also incredibly versatile, allowing for endless creativity and personalization, which, for me, is always a huge bonus in any recipe.
When it comes to serving these delightful creations, the possibilities are as numerous as the sprinkles in your pantry! Of course, they are perfect served upright on a platter, perhaps nestled amongst some festive greenery or alongside other holiday treats. Imagine a beautiful tiered stand overflowing with these charming morsels, each one a tiny work of art. For a truly enchanting presentation, I love to arrange them in small, individual clear bags tied with a pretty ribbon – they make fantastic party favors or thoughtful hostess gifts that are guaranteed to bring a smile. Don’t limit yourself to just serving them at parties; they’re also wonderful for a cozy night in, accompanying a cup of hot cocoa or tea. For a fun twist, why not consider a “decorate your own” cake pop bar at your next gathering? Lay out undecorated cake pops, various sprinkles, edible glitter, and different colored candy melts, and let your guests unleash their inner artists. It’s an interactive activity that’s sure to be a hit with both kids and adults!
Endless Variations to Spark Your Creativity
The beauty of this recipe lies not only in its delicious outcome but also in its adaptability. While the classic vanilla base is always a winner, don’t hesitate to experiment with different cake flavors. Imagine the rich indulgence of chocolate cake pops, the festive hue of red velvet, or the zesty brightness of lemon. Each variation opens up a whole new world of taste! Similarly, the coating can be customized to your heart’s content. Dark chocolate provides a sophisticated contrast, while white chocolate can be tinted with food coloring to match any theme or occasion. Thinking beyond just sprinkles, you could use finely chopped nuts, toasted coconut flakes, mini chocolate chips, or even edible pearls for an elegant touch. And let’s talk about theme adaptation! While these are perfect as
Christmas Tree Cake Pops
, with a change of color and decoration, they can easily transform into adorable hearts for Valentine’s Day, spooky ghosts for Halloween, pastel eggs for Easter, or even miniature sports balls for a game-day treat. This flexibility truly makes the core technique invaluable for any baker who loves to celebrate with personalized sweets. You can swap out the green food coloring for pink or blue, use star-shaped sprinkles for a baby shower, or go wild with rainbow colors for a birthday bash. The possibilities are genuinely boundless, ensuring that this recipe remains a go-to for all your celebratory baking needs throughout the year.
Your Turn to Create and Share!
Now that you’ve got all the insights, the only thing left to do is to roll up your sleeves and dive into the joyful process of making these delightful treats! I wholeheartedly encourage you to give this recipe a try. There’s a unique satisfaction that comes from transforming simple ingredients into something so visually appealing and incredibly tasty, and I promise you’ll find immense joy in every step, from mixing the batter to carefully decorating each pop. Don’t be afraid to experiment, to add your own flair, or to get the kids involved – making these can be a wonderfully fun family activity, creating memories as sweet as the treats themselves. Once you’ve created your masterpieces, please don’t keep them to yourself! I would absolutely love to hear about your experience. Did you try a new flavor combination? Did you come up with a unique decorating idea? How did your family and friends react to your beautiful creations? Share your triumphs, your tips, and your photos with us! Your feedback and shared experiences inspire not only me but also our entire community of baking enthusiasts. So, go forth, bake, enjoy, and spread the delicious cheer!
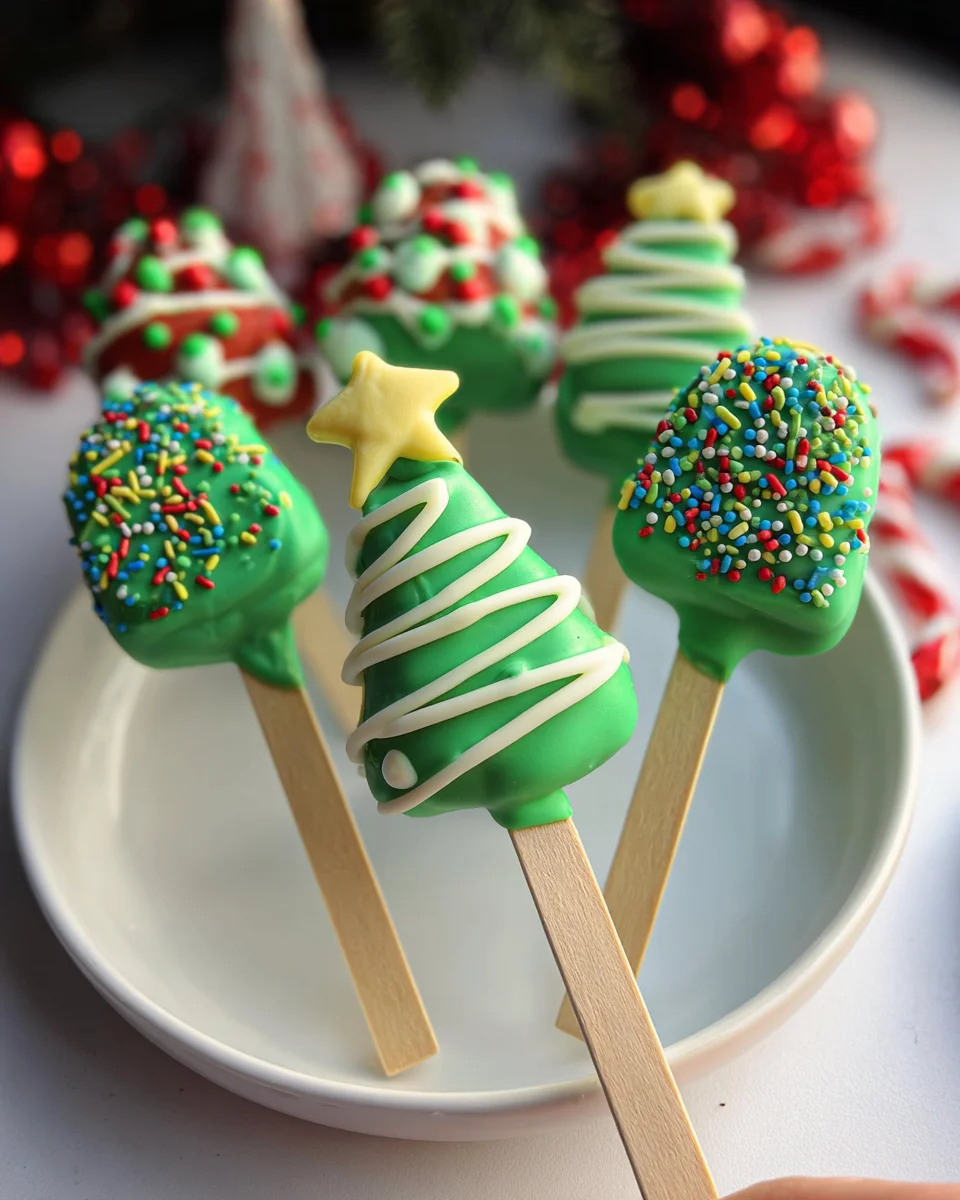
Christmas Tree Cake Pops: Festive Holiday Treats!
Christmas Tree Cake Pops are miniature beacons of holiday cheer, perfect for transforming any festive gathering. These delightful treats combine a moist cake interior with a crisp, sweet candy coating, meticulously decorated to resemble adorable Christmas trees. They are an ultimate party dessert—easy to serve, mess-free, and individually portioned, adding personalized whimsy to your holiday celebrations.
Ingredients
Instructions
Important Information
Nutrition Facts (Per Serving)
It is important to consider this information as approximate and not to use it as definitive health advice.
Allergy Information
Please check ingredients for potential allergens and consult a health professional if in doubt.


