Classic Apple Crum extractble – just the mention of these words evokes a sense of comforting warmth, crisp autumn evenings, and the sweet aroma of baking apples mingling with cinnamon. I truly believe there’s nothing quite like the simple perfection of a perfectly executed apple dessert, especially one topped with a golden, buttery crumble.
The Enduring Charm of a Classic Dessert
This beloved dish, often traced back to British wartime ingenuity when pastry ingredients were scarce, has evolved into a timeless staple enjoyed across the globe. It’s a testament to how humble ingredients can create something extraordinary. People adore this dish for its incredible balance of textures: the tender, spiced apples practically melting in your mouth, contrasted beautifully with the delightful crunch of the oaty, golden brown topping. The ease of preparation, combined with its deeply satisfying taste, makes the Classic Apple Crum extractble a perennial favorite, perfect for any occasion, from a cozy family dinner to a festive gathering. It truly is a dessert that brings smiles to every face.

Ingredients:
-
For the Classic Apple Crumble Filling:
- 8-10 medium baking apples (approximately 2.5 – 3 pounds), such as Granny Smith, Honeycrisp, Braeburn, or a mix for complex flavor. I find a combination offers the best balance of tartness and sweetness, ensuring a truly classic apple crumble experience.
- 1/2 cup (100g) granulated sugar. You might adjust this slightly depending on the natural sweetness of your chosen apples and your personal preference.
- 1/4 cup (50g) light brown sugar, packed. This adds a lovely caramel note to our classic apple crumble.
- 2 tablespoons all-purpose flour. This helps to thicken the juices released by the apples, preventing a watery filling.
- 1 teaspoon ground cinnamon. The quintessential spice for apple dishes!
- 1/4 teaspoon ground nutmeg. Just a touch complements the cinnamon beautifully.
- Pinch of ground cloves or allspice (optional, but highly recommended for depth).
- 1 tablespoon fresh lemon juice. This brightens the flavor, balances the sweetness, and helps prevent the apples from browning too quickly.
- 2 tablespoons unsalted butter, cut into small pieces. These little pats will melt into the filling, enriching the flavor.
-
For the Delicious Crumble Topping:
- 1 1/2 cups (180g) all-purpose flour. The foundation of our crispy, buttery crumble.
- 1/2 cup (100g) granulated sugar.
- 1/2 cup (100g) light brown sugar, packed. This contributes to a chewier, richer crumble texture.
- 1/2 teaspoon ground cinnamon (optional, but I love the hint of spice in the topping too!).
- 1/4 teaspoon salt. A crucial ingredient to balance the sweetness and enhance all the other flavors in the crumble.
- 1 stick (1/2 cup or 113g) cold unsalted butter, cut into 1/2-inch cubes. Keeping the butter very cold is key to achieving that wonderfully crumbly texture.
- 1/2 cup (60g) old-fashioned rolled oats (optional, but highly recommended for extra texture and a slightly nutty flavor). I find it really elevates the rustic appeal of a classic apple crumble.
-
Equipment You’ll Need:
- Large mixing bowls (at least two)
- Vegetable peeler
- Apple corer (optional, but handy)
- Sharp knife and cutting board
- Measuring cups and spoons
- Pastry blender or your fingertips
- 9×13 inch baking dish or a similar sized oval/round dish (approximately 2.5-3 quart capacity). A ceramic or glass dish works beautifully for even baking.
Preparing Your Classic Apple Crumble Filling:
- Preheat Your Oven and Prepare Your Dish: First things first, let’s get that oven ready! Preheat your oven to 375°F (190°C). While it’s heating up, grab your 9×13 inch baking dish (or equivalent). You don’t usually need to grease the dish for apple crumble, as the filling isn’t prone to sticking, but if you’re using a particularly sticky dish or just want extra assurance, a light spray of baking oil or a quick swipe of butter wouldn’t hurt. This simple step ensures your classic apple crumble bakes beautifully without any fuss.
- Peel, Core, and Slice the Apples: This is arguably the most time-consuming part, but it’s where the magic of our classic apple crumble truly begins. Start by thoroughly washing your chosen apples. Using a good quality vegetable peeler, carefully remove all the skin from each apple. Next, core the apples. You can do this with an apple corer, or by simply cutting the apples into quarters and carefully excising the core with a small knife. Once peeled and cored, slice the apples into uniform pieces, about 1/4 to 1/2 inch thick. I prefer slightly thicker slices as they hold their shape better during baking, offering a pleasant bite in the finished classic apple crumble. Aim for consistency in size so they cook evenly. Place all the sliced apples into a very large mixing bowl.
- Combine Filling Ingredients: Now for the flavor infusion! To the bowl with your sliced apples, add the granulated sugar, light brown sugar, all-purpose flour, ground cinnamon, ground nutmeg, and the optional pinch of cloves or allspice. Don’t forget that vital tablespoon of fresh lemon juice – it truly brightens the overall flavor profile of your classic apple crumble and keeps those apples looking fresh. Using a large spoon or your clean hands, gently toss all these ingredients together. Make sure every apple slice is thoroughly coated with the sugar and spice mixture. You want the flour to be evenly distributed, as this will prevent the filling from becoming too runny. This thorough mixing ensures every bite of your classic apple crumble is bursting with flavor.
- Arrange Apples in Baking Dish: Once the apples are beautifully coated, pour the entire mixture into your prepared baking dish. Spread them out evenly. Don’t press them down too firmly; a little bit of loft will allow for better airflow and more even cooking. Finally, dot the top of the apple mixture with the small pieces of cold unsalted butter. These little pats of butter will melt down into the apples, creating a richer, more luxurious filling for your classic apple crumble as it bakes. Set the dish aside while we prepare the star of the show: the crumble topping!
Crafting the Perfect Crumble Topping:
- Combine Dry Ingredients for the Crumble: In a separate large mixing bowl, whisk together the all-purpose flour, granulated sugar, light brown sugar, optional ground cinnamon, and the essential salt. The salt might seem insignificant, but it plays a crucial role in enhancing the sweetness and depth of flavor in the crumble, making our classic apple crumble truly stand out. Ensure these dry ingredients are well combined; this foundational step is important for an evenly flavored topping.
-
Incorporate the Cold Butter: Now for the technique that defines a great crumble! Add the cold, cubed unsalted butter to the dry ingredient mixture. This is where your chosen method comes into play.
- Using Your Fingertips: If you’re going for the traditional method, use your fingertips to rub the butter into the flour mixture. Work quickly, using your thumbs and forefingers to flatten the butter pieces and combine them with the dry ingredients. The goal is to keep the butter as cold as possible, as this prevents it from melting and ensures a flaky, tender crumble. You’ll be looking for a texture that resembles coarse breadcrumbs, with some pea-sized pieces of butter still visible. This takes a bit of time and patience, but it’s incredibly satisfying and ensures a truly rustic classic apple crumble.
- Using a Pastry Blender: A pastry blender is an excellent tool for this job. Press the blades down into the butter and flour mixture, twisting slightly as you lift. Repeat this motion until the butter is evenly distributed and you achieve that desired coarse breadcrumb texture. This method is often faster and helps keep the butter cold.
- Using a Food Processor (with caution): For a super quick approach, you can pulse the dry ingredients and cold butter in a food processor a few times until the mixture resembles coarse crumbs. Be very careful not to over-process, as this can lead to a tough, cake-like topping instead of a tender, crumbly one. Over-processing is the enemy of a perfect classic apple crumble topping!
- Add Optional Oats (if using): Once you’ve achieved your desired crumbly texture, stir in the old-fashioned rolled oats, if you’re using them. I always recommend adding them as they provide a delightful chewiness and a subtle nutty flavor that really complements the apples in our classic apple crumble. Gently mix them in until just combined. Be careful not to compress the mixture too much; we want it light and airy.
- Achieving the Right Crumble Consistency: The perfect crumble topping should be loose, irregular, and have varying sizes of crumbs, from fine dust to small, pea-sized clumps. This variety in texture is what makes each bite of a classic apple crumble so enjoyable. Avoid overworking the mixture, as this can develop the gluten in the flour and melt the butter, resulting in a less desirable, dense topping. You want it to be light enough to sprinkle generously over the apples.
Assembling and Baking Your Classic Apple Crumble:
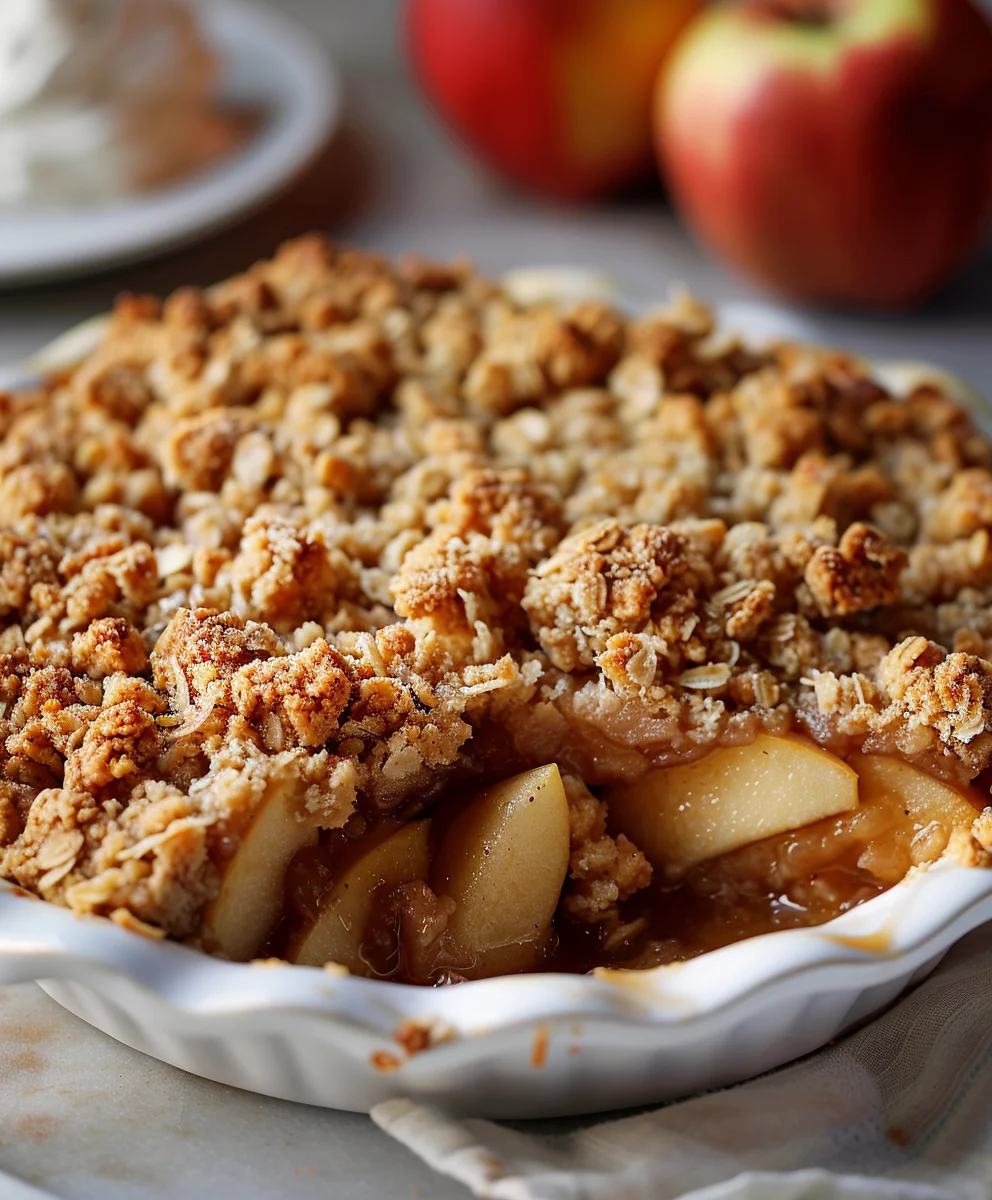
- Layer the Crumble Topping: Now for the grand finale of assembly! Take your beautifully prepared crumble topping and generously sprinkle it evenly over the apple filling in the baking dish. Don’t press the topping down; a light, airy distribution will result in a crispier, more delightful texture. You want good coverage, ensuring every spoonful of classic apple crumble has that perfect apple-to-topping ratio. Feel free to create some lovely peaks and valleys with the crumble for added visual appeal and textural interest.
- Prepare for Baking: Since fruit fillings can sometimes bubble over, especially when juicy, I highly recommend placing your baking dish on a foil-lined baking sheet. This little trick saves you from a messy oven cleanup later and helps ensure that any delicious, syrupy overflows are caught, not baked onto your oven floor. It’s a small step that makes a big difference when baking a classic apple crumble.
-
Bake Your Classic Apple Crumble: Carefully transfer the foil-lined baking sheet with your crumble to the preheated 375°F (190°C) oven. Bake for approximately 45-60 minutes. The exact baking time can vary depending on your oven and the specific apples you chose.
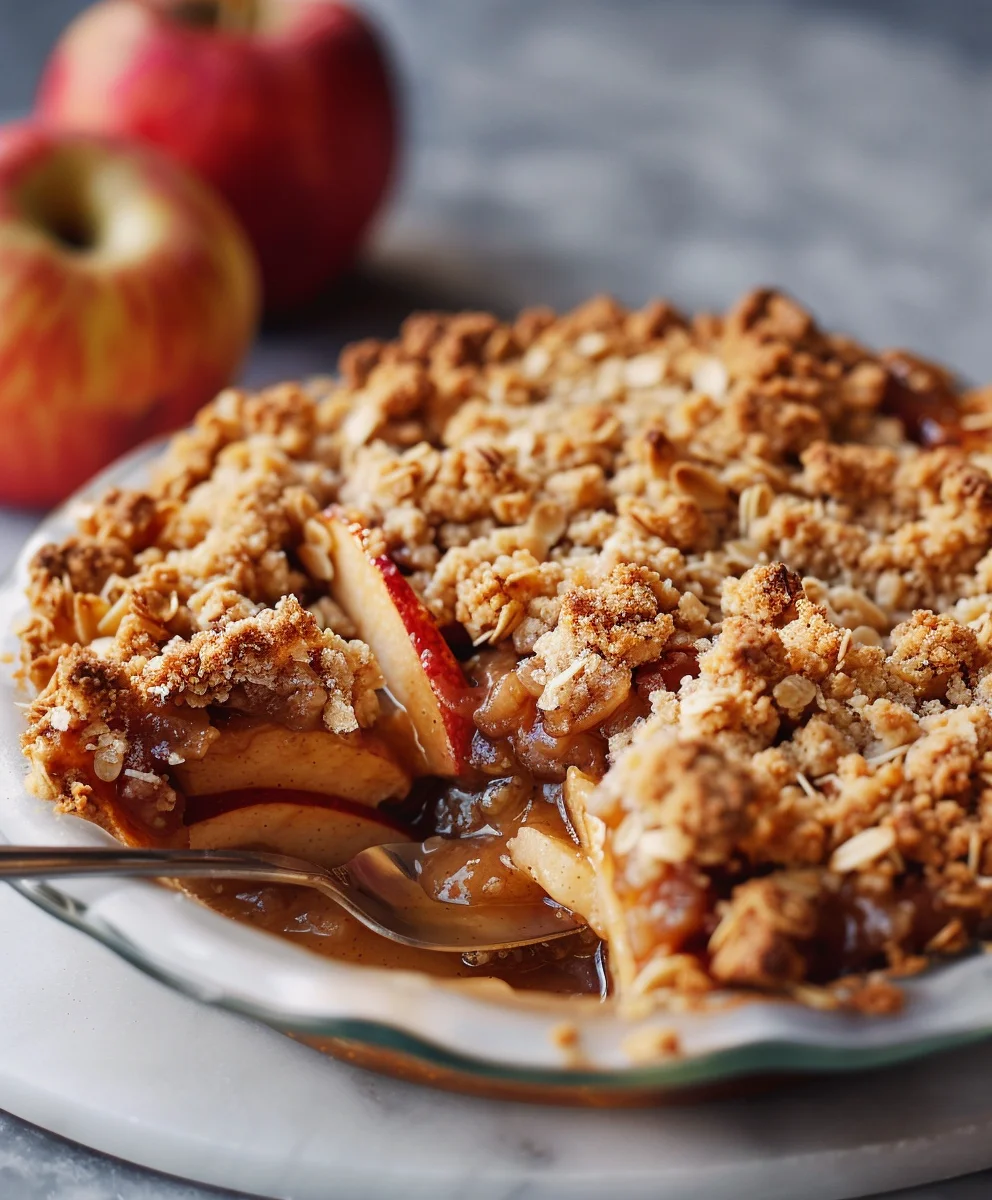
- What to Look For: You’ll know your classic apple crumble is perfectly baked when the topping is a beautiful golden brown and appears wonderfully crisp. More importantly, the apple filling underneath should be visibly bubbling up around the edges, indicating that the apples are tender and the juices have thickened. You can also gently insert a thin knife or skewer into the apple filling (through a less dense part of the crumble) to test for tenderness. If the knife goes in easily with little resistance, your apples are perfectly cooked.
- Troubleshooting Browning: If the crumble topping starts to brown too quickly before the apples are tender and bubbly, you can loosely tent the dish with aluminum foil for the remaining baking time. This protects the topping from over-browning while allowing the apples to finish cooking through.
- Cool Before Serving: Once your classic apple crumble emerges from the oven, irresistibly golden and fragrant, resist the urge to dig in immediately! It’s crucial to let it cool for at least 15-20 minutes on a wire rack. This cooling period allows the filling to set up properly, thickening the juices further, and prevents it from being a completely liquid mess when you scoop it. Plus, it will still be wonderfully warm, which is truly the best way to enjoy a classic apple crumble. This brief wait enhances both the texture and the overall experience.
Serving Suggestions and Storage Tips for Your Classic Apple Crumble:
- Serving Your Warm Classic Apple Crumble: Ah, the moment we’ve been waiting for! This classic apple crumble is absolutely divine served warm, straight from the oven (after that essential cooling period, of course). It’s perfect on its own, but to elevate the experience, I highly recommend pairing it with a scoop of premium vanilla bean ice cream. The cold, creamy ice cream melting into the warm, spiced apples and crisp crumble is a match made in dessert heaven. Alternatively, a dollop of freshly whipped cream or a generous pour of warm custard makes for an equally comforting and luxurious accompaniment. For a simpler touch, a dusting of powdered sugar adds a touch of elegance. This is truly the best way to savor the rich flavors and textures of a homemade classic apple crumble.
- Storing Leftovers: If by some miracle you have any classic apple crumble left over (a rare occurrence in my home!), it stores beautifully. Once it has completely cooled to room temperature, cover the baking dish tightly with plastic wrap or aluminum foil. You can then refrigerate it for up to 3-4 days. The crumble topping might soften slightly in the fridge, but the flavors will meld even further, often tasting even better the next day! For longer storage, you can portion out individual servings into airtight containers.
- Reheating for Optimal Enjoyment: To bring your classic apple crumble back to its glorious best, I suggest reheating individual servings in the microwave for about 30-60 seconds, or until warmed through. For a crispier topping, you can reheat larger portions in a preheated oven at 350°F (175°C) for 15-20 minutes, or until heated through and the topping has re-crisped slightly. Make sure to cover it loosely with foil if you notice the topping browning too much. Reheating ensures you can enjoy that comforting warmth and deliciousness of your classic apple crumble again and again.
- Freezing for Future Indulgence: Yes, you can freeze classic apple crumble! Once completely cooled, you can wrap the entire dish securely in several layers of plastic wrap and then foil, or freeze individual portions in airtight, freezer-safe containers. It will keep well in the freezer for up to 2-3 months. When you’re ready to enjoy, thaw it overnight in the refrigerator, and then reheat it in the oven as described above for a warm, comforting treat whenever the craving strikes. It’s a fantastic make-ahead dessert that truly captures the essence of a classic apple crumble whenever you need it.
Conclusion:
I truly believe that after trying this recipe, you’ll understand why it’s a staple in so many homes and hearts. It’s not just a dessert; it’s an experience. The moment those golden, spiced apples begin to soften beneath their buttery, crunchy topping, your kitchen will be filled with an aroma that instantly transports you to a place of warmth and comfort. There’s something inherently nostalgic about a homemade apple crumble, a timeless appeal that few other desserts can match. This particular rendition, which I’ve carefully refined, promises a perfect balance of tender, sweet-tart fruit and a deeply satisfying, crumbly texture on top. It’s deceptively simple to prepare, yet delivers a gourmet-level taste that will impress even the most discerning palates. This recipe isn’t just about following steps; it’s about creating joy, one spoonful at a time. I’ve poured my passion into ensuring that every detail, from the choice of apples to the blend of spices, contributes to an unforgettable culinary moment. It’s the kind of dessert that gathers loved ones around the table, sparking conversations and creating cherished memories.
When it comes to serving, the possibilities are delightfully varied, each offering a slightly different nuance to this already incredible dessert. My personal favourite, and one I highly recommend, is serving it warm, straight from the oven, with a generous scoop of vanilla bean ice cream. The contrast between the warm, spiced apples and the cold, creamy ice cream is simply divine, a symphony of temperatures and textures that dances on your tongue. For those who prefer a more traditional accompaniment, a silky-smooth, warm custard poured over the top is an absolute classic. The rich, velvety custard complements the fruit and crumble beautifully, adding an extra layer of indulgence. If you’re aiming for something a little lighter, a dollop of freshly whipped cream, perhaps infused with a hint of cinnamon or vanilla, provides a lovely airy counterpoint. And for the purists among us, enjoying it just as it is, perhaps with a dusting of icing sugar, allows the pure flavours of the apples and the crumble to shine through unadulterated. Don’t be afraid to experiment with these pairings; each one unlocks a new dimension of flavour and enjoyment.
But the magic of this recipe extends beyond just serving; it also lies in its wonderful versatility, allowing you to put your own unique stamp on it. While the classic apple filling is undeniably exquisite, feel free to experiment with other fruits or combinations. Pears, berries (raspberries or blackberries work wonderfully), or even stone fruits like peaches and plums can be swapped in, either entirely or as part of a mixed fruit crumble. Imagine a pear and ginger crumble, or an apple and blackberry crumble – each a delightful twist on the original. You could also play with the spices; a pinch of cardamom, a touch of nutmeg, or even a hint of star anise can introduce fascinating new aromatic notes. For an extra layer of texture and nuttiness in the crumble topping, consider adding chopped nuts like pecans, walnuts, or almonds. A sprinkle of rolled oats can also add a delightful chewiness and heartiness to the topping. If you’re feeling adventurous, try adding a tablespoon of orange zest to the apple filling for a bright, citrusy lift. The beauty of this dessert is that it’s incredibly forgiving and adaptable, encouraging you to unleash your inner chef and customize it to your heart’s content.
So, now that you have all the tips, tricks, and inspiration at your fingertips, I genuinely hope you feel empowered and excited to whip up this magnificent dessert in your own kitchen. There’s nothing quite like the satisfaction of creating something so utterly delicious from scratch. This isn’t just a recipe; it’s an invitation to experience culinary comfort at its finest. I truly believe that once you taste the results, you’ll understand why this particular method yields a dessert that is truly exemplary, something that embodies the very essence of a Classic Apple Crum extractble. I encourage you to set aside some time this week, gather your ingredients, and embark on this delightful baking adventure. When you do, please don’t keep the joy to yourself! I would absolutely love to hear about your experience. Did you add any unique twists? What did you serve it with? Share your photos, your stories, and your feedback. Your baking journey is important to me, and seeing your successful creations, especially how you interpret this Classic Apple Crum extractble, brings me immense pleasure. Happy baking, and enjoy every single, delicious bite!
Classic Apple Crumble
A timeless, comforting dessert featuring tender, spiced apples beneath a golden, buttery, and crisp crumble topping. This easy-to-make dish balances sweet and tart flavors with delightful textures, perfect for any occasion.
Ingredients
-
6-8 crisp apples (such as Granny Smith or Braeburn), peeled, cored, and sliced
-
1 tablespoon lemon juice
-
1/2 cup brown sugar
-
1.5 teaspoons ground cinnamon
-
1/4 teaspoon ground nutmeg
-
Pinch ground cloves or allspice
-
1 cup all-purpose flour
-
1/2 cup brown sugar
-
1/2 cup rolled oats (optional)
-
1/2 cup cold unsalted butter, diced
-
1/2 cup chopped walnuts or pecans (optional)
Instructions
-
Step 1
Preheat oven to 375°F (190°C). Prepare a 9×13 inch baking dish. Peel, core, and slice 6-8 crisp apples. -
Step 2
In a large bowl, combine sliced apples with 1 tablespoon lemon juice, the first 1/2 cup brown sugar, 1.5 teaspoons ground cinnamon, 1/4 teaspoon ground nutmeg, and a pinch of ground cloves or allspice. Toss gently to ensure all apple slices are evenly coated. -
Step 3
In a separate large mixing bowl, combine 1 cup all-purpose flour, the second 1/2 cup brown sugar, 1/2 cup rolled oats (optional), and 1/2 cup chopped walnuts or pecans (optional). Add 1/2 cup cold unsalted butter, diced. Using your fingertips or a pastry blender, cut the butter into the dry ingredients until the mixture resembles coarse breadcrumbs with some pea-sized pieces remaining. -
Step 4
Pour the apple filling into the prepared baking dish, spreading evenly. Generously sprinkle the crumble topping over the apples, ensuring good coverage without pressing down. Place the dish on a foil-lined baking sheet. Bake for approximately 45-60 minutes at 375°F (190°C), until the topping is golden brown and crisp, and the apple filling is visibly bubbling around the edges. If the topping browns too quickly, loosely tent the dish with aluminum foil. -
Step 5
Remove the classic apple crumble from the oven and let it cool on a wire rack for at least 15-20 minutes. This allows the filling to set. Serve warm, on its own or with vanilla ice cream, whipped cream, or warm custard. Store any cooled leftovers covered in the refrigerator for up to 3-4 days, or freeze for up to 2-3 months. Reheat individual servings in the microwave or larger portions in a 350°F (175°C) oven until warmed through.
Important Information
Nutrition Facts (Per Serving)
It is important to consider this information as approximate and not to use it as definitive health advice.
Allergy Information
Please check ingredients for potential allergens and consult a health professional if in doubt.