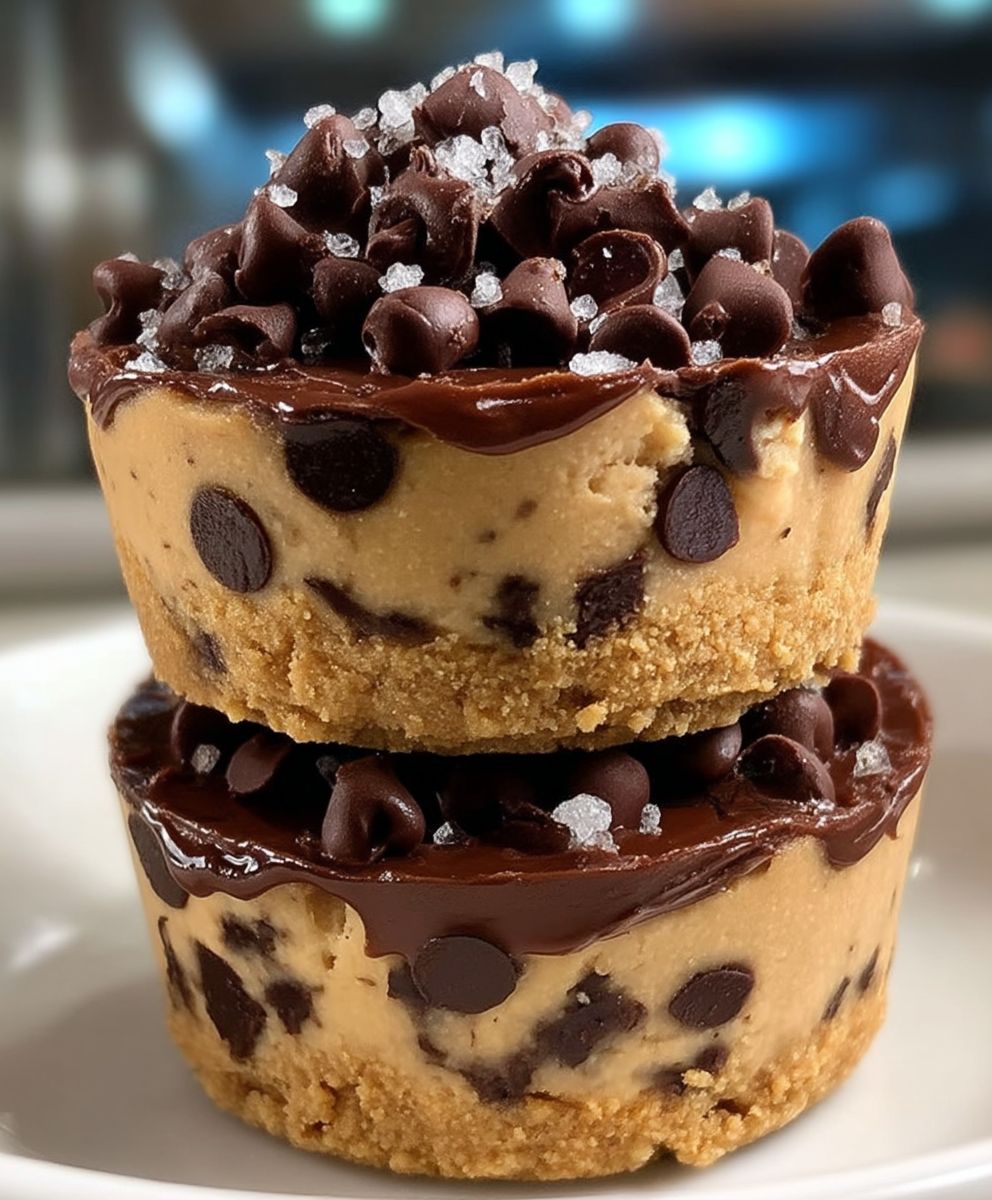
Cookie Dough Cups: Prepare to have your dessert dreams come true! Imagine biting into a perfectly formed, miniature cup filled with the most decadent, safe-to-eat cookie dough imaginable. These aren’t just any ordinary treats; they’re a delightful explosion of textures and flavors that will leave you craving more.
While the exact origins of edible cookie dough are debated, its popularity exploded in recent years as people sought a safe and delicious way to enjoy the irresistible taste of raw cookie dough without the risks associated with raw eggs and flour. This craving for that classic flavor led to innovative creations like our Cookie Dough Cups, offering a convenient and portion-controlled way to indulge.
What makes these little cups so irresistible? It’s the perfect combination of a slightly crisp, buttery exterior and a soft, chewy, chocolate-studded interior. They’re incredibly easy to make, requiring minimal baking time and simple ingredients you likely already have in your pantry. Whether you’re looking for a quick dessert for a weeknight treat, a fun addition to a party spread, or a delightful gift for a friend, these Cookie Dough Cups are guaranteed to be a crowd-pleaser. Get ready to experience cookie dough bliss in every single bite!

Ingredients:
- For the Cookie Dough:
- 1 cup (2 sticks) unsalted butter, softened
- ¾ cup granulated sugar
- ¾ cup packed light brown sugar
- 2 large eggs
- 1 teaspoon vanilla extract
- 2 ¼ cups all-purpose flour
- 1 teaspoon baking soda
- 1 teaspoon salt
- 1 cup semi-sweet chocolate chips
- For the Chocolate Cups:
- 12 ounces semi-sweet chocolate, chopped (or chocolate chips)
- 1 tablespoon coconut oil (optional, for shine)
- Optional Toppings:
- Sprinkles
- Sea salt flakes
- Mini chocolate chips
- Chopped nuts
Making the Chocolate Cups:
- Melt the Chocolate: In a heat-safe bowl set over a saucepan of simmering water (double boiler method), or in the microwave in 30-second intervals, melt the chocolate. If using the microwave, stir well after each interval to prevent burning. Add the coconut oil (if using) to the melted chocolate and stir until smooth and glossy. The coconut oil will give the chocolate a nice shine and help it set more smoothly.
- Prepare the Muffin Tin: Line a 12-cup muffin tin with paper liners. This will make it easier to remove the chocolate cups later. If you don’t have paper liners, you can lightly grease the muffin tin with cooking spray.
- Fill the Liners: Spoon about 1-2 tablespoons of melted chocolate into each paper liner, ensuring the bottom is completely covered. Use the back of a spoon to spread the chocolate up the sides of the liner, creating a cup shape. You want the chocolate to be thick enough to hold the cookie dough filling, so don’t be shy with the chocolate!
- Chill the Cups: Place the muffin tin in the refrigerator for at least 30 minutes, or until the chocolate is completely set. This is crucial for creating a sturdy base for the cookie dough. You can also pop them in the freezer for about 15 minutes for a faster set.
Preparing the Cookie Dough:
- Cream the Butter and Sugars: In a large bowl, cream together the softened butter, granulated sugar, and brown sugar until light and fluffy. This usually takes about 3-5 minutes with an electric mixer. Make sure the butter is truly softened, but not melted, for the best texture.
- Add the Eggs and Vanilla: Beat in the eggs one at a time, then stir in the vanilla extract. Ensure each egg is fully incorporated before adding the next. The vanilla extract enhances the flavor of the cookie dough, so don’t skip it!
- Combine Dry Ingredients: In a separate bowl, whisk together the flour, baking soda, and salt. Whisking ensures that the baking soda and salt are evenly distributed throughout the flour.
- Gradually Add Dry Ingredients to Wet Ingredients: Gradually add the dry ingredients to the wet ingredients, mixing on low speed until just combined. Be careful not to overmix, as this can result in tough cookies. Overmixing develops the gluten in the flour, which can make the cookie dough dense.
- Stir in Chocolate Chips: Fold in the chocolate chips until evenly distributed throughout the cookie dough. I like to use semi-sweet chocolate chips, but you can use any kind you prefer, such as milk chocolate, dark chocolate, or even white chocolate chips.
- Chill the Dough (Optional but Recommended): For best results, cover the bowl with plastic wrap and chill the cookie dough in the refrigerator for at least 30 minutes. This allows the flavors to meld together and prevents the cookies from spreading too much during baking. If you’re short on time, you can skip this step, but the cookie dough cups will be slightly flatter.
Assembling and Baking the Cookie Dough Cups:
- Preheat Oven: Preheat your oven to 350°F (175°C). Make sure your oven rack is in the center position for even baking.
- Remove Chocolate Cups from Refrigerator: Carefully remove the muffin tin with the chocolate cups from the refrigerator.
- Fill the Chocolate Cups: Scoop the cookie dough into the chocolate cups, filling them almost to the top. Don’t overfill them, as the cookie dough will expand during baking. I usually use a small cookie scoop or a spoon to portion the dough.
- Add Optional Toppings: If desired, sprinkle the tops of the cookie dough cups with sprinkles, sea salt flakes, mini chocolate chips, or chopped nuts. This adds a nice visual appeal and extra flavor.
- Bake: Bake for 15-20 minutes, or until the cookie dough is golden brown around the edges and set in the center. The baking time may vary depending on your oven, so keep a close eye on them.
- Cool: Remove the muffin tin from the oven and let the cookie dough cups cool in the tin for a few minutes before carefully removing them from the paper liners.
- Cool Completely: Transfer the cookie dough cups to a wire rack to cool completely. This will prevent them from sticking to the liners and allow the chocolate to fully set.
Tips and Variations:
- Use High-Quality Chocolate: The quality of the chocolate will greatly impact the taste of the chocolate cups. Use a good quality semi-sweet chocolate for the best flavor.
- Add Different Extracts: Experiment with different extracts in the cookie dough, such as almond extract, peppermint extract, or even a hint of orange extract.
- Mix-Ins: Get creative with the mix-ins! Try adding chopped pretzels, toffee bits, or even dried fruit to the cookie dough.
- Different Chocolate: Use different types of chocolate for the cups, such as dark chocolate, milk chocolate, or even white chocolate. You can also swirl different types of chocolate together for a marbled effect.
- Peanut Butter Cups: For a peanut butter twist, add a layer of peanut butter to the bottom of the chocolate cups before adding the cookie dough.
- Salted Caramel: Drizzle salted caramel sauce over the baked cookie dough cups for an extra decadent treat.
- Storage: Store the cookie dough cups in an airtight container at room temperature for up to 3 days, or in the refrigerator for up to a week. They can also be frozen for longer storage.
- Raw Cookie Dough: While this recipe bakes the cookie dough, it’s important to note that consuming raw cookie dough can pose a risk of salmonella poisoning due to the raw eggs. If you’re concerned about this, you can use pasteurized eggs or find a recipe for egg-free cookie dough.
- Even Baking: To ensure even baking, rotate the muffin tin halfway through the baking time. This will help prevent some of the cups from browning too quickly.
- Preventing Spreading: If you find that your cookie dough is spreading too much during baking, try chilling it for a longer period of time. You can also add a tablespoon or two of flour to the dough to help thicken it.
- Melting Chocolate Tips: When melting chocolate, be careful not to overheat it, as this can cause it to seize up. If the chocolate starts to seize, try adding a teaspoon of vegetable oil or shortening to help smooth it out.
- Vegan Option: To make this recipe vegan, substitute the butter with vegan butter, the eggs with flax eggs (1 tablespoon ground flaxseed mixed with 3 tablespoons water per egg), and use vegan chocolate chips.
Enjoy your delicious homemade Cookie Dough Cups! They’re perfect for parties, holidays, or just a sweet treat any time of day. I hope you love this recipe as much as I do!
Conclusion:
So there you have it! These Cookie Dough Cups are truly a must-try for anyone with a sweet tooth, and honestly, who doesn’t have one? The combination of that rich, buttery, slightly salty cookie dough with the creamy, decadent chocolate is simply irresistible. It’s the perfect balance of textures and flavors that will leave you wanting more. I know I always do!
But what makes these cups so special? It’s the ease of preparation, the customizable nature, and the sheer joy they bring. Forget spending hours baking batches of cookies; these come together in a fraction of the time, and they’re portion-controlled, which is a bonus (or not, depending on how many you plan to eat!).
Why are these Cookie Dough Cups a must-try? Because they are:
* Incredibly easy to make.
* Require minimal ingredients.
* Offer maximum flavor.
* Completely customizable to your preferences.
* The perfect treat for any occasion (or no occasion at all!).
Now, let’s talk serving suggestions and variations. While these Cookie Dough Cups are divine on their own, there are so many ways to elevate them even further.
* Serving Suggestions: Serve them chilled straight from the refrigerator for a refreshing treat. You can also let them sit at room temperature for a few minutes for a softer, gooier texture. For an extra touch of elegance, top them with a sprinkle of sea salt or a dusting of cocoa powder. They’re also fantastic served alongside a scoop of vanilla ice cream or a dollop of whipped cream. Imagine a warm Cookie Dough Cup melting into a cold scoop of ice cream – pure bliss!
* Variations: This is where you can really get creative! Try using different types of chocolate, like dark chocolate, white chocolate, or even peanut butter chips. You can also add mix-ins to the cookie dough, such as chopped nuts, pretzels, or sprinkles. For a festive twist, use holiday-themed sprinkles or candies. If you’re feeling adventurous, try adding a layer of caramel or peanut butter to the bottom of the cups before adding the cookie dough. For a healthier option, you can substitute some of the butter with applesauce or use whole wheat flour. The possibilities are endless!
* Dietary Considerations: For a vegan version, use vegan butter and chocolate chips. You can also substitute the egg with a flax egg (1 tablespoon of ground flaxseed mixed with 3 tablespoons of water). For a gluten-free version, use gluten-free flour.
I truly believe that everyone should experience the joy of these Cookie Dough Cups. They’re the perfect treat to share with friends and family, or to simply enjoy on your own as a little indulgence.
So, what are you waiting for? Head to your kitchen, gather your ingredients, and get ready to create some magic. I promise you won’t regret it. And when you do, please, please, please share your experience with me! I’d love to hear what variations you tried, what your family thought, and any tips or tricks you discovered along the way. Tag me in your photos on social media – I can’t wait to see your creations! I’m confident that you’ll find this Cookie Dough Cups recipe to be a new favorite. Happy baking (or rather, no-baking)!
Cookie Dough Cups: The Ultimate Guide to Delicious Homemade Treats
Chocolate shell cups filled with soft, chewy chocolate chip cookie dough. A decadent and easy-to-make treat!
Ingredients
- 1 cup (2 sticks) unsalted butter, softened
- ¾ cup granulated sugar
- ¾ cup packed light brown sugar
- 2 large eggs
- 1 teaspoon vanilla extract
- 2 ¼ cups all-purpose flour
- 1 teaspoon baking soda
- 1 teaspoon salt
- 1 cup semi-sweet chocolate chips
- 12 ounces semi-sweet chocolate, chopped (or chocolate chips)
- 1 tablespoon coconut oil (optional, for shine)
- Sprinkles
- Sea salt flakes
- Mini chocolate chips
- Chopped nuts
Instructions
- In a heat-safe bowl set over a saucepan of simmering water (double boiler method), or in the microwave in 30-second intervals, melt the chocolate. If using the microwave, stir well after each interval to prevent burning. Add the coconut oil (if using) to the melted chocolate and stir until smooth and glossy.
- Line a 12-cup muffin tin with paper liners.
- Spoon about 1-2 tablespoons of melted chocolate into each paper liner, ensuring the bottom is completely covered. Use the back of a spoon to spread the chocolate up the sides of the liner, creating a cup shape.
- Place the muffin tin in the refrigerator for at least 30 minutes, or until the chocolate is completely set.
- In a large bowl, cream together the softened butter, granulated sugar, and brown sugar until light and fluffy (3-5 minutes).
- Beat in the eggs one at a time, then stir in the vanilla extract.
- In a separate bowl, whisk together the flour, baking soda, and salt.
- Gradually add the dry ingredients to the wet ingredients, mixing on low speed until just combined.
- Fold in the chocolate chips until evenly distributed throughout the cookie dough.
- Cover and chill the cookie dough in the refrigerator for at least 30 minutes.
- Preheat your oven to 350°F (175°C).
- Carefully remove the muffin tin with the chocolate cups from the refrigerator.
- Scoop the cookie dough into the chocolate cups, filling them almost to the top.
- If desired, sprinkle the tops of the cookie dough cups with sprinkles, sea salt flakes, mini chocolate chips, or chopped nuts.
- Bake for 15-20 minutes, or until the cookie dough is golden brown around the edges and set in the center.
- Remove the muffin tin from the oven and let the cookie dough cups cool in the tin for a few minutes before carefully removing them from the paper liners.
- Transfer the cookie dough cups to a wire rack to cool completely.
Notes
- Use high-quality chocolate for the best flavor.
- Chilling the dough prevents excessive spreading.
- Don’t overmix the cookie dough.
- Be careful not to overheat the chocolate when melting.
- Store in an airtight container at room temperature for up to 3 days or in the refrigerator for up to a week.
- See “Tips and Variations” section above for more ideas!