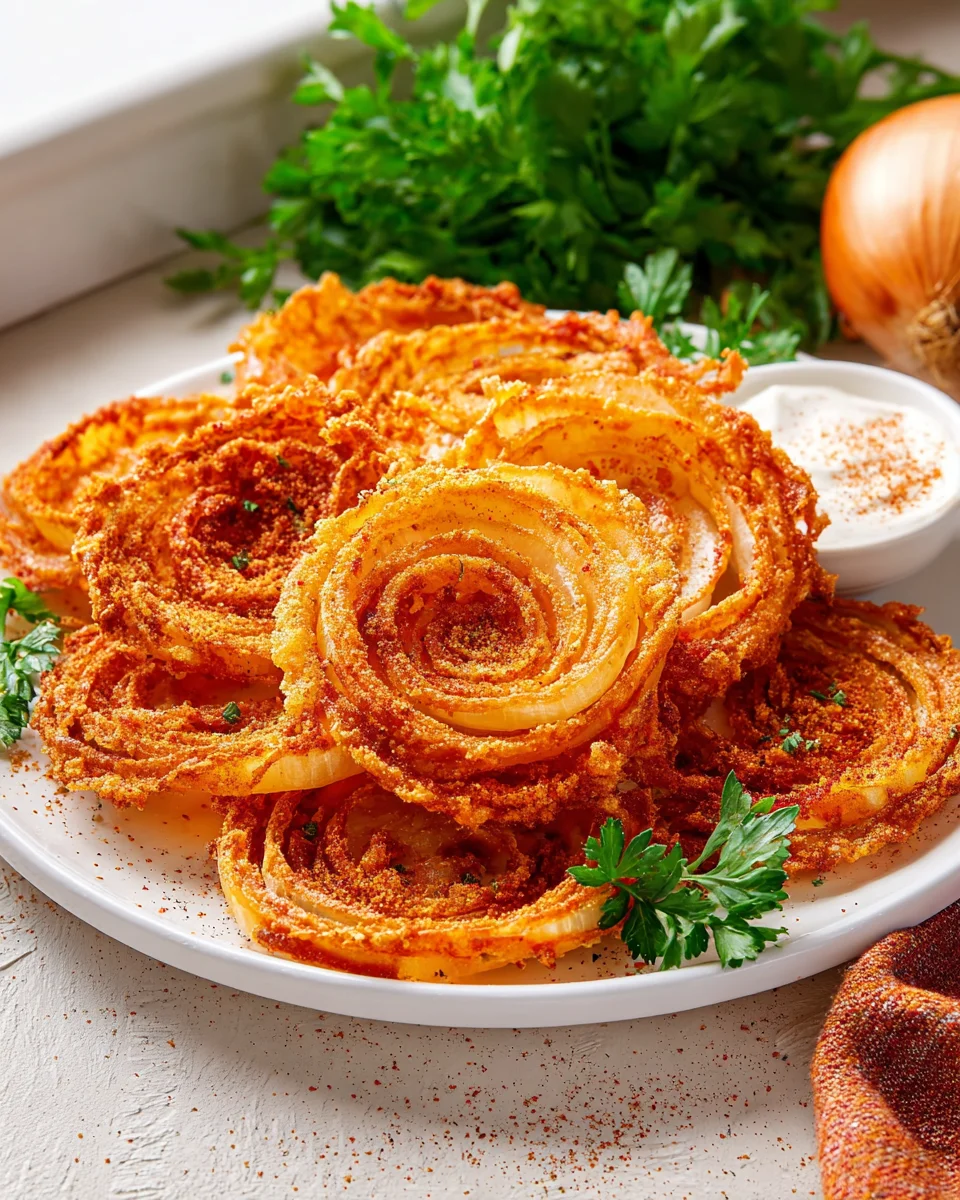
Onion Ring Chips – imagine capturing the irresistible essence of everyone’s favorite crispy side dish and transforming it into a lighter, even more addictive snack! We all know and love the classic onion ring, a staple on diner menus and a much-loved indulgence at barbecues and casual gatherings for generations. Its history is steeped in comfort food lore, offering that perfect balance of sweet, tender onion and a satisfyingly crunchy coating. But what if we could elevate that experience, making it even more versatile and suitable for everyday snacking or elegant appetizers?
That’s precisely what I set out to achieve with this incredible recipe. People absolutely adore these chips because they deliver all the savory, slightly sweet flavor of traditional onion rings but with an unparalleled, delicate crispness that’s simply revolutionary. They are incredibly easy to make, offering a convenient alternative when you’re craving that distinctive onion taste without the fuss of deep-frying. Whether you’re looking for a unique topping for your next burger, a fantastic dipper for your favorite sauces, or just a delightful, guilt-free snack, these Onion Ring Chips are guaranteed to become your new obsession.
Prepare to discover your new favorite snack!

Ingredients:
- 3 large sweet onions (such as Vidalia or Walla Walla), or yellow onions for a sharper flavor
- 1 ½ cups all-purpose flour, divided
- ½ cup cornstarch (this is my secret for extra crispiness!)
- 2 teaspoons fine sea salt, divided, plus more for seasoning after cooking
- 1 teaspoon black pepper, divided
- 1 teaspoon garlic powder
- 1 teaspoon onion powder
- ½ teaspoon smoked paprika (for a lovely hint of smoky flavor and color)
- ¼ teaspoon cayenne pepper (optional, for a little kick)
- 2 large eggs
- ½ cup milk (any kind works, whole milk gives a slightly richer wash)
- 3 cups panko breadcrumbs (these are crucial for that ultimate chip-like crunch)
- Cooking spray or 2-3 tablespoons olive oil (if baking or air frying)
- Optional dipping sauces: ketchup, spicy mayo, ranch dressing, or a homemade aioli
Preparing Your Onions for Perfect “Onion Ring Chips”
- Peel and Slice the Onions: First things first, grab your beautiful onions. Carefully peel away the outer papery layers. Now, this next step is critical for achieving that desired “chip” texture for our Onion Ring Chips. Using a sharp knife or a mandoline (be very careful if using a mandoline!), slice the onions into thin, even rings, aiming for about ⅛ to ¼ inch thick. The thinner they are, the crispier and more chip-like your final result will be. Uniformity is key here for even cooking.
- Separate the Rings: Once sliced, gently separate the onion slices into individual rings. You’ll find a variety of sizes, which is perfectly fine! The smaller inner rings are just as delicious and crispy as the larger outer ones. Place all separated rings into a large bowl.
- The Optional Soaking Step (for milder flavor): If you prefer a milder onion flavor, or if your onions are particularly pungent, you can soak the separated rings in a bowl of ice water for about 15-30 minutes. This helps to reduce the sharp edge of the raw onion. After soaking, make sure to drain them thoroughly and pat them very dry with paper towels. Any excess moisture will prevent the coating from sticking properly and hinder crispness, so don’t skip the drying if you soak!
Setting Up Your Dredging Stations
This is where the magic really begins to happen. We’re going to create a three-station assembly line to ensure every single onion ring is perfectly coated for maximum crunch and flavor. This organized approach makes the process smooth and enjoyable, trust me!
- Prepare the Dry Flour Mix: In a shallow dish or a wide, sturdy plate, combine 1 cup of the all-purpose flour, ½ cup of cornstarch, 1 teaspoon of sea salt, ½ teaspoon of black pepper, the garlic powder, onion powder, smoked paprika, and cayenne pepper (if using). Whisk these ingredients together really well until they are thoroughly combined. This seasoned flour forms the foundational layer of flavor and adhesion for our future “Onion Ring Chips.”
- Create the Egg Wash: In another shallow dish, crack the two large eggs. Add the ½ cup of milk and whisk vigorously with a fork until the eggs and milk are fully combined and slightly frothy. This egg wash acts as the sticky bridge between our dry flour mix and the crispy panko breadcrumbs.
- Season the Panko Breadcrumbs: In a third shallow dish, spread out the 3 cups of panko breadcrumbs. Add the remaining ½ cup of all-purpose flour, 1 teaspoon of sea salt, and ½ teaspoon of black pepper. Mix these together thoroughly with your hands or a fork. The extra flour helps bind the panko better, and seasoning the panko directly ensures every bite of your Onion Ring Chips is flavorful.
Coating Your “Onion Ring Chips” for Ultimate Crispness
This part requires a little patience, but the results are absolutely worth it. A proper coating is the secret to those incredibly crispy, chip-like textures we’re aiming for.
-
The Triple Dip Process: Working with a few onion rings at a time (don’t overcrowd them!), follow this sequence:
- Flour First: Dredge the onion rings in the seasoned flour mix. Make sure each ring is fully coated, then gently shake off any excess flour. We want a thin, even layer here.
- Egg Wash Next: Dip the flour-coated rings into the egg wash. Let any excess drip off briefly. They should be just wet enough to pick up the breadcrumbs.
- Panko Finish: Finally, transfer the rings to the seasoned panko breadcrumbs. Press the panko firmly onto both sides of each onion ring to ensure a thick, even coating. This is where the magic happens for that signature chip-like crunch. Don’t be shy; really press that panko on there!
- Arrange on a Baking Sheet or Air Fryer Basket: As you finish coating each onion ring, place it in a single layer on a parchment-lined baking sheet or directly into your air fryer basket. It is absolutely crucial not to overcrowd the pan or basket. Give each ring space; if they touch, they’ll steam instead of crisp, and we want “chips,” not soggy rings! You might need to work in batches, depending on the size of your equipment.
Cooking Your Crispy “Onion Ring Chips”
Now for the exciting part – transforming those coated rings into golden, crunchy perfection. I’ll provide instructions for both baking and air frying, as both methods yield fantastic, chip-like results without deep-frying.
Method 1: Baking for a Traditional “Chip” Crunch
- Preheat Your Oven: Preheat your oven to 400°F (200°C). Arrange an oven rack in the middle position.
- Prepare for Baking: Once your coated Onion Ring Chips are arranged on the parchment-lined baking sheet, lightly mist them with cooking spray or drizzle very lightly with olive oil. This extra bit of fat helps them brown beautifully and enhances the crisp factor significantly.
- Bake to Golden Perfection: Bake for 15-20 minutes, flipping them halfway through, until they are gloriously golden brown and wonderfully crispy. Keep a close eye on them, as oven temperatures can vary. You might need an extra minute or two depending on how thin your rings are and your oven’s personality. The goal here is a deep golden hue and a firm, crisp texture.
Method 2: Air Frying for Super Quick and Crispy “Onion Ring Chips”
- Preheat Your Air Fryer: Preheat your air fryer to 375°F (190°C) for about 3-5 minutes.
- Arrange in Air Fryer Basket: Place your coated Onion Ring Chips in a single layer in the air fryer basket. Again, do not overcrowd. Lightly mist them with cooking spray or drizzle a tiny bit of olive oil.
- Air Fry Until Crispy: Air fry for 8-12 minutes, shaking the basket or flipping the rings halfway through, until they are beautifully golden, crisp, and irresistible. Air fryers cook quickly, so check on them frequently, especially towards the end. Depending on your air fryer model and the thickness of your rings, cooking times may vary slightly. You’re looking for that unmistakable golden-brown color and a satisfying crunch when you lightly tap them.
The Finishing Touches and Serving Your “Onion Ring Chips”
- Cool Slightly for Maximum Crispness: Once cooked, transfer the Onion Ring Chips to a wire rack set over a baking sheet. This allows air to circulate around them, preventing them from becoming soggy as they cool. They will continue to crisp up as they cool down.
- Season and Serve: While still warm, sprinkle them with a little extra sea salt to taste. Serve your homemade Onion Ring Chips immediately with your favorite dipping sauces. I love them with a classic ketchup, but a spicy mayo or a zesty ranch really elevates the experience. These are best enjoyed fresh, straight from the oven or air fryer, when they are at their absolute crispiest!
Tips for Achieving the Best “Onion Ring Chips”
- Even Slicing is Key: Inconsistent slicing leads to uneven cooking. Thinner rings will crisp faster, while thicker ones might still be a bit soft. Aim for uniform thickness for optimal results.
- Don’t Skip the Cornstarch: This simple addition to the flour mixture makes a noticeable difference in the final crispness of your Onion Ring Chips. It helps create a lighter, crisper crust.
- Press the Panko Firmly: Really take the time to press the panko breadcrumbs onto the onion rings. The more panko that adheres, the crunchier your chips will be.
- Avoid Overcrowding: I cannot stress this enough! Whether baking or air frying, overcrowding traps steam, leading to soggy rings. Cook in batches if necessary. Patience here pays off immensely.
- Spray/Drizzle with Oil: A light coating of oil (either cooking spray or a thin drizzle of olive oil) before cooking is essential for achieving that beautiful golden-brown color and extra crisp texture without deep frying.
- Listen and Look: Pay attention to the sound and appearance. When they’re almost done, you’ll hear a distinct sizzle, and they’ll have a beautiful, deep golden hue.
Variations to Experiment With
- Spicy Kick: Increase the cayenne pepper in the flour mix, or add a pinch of chili powder. You could also mix a bit of sriracha into your egg wash for an extra layer of heat.
- Herby Delight: Add dried herbs like oregano, thyme, or rosemary (finely crushed) to your panko mixture for an aromatic twist.
- Cheesy Goodness: Mix a few tablespoons of finely grated Parmesan cheese into your panko breadcrumbs. The cheese will crisp up beautifully and add a salty, savory depth.
- Gluten-Free Version: Substitute the all-purpose flour with a gluten-free all-purpose flour blend (one that contains xanthan gum works best) and use gluten-free panko breadcrumbs. The process remains the same!
Storage Suggestions
While these Onion Ring Chips are truly best enjoyed immediately, any leftovers can be stored in an airtight container at room temperature for up to 2 days. To re-crisp them, pop them back into a preheated oven at 350°F (175°C) or air fryer at 325°F (160°C) for a few minutes until they are hot and crispy again. Avoid the microwave, as it will make them soft and chewy.
Conclusion:
And there you have it! We’ve journeyed through the simple yet utterly transformative process of creating something truly special in your own kitchen. After all is said and done, I sincerely hope you’re feeling inspired to roll up your sleeves and give this recipe a try. What we’ve explored isn’t just another snack; it’s an experience, a delightful revelation that redefines what a humble onion can become. I promise you, these aren’t just good, they are unforgettable. The perfect blend of crispiness, that delicate savory sweetness from the onion, and a satisfying crunch that makes every bite an absolute joy – it’s a combination that truly elevates the snacking game.
I know, I know, the idea of making chips from scratch might seem a little daunting at first, but trust me when I say the effort is minimal compared to the incredible payoff. You’re not just frying up some vegetables; you’re crafting a culinary masterpiece that boasts a texture and flavor profile far superior to anything you could ever pull from a bag. The moment you pull these golden beauties from the oven or fryer, the aroma alone will tell you you’ve hit gold. That initial warmth, the perfect seasoning, and that glorious crunch – it’s a moment of pure culinary bliss that I truly believe everyone deserves to experience.
Elevate Your Snacking Game: Serving Suggestions & Creative Variations
Now that you’ve mastered the art of making these sensational treats, let’s talk about how to truly make them shine. While they are absolutely divine on their own, straight from the cooling rack, their versatility allows for endless pairing possibilities. Imagine a generous bowl of these crispy delights served alongside your favorite burger or a juicy grilled chicken sandwich – they make for an incredible side dish that outshines traditional fries. Or perhaps you’re hosting a game night? These are the ultimate party snack, guaranteed to disappear faster than you can say “more, please!”
For dipping, the world is your oyster! A classic dollop of ketchup is always welcome, but why not get a little adventurous? My personal favorites include a creamy sriracha mayo for a bit of a kick, a zesty homemade ranch dip, or a sophisticated garlic aioli. For those who love bold flavors, a smoky barbecue sauce or even a sweet chili dip can offer a fantastic contrast to the savory crispness. Don’t be afraid to experiment and find your perfect pairing!
And let’s not forget about variations! The beauty of homemade snacks is how easily you can customize them to your liking. Before frying or baking, consider adding a pinch of smoked paprika for a deeper, more robust flavor, or a dash of cayenne pepper if you crave a fiery zing. A sprinkle of nutritional yeast can give them a cheesy, umami boost without actual cheese, making them perfect for those avoiding dairy. For a different herb twist, finely chopped fresh rosemary or thyme mixed into your coating can introduce an aromatic complexity that’s simply divine. The possibilities are truly boundless, and each small tweak can open up a whole new dimension of flavor for your delightful Onion Ring Chips.
Your Culinary Adventure Awaits! Share Your Success!
So, what are you waiting for? This isn’t just a recipe to read about; it’s a culinary adventure waiting to unfold in your kitchen. I wholeheartedly encourage you to take the plunge, gather your ingredients, and create these magnificent crispy bites for yourself. You’ll be so glad you did, and I have a feeling they’ll quickly become a cherished favorite in your recipe repertoire. There’s an unparalleled satisfaction that comes from creating something so delicious from scratch, something that brings smiles to the faces of everyone who tries it.
Once you’ve experienced the magic, I would absolutely love to hear about it! Please don’t keep your successes to yourself. Share your pictures, tell me about your favorite serving suggestions, or describe any clever variations you came up with. Your experiences and creative twists inspire not just me, but countless other home cooks who are looking for new ways to make everyday meals and snacks extraordinary. Let’s build a community around the joy of cooking and the simple pleasure of a perfectly crispy, homemade treat. Happy cooking, and happy snacking!
Crunchy Onion Ring Chips
Transforming classic onion rings into lighter, more addictive chips with an unparalleled, delicate crispness. Easy to make for everyday snacking or elegant appetizers, delivering savory, slightly sweet flavor with a revolutionary crispness.
Ingredients
Instructions
Important Information
Nutrition Facts (Per Serving)
It is important to consider this information as approximate and not to use it as definitive health advice.
Allergy Information
Please check ingredients for potential allergens and consult a health professional if in doubt.