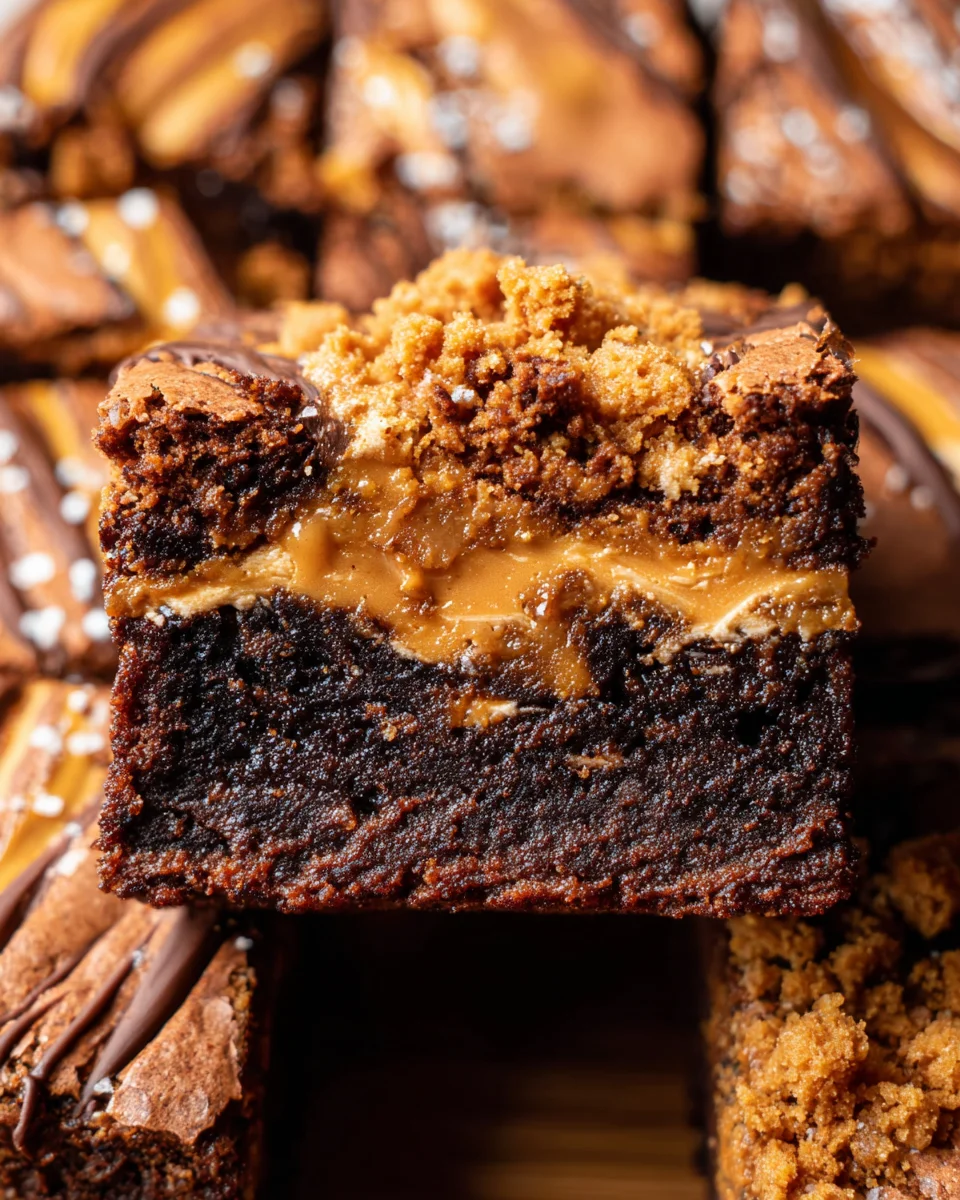
Biscoff Brownies have truly taken the dessert world by storm, and I’m incredibly excited to share with you why! Imagine biting into a decadent, fudgy brownie, only to be met with the warm, spiced notes of caramelized Biscoff spread swirled throughout, topped with crunchy Biscoff cookies. It’s a symphony of flavors and textures that promises to elevate your dessert experience from delightful to absolutely unforgettable. Get ready to immerse yourself in a world where rich chocolate meets the unique charm of a beloved Belgian biscuit.
The magic of Biscoff, originally known as Speculoos, traces its roots back to Belgium and the Netherlands, where these spiced shortcrust cookies were traditionally enjoyed around the festive period of St. Nicholas’ Day. Their unique, caramelised biscuit flavour, derived from specific spices like cinnamon, nutmeg, and ginger, has since captured hearts globally. When combined with the universally loved brownie, it creates a fusion that I find simply irresistible. People adore this dish not just for its rich, chocolatey base, but for the distinctive, comforting taste of Biscoff that cuts through the sweetness, offering a sophisticated twist.
You’ll discover that these aren’t just any ordinary brownies; they are a celebration of flavor and texture.
The buttery crunch of the cookies, the silky-smooth Biscoff spread, and the moist, rich chocolate create an unparalleled culinary delight. This recipe for Biscoff Brownies is a testament to how simple ingredients can come together to form something truly extraordinary. Get ready to bake a batch that is guaranteed to become a new favorite in your recipe repertoire.

Ingredients:
Creating the perfect batch of fudgy, delectable Biscoff Brownies requires a careful selection of ingredients, each playing a crucial role in achieving that rich texture and unique flavor profile. Here’s everything you’ll need for this truly irresistible treat:
- For the Brownie Base:
- 1 cup (226g) unsalted butter, softened slightly
- 1 ½ cups (300g) granulated sugar
- 1 cup (200g) packed light brown sugar
- 4 large eggs, at room temperature
- 2 teaspoons pure vanilla extract
- 1 cup (100g) unsweetened cocoa powder, good quality (Dutch-processed for darker brownies is excellent)
- 1 cup (125g) all-purpose flour
- ½ teaspoon baking powder
- ½ teaspoon salt
- 1 cup (170g) good quality semi-sweet chocolate chips or chopped chocolate (optional, but highly recommended for extra fudginess)
- For the Biscoff Swirl and Topping:
- 1 cup (250g) Biscoff cookie butter spread (also known as Speculoos spread)
- ½ cup (about 60g) Biscoff cookies, crushed into coarse crumbs (for topping)
Preparation & Melting Chocolate
Alright, let’s get started on these incredible Biscoff Brownies! The first few steps are all about setting ourselves up for success and creating that rich, chocolatey foundation.
- First things first, let’s get our oven ready. Preheat your oven to a comfortable 350°F (175°C). It’s essential for a consistent bake, so don’t rush this step.
- Next, prepare your baking pan. I find that an 8×8-inch or 9×13-inch baking pan works best for this recipe, depending on how thick you like your brownies. For an 8×8-inch pan, your brownies will be wonderfully thick and fudgy, while a 9×13-inch pan will yield slightly thinner, but equally delicious, squares. Line your chosen pan with parchment paper, leaving an overhang on two sides. This little trick is a lifesaver later, as it creates convenient “handles” to lift the cooled brownies right out of the pan. Lightly grease the parchment paper and any exposed pan sides with butter or a non-stick cooking spray. This extra layer of grease ensures that even the stickiest bits of brownie won’t adhere to the paper.
- Now, let’s tackle the chocolate. If you’re using semi-sweet chocolate chips or chopped chocolate (and trust me, you absolutely should for an extra fudgy texture and intense chocolate flavor in your Biscoff Brownies), it’s time to melt them. You have a couple of options here.
- Double Boiler Method (my preferred way for control): Place the chocolate chips in a heatproof bowl. Set this bowl over a saucepan filled with about an inch or two of simmering water, ensuring the bottom of the bowl does not touch the water. Stir occasionally until the chocolate is completely melted and smooth. The gentle heat from the steam prevents the chocolate from scorching.
- Microwave Method (quicker, but needs careful attention): Place the chocolate chips in a microwave-safe bowl. Microwave in 20-30 second intervals, stirring well after each interval, until the chocolate is smooth and fully melted. Be very careful not to overheat it, as chocolate can seize up and become grainy if microwaved too long.
Once melted, set the chocolate aside to cool slightly while you prepare the wet ingredients. It should still be liquid, but not piping hot, as we don’t want it to cook our eggs later on.
Mixing the Batter
This is where the magic really starts to happen for our Biscoff Brownies! Getting the batter right is key to that signature fudgy texture and rich flavor.
- In a large mixing bowl, combine the softened unsalted butter with both the granulated sugar and light brown sugar. Using an electric mixer (either a stand mixer with a paddle attachment or a hand mixer), beat them together on medium speed until the mixture is light, fluffy, and pale in color. This creaming process is crucial as it incorporates air, which contributes to the brownie’s texture and prevents them from becoming too dense. Scrape down the sides of the bowl frequently to ensure everything is evenly combined. This typically takes about 2-3 minutes.
- Next, one at a time, beat in the large eggs. Add each egg and mix until it is fully incorporated into the butter-sugar mixture before adding the next. This step helps create an emulsion, leading to a smoother, more stable batter. After all the eggs are in, add the pure vanilla extract. Beat the mixture for another minute or two on medium-high speed. You’ll notice the mixture becoming even lighter and somewhat glossy. It’s a wonderful transformation that sets the stage for truly exceptional Biscoff Brownies.
- Now, remember that slightly cooled melted chocolate from earlier? Gently fold it into the wet ingredients. Pour the melted chocolate into the egg-butter-sugar mixture and mix on low speed, or by hand with a spatula, until just combined. Be careful not to overmix at this stage; we just want to ensure the chocolate is evenly distributed. The aroma at this point is just heavenly!
- In a separate medium bowl, whisk together the dry ingredients: the unsweetened cocoa powder, all-purpose flour, baking powder, and salt. Whisking them together ensures they are well combined and there are no lumps of leavening agent or salt concentrated in one spot. This little step makes a big difference in the final uniformity of your Biscoff Brownies.
- Gradually add the dry ingredient mixture to the wet ingredients. Do this in two or three additions, mixing on low speed or by hand with a rubber spatula until just combined after each addition. The absolute key here is to not overmix. Overmixing develops the gluten in the flour, which can lead to tough, cakey brownies instead of the fudgy perfection we’re aiming for. Stop mixing as soon as you no longer see streaks of dry flour.
- If you opted for extra chocolate chips in the brownie base, now is the time to fold them in. Gently stir them through the batter with a spatula until they are evenly distributed. These chips will melt into delicious pockets of chocolate, enhancing the fudginess of your Biscoff Brownies even further.
- Pour about two-thirds of your rich brownie batter into the prepared baking pan. Use your spatula to spread it evenly into the bottom of the pan. This will form the substantial base layer for our decadent dessert.
Adding the Biscoff Swirl
This is where our Biscoff Brownies truly earn their name! The iconic Biscoff flavor is about to be swirled into glorious fudgy perfection.
- Let’s prepare the Biscoff spread. If your Biscoff cookie butter spread is very thick, you might want to gently warm it slightly to make it more pourable and easier to swirl. You can do this by microwaving it in a microwave-safe bowl for 20-30 seconds, stirring well until it reaches a more liquid consistency. Alternatively, you can place the jar in a bowl of warm water for a few minutes. We want it warm enough to drizzle, but not hot.
- Now, take about half of your warmed Biscoff cookie butter spread and dollop it in spoonfuls over the brownie batter in the pan. Don’t try to spread it out too much at this point; just get it onto the surface.
- Carefully spoon the remaining one-third of the brownie batter over the Biscoff dollops in the pan. Gently spread it out, trying your best not to disturb the Biscoff layer too much, but ensuring it covers most of the Biscoff. It doesn’t have to be perfect.
- Finally, take the remaining half of your warmed Biscoff spread and drizzle or dollop it generously over the top of the second layer of brownie batter.
- Now for the fun part – the swirl! Grab a butter knife or a skewer. Gently drag it through the Biscoff and brownie batter in a swirling motion. You can make figure-eights, zigzags, or just random swirls. The goal is to marble the Biscoff spread into the brownie batter, creating beautiful ribbons of cookie butter goodness throughout your Biscoff Brownies. Don’t overdo it, or the colors will just combine instead of swirl. A few good passes are all you need.
- As a final touch before baking, sprinkle the crushed Biscoff cookies evenly over the swirled top of the batter. These crumbs will add a delightful crunch and an extra boost of that signature spiced cookie flavor to your finished Biscoff Brownies.
Baking the Biscoff Brownies
The moment of truth! Baking these Biscoff Brownies to perfection requires a keen eye and a bit of patience.
- Carefully place your pan of swirled Biscoff Brownies into the preheated 350°F (175°C) oven.
- Bake for approximately 30-35 minutes for an 8×8-inch pan, or 25-30 minutes for a 9×13-inch pan. Baking times can vary quite a bit depending on your specific oven, so it’s always best to keep an eye on them.
How to tell when your Biscoff Brownies are done:
You’re looking for a beautiful, slightly crackled or crinkly top. When you gently shake the pan, the edges should appear set, but the very center should still have a slight wobble. If you insert a toothpick into the center, it should come out with moist crumbs attached, but not wet batter. If it comes out completely clean, your brownies might be a little dry; if it comes out with raw batter, they need more time. Remember, brownies continue to cook slightly from residual heat even after they are removed from the oven, so it’s better to underbake them ever so slightly for maximum fudginess.
- Once your Biscoff Brownies have reached that perfect stage, carefully remove the pan from the oven. The aroma filling your kitchen right now should be absolutely intoxicating!
Cooling & Finishing Touches
Patience is a virtue, especially when it comes to cooling brownies. This final stage is crucial for achieving that ideal fudgy texture and clean slices for your gorgeous Biscoff Brownies.
- Allow the brownies to cool completely in the pan on a wire rack for at least 2-3 hours. Yes, I know it’s hard, but this step is non-negotiable for fudgy brownies that hold their shape. As the brownies cool, their internal structure sets, and the flavors deepen. If you try to cut them while they’re warm, they will likely crumble and be a gooey mess (though a delicious gooey mess, admittedly!). For the absolute best results, I often let mine cool overnight, or pop them in the fridge for an hour once they’re cool enough not to heat up the fridge.
- Once fully cooled, use the parchment paper overhangs as handles to carefully lift the entire slab of Biscoff Brownies out of the pan and transfer it to a cutting board.
- Using a sharp knife, preferably one that’s been run under hot water and wiped dry (this helps with clean cuts), slice your brownies into squares. You can make them as large or as small as you like. For a perfect presentation, wipe your knife clean between each cut.
- Serve your incredible homemade Biscoff Brownies as is, or with a scoop of vanilla ice cream, a drizzle of extra warmed Biscoff spread, or a dollop of whipped cream. They are truly spectacular on their own, too!
- Storage: Store any leftover Biscoff Brownies in an airtight container at room temperature for up to 3-4 days, or in the refrigerator for up to a week. They often taste even better the next day as the flavors meld and deepen.
And there you have it! A truly magnificent batch of Biscoff Brownies, ready to be devoured. Enjoy every single fudgy, spiced, chocolatey bite!
Conclusion:
And there you have it, my friends! We’ve reached the sweet end of our journey with what I truly believe are some of the most extraordinary treats you’ll ever bake. If you’ve been following along, you know that this isn’t just another brownie recipe; it’s an experience, a delightful fusion of classic comfort and an unexpected, warm spice kick that elevates it far beyond the ordinary. I can’t tell you enough how much I adore these, and I’m confident you will too.
Why are these Biscoff Brownies an absolute must-try? Well, for starters, the texture is simply divine – a perfect balance of rich, dense fudginess with those desirable slightly chewy edges that every brownie connoisseur craves. But the real magic, the element that makes them truly unforgettable, comes from the star ingredient: Biscoff. That unique, caramelized biscuit flavor, infused with just the right amount of warm cinnamon and ginger, cuts through the sweetness of the chocolate in the most glorious way. It’s a sophisticated flavor profile that manages to be both comforting and intriguing, making each bite an adventure for your taste buds. They’re incredibly easy to make, yet they taste like something you’d find in a high-end patisserie. Trust me when I say, once you smell them baking, you’ll be utterly captivated.
Elevate Your Brownie Experience with These Serving Ideas
Now, let’s talk about how to best enjoy these glorious creations. While they are undeniably perfect straight out of the pan, still warm and slightly gooey, there are so many ways to take your Biscoff Brownies to the next level. For the ultimate indulgence, serve a warm square with a generous scoop of vanilla bean ice cream, allowing the melting creaminess to mingle with the fudgy brownie. A drizzle of extra melted Biscoff spread or even a touch of salted caramel sauce on top would truly push it into dessert heaven. For a simpler yet equally satisfying treat, a dusting of powdered sugar or a sprinkle of flaky sea salt can enhance their visual appeal and flavor complexity.
Feeling adventurous? Consider incorporating a swirl of cream cheese frosting – plain or Biscoff-flavored – for an extra layer of decadence. You could also chop up some white chocolate chips and fold them into the batter before baking for added sweetness and texture contrast. For those who love a bit of crunch, a handful of toasted pecans or walnuts would be a fantastic addition. These brownies are incredibly versatile, making them perfect for any occasion. Serve them at a dinner party, package them beautifully as homemade gifts, or simply enjoy them with a hot cup of coffee or a cold glass of milk for a moment of personal bliss. They store wonderfully in an airtight container at room temperature for several days, so you can savor them bit by bit, though I doubt they’ll last very long!
Your Culinary Adventure Awaits!
So, what are you waiting for? I wholeheartedly encourage you to dive into your kitchen and give this recipe a try. It’s more than just baking; it’s an act of self-care, a way to bring joy to your home, and an opportunity to create something truly delicious. I promise you won’t regret it. Once you’ve whipped up your batch of these sensational Biscoff Brownies, please, please, please share your experience with me! I absolutely love seeing your creations. Tag me on social media, leave a comment below, or just tell your friends. Let’s spread the Biscoff love and make the world a little fudgier, one incredible brownie at a time!
Decadent Biscoff Brownies
Imagine biting into a decadent, fudgy brownie, only to be met with the warm, spiced notes of caramelized Biscoff spread swirled throughout, topped with crunchy Biscoff cookies. It’s a symphony of flavors and textures that promises to elevate your dessert experience from delightful to absolutely unforgettable.
Ingredients
Instructions
Important Information
Nutrition Facts (Per Serving)
It is important to consider this information as approximate and not to use it as definitive health advice.
Allergy Information
Please check ingredients for potential allergens and consult a health professional if in doubt.