Baked Chimichanga is a culinary delight that promises all the comforting flavors and satisfying textures of its deep-fried cousin, but with a lighter, healthier twist that makes it perfect for any weeknight meal. I know what you might be thinking – can a baked version truly capture that irresistible crunch and molten, savory interior? Absolutely, and I’m thrilled to show you how!
Originating from the Southwestern United States, particularly Arizona, the chimichanga itself is a fascinating evolution of the classic burrito, often said to be created by accident when a burrito mistakenly fell into a deep fryer. While the traditional method involves crisping the tortilla in hot oil, our approach to the Baked Chimichanga embraces modern preferences for lighter fare without compromising on taste or satisfaction. You’ll achieve a golden-brown, beautifully crisp exterior that gives way to a warm, flavorful filling of seasoned meat, beans, and cheese – a truly irresistible combination.
People absolutely adore this dish not just for its incredible taste and wonderful interplay of textures, but also for its versatility and the sheer joy of a guilt-free indulgence. It’s a fantastic way to enjoy a hearty, flavorful meal that feels special, yet is surprisingly straightforward to prepare. Get ready to impress your taste buds and your family with this fantastic recipe!

Ingredients:
-
For the Flavorful Chicken Filling:
- 2 tablespoons olive oil: A good quality olive oil will provide a subtle richness to the base of our filling, ensuring a smooth start to our flavor journey.
- 1 medium yellow onion, finely chopped: The finely diced onion will cook down to create a sweet, aromatic foundation for our chicken. Chopping it finely ensures it practically melts into the sauce.
- 2 cloves garlic, minced: Freshly minced garlic adds an indispensable pungent aroma and depth of flavor that is absolutely essential for this dish.
- 1.5 lbs boneless, skinless chicken breasts or thighs: I often find chicken thighs offer a bit more moisture and richer flavor, but lean chicken breasts work beautifully too for a lighter option. Just make sure they are skinless for this recipe!
- 1 (10-ounce) can Rotel diced tomatoes with green chilies, undrained: This is truly a secret weapon for chimichanga filling, providing both a lovely tomato tang and a gentle warmth from the green chilies. Remember, don’t drain it; we need that flavorful liquid!
- 1 (4-ounce) can diced green chilies, mild or medium, undrained: Another layer of mild, earthy chili flavor to really make the filling sing and deepen its complexity.
- 1/2 cup chicken broth: Adds moisture and helps simmer the chicken to perfect tenderness, ensuring every bite is succulent. Low-sodium is a great choice here to control the overall salt levels.
- 1 tablespoon chili powder: A robust blend of savory and mildly spicy notes, classic and crucial for any Mexican-inspired dish.
- 1 teaspoon ground cumin: Earthy, warm, and slightly pungent, ground cumin is absolutely essential for that authentic, unmistakable Mexican flavor.
- 1/2 teaspoon smoked paprika: Adds a wonderful, subtle smoky depth that elevates the entire dish and complements the other spices beautifully.
- 1/4 teaspoon cayenne pepper (optional, for extra heat): If you, like me, love a little kick, this is your ingredient! Feel free to adjust the amount to your personal spice preference, or omit if you prefer a milder taste.
- Salt and freshly ground black pepper to taste: These are the fundamental seasoning agents, essential for balancing and enhancing all the vibrant flavors.
- 1/2 cup chopped fresh cilantro (optional, for flavor boost): Adds a bright, fresh, herbaceous note that I simply adore in my Mexican cooking. It offers a beautiful contrast.
- 1 cup shredded Monterey Jack or Colby Jack cheese: Melts beautifully into the filling, adding a creamy texture and savory deliciousness that brings everything together.
-
For Assembling the Baked Chimichangas:
- 8-10 large (burrito-sized) flour tortillas (10-inch diameter): These are the foundation of our Baked Chimichangas! Make sure they are fresh, soft, and pliable for easy rolling.
- 2-3 tablespoons olive oil or cooking spray: For brushing the tortillas generously before baking to achieve that irresistible crispy, golden-brown exterior that mimics a fried chimichanga.
- 1/2 cup shredded Monterey Jack or Colby Jack cheese: Reserved for sprinkling on top during the final minutes of baking, creating a glorious, bubbly, and slightly crispy cheesy crust.
-
For Serving (Optional but Highly Recommended!):
- Sour cream or plain Greek yogurt: A cool, tangy counterpoint to the warm, savory chimichangas, offering a refreshing balance.
- Salsa or pico de gallo: Adds fresh, vibrant flavors and a juicy texture, bringing a bright burst of acidity.
- Guacamole or sliced avocado: Creamy, rich, and a classic pairing that adds healthy fats and a smooth texture.
- Extra chopped fresh cilantro: For a final pop of freshness, color, and aromatic appeal.
- Lime wedges: A squeeze of fresh lime juice can surprisingly brighten and tie all the flavors together beautifully, cutting through the richness.
Preparing the Flavorful Chicken Filling
- Sauté Aromatics to Build the Base: Begin our culinary adventure by heating the 2 tablespoons of olive oil in a large, heavy-bottomed skillet or a sturdy Dutch oven over a steady medium heat. Once the oil glistens slightly and appears shimmery, carefully add the finely chopped yellow onion. I always recommend taking the time to chop the onion quite finely; this attention to detail ensures it cooks down smoothly and integrates seamlessly into the filling, providing a lovely sweetness without any noticeable, firm chunks. Sauté the onion for about 5 to 7 minutes, stirring occasionally to prevent any sticking or burning, until it becomes wonderfully soft, translucent, and fragrant. This step is absolutely crucial as it releases the onion’s natural sugars and sets a delicious aromatic foundation that will underpin all the flavors of our chimichanga filling. You’ll know it’s ready when your kitchen starts smelling absolutely fantastic!
- Introduce Garlic and Sear Chicken for Depth: Next, stir in the 2 cloves of minced garlic. Continue to cook for just about 1 minute more, stirring constantly, until the garlic becomes beautifully fragrant and aromatic. Be vigilant here, as minced garlic can turn bitter very quickly if it burns, and we definitely want to avoid that! Then, with care, place the boneless, skinless chicken breasts or thighs into the hot skillet. If your chicken pieces are particularly thick, consider slicing them horizontally to create thinner cutlets; this technique helps them cook more evenly and ensures they absorb all the wonderful flavors better. Sear the chicken for approximately 2 to 3 minutes on each side, just until it achieves a lovely light golden-brown crust. This initial searing step is pivotal for developing a rich depth of flavor and locking in the natural juices, which contributes significantly to the overall deliciousness and succulence of our filling. Remember, we’re not aiming to cook the chicken through completely at this stage, but rather building a foundational layer of savory notes and texture.
- Simmer to Tender Perfection: Now, it’s time to infuse all those wonderful ingredients with incredible flavor! Pour in the entire contents of the 1 (10-ounce) can of Rotel diced tomatoes with green chilies (undrained) – that liquid is pure flavor – along with the 1 (4-ounce) can of diced green chilies (undrained), and the 1/2 cup of chicken broth. Next, generously sprinkle in your dry seasonings: the 1 tablespoon of chili powder, 1 teaspoon of ground cumin, and 1/2 teaspoon of smoked paprika. If you love a little extra warmth and spice, like I often do, now is the perfect moment to add your 1/4 teaspoon of cayenne pepper. Be sure to season generously with salt and freshly ground black pepper to your personal liking. Give everything a good stir to thoroughly combine all the ingredients and ensure the chicken is partially submerged in the flavorful liquid. Bring the mixture to a gentle simmer, then immediately reduce the heat to low, cover the skillet tightly, and let it cook undisturbed for 20 to 25 minutes. The ultimate goal here is for the chicken to become incredibly tender, so much so that it can be easily shredded with a fork. This slow simmering process in the seasoned liquid is absolutely key to achieving moist, flavorful chicken that won’t be dry or tough in your Baked Chimichangas.
- Shred the Chicken with Ease: Once the chicken is thoroughly cooked and wonderfully fork-tender, carefully remove the pieces from the skillet and transfer them to a sturdy cutting board. Using two forks, pull and shred the chicken into bite-sized pieces. This is often the most satisfying part for me, watching the tender chicken practically fall apart with minimal effort! Pro Tip: If you’re tackling a larger batch of chicken or simply want an incredibly fast and efficient method, you can place the warm cooked chicken breasts (after draining off any excess liquid) into the bowl of a stand mixer fitted with the paddle attachment. Turn it on low speed for about 30 seconds, and watch as it magically shreds the chicken for you into perfect, consistent pieces! This technique is a real game-changer and saves a lot of time and effort.
- Combine and Finalize the Filling: Return all the beautifully shredded chicken back into the skillet with the rich, aromatic sauce. Stir everything together thoroughly, making sure every single piece of chicken is coated in that delicious, simmering flavor. Now is a critical moment for any good cook: taste the filling and adjust the seasonings as needed. This is your opportunity to truly make it your own! Perhaps a little more salt is needed to truly bring out all the flavors, another pinch of cumin for added earthiness, or a dash more cayenne if you want to dial up the heat a notch. Remove the skillet from the heat, and immediately stir in the 1 cup of shredded Monterey Jack or Colby Jack cheese until it’s beautifully melted and fully incorporated into the warm chicken mixture. The cheese adds a wonderful, creamy richness and helps to bind the filling together. Finally, if you’re a fan of its bright, fresh taste like I am, gently fold in the 1/2 cup of chopped fresh cilantro. Its vibrant, herbaceous note adds a refreshing contrast to the richness of the filling. Let the filling cool slightly while you prepare your tortillas; this makes it much easier to handle and helps prevent the tortillas from getting soggy too quickly.
Assembling the Perfect Baked Chimichangas
-
Prepare and Warm Your Tortillas: Lay out your large flour tortillas on a clean work surface. This step is absolutely paramount for success: it’s crucial to warm your tortillas slightly before you even think about filling them. Cold tortillas are stiff, less pliable, and brittle, making them incredibly prone to tearing and cracking when you try to fold them. This can lead to messy, unsealed chimichangas that don’t hold their shape during baking. There are several effective ways to achieve perfectly pliable tortillas:
- Microwave Method: For quick results, stack about 3 to 4 tortillas, wrap them loosely in a damp paper towel, and microwave them for 20 to 30 seconds. They should emerge warm and wonderfully flexible. Repeat this process with the remaining tortillas, keeping the warmed ones covered to retain their heat and pliability.
- Oven Method: For a larger batch, a great technique is to wrap a stack of tortillas tightly in aluminum foil and warm them in a preheated 300°F (150°C) oven for approximately 10 to 15 minutes. This gentle, indirect heat warms them through without drying them out.
- Skillet Method: You can also briefly heat each individual tortilla in a dry skillet over medium heat for about 10 to 15 seconds per side. This is a very quick and effective method for a few tortillas but can be a bit more time-consuming if you’re preparing a full batch.
- Preheat Oven and Prep Baking Sheet: While your tortillas are getting nice and warm and flexible, preheat your oven to a robust 400°F (200°C). This higher temperature is specifically chosen to be ideal for achieving that coveted crispy exterior we’re aiming for. Lightly grease a large baking sheet, or for much easier cleanup and guaranteed non-stick results, line it with parchment paper. Ensuring your baking surface is properly prepared is a key step to preventing your chimichangas from sticking and ensuring they brown evenly and beautifully.
- Fill Each Tortilla Thoughtfully: Take one warmed, pliable tortilla and place it on a clean work surface in front of you. Spoon approximately 1/2 to 3/4 cup of the delicious chicken filling slightly below the center of the tortilla. Be very mindful not to overfill! While it might be tempting to pack in as much of that savory filling as possible, doing so will make the chimichangas incredibly difficult to roll neatly and significantly increase the risk of them bursting open and spilling out during baking. Leave about an inch or two of space empty on the sides, and a generous amount of space at the top and bottom of the tortilla. Chef’s Insight: Using a consistent measuring cup or a large scoop for each chimichanga ensures they are all roughly the same size and will cook more uniformly, resulting in a more professional presentation.
-
Mastering the Art of the Fold: This is arguably the most crucial step for creating a professional-looking and structurally sound Baked Chimichanga that holds together perfectly throughout the baking process.
- Fold the Sides Inward: First, take the short ends (the sides of the tortilla closest to the filling, positioned to your left and right) and fold them firmly inward over the filling. Press them down gently to create a neat, somewhat rectangular packet of filling. This effectively creates the “sides” or enclosed ends of your chimichanga.
- Fold the Bottom Up: Next, take the bottom edge of the tortilla (the edge closest to you) and fold it snugly up and over the filling and the already folded side edges. You want to make this fold as tight as possible against the filling, eliminating any air pockets.
- Roll Tightly to Seal: Finally, continue to roll the entire package tightly away from you, rolling towards the top edge of the tortilla. Maintain consistent, firm pressure as you roll to ensure a compact, well-sealed package. When you reach the end, you should have a snug, burrito-like shape that is ready for baking.
Once rolled, immediately place the chimichanga seam-side down on your prepared baking sheet. Positioning them seam-side down is a clever trick; the weight of the chimichanga itself, combined with the heat of the oven, helps to seal the seam securely and prevents it from unraveling or opening up during baking. Repeat this meticulous process with the remaining tortillas and chicken filling, arranging them with a little space in between on the baking sheet to allow for optimal air circulation and even browning.
- Prepare for Golden Baking: With all your chimichangas beautifully assembled and neatly arranged on the baking sheet, it’s time for their final preparation before they head into the oven. Lightly brush the tops and sides of each chimichanga generously with olive oil, or spray them thoroughly and evenly with cooking spray. This thin, even layer of oil is absolutely essential for achieving that glorious golden-brown and wonderfully crispy exterior that perfectly mimics a traditional fried chimichanga, but with a fraction of the oil and without the fuss and mess of deep-frying. This oil promotes uniform browning, contributes to the irresistible crunch, and adds to the overall textural appeal of your Baked Chimichangas.
Baking for Golden Crispy Perfection
-
Bake Until Irresistibly Golden: Carefully slide the baking sheet, laden with your perfectly assembled chimichangas, into your preheated 400°F (200°C) oven. Bake them for approximately 20 to 25 minutes. During this time, you’ll witness a delightful transformation as the tortillas turn a beautiful golden brown and develop a satisfying crispness that is simply irresistible. For the ultimate, all-around crispiness, I highly recommend gently flipping the chimichangas halfway through the baking process (around the 12 to 15-minute mark). This ensures that both sides get equal exposure to the heat, resulting in a more uniform crunch and an even golden color. However, if your oven bakes very evenly, or if you prefer less handling, baking them seam-side down for the entire duration will still yield a wonderfully delicious result, albeit with a slightly softer bottom. The ultimate goal here is a deeply golden, visibly crispy exterior.
How to Check for Doneness: While our flavorful filling is already cooked, we want to ensure the chimichangas are thoroughly heated through to their core. You can carefully press the chimichanga with tongs; it should feel firm and crispy. If you have a reliable food thermometer, you can gently insert it into the center of the filling; the internal temperature should register at least 165°F (74°C). - Optional (But Highly Recommended!) – The Cheesy Finish: For an extra layer of irresistible cheesy goodness, you absolutely must try this step! During the last 5 minutes of baking, carefully pull the baking sheet out of the oven. Generously sprinkle the remaining 1/2 cup of shredded Monterey Jack or Colby Jack cheese evenly over the tops of all the baked chimichangas. Return them to the oven for those final few minutes. This allows the cheese to melt into a wonderfully gooey, bubbly layer that crisps up slightly as it browns, creating an appealing golden crust and adding another fantastic dimension of flavor and texture to your chimichangas. It’s a simple touch that truly makes a big difference!
- The Importance of Resting Before Serving: Once your Baked Chimichangas have reached that perfect golden, crispy state, carefully remove the baking sheet from the oven. As tempting as it is to dig in immediately, resist the urge! It’s important to let the chimichangas rest for about 5 to 10 minutes before you serve them. This short resting period is vital for a couple of key reasons: it allows the incredibly hot filling to set slightly, preventing it from spilling out uncontrollably when you cut into them, and it also allows the crispy tortillas to firm up a bit more, enhancing their overall texture and making them easier to handle. Patience, my friend, will definitely be rewarded with a more enjoyable eating experience!
Serving Your Delicious Baked Chimichangas
- Garnish and Serve Hot: After their brief, well-deserved rest, carefully transfer your magnificent Baked Chimichangas to individual plates. They are absolutely at their best when served hot and fresh from the oven, allowing you to fully appreciate their crispy texture and warm, incredibly savory filling. The aromas filling your kitchen right now should be absolutely incredible and truly inviting!
- Offer a Bounty of Toppings: Encourage everyone at the table to customize their chimichangas with an array of their favorite toppings. A generous dollop of cool sour cream or plain Greek yogurt offers a delightful, tangy contrast to the warm, spicy filling, providing a refreshing balance to every bite. A spoonful of fresh salsa or vibrant pico de gallo adds a burst of juicy freshness and acidity, brilliantly brightening the overall flavor profile. And of course, no Mexican-inspired meal is truly complete without the creamy richness of perfectly ripe guacamole or simply sliced avocado, which adds healthy fats and a smooth, luxurious texture. For a final, refreshing flourish, don’t forget to sprinkle on some extra chopped fresh cilantro for a vibrant color and aromatic appeal. Lastly, always include those lime wedges; a squeeze of fresh lime juice can surprisingly enhance and tie all the diverse flavors together beautifully, cutting through the richness.
- Perfect Pairings for a Complete Meal: While these Baked Chimichangas are certainly hearty and satisfying enough to stand alone as a complete meal, they also pair wonderfully with a few simple side dishes to create an even more fulfilling and balanced dining experience. Think a side of fluffy Mexican rice, a bowl of well-seasoned black beans (either whole or refried), or a crisp, fresh green salad tossed with a zesty vinaigrette to cut through the richness. These thoughtful accompaniments not only fill out the plate but also complement the complex flavors of the chimichangas beautifully, making for a truly memorable meal.
- Storage and Reheating for Later Enjoyment: Should you (miraculously, because they’re so delicious!) find yourself with any leftover Baked Chimichangas – a rare occurrence in my house – proper storage is absolutely key to preserving their deliciousness and texture. Allow the chimichangas to cool completely to room temperature. Then, store them in an airtight container in the refrigerator for up to 3 to 4 days. When you’re ready to enjoy them again, reheating them properly will help retain their coveted crispy texture. For the best results and to regain that desirable crispiness, I highly recommend placing them on a baking sheet and warming them in a preheated oven at 350°F (175°C) for 10 to 15 minutes, or until they are heated through and the tortilla crisps up again beautifully. While microwaving is an option for sheer speed, be aware that it will almost always result in a softer, chewier texture rather than the lovely crispiness we worked so hard to achieve during the initial bake. An air fryer is also an excellent option for reheating, providing a similar crispy outcome to the oven in less time. Enjoy every last bite!
Conclusion:
So there you have it, my friends! We’ve journeyed through the simple steps to create a dish that truly stands out, one that promises to become a cherished addition to your culinary repertoire. This Baked Chimichanga recipe isn’t just another meal; it’s a revelation. It takes all the irresistible flavors and comforting warmth of a classic, deep-fried chimichanga and transforms it into a guilt-free, equally delicious, and undeniably satisfying experience. I’ve found that it consistently delivers that perfect crunch without the heavy oil, making it a fantastic choice for weeknight dinners, lively weekend gatherings, or even a delightful packed lunch that will be the envy of your office. It’s the kind of dish that makes you feel good, both while you’re eating it and long after, proving that healthier alternatives can be just as, if not more, enjoyable.
Why This Recipe is a Must-Try: Flavor Without the Fuss
What truly makes this recipe a must-try, in my humble opinion, is the masterful balance of textures and tastes, all achieved with minimal effort. Imagine a perfectly seasoned, savory filling, bursting with rich flavors from your chosen ingredients, cradled within a golden-brown, crispy tortilla shell that shatters delightfully with every bite. The oven’s gentle, circulating heat ensures that the filling is piping hot and gloriously melted, while the tortilla develops an incredible crispness that rivals its fried counterpart, but with a wonderfully light finish. There’s no greasy residue, just pure, unadulterated flavor and a satisfying texture that will have everyone reaching for seconds. It’s surprisingly straightforward to assemble, making it accessible even for those busy evenings when you crave something extraordinary without the fuss of complicated techniques or extensive cleanup. Trust me, the joy on your family’s faces when they taste this will be all the convincing you need to make it a regular on your menu.
Elevate Your Meal: Delicious Serving Suggestions
Now, let’s talk about enhancing your culinary masterpiece. While incredible on its own, a well-chosen accompaniment can elevate your meal to new heights, adding layers of flavor and texture. For a classic spread that truly hits the spot, I love serving my baked chimichangas alongside a vibrant medley of fresh toppings: think a generous dollop of cool sour cream or a healthier Greek yogurt, a chunky homemade salsa bursting with ripe tomatoes, red onion, and fresh cilantro, and a creamy, rich guacamole made from perfectly ripe avocados. A simple side of fluffy Mexican rice or perfectly seasoned black beans always makes for a hearty, complete meal that satisfies every craving. For a lighter touch, a crisp green salad with a zesty lime vinaigrette offers a refreshing contrast to the rich flavors, cutting through the richness beautifully. And don’t forget the hot sauce! A few dashes of your favorite fiery condiment will add a delightful kick that some, like me, simply can’t do without. These thoughtful additions transform a great dish into an unforgettable dining experience that caters to all palates.
Unleash Your Creativity: Exciting Variations to Try
The beauty of this recipe truly lies in its incredible versatility. Don’t feel limited to the traditional! This recipe provides a fantastic canvas for your culinary creativity, allowing you to customize it to your heart’s content. For the filling, consider swapping out the ground beef for succulent shredded chicken, savory pulled pork, or even a hearty vegetarian mix of seasoned black beans, sweet corn, and colorful bell peppers for a meatless marvel. Experiment with different cheese blends – a fiery Monterey Jack, a smoky sharp cheddar, or a mild queso fresco can each bring a unique character and melt factor to your chimichanga. You could even incorporate some finely diced jalapeños, a pinch of smoked paprika, or a dash of chipotle powder into the filling for an extra layer of flavor and warmth. To make your Baked Chimichanga truly your own, try different salsas – a sweet and tangy mango salsa for a tropical twist, or a fiery habanero salsa for the truly adventurous. These small tweaks ensure that you can enjoy this dish time and time again, always with a fresh and exciting spin. It’s also surprisingly make-ahead friendly; assemble them, cover tightly, and refrigerate or freeze before baking, making meal prep a breeze for busy weekdays or entertaining.
So, what are you waiting for? I wholeheartedly encourage you to roll up your sleeves, gather your ingredients, and give this incredible recipe a try this week. Experience firsthand the satisfying crunch, the savory filling, and the sheer joy of creating something so delicious and wholesome from scratch. Cooking should be an adventure, a chance to nourish yourself and your loved ones, and this recipe perfectly embodies that spirit. Once you’ve had a chance to savor your homemade creation, I would absolutely love to hear about your experience! Please share your thoughts, your personal twists, and even photos of your glorious chimichangas in the comments below or on social media. Your feedback and creativity inspire me and our whole cooking community. Happy cooking, and I can’t wait to see what amazing variations you come up with!
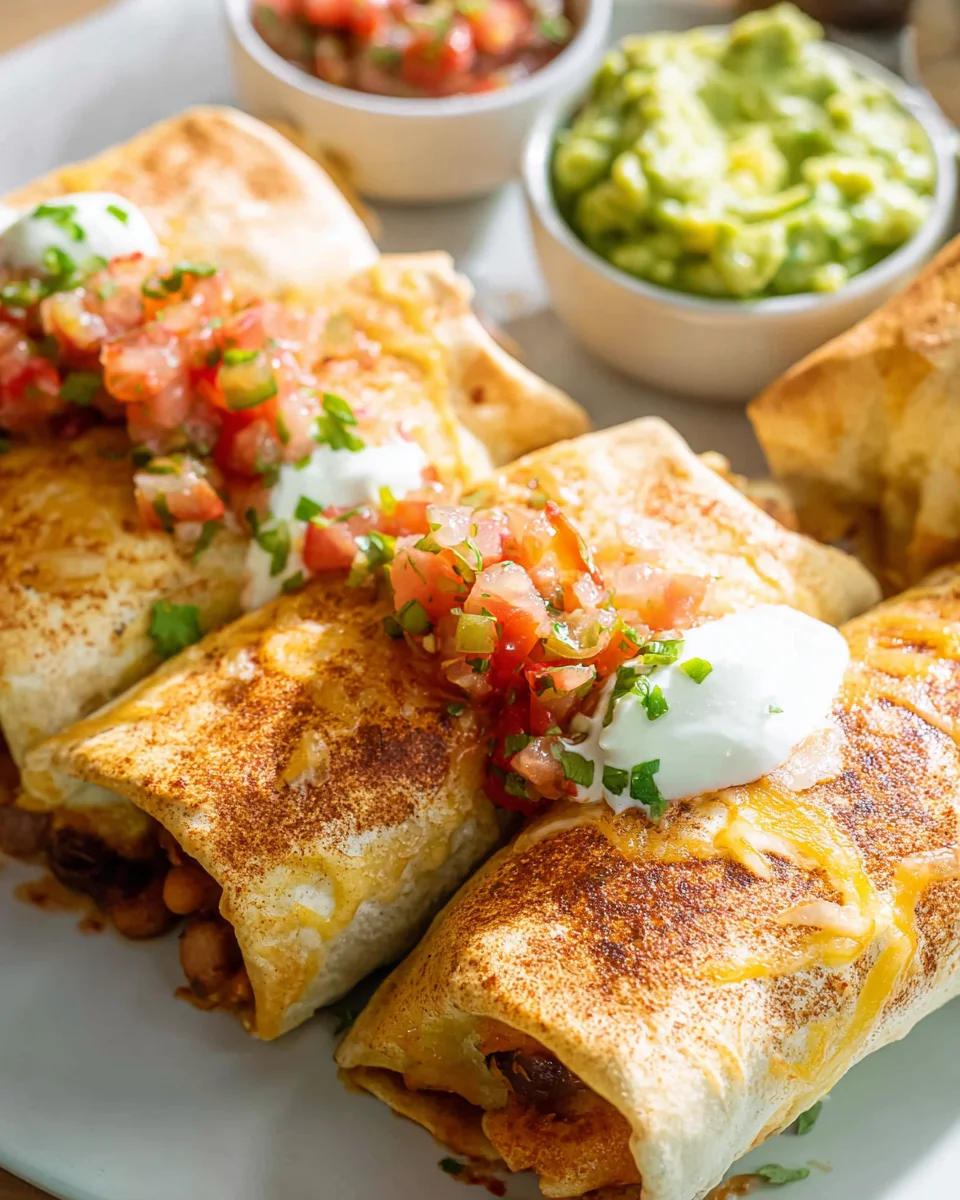
Baked Chicken Chimichanga
Baked Chimichanga is a culinary delight that promises all the comforting flavors and satisfying textures of its deep-fried cousin, but with a lighter, healthier twist. Achieve a golden-brown, crisp exterior with a warm, flavorful filling of seasoned chicken, beans, and cheese, perfect for any weeknight meal.
Ingredients
Instructions
Important Information
Nutrition Facts (Per Serving)
It is important to consider this information as approximate and not to use it as definitive health advice.
Allergy Information
Please check ingredients for potential allergens and consult a health professional if in doubt.