Easter Dirt Cake Casserole
As spring blossoms and Easter approaches, there’s nothing quite like gathering friends and family around a deliciously fun dessert that captures the spirit of the season. That’s where my beloved Easter Dirt Cake Casserole comes into play! This delightful dish is a playful twist on the classic dirt cake, transforming it into a charming casserole that’s perfect for sharing at your holiday gatherings.
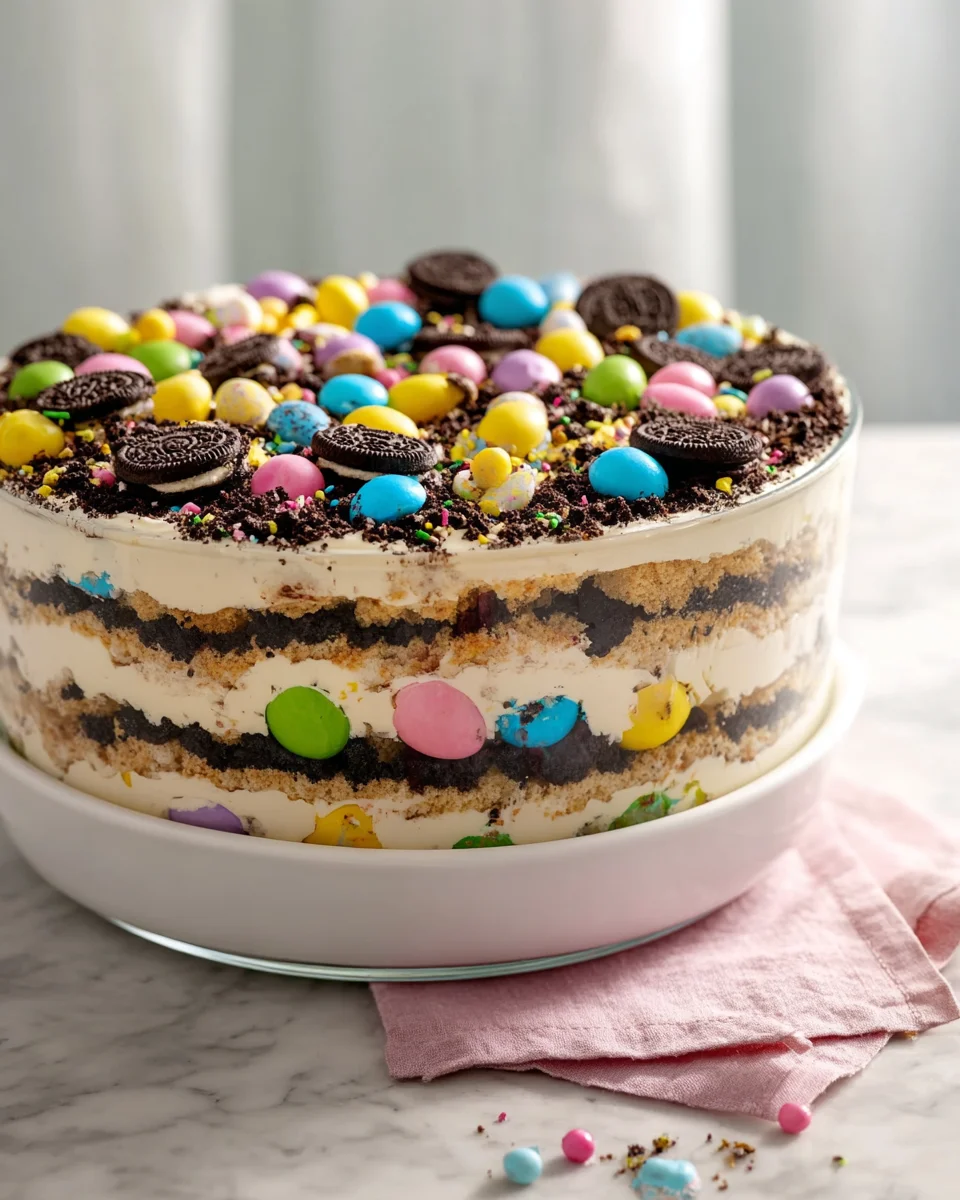
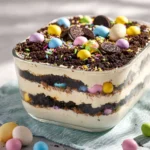
What makes this recipe so special is its combination of creamy layers, crunchy crushed cookies, and vibrant candy decorations that mimic a garden in full bloom. Imagine digging into a fluffy chocolate pudding base, surrounded by layers of whipped cream and topped with crushed Oreo cookies that resemble, you guessed it, dirt! And let’s not forget the adorable gummy worms and colorful edible flowers that add a festive touch, making it an instant hit with kids and adults alike.
Readers will love how easy it is to prepare, allowing you to focus on making memories rather than spending all day in the kitchen. Plus, the playful presentation of the Easter Dirt Cake Casserole sparks joy and brings out the inner child in everyone. So, let’s roll up our sleeves and get ready to create a show-stopping dessert that will have everyone asking for seconds!

Ingredient Notes
When making an Easter Dirt Cake Casserole, there are a few key ingredients that you’ll want to gather. This dessert is a delightful combination of flavors and textures that really captures the spirit of Easter. Here’s what you’ll need:
- Chocolate Sandwich Cookies: The classic choice for this dessert is Oreos, but feel free to use any chocolate sandwich cookies you love. If you need a gluten-free option, there are gluten-free varieties available.
- Butter: Unsalted butter works best for a balanced flavor, but if you’re in a pinch, you can substitute with margarine.
- Cream Cheese: Make sure to use softened cream cheese for easy mixing. You can substitute with a vegan cream cheese if you prefer a dairy-free option.
- Powdered Sugar: This ingredient sweetens the filling, but you could use a sugar substitute if you’re looking for a healthier option.
- Whipped Topping: I love using Cool Whip for a light texture, but homemade whipped cream will work just as well if you prefer that route.
- Chocolate Pudding Mix: Instant chocolate pudding mix is essential for that rich, chocolatey flavor. You can also try using vanilla pudding for a different twist.
- Milk: Any type of milk works; however, if you’re looking for a non-dairy alternative, almond or coconut milk can be used.
- Easter Candy: For decoration, consider mini chocolate eggs or gummy bunnies. Feel free to get creative with whatever Easter-themed candies you have on hand!
Step-by-Step Instructions
Now that you have your ingredients ready, let’s dive into making this delightful Easter Dirt Cake Casserole.
- Prepare the Cookie Crust: Start by crushing the chocolate sandwich cookies into fine crumbs. You can do this by placing them in a resealable plastic bag and crushing them with a rolling pin, or use a food processor. Reserve about 1 cup of the crumbs for topping the casserole.
- Mix the Butter and Crumbs: In a mixing bowl, combine the cookie crumbs with melted butter. Mix until the crumbs are evenly coated and resemble wet sand.
- Layer the Base: Press the cookie and butter mixture into the bottom of a greased 9×13-inch casserole dish. This will be your crust.
- Make the Cream Cheese Filling: In another bowl, beat together the softened cream cheese and powdered sugar until smooth. Fold in the whipped topping until combined.
- Prepare the Pudding: In a separate bowl, whisk together the chocolate pudding mix and milk until thickened. This usually takes about 2 minutes.
- Combine Layers: Spread half of the cream cheese mixture over the cookie crust, followed by a layer of chocolate pudding. Repeat with the remaining cream cheese mixture and finish with the rest of the pudding.
- Top with Cookie Crumbs: Sprinkle the reserved cookie crumbs over the top of the pudding layer. This adds that classic “dirt” look that makes the dish so fun!
- Add Easter Touches: Decorate the top with your choice of Easter candy, arranging them in a fun pattern or simply scattering them for a whimsical look.
- Chill Before Serving: Cover the casserole with plastic wrap and refrigerate for at least 4 hours, or overnight if you have the time. This allows the flavors to meld beautifully.
Tips & Suggestions
Creating the perfect Easter Dirt Cake Casserole can be a breeze with a few helpful tips:
- Make Ahead: This dessert is perfect for making ahead of time. In fact, the flavors improve after a day in the refrigerator, so consider preparing it the day before your Easter gathering.
- Customize the Layers: Feel free to get creative with the fillings. You can add a layer of fruit, like sliced strawberries or bananas, between the cream cheese and pudding layers for a refreshing twist.
- Kid-Friendly Fun: Involve kids in the decorating process! Let them help sprinkle the cookie crumbs and place the candy on top for a fun family activity.
- Presentation: For a more elegant presentation, consider serving this dessert in individual cups or jars, layering the ingredients for a beautiful display.
Storage
Storing your Easter Dirt Cake Casserole properly will keep it fresh and delicious. Here are some tips:
- Refrigeration: Store any leftovers in an airtight container in the refrigerator. It should stay fresh for about 3-5 days.
- Freezing: While I don’t recommend freezing the entire casserole due to the whipped topping, you can freeze the chocolate pudding layer separately. Just note that the texture may change slightly upon thawing.
- Serving Cold: This dessert is best served cold, so make sure to keep it chilled until you’re ready to serve!
Enjoy creating this delicious and festive Easter Dirt Cake Casserole, perfect for celebrating the holiday with family and friends!
Final Thoughts
If you’re looking for the perfect dessert to brighten up your Easter celebrations, look no further than the Easter Dirt Cake Casserole. This delightful treat combines creamy layers of pudding and whipped topping with rich chocolate cookies, topped off with colorful Easter candy for that festive touch. It’s not just a feast for the eyes; every bite is a delicious explosion of flavors that both kids and adults will adore. The beauty of the Easter Dirt Cake Casserole is in its simplicity—it’s easy to prepare, making it a stress-free addition to your holiday table. So gather your loved ones, roll up your sleeves, and whip up this charming dessert that will surely become a beloved tradition in your home. Trust me, you won’t want to miss out on the joy of sharing this delightful treat!
Delicious Easter Dirt Cake Casserole Recipe for Spring Fun
- Total Time: 20 minutes
- Yield: 12 servings
Description
Gather friends and family around this delightful Easter Dirt Cake Casserole, a playful twist on the classic dirt cake. With creamy layers, crunchy cookies, and vibrant candy decorations, it’s perfect for holiday gatherings.
Ingredients
- Chocolate Sandwich Cookies (e.g., Oreos)
- Unsalted Butter
- Cream Cheese (softened)
- Powdered Sugar
- Whipped Topping (e.g., Cool Whip)
- Chocolate Pudding Mix (instant)
- Milk
- Easter Candy (e.g., mini chocolate eggs, gummy bunnies)
Instructions
- Prepare the Cookie Crust: Start by crushing the chocolate sandwich cookies into fine crumbs. You can do this by placing them in a resealable plastic bag and crushing them with a rolling pin, or use a food processor. Reserve about 1 cup of the crumbs for topping the casserole.
- Mix the Butter and Crumbs: In a mixing bowl, combine the cookie crumbs with melted butter. Mix until the crumbs are evenly coated and resemble wet sand.
- Layer the Base: Press the cookie and butter mixture into the bottom of a greased 9×13-inch casserole dish. This will be your crust.
- Make the Cream Cheese Filling: In another bowl, beat together the softened cream cheese and powdered sugar until smooth. Fold in the whipped topping until combined.
- Prepare the Pudding: In a separate bowl, whisk together the chocolate pudding mix and milk until thickened. This usually takes about 2 minutes.
- Combine Layers: Spread half of the cream cheese mixture over the cookie crust, followed by a layer of chocolate pudding. Repeat with the remaining cream cheese mixture and finish with the rest of the pudding.
- Top with Cookie Crumbs: Sprinkle the reserved cookie crumbs over the top of the pudding layer. This adds that classic 'dirt' look that makes the dish so fun!
- Add Easter Touches: Decorate the top with your choice of Easter candy, arranging them in a fun pattern or simply scattering them for a whimsical look.
- Chill Before Serving: Cover the casserole with plastic wrap and refrigerate for at least 4 hours, or overnight if you have the time. This allows the flavors to meld beautifully.
- Prep Time: 20 mins
- Cook Time: 0 mins
- Category: Dessert
- Method: No-bake
- Cuisine: American
Nutrition
- Serving Size: 1 slice
- Calories: 350
- Sugar: 25 g
- Sodium: 200 mg
- Fat: 18 g
- Saturated Fat: 10 g
- Unsaturated Fat: 6 g
- Trans Fat: 0 g
- Carbohydrates: 45 g
- Fiber: 2 g
- Protein: 4 g
- Cholesterol: 30 mg
Keywords: This dessert is perfect for making ahead of time; the flavors improve after a day in the refrigerator. You can customize the layers by adding fruit like sliced strawberries or bananas for a refreshing twist.