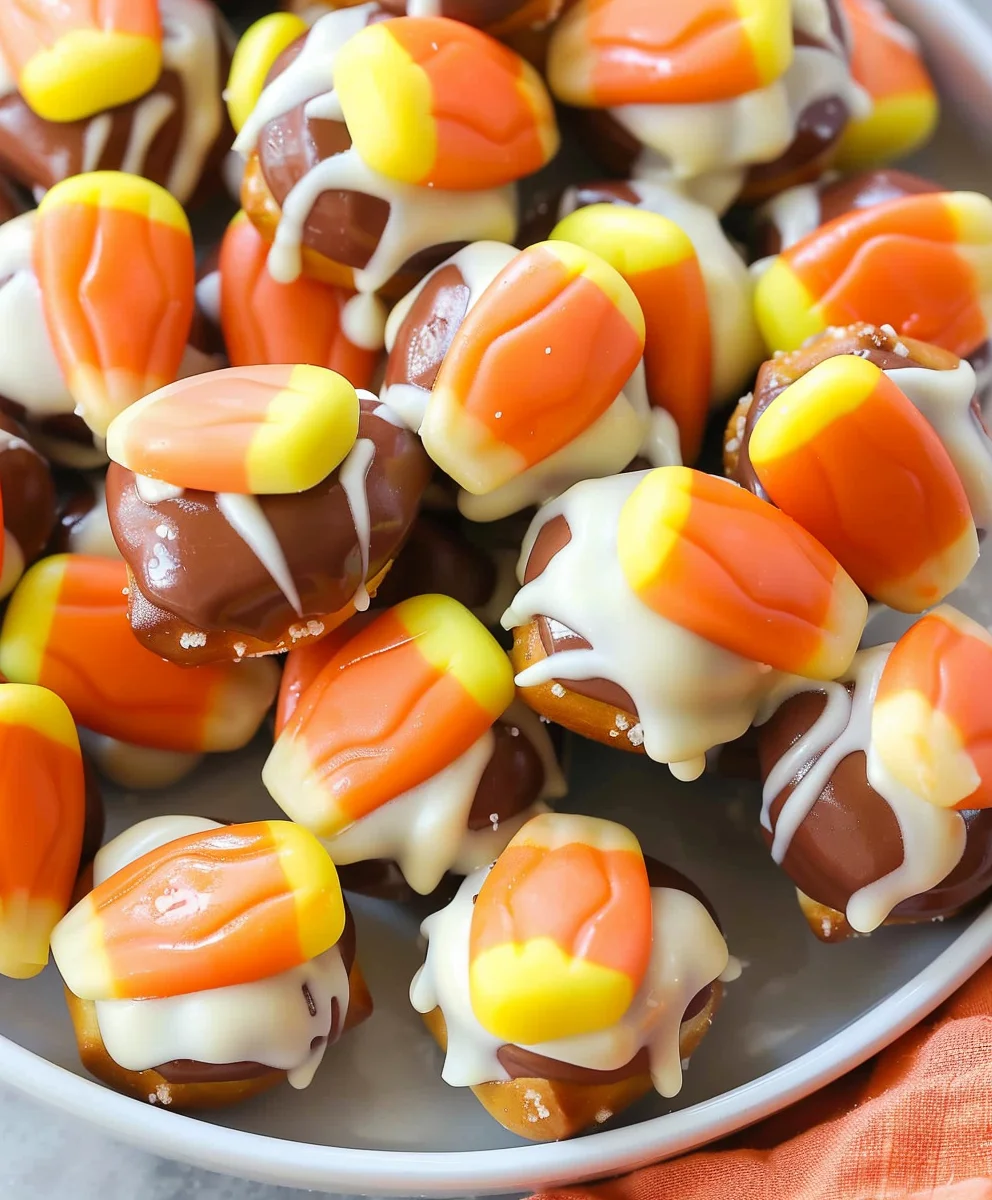
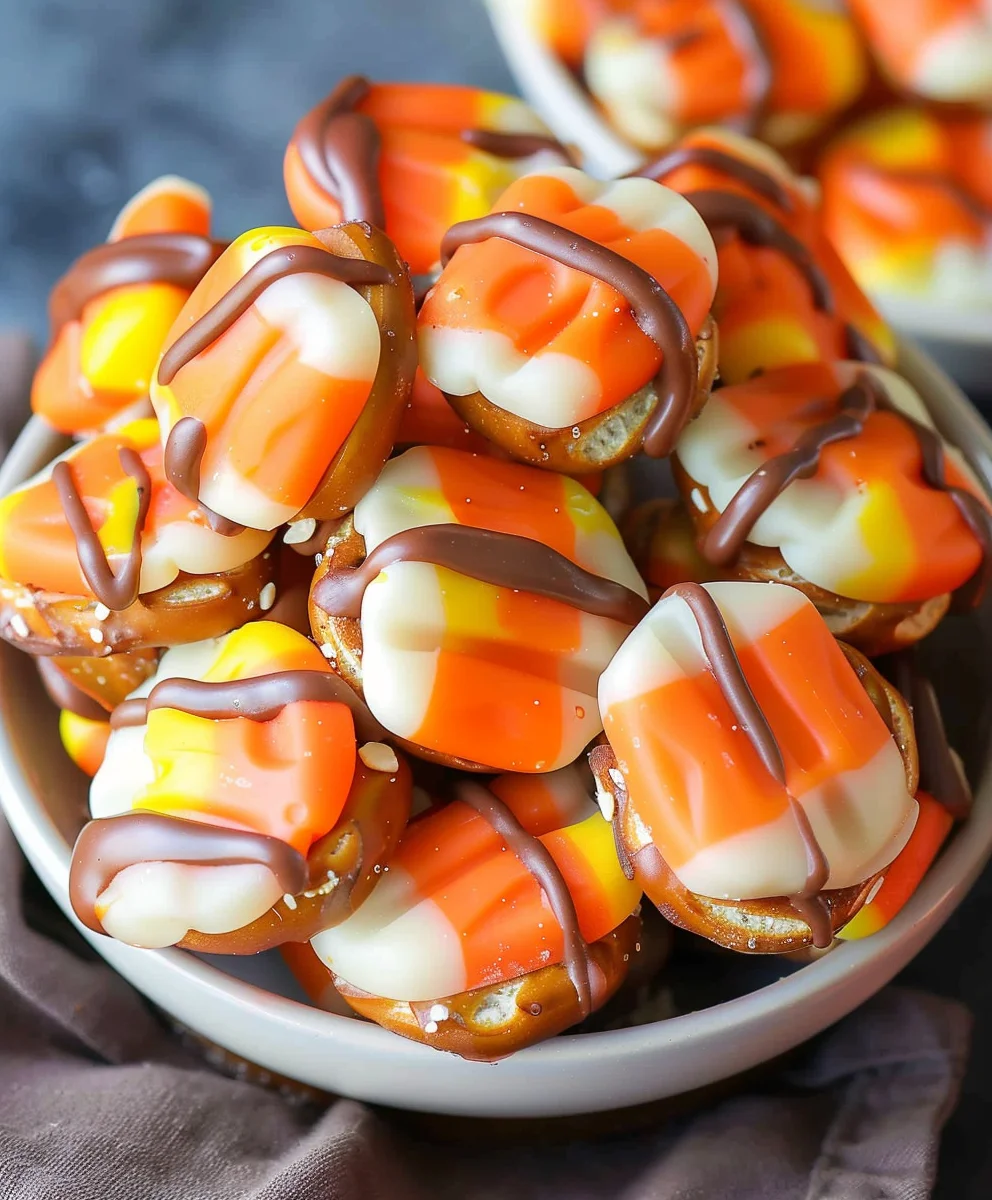
Candy Corn Pretzel Bites are, without a doubt, one of my favorite discoveries for the autumn season. Imagine sinking your teeth into a perfectly balanced treat where the salty crunch of a pretzel meets the creamy sweetness of white chocolate, all crowned with the iconic, festive charm of candy corn. This delightful no-bake confection isn’t just a snack; it’s a celebration of fall in every single bite, offering an unparalleled combination of textures and flavors that simply can’t be resisted. I’ve found that their visual appeal, with those vibrant orange, yellow, and white hues, makes them an instant hit at any gathering, from casual family nights to elaborate Halloween parties.
What truly makes these treats a sensation is their remarkable simplicity and the sheer joy they bring. While candy corn itself has a rich history as a beloved American Halloween staple, transforming it into these easy-to-assemble Candy Corn Pretzel Bites elevates its charm to a whole new level. People adore this dish not only for its irresistible sweet-and-salty harmony but also for the incredible convenience it offers. They require minimal effort and absolutely no baking, making them an ideal last-minute snack or a fun activity to share with loved ones. Each bite delivers that satisfying crunch followed by a smooth, melting sweetness, creating a truly memorable experience that embodies the spirit of autumn.

Ingredients:
- 1 bag (10-12 ounces) mini pretzel twists or square snap pretzels: I usually go for the square snaps because they provide a nice, flat canvas for our colorful melts, but mini twists work beautifully too! Just make sure they’re not broken.
- 12 ounces white candy melts or white chocolate melting wafers: These will form the base of our lovely Candy Corn Pretzel Bites. Ghirardelli or Wilton brands are usually reliable choices for smooth melting. You could also use high-quality white chocolate chips, but you might need to add a touch of shortening to get the right consistency.
- 6 ounces yellow candy melts or yellow chocolate melting wafers: This vibrant color is essential for achieving that iconic candy corn look. Again, consistency is key, so good quality melts are recommended.
- 6 ounces orange candy melts or orange chocolate melting wafers: The final hue for our tri-color masterpiece! Make sure your orange and yellow are distinctly different for the best visual appeal in your Candy Corn Pretzel Bites.
- 1 bag (approximately 16 ounces) candy corn: Of course! These are the stars of the show, providing both the aesthetic and a sweet, chewy counterpoint to the salty pretzels. Choose fresh, pliable candy corn for the best results. Stale candy corn can be hard to press into the melted chocolate.
- Optional: A few drops of neutral oil (like vegetable or coconut oil) or paramount crystals: If your candy melts are a bit too thick after melting, a tiny bit of oil or paramount crystals can help thin them out to a perfect dipping consistency without affecting the flavor.
- Parchment paper or silicone baking mats: Absolutely essential for easy cleanup and preventing your Candy Corn Pretzel Bites from sticking. I always line my baking sheets generously.
- Baking sheets: You’ll need a few to lay out your dipped pretzels. Having them ready makes the process much smoother.
- Small, microwave-safe bowls or double boiler setup: We’ll be melting three different colors of candy melts, so having separate bowls is crucial to avoid mixing colors accidentally.
- Small spoons, spatulas, or dipping tools: For stirring the melted candy and for drizzling or spreading.
Preparing Your Workspace for Perfect Candy Corn Pretzel Bites
Before we even think about melting chocolate, let’s get our kitchen ready! This step is often overlooked, but trust me, a well-prepared workspace makes all the difference, especially when working with melting chocolate which sets quickly.
- Clear the Decks: First things first, clear a large, flat surface in your kitchen. I usually designate my kitchen island or a spacious counter for this. You’ll need room for your baking sheets, ingredients, and melting stations.
- Line Those Baking Sheets: Grab several baking sheets – at least two or three – and line them generously with parchment paper or silicone baking mats. This is non-negotiable for easy removal of your finished Candy Corn Pretzel Bites and minimal cleanup. Trust me, trying to pry chocolate-coated pretzels off an unlined sheet is an exercise in frustration!
- Unwrap and Sort: Open your bag of pretzels. If you’re using square snap pretzels, you might want to quickly sort through them to remove any broken pieces. While a few broken ones are inevitable, we want mostly intact pretzels for dipping. For mini twists, just make sure they’re mostly whole.
- Candy Corn Ready: Open your bag of candy corn and have it easily accessible. When you’re dipping, things move quickly, and you don’t want to be fumbling with packaging. You might even want to separate some into a small bowl so they’re within arm’s reach.
- Set Up Your Melting Stations: Arrange your small microwave-safe bowls or your double boiler components. You’ll need three separate melting vessels for the white, yellow, and orange candy melts. Keep small spoons or spatulas designated for each color next to their respective bowls.
- Prepare for Embellishment (Optional): If you plan to add any extra sprinkles (though for true Candy Corn Pretzel Bites, it’s often not necessary), have them in a small dish ready to go. Remember, speed is key once the chocolate is melted.
- Relax and Enjoy the Process: Take a deep breath! Making Candy Corn Pretzel Bites is supposed to be fun. Having everything organized will help reduce any stress and make the process enjoyable.
Melting the Candy Melts: Achieving the Perfect Consistency
This is where the magic begins, transforming solid candy melts into a luscious, dippable coating for our Candy Corn Pretzel Bites. The key here is patience and gentle heat to prevent seizing or burning.
- Start with White Melts: Begin with your white candy melts. Place them in one of your microwave-safe bowls. I find that melting in the microwave is the quickest and easiest method for home cooks, but a double boiler also works wonderfully for a more controlled, gentle heat.
- Microwave Method: If using the microwave, heat the melts in 30-second intervals on 50% power. After each interval, stir the melts thoroughly with a clean, dry spoon or spatula. Even if they don’t look melted, stirring helps distribute the heat. Continue this process until the melts are smooth and creamy. It usually takes about 1.5 to 2.5 minutes total for 12 ounces, but microwaves vary, so always go by feel. Overheating is the enemy here! If your melts become stiff or crumbly, they’ve likely seized, and it’s very difficult to salvage them.
- Double Boiler Method: If using a double boiler, place the melts in the top bowl, ensuring the bottom of the bowl does not touch the simmering water below. Stir constantly until completely melted and smooth. This method offers excellent control, reducing the risk of overheating.
- Check for Consistency: Once melted, the white candy should be smooth, pourable, and free of lumps. If it’s too thick, add a tiny bit of neutral oil (1/4 to 1/2 teaspoon at a time) or a few paramount crystals and stir until you reach the desired consistency. It should be thin enough to coat a pretzel without forming a heavy, gloppy layer.
- Repeat for Yellow and Orange: In separate microwave-safe bowls, repeat the melting process for your yellow and orange candy melts. Use clean spoons for each color to prevent cross-contamination. You’ll be melting less quantity (6 ounces each), so they might melt a bit faster. Keep a close eye on them!
- Maintain Warmth (Optional): If you find your melts are starting to thicken as you work, you can give them a quick 10-15 second burst in the microwave (on 50% power) and stir, or place them back over the double boiler for a moment. This is especially helpful if you’re making a large batch of Candy Corn Pretzel Bites.
Assembling Your Delightful Candy Corn Pretzel Bites
Now for the fun part – transforming simple pretzels into eye-catching Candy Corn Pretzel Bites! This step requires a bit of a steady hand and some swift action, as the candy melts set relatively quickly.
- The White Base Layer: Take one of your pretzels. If you’re using square snaps, I usually hold it by two corners. If using twists, hold it by one of the “loops.” Dip about two-thirds of the pretzel into the melted white candy. You want a good, even coating. Gently tap the pretzel against the side of the bowl or use a clean spoon to remove any excess white candy. This creates a neat base.
- Place on Parchment: Carefully place the dipped pretzel onto your prepared parchment-lined baking sheet. Leave a little space between each pretzel. Continue dipping the remaining pretzels in the white candy until you’ve done as many as you’d like for this batch, or until your white candy starts to thicken too much.
- Quick Chill (Optional but Recommended): Once you have a tray of white-dipped pretzels, you can pop the baking sheet into the refrigerator for 5-10 minutes. This will help the white layer set quickly, making it easier to add the next colors without the white candy running or mixing. Don’t leave them in too long, or they might become too cold, making the subsequent layers difficult to adhere.
- The Sunny Yellow Layer: Once the white layer is set (or at least firm to the touch), it’s time for the yellow. Take a pretzel and dip about half of the remaining exposed part of the pretzel into the yellow candy melts. This means the yellow will slightly overlap the white, leaving a small portion of the pretzel still uncovered. Again, tap off any excess.
- Repeat Yellow: Place the yellow-dipped pretzels back on the parchment paper. Continue with all your pretzels until they have their yellow stripe. If the white layer isn’t fully set, be extra careful not to drag the yellow into the white.
- Another Quick Chill (Optional): A short chill after the yellow layer will again help speed up the process and give you cleaner lines for your Candy Corn Pretzel Bites.
- The Vibrant Orange Tip: Finally, for the last color! Dip the very tip of the pretzel (the last exposed part) into the orange candy melts. You’re aiming for a small, distinct orange stripe. This is usually about 1/4 to 1/3 of the pretzel’s length, depending on the pretzel size and how much room you left.
- Press in the Candy Corn: Immediately after dipping the orange tip, while the orange candy is still wet and pliable, gently press a piece of candy corn onto the orange section. I usually press it directly onto the orange tip, making sure it adheres well. The warmth of the freshly melted orange candy will help the candy corn stick firmly.
- Final Placement: Carefully place the completed Candy Corn Pretzel Bites back onto the parchment-lined baking sheet. Repeat steps 13-20 for all remaining pretzels, working in batches if necessary to ensure the candy melts stay at a good consistency and you have time to press on the candy corn before the candy sets.
Setting and Storing Your Beautiful Candy Corn Pretzel Bites
We’re almost there! Now we just need to let our lovely creations fully set so they’re ready to be enjoyed or shared. Proper setting ensures a clean, non-sticky finish, and correct storage helps maintain their freshness.
- Allow to Fully Set: Once all your Candy Corn Pretzel Bites are assembled and decorated with their candy corn, leave them undisturbed on the parchment-lined baking sheets. You have two options for setting:
- Room Temperature: If your kitchen isn’t too warm or humid, you can simply leave them out at room temperature for about 30-60 minutes. They will firm up nicely on their own.
- Refrigerator: For a faster set, place the baking sheets into the refrigerator for 15-20 minutes. Be careful not to leave them in too long, especially if your refrigerator is very cold, as this can sometimes cause the chocolate to “bloom” (a white, chalky film), although this is more common with real chocolate than candy melts.
The goal is for the candy melts to be completely firm and cool to the touch. They should easily peel off the parchment paper without sticking.
- Peel and Store: Once fully set, gently peel the Candy Corn Pretzel Bites off the parchment paper. They should come off cleanly.
- Short-Term Storage: For immediate enjoyment or serving within a day or two, you can arrange them on a platter or store them in an airtight container at room temperature. Make sure to keep them in a cool, dry place away from direct sunlight, which can melt the candy coating.
- Long-Term Storage: If you’re making these ahead of time or have leftovers (highly unlikely, but one can dream!), store them in an airtight container at room temperature. Layer them between sheets of parchment paper to prevent them from sticking together. They will remain fresh and delicious for up to 1-2 weeks. While you can refrigerate them for longer storage, I generally prefer room temperature storage to maintain the best texture and prevent any condensation issues when they’re brought back out.
- Consider Packaging for Gifts: These Candy Corn Pretzel Bites make wonderful gifts! Once fully set, you can package them in clear cellophane bags tied with festive ribbons, or arrange them in decorative tins. They’re always a hit!
Tips for Perfecting Your Candy Corn Pretzel Bites
Even though this is a relatively simple recipe, a few extra tips can elevate your Candy Corn Pretzel Bites from good to absolutely perfect!
- Don’t Overheat Your Melts: I cannot stress this enough. Overheating candy melts or chocolate is the most common pitfall. It causes them to seize, becoming thick, crumbly, and unusable. Always use low power in the microwave and stir frequently. If using a double boiler, keep the water at a gentle simmer, not a rolling boil.
- Dry Bowls are Key: Ensure all your bowls, spoons, and spatulas are completely dry. Even a tiny drop of water can cause candy melts or chocolate to seize.
- Work in Batches: If you’re making a large quantity of Candy Corn Pretzel Bites, it’s often best to work in smaller batches. Dip a tray’s worth of pretzels, then let them chill slightly, and move on to the next. This prevents your candy melts from cooling and thickening too much before you’ve finished dipping.
- Experiment with Pretzel Shapes: While square snap pretzels offer a great canvas, mini pretzel twists work just as well. The twists offer a different texture and a slightly more rustic look, which can be charming.
- Troubleshooting Thick Melts: If your candy melts do become too thick, try adding a tiny amount of paramount crystals or a neutral oil like coconut or vegetable oil (start with 1/4 teaspoon). Stir well. Add more sparingly if needed until you reach a smooth, dippable consistency.
- Clean Lines with Toothpicks: For extra neatness, you can use a toothpick to gently clean up any messy edges between colors while the candy is still wet. This is a small detail that makes a big visual impact on your Candy Corn Pretzel Bites.
- Consider a Warming Tray: If you plan to make many batches or enjoy dipping frequently, a small electric warming tray designed for candy melts can be a fantastic investment. It keeps your melts at a consistent, perfect dipping temperature.
- Adding Extra Sparkle (Optional): While the classic Candy Corn Pretzel Bites don’t usually feature sprinkles, if you want to add a touch of sparkle, consider adding some fine edible glitter or autumn-themed sprinkles to the wet orange tip before adding the candy corn. Just a little can go a long way.
- Gift Giving: These are fabulous for fall parties, Halloween treats, or as a thoughtful homemade gift. Arrange them in a clear cellophane bag tied with a festive ribbon, or layer them in a cute tin. They’re always a crowd-pleaser and a perfect representation of the season.
- Have Fun! The most important tip is to enjoy the process. These Candy Corn Pretzel Bites are a simple, joyful treat to make, and your enthusiasm will shine through in your delicious creations!
Conclusion:
My friends, after walking you through the simple steps for these delightful treats, I truly hope you’re feeling inspired to get into the kitchen. These aren’t just any snack; they are a truly magical combination of textures and flavors that will surprise and delight everyone who takes a bite. Imagine the perfect balance: the satisfying crunch of a salty pretzel, the smooth, rich melt of chocolate, and that iconic, sweet chewiness of candy corn. It’s a symphony for your taste buds, hitting all the right notes of sweet, salty, and utterly addictive. What makes this recipe a true gem is its incredible ease and speed. You don’t need to be a seasoned baker or possess a pantry full of exotic ingredients. With just three simple components and a few minutes of your time, you can transform ordinary ingredients into something extraordinary. This recipe is your secret weapon for last-minute gatherings, a delightful surprise for school lunchboxes, or simply a comforting treat to brighten your own day. It’s proof that sometimes, the simplest recipes yield the most impressive results.
Seriously, if you’ve been looking for that perfect, no-fuss, crowd-pleasing snack, then these Candy Corn Pretzel Bites are absolutely it. They embody everything wonderful about homemade treats: they’re made with love, they’re incredibly customizable, and they bring instant joy. Forget complicated desserts; this recipe is all about maximizing deliciousness with minimal effort. It’s perfect for busy parents, budding young chefs, or anyone who appreciates a delightful indulgence that doesn’t demand hours of preparation. The vibrant colors of the candy corn also make them visually appealing, especially during the autumn months or for any festive occasion where a pop of color is welcome.
Now, let’s talk about how you can elevate your Candy Corn Pretzel Bites experience or adapt them for different occasions!
Serving Suggestions to Impress
These little wonders are incredibly versatile. Arrange them artfully on a festive platter for your next holiday party, and watch them disappear in minutes. They also make fantastic edible gifts; simply package them in clear cellophane bags tied with a pretty ribbon, and you’ll have thoughtful, homemade presents ready to go. Don’t forget them as a delightful addition to a coffee break or an afternoon tea spread. Imagine pairing the sweet-and-salty crunch with a warm cup of coffee or a soothing herbal tea – pure bliss! For a fun twist, try crushing a few and sprinkling them over a scoop of vanilla ice cream for an instant upgrade to your dessert game. They’re also wonderfully portable, making them ideal for picnics, road trips, or as a welcome snack during long study sessions. The possibilities for sharing these delightful bites are truly endless, and they’re guaranteed to bring smiles wherever they go.
Creative Variations to Explore
This recipe is also a fantastic canvas for your creativity. While the classic candy corn combination is undeniably charming, feel free to experiment! Unleash your inner food artist and make this recipe truly your own.
Chocolate Choices:
Instead of classic milk chocolate, why not try dark chocolate for a richer, more sophisticated bite that beautifully balances the sweetness of the candy corn? Or for an even sweeter, creamier profile that truly melts in your mouth, opt for luxurious white chocolate. During the festive season, you could even use peppermint bark chocolate for a refreshing, minty twist that’s absolutely divine and perfect for holiday gatherings. Imagine customizing batches for different taste preferences – a dark chocolate batch for the connoisseurs and a white chocolate batch for the sweet-toothed!
Topping Transformations:
The beauty of this recipe lies in its incredible adaptability. Swap out the candy corn for other small candies to match any theme or holiday! Think colorful M&M’s in various hues – seasonal colors like vibrant red and green for Christmas, delicate pastels for Easter, or even just the classic rainbow mix for a cheerful everyday treat. Reese’s Pieces would add a delightful peanut butter kick that’s irresistible, or you could try mini marshmallows for a fluffy, gooey texture. Sprinkles are always a winner, especially if you’re making them for a birthday party or a child-friendly event – they add instant fun and visual appeal. For a sophisticated textural contrast, sprinkle on some finely chopped nuts like crunchy pecans, earthy walnuts, or delicate almonds. A drizzle of contrasting chocolate (e.g., elegant white chocolate over rich dark chocolate, or vice versa) after they’ve set can add an extra layer of visual appeal and flavor complexity. You could also try a light sprinkle of flaky sea salt on top of the melted chocolate for an even more pronounced salty-sweet contrast, especially if you’re using darker chocolate. A tiny dollop of gooey caramel on some of them before the candy corn goes on? Oh, absolutely! The possibilities are truly endless, limited only by your imagination and what wonderful ingredients you happen to have in your pantry.
So, what are you waiting for? I wholeheartedly encourage you to give these Candy Corn Pretzel Bites a try. They’re a fantastic, engaging project for kids and adults alike, a wonderful way to unwind and get creative in the kitchen, and an absolute treat to share with loved ones. Once you’ve whipped up your glorious batch, I would be absolutely thrilled to hear about your experience! Did you stick to the classic recipe, or did you get wonderfully creative with your own unique variations? What did your family and friends think of these delightful snacks? Please, don’t be shy – share your mouth-watering photos, your insightful comments, and your unique twists on social media. Tag me if you do, because I genuinely love seeing your culinary creations come to life and hearing your stories. Your valuable feedback and imaginative adaptations inspire not only me but also our entire community of fellow food enthusiasts. Let’s spread the joy of easy, delicious homemade treats together! Happy baking, my friends, and enjoy every single delightful bite!
Easy Candy Corn Pretzel Bites: Fall’s Best Sweet Snack!
These delightful no-bake Candy Corn Pretzel Bites combine the salty crunch of pretzels with creamy chocolate sweetness and festive candy corn. An easy, quick-to-make treat perfect for fall gatherings, Halloween parties, or a fun activity with loved ones.
Ingredients
-
75 miniature bite-sized pretzels
-
75 Hershey’s Kisses (1 12-ounce bag)
-
75 pieces of candy corn
Instructions
-
Step 1
Line 2-3 baking sheets generously with parchment paper. Unwrap all 75 Hershey’s Kisses, and have your pretzels and candy corn easily accessible. -
Step 2
Place unwrapped Hershey’s Kisses in a microwave-safe bowl. Microwave on 50% power for 30-second intervals, stirring thoroughly after each, until completely smooth and melted. This typically takes 1.5-2.5 minutes total; avoid overheating. -
Step 3
Dip each miniature pretzel into the melted Hershey’s chocolate, ensuring it’s well-coated. Gently tap off any excess chocolate. Immediately place the dipped pretzel on a prepared parchment-lined baking sheet. -
Step 4
While the chocolate is still wet and pliable, gently press one piece of candy corn onto the melted chocolate on each pretzel. -
Step 5
Allow the Candy Corn Pretzel Bites to set completely. This can be done at room temperature for 30-60 minutes or in the refrigerator for 15-20 minutes for a faster set. They should be firm and cool to the touch. -
Step 6
Once fully set, gently peel the pretzel bites from the parchment paper. Store them in an airtight container at room temperature for up to 1-2 weeks, layering with parchment paper to prevent sticking.
Important Information
Nutrition Facts (Per Serving)
It is important to consider this information as approximate and not to use it as definitive health advice.
Allergy Information
Please check ingredients for potential allergens and consult a health professional if in doubt.