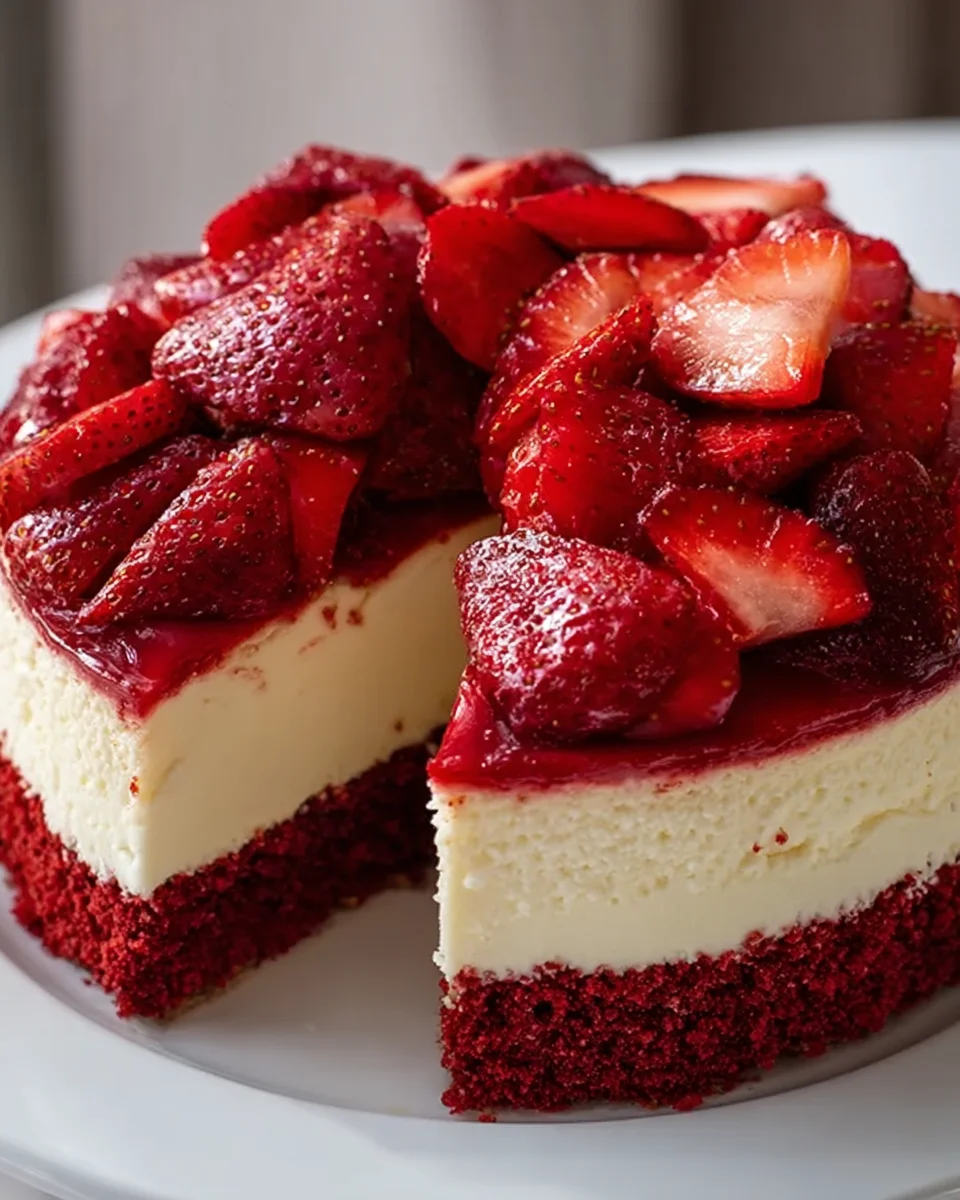
Red Velvet Strawberry Cheesecake is more than just a dessert; it’s a showstopper that promises to mesmerize with its vibrant hues and tantalizing flavors. Imagine a dessert so visually stunning it becomes the centerpiece of any gathering, yet so incredibly delicious that every bite feels like a luxurious treat. The deep, rich red velvet layers, with their subtle cocoa essence, provide the perfect foundation for a lusciously creamy, tangy cheesecake filling, all crowned with the sweet, refreshing burst of fresh strawberries.
The heritage of this magnificent creation brings together two dessert legends. Red velvet cake, with its iconic color and distinctive buttermilk tang, has a storied past, often gracing grand Southern tables and special celebrations for decades. Cheesecake, a dessert with roots tracing back to ancient Greece, has evolved through centuries, always maintaining its beloved creamy indulgence. Combining these two, and infusing them with the bright, seasonal joy of strawberries, creates a truly unforgettable experience.
People absolutely adore this dish because it delivers on every front. It’s the ultimate fusion of classic comfort and sophisticated elegance. The textural interplay between the moist cake, the silky-smooth cheesecake, and the tender fruit is simply divine, while the balanced sweetness and subtle tang keep you coming back for more. This exquisite Red Velvet Strawberry Cheesecake is not just a recipe; it’s an invitation to create magic in your kitchen and delight everyone around your table. I promise, the effort is well worth the incredible reward!

Ingredients:
-
For the Red Velvet Crust:
- 1 box (approximately 15.25 ounces) red velvet cake mix (dry mix only, do not prepare according to box directions)
- 1/2 cup (1 stick) unsalted butter, melted
-
For the Red Velvet Cheesecake Filling:
- 4 packages (8 ounces each) full-fat cream cheese, softened to room temperature
- 1 ½ cups granulated sugar
- 4 large eggs, room temperature
- 1 cup full-fat sour cream, room temperature
- 2 teaspoons pure vanilla extract
- 2 tablespoons unsweetened cocoa powder
- 2 teaspoons red gel food coloring (I find gel gives the best vibrant red color)
- 2 tablespoons all-purpose flour
-
For the Luscious Strawberry Topping:
- 2 pounds fresh strawberries, hulled and sliced
- 1/2 cup granulated sugar (adjust to taste based on sweetness of strawberries)
- 2 tablespoons fresh lemon juice
- 2 tablespoons cornstarch
- 2 tablespoons cold water
-
For the Cream Cheese Frosting (Optional, for decoration):
- 1 package (8 ounces) full-fat cream cheese, softened
- 1/2 cup (1 stick) unsalted butter, softened
- 3-4 cups powdered sugar, sifted
- 1 teaspoon pure vanilla extract
- 1-2 tablespoons milk or heavy cream (if needed for consistency)
-
For Garnish:
- Fresh strawberries, sliced or whole
- White chocolate shavings (optional)
- Fresh mint leaves (optional)
-
Preparing the Red Velvet Crust
Before we dive into the creamy goodness of our Red Velvet Strawberry Cheesecake, let’s get our foundation ready. Preheat your oven to 350°F (175°C). You’ll need a 9-inch springform pan for this recipe. If you don’t have one, I highly recommend investing in one for cheesecakes – it makes the process so much easier!
First, we’ll prepare the crust. Take your dry red velvet cake mix and pour it into a medium-sized bowl. This is where the magic starts for our vibrant red velvet base. Next, melt your ½ cup of unsalted butter until it’s completely liquid. Pour the melted butter over the dry cake mix. Now, with a fork or your clean hands, mix these two ingredients together until the mixture resembles coarse, moist crumbs. It should hold together when you press it between your fingers. If it seems too dry, add a tiny bit more melted butter, about a tablespoon at a time, until it reaches the right consistency.
Press this crumb mixture evenly into the bottom of your 9-inch springform pan. I like to use the bottom of a flat-bottomed glass or a measuring cup to really compact the crumbs, creating a solid, sturdy base for our cheesecake. Make sure it’s packed tightly and evenly across the entire bottom. Once pressed, bake the crust in your preheated oven for about 8-10 minutes. This quick bake helps to set the crust and prevent it from becoming soggy. After baking, remove it from the oven and set it aside to cool completely while we prepare the cheesecake filling. You can even pop it in the fridge for a bit to speed up the cooling process.
-
Making the Red Velvet Cheesecake Filling
Now for the star of the show: the rich, creamy, and beautifully red cheesecake filling! Reduce your oven temperature to 325°F (160°C). This lower temperature is crucial for baking a cheesecake that won’t crack. Grab a very large mixing bowl or the bowl of your stand mixer fitted with the paddle attachment.
Add the four packages of softened full-fat cream cheese to the bowl. It’s incredibly important that your cream cheese is at room temperature; otherwise, you’ll end up with lumps, and nobody wants a lumpy cheesecake! Beat the cream cheese on medium speed for about 2-3 minutes until it’s completely smooth and creamy. Scrape down the sides of the bowl frequently to ensure everything gets incorporated.
Next, gradually add the 1 ½ cups of granulated sugar to the cream cheese, beating until just combined. Be careful not to overmix at this stage, as too much air can cause cracks later. Once the sugar is incorporated, beat in the full-fat sour cream and vanilla extract until smooth. The sour cream adds an incredible tang and helps to create that signature creamy texture of a perfect cheesecake.
In a separate small bowl, whisk together the unsweetened cocoa powder and the red gel food coloring until a smooth, deep red paste forms. This ensures the cocoa is fully dissolved and the color is evenly distributed without streaks. Add this vibrant red paste to your cream cheese mixture and beat on low speed until the color is thoroughly blended, giving us that classic red velvet hue.
Now for the eggs. Add the large eggs one at a time, beating on low speed after each addition just until combined. Do not overmix the eggs! Overmixing introduces too much air, which expands during baking and then collapses, leading to cracks. After the eggs are just incorporated, gently fold in the 2 tablespoons of all-purpose flour. The flour helps to stabilize the filling and further reduce the chances of cracking, giving our Red Velvet Strawberry Cheesecake a smooth, unblemished top.
-
Baking the Red Velvet Strawberry Cheesecake
This is arguably the most critical stage for a flawless cheesecake. We’re going to use a water bath, which provides a moist, even baking environment and prevents cracking. To prepare for the water bath, wrap the bottom and sides of your springform pan with two layers of heavy-duty aluminum foil. Make sure the foil goes up the sides of the pan to prevent any water from seeping in.
Pour your beautiful red velvet cheesecake filling over the cooled red velvet crust in the springform pan. Gently tap the pan on the counter a few times to release any large air bubbles. Place the foil-wrapped springform pan into a larger roasting pan. Carefully pour hot water into the roasting pan, making sure it comes about halfway up the sides of the springform pan. Be very cautious not to splash water into the cheesecake filling.
Carefully transfer the roasting pan with the cheesecake to your preheated 325°F (160°C) oven. Bake for approximately 60-75 minutes. The cheesecake is done when the edges are set, but the center still has a slight wobble when you gently shake the pan. This slight wobble is key! It means the cheesecake is perfectly cooked and will firm up as it cools.
Once baked, turn off the oven but leave the cheesecake inside with the oven door ajar for another hour. This slow cooling process is incredibly important for preventing cracks due to sudden temperature changes. After an hour, carefully remove the cheesecake from the water bath (be mindful of the hot water!) and remove the foil. Let it cool completely on a wire rack at room temperature. Once completely cool, cover the cheesecake with plastic wrap and refrigerate for at least 6-8 hours, or preferably overnight. This chilling time is non-negotiable for a perfectly set cheesecake. It allows the cheesecake to firm up and develop its full flavor and luscious texture.
-
Creating the Luscious Strawberry Topping
While your Red Velvet Strawberry Cheesecake is chilling to perfection, let’s prepare the star topping! This fresh strawberry topping is the perfect complement to the rich cheesecake. In a medium saucepan, combine the hulled and sliced fresh strawberries, ½ cup of granulated sugar, and 2 tablespoons of fresh lemon juice. Stir gently to combine everything.
Place the saucepan over medium heat and bring the mixture to a gentle simmer, stirring occasionally. As the strawberries cook, they will release their juices, creating a beautiful syrup. Continue to simmer for about 5-7 minutes, or until the strawberries have softened slightly, but still retain some of their shape. We don’t want a mushy jam, but rather a vibrant, chunky topping.
While the strawberries are simmering, prepare your cornstarch slurry. In a small bowl, whisk together the 2 tablespoons of cornstarch and 2 tablespoons of cold water until smooth and no lumps remain. This slurry will thicken our strawberry topping beautifully.
Once the strawberries are softened, slowly pour the cornstarch slurry into the simmering strawberry mixture, stirring continuously. Continue to cook and stir for another 1-2 minutes, or until the topping has visibly thickened to your desired consistency. It should coat the back of a spoon. Remove the saucepan from the heat and let the strawberry topping cool completely to room temperature. You can transfer it to a bowl and even pop it in the fridge to speed up the cooling process. We want it cool before applying it to our chilled cheesecake.
-
Whipping Up the Cream Cheese Frosting (Optional)
If you’re feeling fancy and want to add an extra layer of decadence and visual appeal to your Red Velvet Strawberry Cheesecake, a simple cream cheese frosting border or dollops are absolutely perfect. In a large mixing bowl or the bowl of your stand mixer, beat the softened cream cheese and softened unsalted butter together on medium speed until smooth and creamy, about 2-3 minutes. Again, room temperature ingredients are key for a lump-free frosting.
Gradually add the sifted powdered sugar, one cup at a time, beating on low speed until incorporated, then increasing to medium speed. Add the pure vanilla extract and beat until light and fluffy. If the frosting seems too thick, add a tablespoon or two of milk or heavy cream until you reach your desired piping consistency. If it’s too thin, add more sifted powdered sugar. This frosting is not only delicious but also provides a beautiful contrast to the red and white cheesecake.
-
Assembling and Decorating Your Red Velvet Strawberry Cheesecake
The moment of truth! Once your Red Velvet Strawberry Cheesecake has thoroughly chilled, carefully run a thin knife around the edge of the springform pan before releasing and removing the ring. This helps to ensure a clean release and prevents any tearing on the sides of the cheesecake. If you prepared the cream cheese frosting, you can pipe a decorative border around the top edge of the cheesecake using a piping bag fitted with your favorite nozzle (a star tip works wonderfully for this!).
Next, spoon the cooled strawberry topping generously over the center of the chilled cheesecake. You can spread it all the way to the edges, or leave a small border of the plain cheesecake exposed for a contrasting look. I love to let some of the strawberries tumble over the sides for a rustic, inviting presentation. The bright red of the strawberries and the deep red of the cheesecake create a truly stunning visual.
Finally, for that extra touch of elegance and freshness, garnish your masterpiece! Arrange fresh strawberry slices or whole strawberries on top of the strawberry topping. You can also sprinkle some delicate white chocolate shavings for a touch of sweetness and visual appeal. A few fresh mint leaves strategically placed will add a pop of green and a refreshing aroma. And there you have it – your magnificent Red Velvet Strawberry Cheesecake is complete and ready to be admired, then devoured! Serve chilled for the best texture and flavor. Each slice promises a delightful symphony of flavors and textures, making it an unforgettable dessert for any occasion.
Conclusion:
As we wrap up our journey through this incredible recipe, I truly hope you’re as excited as I am about creating this masterpiece in your own kitchen. This isn’t just another dessert; it’s a celebration of flavors, a symphony of textures, and a feast for the eyes. When I first envisioned the combination of rich red velvet, tangy, creamy cheesecake, and the bright burst of fresh strawberries, I knew it would be something special, and it absolutely delivered. The Red Velvet Strawberry Cheesecake stands out because it marries the deep, cocoa-infused allure of a classic red velvet cake with the smooth, luxurious decadence of a perfectly baked cheesecake. Then, it elevates everything with the vibrant sweetness and slight tartness of fresh strawberries, making every single bite an unforgettable experience. It’s a showstopper, effortlessly elegant, and surprisingly approachable for home bakers who want to impress without the fuss of overly complicated techniques.
I find immense joy in crafting desserts that not only taste divine but also look absolutely stunning, and this particular cheesecake checks every single box. Imagine the gasp of delight from your guests as you present a slice revealing those beautiful layers: the subtle crimson of the cake, the pristine white of the cheesecake, and the vivid red of the strawberries. It’s an edible work of art that feels incredibly sophisticated yet retains that comforting, homemade charm. Beyond its visual appeal, the texture play is phenomenal – the moist, tender crumb of the red velvet base perfectly complementing the silky-smooth, melt-in-your-mouth cheesecake layer. And let’s not forget the delightful pop of juicy strawberries that cuts through the richness, balancing the flavors in a way that will have everyone asking for seconds. This is truly a recipe that transforms a simple meal into a memorable occasion, a dessert that speaks volumes about your culinary passion.
Serving Suggestions & Creative Variations
Once your glorious Red Velvet Strawberry Cheesecake has cooled to perfection and chilled sufficiently – and patience, my friends, is a virtue when it comes to cheesecake – it’s time to truly enjoy the fruits of your labor. I always recommend serving slices well-chilled, as this enhances the firm yet creamy texture of the cheesecake. For an extra touch of elegance, consider garnishing each slice with a dollop of freshly whipped cream, perhaps lightly sweetened with a hint of vanilla, and a few extra fresh strawberry halves or slices. A light dusting of cocoa powder or finely grated dark chocolate can also add a sophisticated finish and a subtle bitterness that wonderfully complements the sweetness. For those special occasions, a small drizzle of melted white chocolate over the top before serving adds another layer of visual appeal and a touch more sweetness.
But why stop there? The beauty of a recipe like this lies in its adaptability. While I adore the classic strawberry topping, feel free to experiment with other fresh berries. Think about a vibrant mix of raspberries and blueberries for a patriotic touch, or even a simple, elegant layer of fresh blackberries. If you’re a chocolate lover, try adding a handful of mini chocolate chips to the cheesecake batter for an extra textural surprise, or create a simple chocolate ganache drizzle to cascade over the top. Another exciting variation could be to incorporate a hint of orange zest into the cheesecake batter itself, providing a bright, citrusy note that wonderfully cuts through the richness. For a playful twist, you could even transform this recipe into individual mini cheesecakes baked in muffin tins or small ramekins – perfect for portion control and impressive for a buffet spread. Just remember to adjust baking times accordingly!
Your Turn to Create!
Now, it’s your turn to experience the magic of this stunning dessert. I genuinely encourage you to roll up your sleeves, gather your ingredients, and embark on the delightful journey of baking this Red Velvet Strawberry Cheesecake. There’s an immense sense of satisfaction that comes from creating something so beautiful and delicious from scratch, and I promise you, the smiles and compliments you’ll receive will make every effort worthwhile. Don’t be intimidated; follow the steps, trust the process, and you’ll be rewarded with a dessert that tastes as incredible as it looks. I can’t wait for you to discover the joy of baking and sharing this exceptional treat with your loved ones. Once you’ve made it, please come back and share your experience! What variations did you try? How did your family and friends react? Your culinary adventures inspire me and our whole community of home bakers. Happy baking, everyone!
Easy Red Velvet Strawberry Cheesecake: A Berry Sweet Treat!
Red Velvet Strawberry Cheesecake is a showstopper dessert, combining a rich red velvet cake base with a creamy, tangy red velvet cheesecake filling, all crowned with fresh strawberries. This exquisite dish offers the ultimate fusion of classic comfort and sophisticated elegance, perfect for any gathering.
Ingredients
Instructions
Important Information
Nutrition Facts (Per Serving)
It is important to consider this information as approximate and not to use it as definitive health advice.
Allergy Information
Please check ingredients for potential allergens and consult a health professional if in doubt.