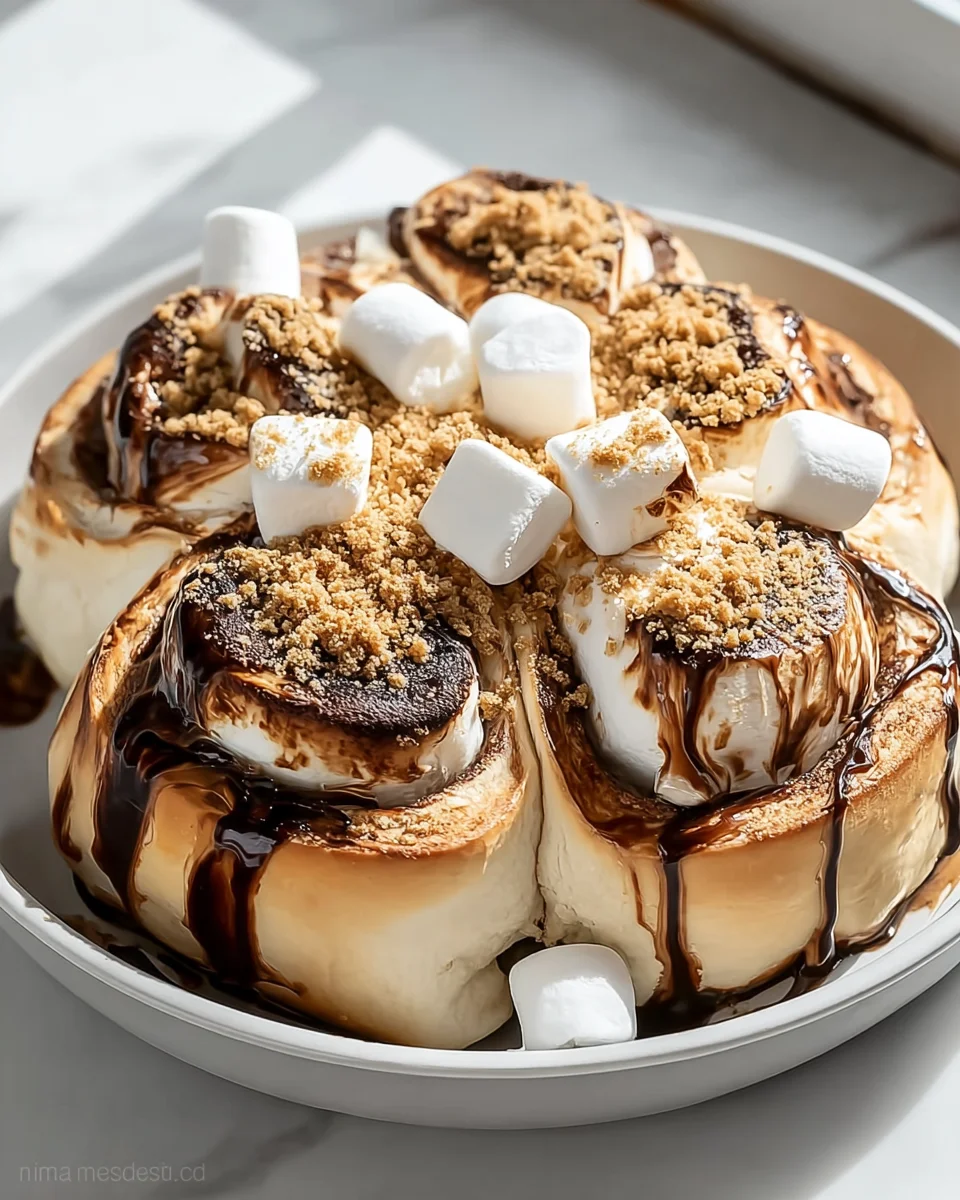
S’mores Rolls offer a truly delightful twist on a beloved classic, transforming the quintessential campfire favorite into a convenient, indoor treat that everyone can enjoy without the smoky hassle. We all know and love the traditional s’mores—a quintessential American dessert born from the warmth of a crackling bonfire, bringing together perfectly toasted marshmallows, rich melted chocolate, and crisp graham crackers. This iconic treat has been a staple of summer nights and scouting adventures for generations, embodying the simple joys of childhood and camaraderie.
But what if you could capture that same magical experience, that perfect blend of gooey sweetness and delightful crunch, in a more refined and utterly irresistible form, perfect for any occasion? That’s precisely where these wonderful S’mores Rolls come into play. Imagine a warm, golden pastry encasing pockets of molten chocolate and fluffy marshmallow, all complemented by the subtle, comforting crunch of graham cracker. These rolls provide all the nostalgic flavors and textures we adore, but with the added convenience of being easily made in your own kitchen. They’re significantly less messy than their campfire cousins, making them perfect for parties, cozy evenings in, or simply satisfying that sudden craving for something truly special. The harmonious combination of textures—the soft dough, the yielding marshmallow, the decadent chocolate, and the firm graham cracker bits—creates an experience that is nothing short of heavenly. I am absolutely thrilled to share this recipe with you!

Ingredients:
-
For the Dough:
- 1 cup (240ml) whole milk: I prefer whole milk for its richness, which contributes to a softer, more tender roll. Make sure it’s warmed to between 105-115°F (40-46°C) – this is crucial for activating the yeast without killing it.
- 2 ¼ teaspoons (7g) active dry yeast: This is typically one standard packet. Ensure it’s fresh for the best rise in our S’mores Rolls.
- ¼ cup (50g) granulated sugar, divided: A little bit for the yeast, and the rest to sweeten our dough and make it delightfully soft.
- 1 large egg: At room temperature, please! A room temperature egg incorporates more smoothly into the dough and contributes to a beautiful, rich color and tender texture.
- ¼ cup (57g) unsalted butter, melted: Allow it to cool slightly after melting so it doesn’t cook the egg or yeast. Butter adds incredible flavor and richness, making these S’mores Rolls truly decadent.
- 1 teaspoon vanilla extract: A touch of vanilla always elevates sweet baked goods.
- ½ teaspoon salt: Don’t skip the salt! It balances the sweetness and enhances all the other flavors.
- 3 to 3 ½ cups (360-420g) all-purpose flour: I recommend starting with 3 cups and adding more as needed during kneading until the dough is smooth and manageable. The exact amount can vary based on humidity and how accurately you measure.
-
For the S’mores Filling:
- 1 ½ cups graham cracker crumbs: About 10-12 full graham cracker sheets, finely crushed. You can do this by hand in a bag or a food processor for a super fine crumb.
- ½ cup (113g) unsalted butter, melted: This helps bind the graham cracker crumbs and chocolate together into a spreadable, delicious filling.
- ½ cup (100g) packed light brown sugar: Brown sugar adds moisture and a wonderful molasses flavor that complements the S’mores theme perfectly.
- 1 teaspoon ground cinnamon: A pinch of cinnamon brings warmth and depth to the S’mores experience. It’s optional, but I highly recommend it!
- 1 ½ cups mini marshmallows: These are perfect because they melt beautifully without making a huge mess, creating that signature gooey S’mores texture.
- 1 cup (170g) semi-sweet chocolate chips: Or chopped milk chocolate bars, depending on your preference. I like a mix, honestly! You can even use dark chocolate if you want to cut some of the sweetness.
-
For the Vanilla Glaze:
- 1 ½ cups (180g) powdered sugar (confectioners’ sugar): Sifted, if you want an extra smooth glaze, though it’s not strictly necessary.
- 2-3 tablespoons whole milk (or heavy cream): Start with 2 tablespoons and add more a tiny bit at a time until you reach your desired drizzling consistency. Heavy cream will make it richer.
- ½ teaspoon vanilla extract: Essential for a classic, aromatic glaze.
-
For Garnish (Optional but Recommended):
- Extra graham cracker crumbs
- A few more mini marshmallows (to toast lightly with a kitchen torch, if you’re feeling fancy!)
- A drizzle of melted chocolate
Prepping Your Workspace and Tools
Before we dive into creating these amazing S’mores Rolls, let’s gather our tools and get organized. You’ll need a large mixing bowl (or the bowl of a stand mixer), a measuring cup for liquids and dry ingredients, measuring spoons, a whisk, a rubber spatula, a rolling pin, a sharp knife or bench scraper, and a 9×13-inch baking pan. Make sure your baking pan is lightly greased with butter or non-stick spray – this will ensure our glorious S’mores Rolls don’t stick and come out perfectly. I also like to have a clean, lightly floured surface ready for rolling out the dough. Being prepared makes the whole baking process so much more enjoyable and efficient!
Crafting the Irresistible Dough for Your S’mores Rolls
-
Activating the Yeast: The Foundation of Fluffy S’mores Rolls
In a large mixing bowl (or the bowl of your stand mixer fitted with the dough hook attachment), pour in the warmed whole milk. It’s incredibly important that your milk is between 105-115°F (40-46°C). If it’s too cold, the yeast won’t activate; if it’s too hot, it will kill the yeast, and your S’mores Rolls won’t rise. I usually test it with a clean finger – it should feel warm, like a baby’s bath water, but not hot. Sprinkle the active dry yeast over the milk, along with 1 tablespoon of the granulated sugar. Give it a gentle stir. Let this mixture sit for 5-10 minutes. You’ll know the yeast is active and happy when it becomes foamy and bubbly on the surface. This bubbly action means it’s ready to make your S’mores Rolls light and airy!
-
Combining Wet and Dry Ingredients for Optimal Flavor
Once your yeast is active, it’s time to add the rest of the wet ingredients. To the yeast mixture, add the room temperature large egg, the cooled melted unsalted butter, the remaining granulated sugar, the vanilla extract, and the salt. Give it a good whisk until everything is well combined. This step ensures all the flavors are evenly distributed before we introduce the flour. Now, gradually add 3 cups of the all-purpose flour to the wet ingredients, mixing with a wooden spoon or the dough hook on low speed until a shaggy dough forms. I always recommend adding flour in stages, as the exact amount can vary.
-
Kneading to Perfection: The Secret to Tender Rolls
This is where the magic happens for the texture of your S’mores Rolls! If you’re using a stand mixer, increase the speed to medium-low and continue to knead for 7-10 minutes. If the dough seems too sticky, add the remaining flour a tablespoon at a time until the dough pulls away from the sides of the bowl and feels smooth and elastic. Resist the urge to add too much flour, as this can make your S’mores Rolls tough. You’re looking for a dough that is soft, slightly tacky but not sticky, and smooth. When you pull a small piece of dough, you should be able to stretch it thin enough to see light through it without it tearing – this is called the “windowpane test” and indicates excellent gluten development. If kneading by hand, turn the shaggy dough out onto a lightly floured surface. Knead by pushing the dough away from you with the heels of your hands, folding it back, and turning it. Continue this motion for 10-15 minutes, or until the dough is smooth, elastic, and passes the windowpane test. Proper kneading is essential for the ultimate soft and chewy texture of your finished S’mores Rolls.
-
The First Rise: Developing Flavor and Texture
Once your dough is beautifully kneaded, lightly grease a clean large bowl with a little oil or non-stick spray. Place the dough in the bowl, turning it once to coat the top. Cover the bowl tightly with plastic wrap or a clean kitchen towel. Now, we let the dough rise in a warm, draft-free place for 1 to 1 ½ hours, or until it has doubled in size. A slightly warm oven (turned off, with just the pilot light on if you have one, or briefly warmed and then turned off) is a perfect spot. You can also place it near a sunny window. This first rise is vital not only for increasing the volume of your S’mores Rolls but also for developing their complex flavor. When it’s doubled, gently punch down the dough to release the air. This step is satisfying and prepares the dough for shaping.
Preparing the Delectable S’mores Filling
-
Crushing Graham Crackers: The Heart of the S’mores Roll
While your dough is on its first rise, let’s prepare our incredible S’mores filling. You’ll need about 10-12 full graham cracker sheets to yield 1 ½ cups of crumbs. My preferred method for this is to place the graham crackers in a large resealable plastic bag and crush them with a rolling pin until they are fine crumbs. You can also pulse them in a food processor for a more uniform, sandy texture. Finely crushed crumbs are important for an even spread and a pleasant texture in your S’mores Rolls, avoiding large, hard chunks.
-
Mixing the Gooey Goodness: Creating the Signature S’mores Taste
In a medium bowl, combine the finely crushed graham cracker crumbs, the melted unsalted butter, the packed light brown sugar, and the optional ground cinnamon. Stir everything together with a spoon or spatula until it’s thoroughly combined and resembles wet sand. This mixture will be spread over our dough, forming the base of our S’mores experience. The melted butter helps to bind everything, creating a delicious, sticky foundation for the chocolate and marshmallows. Set this delightful filling aside for a moment, waiting for the dough to be ready. This is where the classic S’mores flavor truly starts to come alive for our special S’mores Rolls.
Assembling Your S’mores Rolls: The Fun Part!
-
Rolling Out the Dough: Setting the Stage
Once your dough has completed its first rise and has been gently punched down, turn it out onto a lightly floured surface. Using your rolling pin, roll the dough into a large rectangle. Aim for a rectangle that is approximately 12 inches by 18 inches (30cm x 45cm) and about ¼-inch thick. Try to keep the edges as straight as possible, as this will make rolling and slicing much easier and yield more uniformly sized S’mores Rolls. If the dough springs back too much, let it rest for 5-10 minutes to allow the gluten to relax, then continue rolling. Patience here is key to getting that perfect canvas for our filling.
-
Spreading the Filling: Layering the S’mores Flavor
Evenly spread the entire graham cracker and brown sugar mixture over the rolled-out dough, leaving about a ½-inch border clear on one of the longer sides. This border will help seal the roll later on. Use an offset spatula or the back of a spoon to spread the filling all the way to the other three edges. You want a generous, even layer of this delicious, buttery, cinnamon-spiced graham cracker mixture because it’s a core component of the “S’mores” identity in these rolls.
-
Adding the Stars: Chocolate and Marshmallows
Now for the iconic S’mores elements! Sprinkle the mini marshmallows evenly over the graham cracker filling. Then, generously scatter the chocolate chips (or chopped chocolate) over the marshmallows. Don’t be shy here! The more chocolate and marshmallow, the gooier and more decadent your S’mores Rolls will be. Make sure they are distributed fairly evenly so every bite gets a taste of everything. As these bake, the marshmallows will melt into a gooey cloud and the chocolate will become wonderfully fudgy.
-
Rolling and Slicing: Shaping Your S’mores Rolls
Starting from one of the long sides (the one without the ½-inch border), carefully and tightly roll the dough into a log. The tighter you roll, the more spirals your S’mores Rolls will have, and the less likely the filling is to escape. Once rolled, gently pinch the seam closed along the bottom and at the ends to seal the filling inside. Now, using a very sharp knife, a piece of unflavored dental floss, or a bench scraper, slice the log into 12 equal pieces, each about 1 ½ inches thick. If using dental floss, slide it under the log, cross the ends over the top, and pull to make a clean cut. This method often prevents squishing the rolls. Arrange the sliced S’mores Rolls in your prepared 9×13-inch baking pan, leaving a little space between each one, as they will expand during the second rise and baking.
-
The Second Rise: Achieving Maximum Fluffiness
Cover the baking pan loosely with plastic wrap or a clean kitchen towel. Let the S’mores Rolls rise in a warm, draft-free place for another 30-45 minutes, or until they look noticeably puffy and have nearly doubled in size. This second rise is crucial for developing a light, airy texture and ensuring your S’mores Rolls are beautifully soft. It also helps them bake evenly. While they are rising, preheat your oven so it’s ready for baking.
Baking Your Golden S’mores Rolls
-
Preheat and Bake: Bringing the S’mores Rolls to Life
Preheat your oven to 375°F (190°C). Once the S’mores Rolls have completed their second rise and are looking wonderfully puffy, carefully remove the cover. Place the baking pan into the preheated oven. Bake for 20-25 minutes, or until the rolls are golden brown on top and cooked through. The exact baking time can vary depending on your oven, so keep an eye on them. You might notice some of the marshmallow and chocolate peeking out, bubbling enticingly – this is perfectly normal and part of the S’mores charm!
-
Checking for Doneness: Ensuring Perfection
To ensure your S’mores Rolls are perfectly baked, look for a deep golden-brown color on the tops and edges. If you have a meat thermometer, you can insert it into the center of a roll (avoiding the gooey filling) – it should register around 200°F (93°C). Do not overbake, as this can dry out your rolls. We want them soft and tender, with that delightful S’mores gooeyness inside. Once baked, remove the pan from the oven and let the S’mores Rolls cool in the pan for about 5-10 minutes. This brief cooling period allows them to set slightly before you add the glaze, making them easier to handle.
The Finishing Touch: Glaze and Garnish
-
Whipping Up the Glaze: A Sweet Drizzle
While the S’mores Rolls are cooling slightly, let’s make our simple yet delicious vanilla glaze. In a medium bowl, whisk together the powdered sugar, 2 tablespoons of milk (or cream), and the vanilla extract until smooth. If the glaze is too thick, add more milk, half a teaspoon at a time, until you reach a smooth, drizzling consistency. If it’s too thin, add a little more powdered sugar. You’re aiming for a glaze that is thick enough to coat a spoon but thin enough to pour or drizzle easily over the rolls. This glaze adds an extra layer of sweetness and a beautiful finish to our S’mores Rolls.
-
Drizzling and Decorating: The Grand Finale
Once the S’mores Rolls have cooled for a few minutes, drizzle the vanilla glaze generously over them while they are still warm in the pan. The warmth of the rolls will help the glaze spread and slightly melt, creating a wonderful sheen. If you’re feeling extra fancy, now is the time to add your garnishes! Sprinkle a few extra graham cracker crumbs over the top for texture and visual appeal. For an ultimate touch, you can even melt a little extra chocolate and drizzle it over the glaze, or if you have a kitchen torch, lightly toast a few more mini marshmallows on top of the glazed rolls for that fresh-from-the-campfire look and taste. Serve your S’mores Rolls warm, as this is when they are at their absolute best, with all that gooey chocolate and marshmallow goodness. They are truly irresistible!
Tips for Perfect S’mores Rolls Every Time
To ensure your S’mores Rolls are always a smashing success, here are a few extra pointers I’ve picked up along the way:
- Temperature Control is Key: Always check your milk temperature carefully for the yeast. Too hot or too cold can lead to dense rolls.
- Don’t Skimp on Kneading: Under-kneaded dough won’t develop enough gluten, resulting in a less airy texture. Take the time to get it right, whether by hand or mixer.
- Flour Measurement Matters: Measuring flour by weight (grams) is always more accurate than by volume (cups), as a cup of flour can vary significantly based on how it’s scooped. If you don’t have a scale, lightly spoon flour into your measuring cup and level it off.
- Warm Rising Environment: A warm, draft-free spot is crucial for both rises. If your kitchen is cold, a slightly warmed (then turned off) oven or even your microwave (turned off!) can create a cozy spot for your dough.
- Customize Your Chocolate: Feel free to experiment with different types of chocolate chips – milk, dark, or even white chocolate can change the flavor profile of your S’mores Rolls.
- Freshness is Best: While S’mores Rolls are delicious on day one, they are truly at their peak when warm from the oven. Reheat leftovers briefly in the microwave for that fresh-baked experience.
- Storage: Store any leftover S’mores Rolls in an airtight container at room temperature for up to 2-3 days. They also freeze well, unglazed, for up to a month. Thaw and then glaze before serving.
Following these tips will help you create the most delightful, gooey, and utterly satisfying S’mores Rolls that will have everyone asking for more!
Conclusion:
As we wrap up our delightful journey through this recipe, I truly hope you’re feeling inspired and excited to bring these incredible creations to life in your own kitchen. This isn’t just another dessert; it’s an experience, a nostalgic hug in every bite, and a guaranteed crowd-pleaser that will have everyone asking for the recipe. The magic of taking simple ingredients and transforming them into something so utterly irresistible is truly rewarding. We’ve taken the beloved campfire classic and elevated it into a treat that’s not only easier to enjoy without the need for a bonfire but also versatile enough for any occasion. The rich, melty chocolate, the gooey, perfectly toasted marshmallow, and the tender, flaky crust combine to create a symphony of textures and flavors that is simply unparalleled. It’s the kind of treat that conjures happy memories and creates new ones, making it an absolute must-try for anyone who appreciates a touch of sweetness and a lot of joy in their life. You’ll find that the effort is minimal, but the payoff in terms of taste and sheer delight is absolutely enormous, making these S’mores Rolls a definite keeper in your culinary repertoire.
Now, let’s talk about making these beauties shine even brighter. While they are undeniably glorious straight out of the oven, still warm and slightly ooey-gooey, there are so many ways to serve and enjoy them. For a truly decadent dessert experience, imagine serving a warm S’mores Roll alongside a scoop of premium vanilla bean ice cream, allowing the cold creaminess to contrast beautifully with the warm, rich pastry. A light dusting of powdered sugar always adds an elegant touch, or for an extra layer of chocolatey goodness, a drizzle of homemade chocolate sauce or a rich caramel swirl can elevate them even further. Don’t shy away from serving them with a robust cup of coffee in the morning for an indulgent breakfast treat, or alongside a tall glass of cold milk for that quintessential comfort food feeling. For those who like to experiment, consider a sprinkle of flaky sea salt over the chocolate before baking; it wonderfully enhances the sweetness and depth of flavor.
But wait, the fun doesn’t stop there! One of the most wonderful things about this recipe is its incredible adaptability. Feel free to unleash your inner pastry chef and experiment with variations to truly make it your own. Instead of traditional milk chocolate, why not try dark chocolate chips for a more sophisticated, intense flavor, or even white chocolate for a creamy, sweet contrast? You could swap out regular marshmallows for flavored ones, like peppermint during the holidays, or even mini chocolate-stuffed marshmallows for an extra surprise. For a nutty crunch, a sprinkle of finely chopped pecans or walnuts could be added along with the chocolate. Imagine the possibilities! A pinch of cinnamon mixed into the butter before rolling can add a lovely warmth, or a tiny dash of chili powder for an unexpected, intriguing kick. This recipe is a fantastic canvas for your creativity, allowing you to tailor the S’mores Rolls to your exact preferences or to suit a specific occasion. There’s no wrong way to enjoy these, only delicious possibilities waiting to be discovered.
So, what are you waiting for? I wholeheartedly encourage you to roll up your sleeves, gather your ingredients, and embark on this incredibly rewarding baking adventure. You’ll be amazed at how simple it is to achieve such spectacular results. And once you’ve pulled that golden tray of warm, fragrant S’mores Rolls from your oven, take a moment to savor the aroma, then dive into that first glorious bite. I’m genuinely excited for you to experience the joy they bring! When you do try this recipe, I would absolutely love to hear about it. Please come back and share your experience in the comments below, or even tell me about any creative twists you added. Your culinary adventures inspire me, and I can’t wait to see how you make these irresistible treats your own. Happy baking, my friends!
Easy S’mores Rolls: Perfect Gooey Chocolate Meringue Treat
S’mores Rolls offer a delightful twist on the classic campfire treat, transforming it into a convenient, indoor dessert. Enjoy all the nostalgic flavors and textures—gooey chocolate and crisp graham cracker—encased in a warm, golden pastry, topped with a fluffy meringue. Perfect for any occasion, these rolls are less messy than traditional s’mores and are easily made in your own kitchen.
Ingredients
Instructions
Important Information
Nutrition Facts (Per Serving)
It is important to consider this information as approximate and not to use it as definitive health advice.
Allergy Information
Please check ingredients for potential allergens and consult a health professional if in doubt.