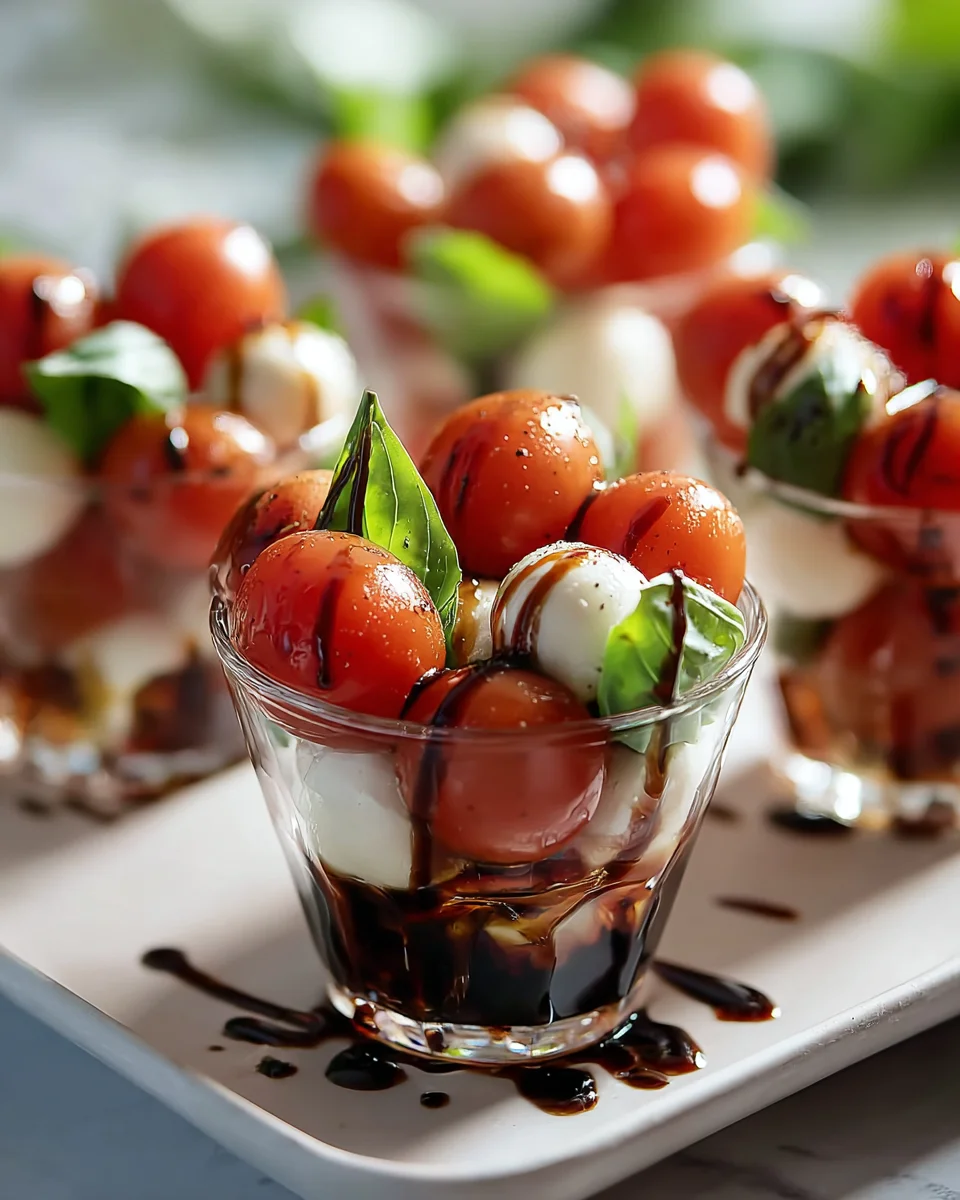
Christmas Mini Caprese Salad Cups are here to revolutionize your holiday appetizer spread! Are you searching for a show-stopping starter that’s both incredibly easy to prepare and absolutely bursting with festive cheer? Look no further! I’m thrilled to share a recipe that perfectly embodies the spirit of the season while offering a refreshing counterpoint to richer holiday fare. Originating from the beautiful island of Capri in Italy, the classic Caprese salad, with its vibrant red tomatoes, creamy white mozzarella, and fresh green basil, naturally lends itself to Christmas celebrations, mirroring the iconic colors of the holiday.
I simply adore how these delightful individual servings transform a simple salad into an elegant, grab-and-go masterpiece. People love this dish not just for its stunning visual appeal and ease of assembly, but for the incredible symphony of flavors and textures. The sweet burst of cherry tomatoes, the delicate creaminess of fresh mozzarella, and the aromatic kiss of basil, all brought together with a hint of tangy balsamic glaze, create an unforgettable experience. These Christmas Mini Caprese Salad Cups are the ideal solution for entertaining, offering a light, fresh, and undeniably chic option that your guests will rave about. They are truly effortless elegance in a cup!

Ingredients:
- For the Christmas Mini Caprese Salad Cups:
- 2 pints (approximately 4 cups) vibrant red cherry tomatoes, ideally firm and sweet.
- 1 pint (approximately 2 cups) bright yellow cherry tomatoes (optional, but they add a lovely festive touch!).
- 1 (16-ounce) container fresh mini mozzarella balls (bocconcini), drained well. Look for the small, pearl-sized ones if possible, as they fit beautifully into this mini concept.
- 1 large bunch fresh basil leaves, preferably a mix of small to medium leaves for optimal layering and garnish.
- 2 tablespoons high-quality extra virgin olive oil.
- 1 teaspoon flaky sea salt, or to taste.
- ½ teaspoon freshly ground black pepper, or to taste.
- For the Balsamic Glaze (highly recommended for homemade goodness!):
- 1 cup good quality balsamic vinegar. The better the vinegar, the richer and more complex your glaze will be.
- 1 tablespoon brown sugar or maple syrup (optional, but it really helps to thicken and mellow the glaze, especially if your vinegar is very acidic).
- For Serving (choose one or a combination):
- Small appetizer spoons or shot glasses/mini cups.
- Cocktail skewers or toothpicks.
Oh, these Christmas Mini Caprese Salad Cups are an absolute dream for holiday entertaining! They’re so simple, yet elegant and bursting with fresh flavors. I adore how the vibrant red and green (and optional yellow!) instantly scream “festive,” making them a perfect addition to any holiday spread. Let’s get these delightful little bites made!
Preparing the Caprese Components
This phase is all about getting our core ingredients ready to shine. Precision and gentle handling are key here to maintain the beautiful integrity of each piece.
- Wash and Dry the Tomatoes: First things first, you’ll want to thoroughly wash both the red and yellow cherry tomatoes under cool running water. After washing, it’s absolutely crucial to dry them completely. I usually lay them out on a clean kitchen towel or use a salad spinner if I’m feeling fancy. Excess moisture can dilute the flavors and make your Caprese cups less appealing. If any tomatoes have stems, gently remove them.
- Drain the Mozzarella: Next, carefully drain the mini mozzarella balls. They often come packed in water or brine, and we don’t want any of that extra liquid watering down our salad. You can place them in a colander for a few minutes to let all the liquid drip away. For an even drier result, you can gently blot them with a paper towel. I find this step incredibly important for preventing a soggy salad.
- Prepare the Basil: This is where the gorgeous green comes in! Wash your fresh basil leaves very gently. Pat them dry with paper towels. For the smaller leaves, you can leave them whole. For larger leaves, you’ll want to stack a few together, roll them tightly (this technique is called chiffonade), and then slice them into thin strips. Alternatively, you can simply tear larger leaves into smaller, bite-sized pieces. I prefer tearing for a more rustic look and to avoid bruising the delicate leaves.
- Slice and Season (Optional but Recommended): For a truly mini experience and to ensure every bite is perfectly balanced, I like to halve the cherry tomatoes. This allows for easier eating and ensures a lovely pop of flavor in each cup. You can also halve the mini mozzarella balls if they seem a bit too large for your chosen serving vessels. Once halved, place the tomatoes and mozzarella in separate bowls. Drizzle them lightly with a tiny bit of the extra virgin olive oil, and season with flaky sea salt and freshly ground black pepper. This initial seasoning really helps to bring out their natural flavors. Trust me, it makes a difference!
Crafting the Balsamic Glaze
While you can certainly buy pre-made balsamic glaze, making it yourself is surprisingly easy and allows you to control the sweetness and consistency. Plus, the aroma filling your kitchen is simply divine! A homemade balsamic glaze elevates these Christmas Mini Caprese Salad Cups from good to absolutely spectacular.
- Combine Ingredients: Pour the good quality balsamic vinegar into a small, heavy-bottomed saucepan. If you’re using brown sugar or maple syrup, add it now. The sugar helps to thicken the glaze and round out the sharp acidity of the vinegar, resulting in a beautifully balanced flavor profile.
- Bring to a Gentle Simmer: Place the saucepan over medium-low heat. You want to bring the vinegar to a gentle simmer, not a rolling boil. A gentle simmer is key to a smooth reduction without burning. Stir occasionally to ensure the sugar dissolves completely if you’re using it.
- Reduce to a Glaze: This is the patient part. Allow the balsamic vinegar to simmer gently, uncovered, for about 10-15 minutes, or until it has reduced by about half and coats the back of a spoon. As it cooks, you’ll notice it thickening and becoming syrupy. Keep a close eye on it, especially towards the end, as it can go from perfect to burnt very quickly. My secret tip here: dip a cold spoon into the glaze, and if it coats the spoon and holds its shape for a second before dripping, it’s ready. Remember, it will thicken significantly more as it cools, so don’t over-reduce it on the stove!
- Cool and Store: Once your glaze reaches the desired consistency, remove the saucepan from the heat. Carefully pour the hot glaze into a heat-proof jar or a small bowl. Allow it to cool completely at room temperature. As it cools, it will continue to thicken into that luscious, pourable glaze we’re aiming for. Once cool, you can cover it and store it in the refrigerator for up to two weeks. It might solidify a bit in the fridge, but a quick warm-up in the microwave or a few minutes at room temperature will bring it back to a pourable consistency.
Assembling Your Christmas Mini Caprese Salad Cups
Now for the fun part: bringing it all together into these adorable, bite-sized delights! Presentation is everything when it comes to party food, and these cups are designed to impress.
- Choose Your Serving Vessel: Decide if you’re using mini appetizer spoons, small shot glasses, or cocktail skewers. Each offers a slightly different presentation.
- For Spoons/Cups: These create a beautiful layered effect.
- For Skewers: These are fantastic for a grab-and-go option and allow for easy color alternating.
- Layering the Ingredients (Spoons/Cups Method):
- First Layer: Start with a small piece of basil leaf at the bottom of each spoon or cup. This provides a lovely green base and a burst of aromatic flavor in the first bite.
- Second Layer: Next, add a halved mini mozzarella ball. If you seasoned them earlier, they’re ready to go!
- Third Layer: Then, add a halved red cherry tomato.
- Fourth Layer (Optional, for Christmas colors): Follow with a halved yellow cherry tomato, if using. This alternating color really plays up the festive theme.
- Fifth Layer: Place another small basil leaf on top, perhaps folded or gently torn to fit.
- Repeat: Continue layering, aiming for 2-3 pieces of tomato and mozzarella per cup/spoon, interspersed with basil, until your serving vessel is attractively full but not overflowing. I like to finish with a colorful tomato on top for visual appeal.
- Assembling on Skewers (Skewers Method):
- This method is incredibly straightforward and often quite popular at parties. Start by threading a small basil leaf onto the skewer.
- Follow with a mini mozzarella ball.
- Then, add a red cherry tomato half.
- If using, add a yellow cherry tomato half.
- Finish with another basil leaf or a second mozzarella ball, depending on the length of your skewer and desired look.
- You can alternate the colors beautifully here: basil, mozzarella, red tomato, basil, mozzarella, yellow tomato, for a truly festive skewer.
- The Grand Finale: Drizzle with Balsamic Glaze: Once all your mini Caprese cups or skewers are assembled, it’s time for the crowning glory! Drizzle a small amount of your homemade balsamic glaze over each one. A little goes a long way, as the glaze is quite potent and sweet. You can use a spoon, or for more precision, transfer the glaze to a squeeze bottle. This step is non-negotiable for that authentic Caprese experience. The glaze adds a beautiful tang and sweetness that perfectly complements the fresh ingredients.
- Final Garnish (Optional): For an extra touch of elegance and flavor, you can sprinkle a tiny pinch of flaky sea salt and freshly ground black pepper over the finished cups or skewers just before serving. A tiny basil sprig on top of each is also a beautiful touch.
Serving Suggestions and Storage
These Christmas Mini Caprese Salad Cups are best served fresh, but there are ways to prepare ahead to minimize stress on party day!
- Serving: Arrange your beautiful Christmas Mini Caprese Salad Cups on a large platter. I love using a white platter to really make the red, green, and white colors pop. For skewers, you can stand them upright in a decorative container or lay them flat. They make an excellent appetizer for any holiday gathering, from a casual open house to a formal dinner party.
- Make-Ahead Tips: You can prepare the individual components a day in advance. Wash and halve the tomatoes, drain the mozzarella, and prepare the basil. Store them separately in airtight containers in the refrigerator. The balsamic glaze can be made up to two weeks in advance. I highly recommend assembling the cups or skewers no more than 1-2 hours before serving. This prevents the basil from wilting and the tomatoes from releasing too much liquid. If you assemble too early, the texture won’t be as crisp and fresh, which is what makes these so delightful. Drizzle with the balsamic glaze just before serving.
- Storage: If you have any leftovers (which is rare with these!), store them in an airtight container in the refrigerator. They are best consumed within 24 hours. The basil may wilt slightly, but the flavors will still be delicious.
Tips for Perfect Christmas Mini Caprese Salad Cups
I’ve made these countless times, and I’ve picked up a few tricks along the way that I’m happy to share to ensure your Caprese cups are nothing short of perfect!
- Ingredient Quality is Key: Because this recipe uses so few ingredients, the quality of each one really shines through. Invest in the freshest, ripest cherry tomatoes you can find, good quality fresh mozzarella, and aromatic basil. A good balsamic vinegar also makes a huge difference in your glaze. You truly taste the difference!
- Mind the Moisture: I cannot stress enough how important it is to thoroughly dry your tomatoes and drain your mozzarella. Excess water will dilute the flavors and make your beautiful appetizer watery and less appealing.
- Season Appropriately: A light seasoning of salt and pepper on the individual components before assembly can enhance their natural flavors. Don’t overdo it, as the balsamic glaze will also add a layer of seasoning.
- Temperature Matters: Serve these at room temperature for the best flavor. Taking them out of the fridge about 15-20 minutes before serving allows the flavors to truly open up and be appreciated. The chill can dull the brightness of the tomatoes and basil.
- Batching for Crowds: If you’re hosting a large party, consider having an assembly line! Get a few helpers to wash, slice, and layer. It speeds up the process significantly and makes it more fun.
- Presentation Matters: Use attractive serving dishes. The visual appeal is a huge part of the holiday experience. Consider garnishing the platter with extra basil leaves or a light dusting of finely chopped fresh parsley for more green.
- Experiment with Balsamic Glaze Sweetness: Taste your balsamic vinegar before adding sugar to the glaze. Some balsamic vinegars are naturally sweeter than others. Adjust the brown sugar or maple syrup to your preference. If you like a tarter glaze, omit the added sweetener.
- A Twist on the Traditional: For an extra festive touch or if you want to expand beyond the classic Caprese, consider adding a tiny sprinkle of toasted pine nuts for crunch, or a very thin slice of avocado for an additional layer of creaminess (though this moves away from strict Caprese). You could also try infusing your olive oil with a garlic clove for a subtle garlic kick.
- Consider a Tray with Wells: For easier transport and serving, especially for the spoon method, consider using a serving tray that has small indentations or wells. This prevents the spoons from sliding around.
- Label for Dietary Needs: These are naturally gluten-free and vegetarian, making them ideal for many guests. However, if you’re serving other dishes, a small label indicating “Vegetarian & Gluten-Free” can be a thoughtful touch for your guests.
These Christmas Mini Caprese Salad Cups are one of my go-to holiday appetizers because they are fresh, flavorful, and so vibrant. They bring that perfect festive cheer to any table without being overly heavy. Enjoy making and sharing them!
Ingredients:
- For the Christmas Mini Caprese Salad Cups:
- 2 pints (approximately 4 cups) vibrant red cherry tomatoes, ideally firm and sweet.
- 1 pint (approximately 2 cups) bright yellow cherry tomatoes (optional, but they add a lovely festive touch!).
- 1 (16-ounce) container fresh mini mozzarella balls (bocconcini), drained well. Look for the small, pearl-sized ones if possible, as they fit beautifully into this mini concept.
- 1 large bunch fresh basil leaves, preferably a mix of small to medium leaves for optimal layering and garnish.
- 2 tablespoons high-quality extra virgin olive oil.
- 1 teaspoon flaky sea salt, or to taste.
- ½ teaspoon freshly ground black pepper, or to taste.
- For the Balsamic Glaze (highly recommended for homemade goodness!):
- 1 cup good quality balsamic vinegar. The better the vinegar, the richer and more complex your glaze will be.
- 1 tablespoon brown sugar or maple syrup (optional, but it really helps to thicken and mellow the glaze, especially if your vinegar is very acidic).
- For Serving (choose one or a combination):
- Small appetizer spoons or shot glasses/mini cups.
- Cocktail skewers or toothpicks.
Oh, these Christmas Mini Caprese Salad Cups are an absolute dream for holiday entertaining! They’re so simple, yet elegant and bursting with fresh flavors. I adore how the vibrant red and green (and optional yellow!) instantly scream “festive,” making them a perfect addition to any holiday spread. Let’s get these delightful little bites made!
Preparing the Caprese Components
This phase is all about getting our core ingredients ready to shine. Precision and gentle handling are key here to maintain the beautiful integrity of each piece.
- Wash and Dry the Tomatoes: First things first, you’ll want to thoroughly wash both the red and yellow cherry tomatoes under cool running water. After washing, it’s absolutely crucial to dry them completely. I usually lay them out on a clean kitchen towel or use a salad spinner if I’m feeling fancy. Excess moisture can dilute the flavors and make your Caprese cups less appealing. If any tomatoes have stems, gently remove them.
- Drain the Mozzarella: Next, carefully drain the mini mozzarella balls. They often come packed in water or brine, and we don’t want any of that extra liquid watering down our salad. You can place them in a colander for a few minutes to let all the liquid drip away. For an even drier result, you can gently blot them with a paper towel. I find this step incredibly important for preventing a soggy salad.
- Prepare the Basil: This is where the gorgeous green comes in! Wash your fresh basil leaves very gently. Pat them dry with paper towels. For the smaller leaves, you can leave them whole. For larger leaves, you’ll want to stack a few together, roll them tightly (this technique is called chiffonade), and then slice them into thin strips. Alternatively, you can simply tear larger leaves into smaller, bite-sized pieces. I prefer tearing for a more rustic look and to avoid bruising the delicate leaves.
- Slice and Season (Optional but Recommended): For a truly mini experience and to ensure every bite is perfectly balanced, I like to halve the cherry tomatoes. This allows for easier eating and ensures a lovely pop of flavor in each cup. You can also halve the mini mozzarella balls if they seem a bit too large for your chosen serving vessels. Once halved, place the tomatoes and mozzarella in separate bowls. Drizzle them lightly with a tiny bit of the extra virgin olive oil, and season with flaky sea salt and freshly ground black pepper. This initial seasoning really helps to bring out their natural flavors. Trust me, it makes a difference!
Crafting the Balsamic Glaze
While you can certainly buy pre-made balsamic glaze, making it yourself is surprisingly easy and allows you to control the sweetness and consistency. Plus, the aroma filling your kitchen is simply divine! A homemade balsamic glaze elevates these Christmas Mini Caprese Salad Cups from good to absolutely spectacular.
- Combine Ingredients: Pour the good quality balsamic vinegar into a small, heavy-bottomed saucepan. If you’re using brown sugar or maple syrup, add it now. The sugar helps to thicken the glaze and round out the sharp acidity of the vinegar, resulting in a beautifully balanced flavor profile.
- Bring to a Gentle Simmer: Place the saucepan over medium-low heat. You want to bring the vinegar to a gentle simmer, not a rolling boil. A gentle simmer is key to a smooth reduction without burning. Stir occasionally to ensure the sugar dissolves completely if you’re using it.
- Reduce to a Glaze: This is the patient part. Allow the balsamic vinegar to simmer gently, uncovered, for about 10-15 minutes, or until it has reduced by about half and coats the back of a spoon. As it cooks, you’ll notice it thickening and becoming syrupy. Keep a close eye on it, especially towards the end, as it can go from perfect to burnt very quickly. My secret tip here: dip a cold spoon into the glaze, and if it coats the spoon and holds its shape for a second before dripping, it’s ready. Remember, it will thicken significantly more as it cools, so don’t over-reduce it on the stove!
- Cool and Store: Once your glaze reaches the desired consistency, remove the saucepan from the heat. Carefully pour the hot glaze into a heat-proof jar or a small bowl. Allow it to cool completely at room temperature. As it cools, it will continue to thicken into that luscious, pourable glaze we’re aiming for. Once cool, you can cover it and store it in the refrigerator for up to two weeks. It might solidify a bit in the fridge, but a quick warm-up in the microwave or a few minutes at room temperature will bring it back to a pourable consistency.
Assembling Your Christmas Mini Caprese Salad Cups
Now for the fun part: bringing it all together into these adorable, bite-sized delights! Presentation is everything when it comes to party food, and these cups are designed to impress.
- Choose Your Serving Vessel: Decide if you’re using mini appetizer spoons, small shot glasses, or cocktail skewers. Each offers a slightly different presentation.
- For Spoons/Cups: These create a beautiful layered effect.
- For Skewers: These are fantastic for a grab-and-go option and allow for easy color alternating.
- Layering the Ingredients (Spoons/Cups Method):
- First Layer: Start with a small piece of basil leaf at the bottom of each spoon or cup. This provides a lovely green base and a burst of aromatic flavor in the first bite.
- Second Layer: Next, add a halved mini mozzarella ball. If you seasoned them earlier, they’re ready to go!
- Third Layer: Then, add a halved red cherry tomato.
- Fourth Layer (Optional, for Christmas colors): Follow with a halved yellow cherry tomato, if using. This alternating color really plays up the festive theme.
- Fifth Layer: Place another small basil leaf on top, perhaps folded or gently torn to fit.
- Repeat: Continue layering, aiming for 2-3 pieces of tomato and mozzarella per cup/spoon, interspersed with basil, until your serving vessel is attractively full but not overflowing. I like to finish with a colorful tomato on top for visual appeal.
- Assembling on Skewers (Skewers Method):
- This method is incredibly straightforward and often quite popular at parties. Start by threading a small basil leaf onto the skewer.
- Follow with a mini mozzarella ball.
- Then, add a red cherry tomato half.
- If using, add a yellow cherry tomato half.
- Finish with another basil leaf or a second mozzarella ball, depending on the length of your skewer and desired look.
- You can alternate the colors beautifully here: basil, mozzarella, red tomato, basil, mozzarella, yellow tomato, for a truly festive skewer.
- The Grand Finale: Drizzle with Balsamic Glaze: Once all your mini Caprese cups or skewers are assembled, it’s time for the crowning glory! Drizzle a small amount of your homemade balsamic glaze over each one. A little goes a long way, as the glaze is quite potent and sweet. You can use a spoon, or for more precision, transfer the glaze to a squeeze bottle. This step is non-negotiable for that authentic Caprese experience. The glaze adds a beautiful tang and sweetness that perfectly complements the fresh ingredients.
- Final Garnish (Optional): For an extra touch of elegance and flavor, you can sprinkle a tiny pinch of flaky sea salt and freshly ground black pepper over the finished cups or skewers just before serving. A tiny basil sprig on top of each is also a beautiful touch.
Serving Suggestions and Storage
These Christmas Mini Caprese Salad Cups are best served fresh, but there are ways to prepare ahead to minimize stress on party day!
- Serving: Arrange your beautiful Christmas Mini Caprese Salad Cups on a large platter. I love using a white platter to really make the red, green, and white colors pop. For skewers, you can stand them upright in a decorative container or lay them flat. They make an excellent appetizer for any holiday gathering, from a casual open house to a formal dinner party.
- Make-Ahead Tips: You can prepare the individual components a day in advance. Wash and halve the tomatoes, drain the mozzarella, and prepare the basil. Store them separately in airtight containers in the refrigerator. The balsamic glaze can be made up to two weeks in advance. I highly recommend assembling the cups or skewers no more than 1-2 hours before serving. This prevents the basil from wilting and the tomatoes from releasing too much liquid. If you assemble too early, the texture won’t be as crisp and fresh, which is what makes these so delightful. Drizzle with the balsamic glaze just before serving.
- Storage: If you have any leftovers (which is rare with these!), store them in an airtight container in the refrigerator. They are best consumed within 24 hours. The basil may wilt slightly, but the flavors will still be delicious.
Tips for Perfect Christmas Mini Caprese Salad Cups
I’ve made these countless times, and I’ve picked up a few tricks along the way that I’m happy to share to ensure your Caprese cups are nothing short of perfect!
- Ingredient Quality is Key: Because this recipe uses so few ingredients, the quality of each one really shines through. Invest in the freshest, ripest cherry tomatoes you can find, good quality fresh mozzarella, and aromatic basil. A good balsamic vinegar also makes a huge difference in your glaze. You truly taste the difference!
- Mind the Moisture: I cannot stress enough how important it is to thoroughly dry your tomatoes and drain your mozzarella. Excess water will dilute the flavors and make your beautiful appetizer watery and less appealing.
- Season Appropriately: A light seasoning of salt and pepper on the individual components before assembly can enhance their natural flavors. Don’t overdo it, as the balsamic glaze will also add a layer of seasoning.
- Temperature Matters: Serve these at room temperature for the best flavor. Taking them out of the fridge about 15-20 minutes before serving allows the flavors to truly open up and be appreciated. The chill can dull the brightness of the tomatoes and basil.
- Batching for Crowds: If you’re hosting a large party, consider having an assembly line! Get a few helpers to wash, slice, and layer. It speeds up the process significantly and makes it more fun.
- Presentation Matters: Use attractive serving dishes. The visual appeal is a huge part of the holiday experience. Consider garnishing the platter with extra basil leaves or a light dusting of finely chopped fresh parsley for more green.
- Experiment with Balsamic Glaze Sweetness: Taste your balsamic vinegar before adding sugar to the glaze. Some balsamic vinegars are naturally sweeter than others. Adjust the brown sugar or maple syrup to your preference. If you like a truer, tarter glaze, omit the added sweetener.
- A Twist on the Traditional: For an extra festive touch or if you want to expand beyond the classic Caprese, consider adding a tiny sprinkle of toasted pine nuts for crunch, or a very thin slice of avocado for an additional layer of creaminess (though this moves away from strict Caprese). You could also try infusing your olive oil with a garlic clove for a subtle garlic kick, but be careful not to overpower the fresh Caprese flavors.
- Consider a Tray with Wells: For easier transport and serving, especially for the spoon method, consider using a serving tray that has small indentations or wells. This prevents the spoons from sliding around.
- Label for Dietary Needs: These are naturally gluten-free and vegetarian, making them ideal for many guests. However, if you’re serving other dishes, a small label indicating “Vegetarian & Gluten-Free” can be a thoughtful touch for your guests, ensuring everyone feels welcome and can enjoy your delicious spread.
These Christmas Mini Caprese Salad Cups are one of my go-to holiday appetizers because they are fresh, flavorful, and so vibrant. They bring that perfect festive cheer to any table without being overly heavy. Enjoy making and sharing them!
Conclusion:
Well, there you have it! After walking you through the simple steps, I sincerely hope you’re feeling as inspired as I am to whip up a batch of these truly delightful bites. This recipe isn’t just about assembling ingredients; it’s about creating moments, adding a splash of vibrant color to your table, and bringing an undeniable freshness to any gathering. I genuinely believe this dish is a must-try for so many reasons. For starters, the ease of preparation is simply unmatched. You don’t need to be a gourmet chef to achieve stunning results; just a few fresh components come together to create something truly magical. The visual appeal alone is enough to make jaws drop – those festive red tomatoes, the pearly white mozzarella, and the verdant green basil, all glistening under a balsamic glaze, create a mini edible masterpiece. It’s a symphony of textures and flavors: the juicy burst of the tomato, the creamy chew of the mozzarella, the aromatic pop of basil, and that sweet-tangy finish from the glaze. Each bite is a little explosion of classic Italian goodness, made even better by its convenient, individual serving size. This is not merely an appetizer; it’s a statement piece, a conversation starter, and a testament to how simple, high-quality ingredients can combine to produce extraordinary flavor. Trust me, your taste buds will thank you for making this recipe a staple.
Now, let’s talk about making these beauties truly your own! While the classic rendition is perfect, there’s always room for creative flair. For serving, consider arranging them artfully on a large, rustic wooden platter for an elegant touch, or simply have them ready in their individual cups on a tray for easy grab-and-go enjoyment. They are absolutely perfect as a light appetizer before a hearty meal, but don’t limit them to just starters! These cups also make a fantastic, refreshing side dish to grilled chicken or fish, adding a bright counterpoint to richer flavors. I’ve even enjoyed them as a light lunch when paired with a crusty baguette.
Thinking about variations? Oh, the possibilities are endless! If you’re looking to switch up the cheese, small cubes of smoked mozzarella could add a lovely depth, or even tiny balls of burrata for an extra creamy indulgence. For a slightly different herbal note, a tiny sprig of fresh mint or a sprinkle of finely chopped oregano could be interesting, though basil truly shines here. If you prefer a lighter dressing, a drizzle of high-quality extra virgin olive oil with a squeeze of fresh lemon juice could replace some of the balsamic glaze, offering a zesty brightness. And for those who love a bit of a kick, a very thin slice of jalapeño or a sprinkle of red pepper flakes could introduce a subtle heat. You could even wrap a tiny piece of prosciutto around the mozzarella for a savory, salty kick – just be mindful it wouldn’t be vegetarian anymore! For an unexpected twist, consider adding a small, pitted Kalamata olive to some of the cups for a briny pop. These aren’t just for Christmas either; swap out the red cups for clear ones, and they’re perfect for summer picnics, bridal showers, or any occasion that calls for fresh, delicious simplicity. These Christmas Mini Caprese Salad Cups are incredibly versatile and adaptable!
So, what are you waiting for? I wholeheartedly encourage you to roll up your sleeves and give this recipe a try. You’ll be amazed at how quickly these little gems disappear once they hit the table. They’re perfect for holiday parties, family gatherings, or just a simple weeknight treat when you’re craving something fresh and satisfying. Don’t be shy about experimenting with your own personal touches – that’s half the fun of cooking! Once you’ve made them, I would absolutely love to hear about your experience. Did you add a unique twist? What did your guests think? Please share your thoughts and creations; it brings me so much joy to hear how my recipes come to life in your kitchens. Get ready to impress everyone with these vibrant, flavorful, and incredibly easy appetizers! Happy cooking, my friends!
Christmas Mini Caprese Salad Cups
Revolutionize your holiday appetizer spread with these easy and festive Christmas Mini Caprese Salad Cups. Featuring vibrant tomatoes, creamy mozzarella, fresh basil, and a tangy balsamic glaze, they offer a refreshing and elegant bite-sized starter perfect for any holiday gathering.
Ingredients
Instructions
Important Information
Nutrition Facts (Per Serving)
It is important to consider this information as approximate and not to use it as definitive health advice.
Allergy Information
Please check ingredients for potential allergens and consult a health professional if in doubt.