Christmas Tree Shaped Charcuterie
Oh, the holidays are just around the corner, and I don’t know about you, but I’m always looking for ways to make entertaining a little more magical and a lot less stressful! That’s precisely why I am absolutely thrilled to share the recipe for our Christmas Tree Shaped Charcuterie. Forget your run-of-the-mill appetizer platter; this isn’t just a selection of delicious bites, it’s a dazzling centerpiece that practically screams “holiday cheer!”
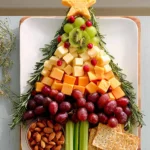
What makes this dish so special is its incredible visual appeal – we’re taking all the savory goodness of a traditional charcuterie board and transforming it into an edible Christmas tree! Imagine layers of savory cured beef, an assortment of exquisite cheeses, vibrant fresh fruits, crunchy crackers, and perhaps some briny olives, all meticulously arranged to form a festive fir. I promise you, your guests will gasp in delight the moment they lay eyes on it!
You are going to absolutely love making this because it’s surprisingly easy to assemble, incredibly customizable to your tastes (and what you have on hand!), and undeniably impressive. It’s the perfect showstopper for any holiday gathering, offering a delightful array of textures and flavors that cater to everyone. So, get ready to dive into creating a beautiful, edible masterpiece that will be the talk of your holiday party, perhaps even paired with a lovely non-alcoholic sparkling cider!

Ingredient Notes
Creating a beautiful Christmas Tree Shaped Charcuterie board is all about selecting ingredients that are not only delicious but also visually appealing and easy to arrange into our festive shape. I always recommend choosing a variety of colors, textures, and flavors to make your tree truly spectacular. Here’s a rundown of the key components I love to use:
Cheeses
- Firm Cheeses: These are the backbone of our tree. Think sharp cheddar, provolone, or Gruyère. I like to cut these into triangles of varying sizes to form the “branches” or into cubes. You can even use a small star cookie cutter for some festive cheese “ornaments.”
- Soft Cheeses: Brie or camembert wedges are wonderful for adding creaminess. You can place them at the base of your tree or in strategic spots. Goat cheese logs can also be rolled in herbs or dried cranberries for extra color.
- Marbled Cheeses: Colby Jack or Monterey Jack add visual interest with their two-tone appearance.
Cured Meats (Beef-based)
To adhere to dietary substitutions, we’ll focus on delicious beef options. These add savory depth and can be folded creatively to give texture to our tree.
- Beef Salami: Thinly sliced beef salami can be folded into quarters or rolled into cones to create wonderful texture and fill out your tree.
- Beef Prosciutto: Its delicate texture and rich flavor are fantastic. I like to loosely fold slices to create soft, undulating “branches” or layers.
- Roast Beef Deli Slices: Thinly sliced roast beef can be folded or rolled similarly to salami, offering a different flavor profile.
Fruits
Fruits are our colorful “ornaments” and provide a lovely freshness that balances the richness of the meats and cheeses.
- Green Grapes: Cluster them together to form sections of green foliage.
- Red Grapes: These are perfect for scattering like small red ornaments.
- Berries: Fresh cranberries, raspberries, or halved strawberries add vibrant pops of red. Blueberries can also be used for a different accent.
- Kiwi Slices: Cut into halves or quarters, their green flesh with black seeds is very striking.
- Pomegranate Arils: These ruby-red jewels are fantastic for sprinkling over the board for a festive sparkle.
- Apple/Pear Slices: Remember to toss them in a little lemon juice to prevent browning. You can even cut small star shapes out of them!
Vegetables
- Olives: Green and black olives add a briny touch and are great for filling gaps.
- Cherry Tomatoes: Bright red and round, they’re perfect mini ornaments.
- Cucumber Slices: If you’re feeling fancy, use a mini cookie cutter to make cucumber stars or tree shapes.
Crackers & Bread
These are essential for scooping up our delicious components. I usually place them around the base of the tree or strategically tuck them into the design.
- Assorted Crackers: Choose a variety of shapes and textures – water crackers, multigrain, or even some festive star-shaped crackers.
- Mini Toasts or Baguette Slices: A sturdy option for heavier cheeses or spreads.
- Breadsticks: A few long breadsticks can even form the “trunk” of your tree!
Spreads & Dips
- Fig Jam or Cranberry Preserves: These add a sweet and tangy element, often in a festive red color.
- Honey: A drizzle of honey over some brie is always a hit.
- Hummus: Plain or red pepper hummus can add another layer of flavor and color.
Garnishes & Embellishments
- Rosemary Sprigs: These are absolutely crucial for giving our charcuterie tree its authentic “pine needle” look and aroma. Tuck them throughout.
- Edible Star Topper: A star cut from a slice of cheese (like cheddar or provolone) or a slice of starfruit can crown your tree perfectly.
- Small Candy Canes (optional, for decor only): Small, individually wrapped candy canes can be placed around the board for a decorative touch if desired.
The beauty of a charcuterie board is its flexibility, so feel free to mix and match based on your preferences and what looks most festive!
Step-by-Step Instructions
Alright, let’s get building our edible masterpiece! The key to a stunning Christmas Tree Shaped Charcuterie board is starting with a good foundation and building upwards, much like decorating a real tree. I find it helpful to visualize the tree shape as I go.
-
Prepare Your Board and Base
- First, choose a large platter, cutting board, or baking sheet that will serve as your canvas. I like a rectangular or oval shape to give me plenty of room.
- Next, envision your tree. I usually start by placing a few long breadsticks or even a sturdy piece of cheese (like a thick slice of provolone) at the bottom center to form the “trunk” of the tree.
- At the very bottom, where the widest part of your tree will be, lay down a foundation of your larger cheese pieces or folded beef salami. Think of this as the bottom layer of branches.
-
Build the “Branches” with Cheeses and Meats
- Now, start arranging your cheeses and beef meats, working your way up from the wide base, gradually narrowing the arrangement to form the classic Christmas tree silhouette.
- For firm cheeses, cut them into triangles of varying sizes. I layer these, slightly overlapping, to create a fuller look.
- For beef salami or roast beef, I love to fold slices into quarters or roll them into small cones. For beef prosciutto, a gentle scrunch or loose fold works best. Place these meats strategically among the cheeses to break up the texture and add color.
- Continue layering, ensuring you’re maintaining the triangular tree shape as you move upwards. Don’t be afraid to stack a little to create dimension.
-
Add “Ornaments” and Color with Fruits and Vegetables
- Once your main cheese and meat structure is in place, it’s time for the “decorations”! I scatter grapes (red and green) throughout the tree, placing clusters here and there.
- Cherry tomatoes, raspberries, and pomegranate arils are fantastic for adding bright red pops of color – our festive ornaments.
- Tuck in kiwi slices or cucumber shapes to add more green and visual interest.
- Fill any smaller gaps with olives or blueberries to give it a truly lush, full appearance.
-
Fill and Garnish
- Take a step back and look at your tree. Are there any empty spaces? This is where nuts (pecans, walnuts, almonds) come in handy. I use them to fill any remaining voids and add a lovely crunch.
- Place small bowls or ramekins of your chosen spreads (like fig jam or hummus) at the base of the tree or slightly off to the side, where they’re easily accessible.
- Now for the magic touch: tuck fresh rosemary sprigs throughout your charcuterie tree. These truly make it look like a pine tree and add a wonderful aromatic element. I place them peeking out from under cheeses and meats.
-
Crown Your Tree
- No Christmas tree is complete without a star! I typically use a star-shaped piece of cheddar or provolone cheese, cut with a cookie cutter, and place it proudly at the very top of my charcuterie tree. A slice of starfruit can also work beautifully here.
-
Arrange Crackers
- Finally, arrange your assorted crackers and bread around the base of the charcuterie tree. I like to fan them out or create a neat line, making sure they’re easily reachable without disturbing the tree itself.
And there you have it! A festive and delicious Christmas Tree Shaped Charcuterie ready to impress your guests. I always feel a little extra joy when I see it come together.
Tips & Suggestions
To make your Christmas Tree Shaped Charcuterie truly shine, I’ve gathered some of my favorite tips and tricks. These suggestions will help you create a showstopper that’s as delicious as it is beautiful.
- Start with a Sketch: Before you even touch an ingredient, I find it incredibly helpful to mentally (or even physically) sketch out how you want your tree to look on your chosen board. This helps with ingredient selection and placement.
- Think in Layers and Dimension: Don’t just lay everything flat. Fold meats, stack cheeses slightly, and build up layers. This adds height and visual interest, making your tree look full and inviting.
- Color Palette is Key: Stick to classic Christmas colors: reds (cranberries, raspberries, cherry tomatoes, red grapes), greens (rosemary, green grapes, kiwi, cucumber), and whites/neutrals (various cheeses, crackers). This cohesive palette enhances the festive theme.
- Variety in Texture and Flavor: Offer a good mix – creamy cheeses, firm cheeses, salty meats, sweet fruits, crunchy nuts, and crisp crackers. This ensures every bite is interesting and caters to different palates.
- Pre-Cut and Prep: Do as much chopping, slicing, and dicing as you can beforehand. This makes assembly much quicker and less stressful, allowing you to focus on the artistic arrangement. Keep fruits like apples and pears in lemon water to prevent browning.
- Use Cookie Cutters: Don’t underestimate the power of a small cookie cutter! Use star or small tree shapes on cheese slices, cucumber, or even toast for extra festive flair. This is especially fun for the tree topper.
- The Rosemary “Needles”: This is a game-changer! Fresh rosemary sprigs tucked throughout the board truly transform it into a pine tree. Don’t be shy with them; they add fragrance and authenticity.
- Consider Dips and Spreads: Place small ramekins of honey, fig jam, or cranberry preserves either within the tree (if space allows) or attractively around its base. A little bowl of green pesto or hummus could even represent a small “gift” at the tree’s base.
- Strategic Placement of Crackers: While some people put all crackers in a separate bowl, I like to arrange a selection of them fanned out around the base of the tree. This makes the board feel complete and ready to eat.
- Keep it Cool: If you’re assembling the board ahead of time, keep it refrigerated until about 15-20 minutes before serving. This allows the cheeses to come to room temperature, enhancing their flavor, but prevents the meats and fruits from sitting out too long.
- Pairing Suggestions: Serve your beautiful charcuterie tree with non-alcoholic sparkling cider, cranberry spritzers, or even a festive ginger beer. These offer a refreshing contrast to the rich flavors on the board.
- Don’t Be Afraid to Adjust: As you’re building, step back often to assess your progress. It’s easy to move things around until you achieve your desired look. Remember, it’s meant to be enjoyed, so have fun with the process!
Following these tips will help you create not just a snack, but a centerpiece that will surely be a talking point at your holiday gathering!
Storage
While a Christmas Tree Shaped Charcuterie board is definitely best enjoyed fresh, I understand that sometimes you might have leftovers or need to assemble parts of it ahead of time. Here’s my advice on storage:
- Pre-Assembly Storage: If you’re prepping ingredients ahead, I recommend keeping components separate. Store sliced cheeses, folded meats, and cut fruits/vegetables in individual airtight containers or Ziploc bags in the refrigerator for up to 1-2 days. Crackers, nuts, and dry items should be stored at room temperature in their original packaging.
- Short-Term Storage of an Assembled Board: If you’ve assembled the board but it won’t be served for a few hours, carefully cover the entire board with plastic wrap, ensuring it’s sealed tightly to prevent air exposure. Place it in the refrigerator. I generally wouldn’t recommend storing an assembled board for more than 4-6 hours before serving, as fruits can start to dry out or “weep,” and some items might lose their fresh appeal.
- Leftover Storage: For any significant leftovers, I suggest dismantling the tree. Separate the cheeses, meats, and fruits into individual airtight containers.
- Cheeses: Most firm cheeses will last for several days in the refrigerator if properly wrapped. Softer cheeses should be consumed within 1-2 days.
- Cured Beef Meats: These can typically be stored in an airtight container in the fridge for 2-3 days.
- Fruits & Vegetables: These are best consumed as soon as possible after the board is disassembled. Their shelf life will vary, but usually 1-2 days at most for optimal freshness. Crackers will get soggy if stored with moist ingredients; remove them.
- Best Served Fresh: The ultimate truth about charcuterie is that it truly shines when served fresh. The textures are at their best, and the flavors are vibrant. The visual appeal of the “tree” is also paramount, and it tends to lose some of its structural integrity and freshness after being refrigerated for too long. My advice is always to assemble it as close to serving time as possible for the best experience!

Final Thoughts
I hope you’re as excited as I am about this delightful holiday creation! The Christmas Tree Shaped Charcuterie isn’t just an appetizer; it’s a festive statement piece that brings an instant smile to everyone’s face and truly sets a joyful tone for any gathering.
It’s so much fun to assemble, and the visual impact it creates is truly something special. Imagine your guests gathering around this edible masterpiece! I promise you, the Christmas Tree Shaped Charcuterie is a must-try this season because it effortlessly combines delicious flavors with an incredibly charming presentation. Whether you’re opting for a spread featuring savory beef options or pairing it with your favorite non-alcohol alternatives, this board is wonderfully adaptable to suit all tastes and dietary preferences, making it a crowd-pleaser for everyone.
So go ahead, embrace the holiday spirit and create this stunning and delicious centerpiece. I can’t wait for you to experience the joy of making and sharing your very own Christmas Tree Shaped Charcuterie!
Festive Christmas Tree Shaped Charcuterie for Holiday Parties
- Total Time: 30 minutes
- Yield: 8 servings
Description
Create a stunning Christmas Tree Shaped Charcuterie that serves as both a delicious appetizer and a festive centerpiece for your holiday gatherings. This visually appealing dish combines savory meats, a variety of cheeses, and colorful fruits and vegetables, making it a delightful treat for your guests.
Ingredients
- Sharp cheddar cheese
- Provolone cheese
- Gruyère cheese
- Brie cheese
- Camembert cheese
- Goat cheese
- Colby Jack cheese
- Monterey Jack cheese
- Beef salami
- Beef prosciutto
- Roast beef deli slices
- Green grapes
- Red grapes
- Fresh cranberries
- Raspberries
- Strawberries
- Blueberries
- Kiwi slices
- Pomegranate arils
- Apple slices
- Pear slices
- Lemon juice
- Green olives
- Black olives
- Cherry tomatoes
- Cucumber slices
- Assorted crackers
- Mini toasts
- Baguette slices
- Breadsticks
- Fig jam
- Cranberry preserves
- Honey
- Hummus
- Rosemary sprigs
- Edible star topper (cheese or starfruit)
- Small candy canes (optional)
Instructions
- Prepare Your Board and Base: Choose a large platter, cutting board, or baking sheet. Place long breadsticks or a thick slice of cheese at the bottom center to form the trunk of the tree. Lay down larger cheese pieces or folded beef salami at the bottom for the foundation.
- Build the 'Branches' with Cheeses and Meats: Arrange cheeses and beef meats, starting from the wide base and narrowing upwards. Cut firm cheeses into triangles and layer them. Fold or roll beef salami and roast beef, placing them among the cheeses.
- Add 'Ornaments' and Color with Fruits and Vegetables: Scatter grapes, cherry tomatoes, raspberries, and pomegranate arils throughout the tree. Tuck in kiwi slices or cucumber shapes and fill gaps with olives or blueberries.
- Fill and Garnish: Use nuts to fill any empty spaces. Place small bowls of spreads at the base of the tree. Tuck fresh rosemary sprigs throughout the tree for a pine tree look.
- Crown Your Tree: Place a star-shaped piece of cheese or a slice of starfruit at the top of the charcuterie tree.
- Arrange Crackers: Arrange assorted crackers and bread around the base of the charcuterie tree for easy access.
- Prep Time: 30 mins
- Cook Time: 0 mins
- Category: Appetizer
- Method: No cooking required
- Cuisine: American
Nutrition
- Serving Size: 1 slice
- Calories: 250
- Sugar: 5 g
- Sodium: 400 mg
- Fat: 15 g
- Saturated Fat: 7 g
- Unsaturated Fat: 5 g
- Trans Fat: 0 g
- Carbohydrates: 20 g
- Fiber: 2 g
- Protein: 10 g
- Cholesterol: 30 mg
Keywords: Feel free to mix and match ingredients based on your preferences. Use cookie cutters for festive shapes and keep the board refrigerated until serving.