Dairy Free Gluten Free Dinner Rolls are more than just a side dish; they’re a warm embrace, a symbol of comfort, and a true culinary triumph for anyone navigating specific dietary needs. I know the struggle firsthand – the yearning for that perfectly soft, pillowy roll that complements any meal, only to be met with limited options that often disappoint in texture or taste. But what if I told you that you no longer have to compromise?
The Unsung Hero of the Table, Reimagined
For centuries, the humble dinner roll has held a special place at tables around the world, from festive holiday feasts to simple weeknight dinners, embodying warmth and togetherness. Its ability to absorb delicious gravies, accompany hearty stews, or simply be enjoyed with a smear of your favorite spread makes it universally beloved. The challenge, however, has always been recreating that beloved experience without gluten or dairy. This recipe for Dairy Free Gluten Free Dinner Rolls changes everything. People adore these rolls not just because they meet crucial dietary requirements, but because they genuinely deliver on flavor and an incredibly light, airy texture that is surprisingly easy to achieve. Get ready to rediscover the joy of a truly fantastic roll!

Ingredients:
Creating truly delightful Dairy Free Gluten Free Dinner Rolls requires a bit of precision and a selection of specific ingredients designed to give us that wonderful soft, pillowy texture we all crave. Here’s everything you’ll need:
- 2 ¼ teaspoons active dry yeast (or one 0.25-ounce packet): This is our leavening agent, the magical component that will make our rolls rise beautifully. Make sure your yeast is fresh and active for the best results!
- 1 teaspoon granulated sugar (plus 1 tablespoon for the dough): The initial teaspoon helps “feed” our yeast, waking it up and ensuring it’s ready to work its magic. The additional tablespoon adds a touch of sweetness and helps with browning.
- 1 ½ cups warm unsweetened dairy-free milk (such as almond, soy, or oat milk), heated to 105-115°F (40-46°C): Temperature is crucial here! Too hot and you’ll kill the yeast; too cold and it won’t activate properly. I usually microwave mine for about 45-60 seconds, then check with a thermometer.
- ¼ cup dairy-free unsalted butter, melted (or a neutral-flavored oil like canola or sunflower): This provides richness and helps tenderize our Dairy Free Gluten Free Dinner Rolls. Make sure it’s melted but not boiling hot.
- 1 tablespoon apple cider vinegar: A secret weapon in gluten-free baking! The acidity helps tenderize the crumb and reacts with the baking soda (if used) to create more lift.
- 2 cups (approximately 280g) gluten-free all-purpose flour blend, preferably one containing xanthan gum (if your blend does not contain xanthan gum, add an additional 1 teaspoon xanthan gum separately): Not all GF blends are created equal. I recommend a blend designed for baking, often rice-flour based with tapioca starch and potato starch. If your blend is missing xanthan gum, it’s a must-add for elasticity!
- ½ cup (approximately 70g) tapioca starch (or tapioca flour): This contributes to the chewy texture and helps prevent the rolls from being too dense.
- ½ cup (approximately 70g) potato starch: Another fantastic starch that helps keep our Dairy Free Gluten Free Dinner Rolls light and tender.
- 1 teaspoon xanthan gum: Absolutely essential for gluten-free baking! This mimics the elasticity and binding properties of gluten, preventing our rolls from crumbling. If your flour blend already has it, you might reduce this slightly or skip, but I often find a little extra helps with rolls.
- 1 teaspoon salt: Crucial for flavor and also helps to control yeast activity. Don’t skip it!
- ½ teaspoon baking powder: Provides an extra boost of lift, working in conjunction with the yeast for truly fluffy rolls.
- For brushing (optional): 2 tablespoons melted dairy-free butter or olive oil. This gives our rolls a beautiful golden sheen and adds extra flavor right out of the oven.
Preparing Your Workspace and Ingredients
Before we dive into mixing, let’s get organized! Baking, especially gluten-free baking, benefits greatly from a little preparation. I always find that having everything measured and ready to go makes the process so much smoother and more enjoyable. Trust me, it significantly reduces the chances of forgetting an ingredient or making a mistake when you’re in the flow of things.
- Gather Your Tools: Make sure you have a large mixing bowl (or the bowl of a stand mixer fitted with a paddle attachment), a whisk, a rubber spatula, measuring cups and spoons, a liquid measuring cup, a baking sheet (I prefer a light-colored one for even baking), and parchment paper. A kitchen thermometer for checking milk temperature is also incredibly handy.
- Warm the Dairy-Free Milk: In a microwave-safe measuring cup or a small saucepan, gently warm your 1 ½ cups of dairy-free milk until it reaches a temperature between 105-115°F (40-46°C). This temperature range is absolutely critical for activating the yeast properly. If it’s too hot, you’ll kill the yeast, and your rolls won’t rise. If it’s too cool, the yeast won’t activate efficiently, leading to a sluggish rise. I usually aim for the lower end of the spectrum, around 105-110°F, just to be safe. You should be able to comfortably stick your finger in it without feeling burned.
- Activate the Yeast: Pour the warmed dairy-free milk into your large mixing bowl. Sprinkle the 1 teaspoon of granulated sugar and the 2 ¼ teaspoons of active dry yeast over the top. Give it a gentle stir, just enough to dissolve the sugar and ensure the yeast is submerged. Now, let it sit undisturbed for 5-10 minutes. During this time, you should observe the mixture becoming foamy and bubbly on the surface. This beautiful foam is proof that your yeast is alive and ready to perform! If you don’t see any activity, your yeast might be old or your milk was not at the right temperature. In that case, unfortunately, you’ll need to start this step over with new yeast and re-warmed milk. It’s a vital step for fluffy Dairy Free Gluten Free Dinner Rolls.
- Prepare Your Baking Sheet: While the yeast is activating, line a large baking sheet with parchment paper. If you don’t have parchment paper, you can lightly grease the baking sheet with dairy-free butter or oil. This step prevents sticking and makes cleanup a breeze.
Mixing the Dairy Free Gluten Free Dinner Rolls Dough
Now that our yeast is bubbly and happy, it’s time to bring all our ingredients together to form the dough for our delicious Dairy Free Gluten Free Dinner Rolls. Gluten-free dough has a different consistency than traditional wheat dough – it will be stickier and less elastic, almost like a thick batter, and that’s perfectly normal!
- Combine Wet Ingredients: Once your yeast mixture is foamy, add the melted dairy-free butter (or oil), the remaining 1 tablespoon of granulated sugar, and the apple cider vinegar to the bowl. Whisk everything together until it’s well combined. The apple cider vinegar is really a hidden gem in gluten-free baking; it helps to create a softer, more tender crumb.
- Whisk Dry Ingredients: In a separate medium-sized bowl, combine the gluten-free all-purpose flour blend, tapioca starch, potato starch, xanthan gum, salt, and baking powder. Use a whisk to thoroughly combine these ingredients, ensuring there are no clumps and that the xanthan gum is evenly distributed. Even distribution of xanthan gum is key to preventing a gummy texture and ensuring uniform binding throughout the rolls. This also helps incorporate a little air, which is always good for lightness.
- Combine Wet and Dry: Gradually add the dry ingredient mixture to the wet ingredients in the large mixing bowl. If you’re using a stand mixer, attach the paddle attachment and mix on low speed until just combined, then increase to medium-low and mix for about 3-5 minutes. If mixing by hand, use a sturdy rubber spatula or a wooden spoon and stir vigorously for about 4-5 minutes. You want to ensure all the flour is fully hydrated and the mixture is smooth, without any dry pockets. The dough will be quite sticky, soft, and thick – much like a very thick cake batter or a soft cookie dough. It won’t form a traditional elastic ball like wheat dough, and that’s exactly what we’re looking for!
- Assess Dough Consistency: At this point, your dough should be thick enough to hold its shape somewhat but still very sticky to the touch. If it seems excessively wet and doesn’t hold any shape at all, you can add another tablespoon or two of your gluten-free flour blend. If it feels too stiff or dry (which is less common with this recipe), add a teaspoon of dairy-free milk. Trust your instincts here; consistency is important for the final texture of your Dairy Free Gluten Free Dinner Rolls.
The First Rise: Developing Flavor and Texture
The first rise, often called bulk fermentation, is where our dough really starts to develop its flavor and structure. For gluten-free dough, this rise is just as important as it is for traditional dough, despite the differences in texture.
- Prepare for the Rise: Lightly grease a clean large bowl with a little dairy-free oil or melted dairy-free butter. Transfer your sticky dough into this greased bowl. Using a greased spatula or your greased hands (this helps prevent sticking!), gently turn the dough once or twice to coat it lightly with oil. This prevents a dry skin from forming on the dough during the rise.
- Cover and Rest: Cover the bowl tightly with plastic wrap or a clean kitchen towel. You want to create a warm, humid environment for the yeast to thrive.
- Find a Warm Spot: Place the covered bowl in a warm, draft-free place in your kitchen. Ideal spots include:
- Inside a microwave that’s turned off, with a cup of hot water alongside the bowl to create a steamy environment.
- In a slightly warmed oven (turn your oven on to its lowest setting for just 1-2 minutes, then turn it off completely before placing the dough inside).
- Near a sunny window (if it’s not too hot directly).
- On top of the refrigerator.
A consistent warm temperature is essential for a good rise.
- Allow to Rise: Let the dough rise for 60-90 minutes, or until it has noticeably increased in size, typically about 1 ½ times its original volume. Gluten-free dough won’t always double in size like wheat dough, so look for a significant puffiness and aeration. You might see some small bubbles forming on the surface. Patience is a virtue here; don’t rush the rise, as it contributes immensely to the light texture of your Dairy Free Gluten Free Dinner Rolls. The exact time will depend on the warmth of your kitchen and the vitality of your yeast.
Shaping Your Dairy Free Gluten Free Dinner Rolls
Now comes the fun part – transforming our risen dough into individual rolls! This step might feel a little different with gluten-free dough, as it remains stickier and softer than what you might be used to. Don’t worry, with a few tricks, you’ll be shaping perfect Dairy Free Gluten Free Dinner Rolls in no time.
- Prepare Your Surface and Hands: Lightly flour your work surface with extra gluten-free flour (or use a light spray of oil if you prefer not to add more flour). Also, lightly dust your hands with gluten-free flour, or better yet, lightly oil them. Oiling your hands is often more effective than flouring when dealing with sticky gluten-free dough, as it prevents absorption and maintains the dough’s moisture.
- Gently Deflate the Dough: Once the dough has completed its first rise, gently punch it down to release the accumulated gases. Use your oiled hands or a greased spatula to carefully scrape the dough out of the bowl and onto your prepared work surface. Try to handle the dough as little as possible, just enough to get it out.
- Divide the Dough: For consistently sized rolls, I recommend using a kitchen scale. Divide the dough into 12-16 equal portions, depending on your desired roll size. For medium-sized rolls, aim for about 60-70 grams per roll. You can eyeball it too, but a scale ensures uniformity in baking.
- Shape the Rolls:
The “Roll and Tuck” Method:
- Take one portion of dough and place it between the palms of your lightly oiled hands.
- Gently roll the dough into a smooth ball. The trick here is to create surface tension. As you roll, slightly tuck the edges of the dough underneath itself. Imagine you’re trying to create a smooth top surface by pinching and folding the bottom.
- Alternatively, place the portion of dough on your lightly floured or oiled work surface. Cup your hand over the dough, pressing down gently while moving your hand in a circular motion. This action helps to pull the dough into a tight ball, creating a smooth, round top and a slightly tucked-under base.
Don’t overwork the dough; handle it gently and quickly. The goal is to create a relatively smooth, round shape.
- Arrange on Baking Sheet: Place the shaped rolls onto your parchment-lined baking sheet, leaving about 1-2 inches of space between each roll. They will expand quite a bit during the second rise and baking. For soft-sided pull-apart rolls, you can place them a little closer together. For individual, crustier rolls, give them more space.
The Second Rise: Achieving Pillowy Softness
The second rise is crucial for developing the final light and airy texture of our Dairy Free Gluten Free Dinner Rolls. It’s a bit shorter than the first, but equally important for achieving that pillowy softness we’re aiming for.
- Prepare for the Second Rise: Once all your rolls are shaped and arranged on the baking sheet, lightly spray them with a fine mist of dairy-free cooking spray or lightly brush them with a thin layer of dairy-free oil. This helps to prevent a dry crust from forming on top, which could inhibit the rise.
- Cover the Rolls: Loosely cover the entire baking sheet with a large piece of plastic wrap or a clean, damp kitchen towel. Make sure the cover is not touching the rolls directly, as they will expand. You can use an inverted large bowl or another baking sheet to create a dome over them if needed.
- Find a Warm, Draft-Free Spot (Again!): Place the covered baking sheet back into your chosen warm, draft-free spot. The same conditions that worked for the first rise will work here.
- Allow to Rise: Let the rolls rise for another 30-45 minutes, or until they look visibly puffy and have increased in size by about 50%. They won’t necessarily double, but they should look noticeably larger and softer. This second proofing is where the rolls truly gain their characteristic lightness, so resist the urge to rush it. If your kitchen is cooler, it might take a bit longer.
- Preheat Your Oven: About 15-20 minutes before the second rise is complete, preheat your oven to 375°F (190°C). This ensures the oven is at the correct temperature when the rolls are ready to go in, which is important for a good “oven spring.”
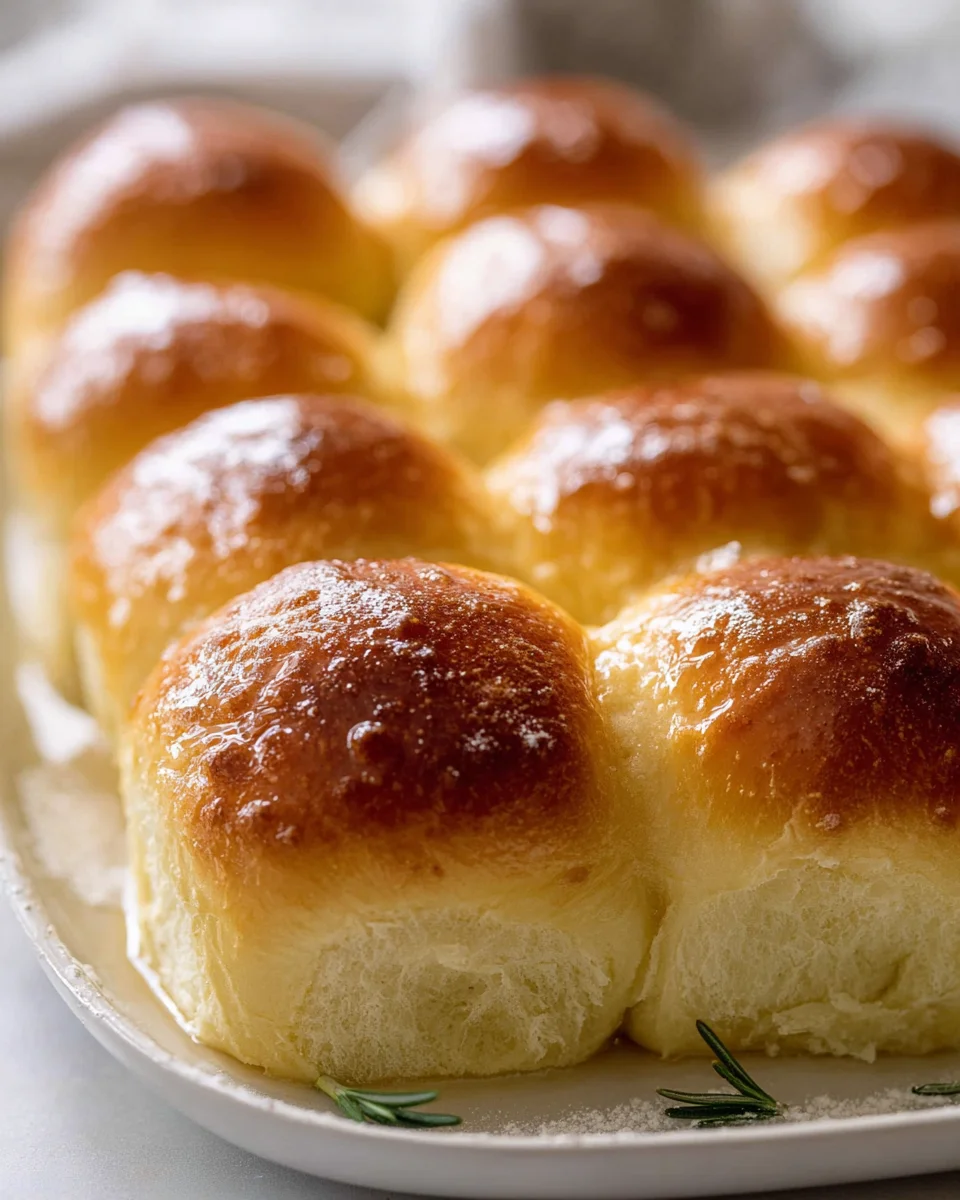
Baking Your Golden Brown Dairy Free Gluten Free Dinner Rolls
The moment of truth! Baking these Dairy Free Gluten Free Dinner Rolls to a beautiful golden brown is the final step before you get to enjoy their deliciousness. Getting the timing and temperature right is key to a perfectly baked roll that is soft on the inside and just lightly crisp on the outside.
- Prepare for Baking (Optional Brush): Just before placing the rolls in the oven, you have an optional step that can enhance their appearance and flavor. You can lightly brush the tops of the rolls with a little melted dairy-free butter or olive oil. This not only encourages a lovely golden-brown crust but also adds a subtle richness. If you skip this, they will still bake beautifully, but the crust might be a little less shiny.
- Place in Oven: Carefully transfer the baking sheet with the risen rolls to the preheated 375°F (190°C) oven. Try to do this gently to avoid deflating the rolls. Place the baking sheet on the middle rack for even heat distribution.
- Bake the Rolls: Bake for 20-25 minutes. The exact time will vary slightly depending on your oven and the size of your rolls. Around the 15-minute mark, you’ll start to notice a wonderful aroma filling your kitchen – a sure sign that deliciousness is on its way!
- Check for Doneness: The rolls are done when they are beautifully golden brown on top and sound hollow when tapped on the bottom. If you have an instant-read thermometer, the internal temperature should be around 200-205°F (93-96°C). Don’t be afraid to give them a little extra time if they aren’t quite golden enough; under-baked gluten-free goods can be gummy. If they are browning too quickly, you can loosely tent them with aluminum foil for the last 5-10 minutes of baking.
- Rotate if Necessary: If your oven bakes unevenly, you might want to rotate the baking sheet halfway through the baking time to ensure all your Dairy Free Gluten Free Dinner Rolls brown uniformly.
Cooling and Serving Your Delicious Dairy Free Gluten Free Dinner Rolls
You’ve done it! Your kitchen now smells amazing, and you have a tray full of beautiful, golden-brown Dairy Free Gluten Free Dinner Rolls. But don’t dive in just yet! A crucial step for gluten-free baked goods is proper cooling.
- Transfer to a Cooling Rack: As soon as you pull the rolls out of the oven, use a spatula to immediately transfer them from the baking sheet to a wire cooling rack. Allowing them to cool on the rack prevents the bottoms from becoming soggy due to trapped steam. The circulating air ensures they cool evenly.
- Optional Finishing Touch (Highly Recommended!): While the rolls are still warm (within the first 5 minutes of coming out of the oven), brush their tops with a little more melted dairy-free butter or a tiny bit of olive oil. This simple step adds an incredible sheen, enhances the flavor, and keeps the crust wonderfully soft. The warmth of the rolls will quickly absorb the butter, infusing them with extra richness.
- Cool Completely (or Mostly): I know, I know, it’s hard to resist! But allowing your Dairy Free Gluten Free Dinner Rolls to cool for at least 20-30 minutes (or even longer, until just warm to the touch) is genuinely important for gluten-free bread. This cooling period allows the internal structure of the rolls to set properly. If you cut into them too soon, they can appear gummy or dense. Patience will be rewarded with the perfect texture.
- Serve and Enjoy: Once cooled, these rolls are ready to be devoured! Serve them warm with your favorite dairy-free butter, a drizzle of olive oil, or alongside a comforting soup or stew. They are perfect for holiday meals, Sunday dinners, or just as a delightful snack.
- Storing Leftovers: If by some miracle you have any leftover Dairy Free Gluten Free Dinner Rolls, store them in an airtight container at room temperature for up to 2-3 days. For longer storage, you can freeze them for up to 3 months. To reheat, simply pop them in a warm oven or microwave for a short period until soft and warm again. Enjoy the fruits of your labor!
Conclusion:
After all our hard work together, baking up a storm in the kitchen, I truly believe you’re about to discover a recipe that will become an absolute staple in your home. This isn’t just another set of instructions; it’s a gateway to deliciousness, especially for those navigating dietary restrictions or simply looking for incredibly satisfying bread that everyone at the table can enjoy. I poured my heart into perfecting these rolls, ensuring they deliver on every front: taste, texture, and ease of preparation. They are a testament to the fact that ‘free-from’ doesn’t mean ‘flavor-free’ – quite the opposite, in fact!
So, why exactly are these wonderful rolls a must-try? For starters, they are a revelation for anyone who has felt deprived of soft, pillowy bread due to allergies or sensitivities. Many dairy-free and gluten-free baked goods can be dense, crumbly, or lacking in that classic ‘bread’ feel, but not these. I promise you a light, airy crumb, a tender chew, and a beautiful golden crust that defies expectations.
Imagine pulling apart a warm roll, steam gently rising, and experiencing that comforting aroma filling your kitchen – that’s what awaits you.
This recipe is meticulously crafted to ensure success, even for beginner bakers, guiding you through each step to achieve professional-looking and tasting results. It’s the kind of baking project that feels immensely rewarding, turning simple ingredients into something truly special. Plus, knowing exactly what goes into your bread, free from unnecessary additives, brings a peace of mind that store-bought alternatives often can’t match. This recipe for homemade Dairy Free Gluten Free Dinner Rolls is truly a game-changer, offering an unparalleled level of comfort and quality that you’ll be proud to serve.
Now, let’s talk about how to truly make these delightful rolls shine on your table. While they are utterly scrumptious straight from the oven with a smear of dairy-free butter or olive oil, their versatility is one of their greatest strengths. For a hearty meal, I love serving them alongside a rich, warming lentil soup or a creamy tomato bisque – perfect for dipping and soaking up every last drop. They also make an excellent accompaniment to roasted chicken or a slow-cooked beef stew, adding that much-needed element of comforting carbohydrate.
But don’t stop there! Get creative. These rolls are fantastic for turning into mini sandwiches or sliders for a party; just slice them horizontally and fill with your favorite deli slices, vegan cheese, and crisp lettuce. Or, consider making them into garlic bread by brushing them with a mixture of melted dairy-free butter, minced garlic, and fresh parsley before a quick toast under the broiler. For a breakfast twist, try adding a touch of cinnamon and a sprinkle of brown sugar to the dough for a slightly sweet version, perfect with your morning coffee. You can even incorporate fresh herbs like rosemary or thyme into the dough for an aromatic savory variation that pairs beautifully with Italian-inspired dishes.
The possibilities are truly endless, limited only by your imagination!
You could even make a batch ahead of time, freeze them, and then simply warm them up when you need a quick, wholesome side. This convenience factor makes them invaluable for busy weeknights or unexpected guests.
So, my dear friends, I urge you to roll up your sleeves, preheat your oven, and embark on this wonderful baking journey. There’s an unparalleled joy that comes from creating something so delicious and wholesome with your own hands, especially when it caters to specific dietary needs without compromising on flavor or texture.
Give this recipe for Dairy Free Gluten Free Dinner Rolls a try – I promise you won’t be disappointed.
When you pull that golden tray of perfectly baked rolls from the oven, I guarantee a feeling of accomplishment and pure satisfaction will wash over you. And please, please, please, once you’ve made them, come back and share your experience with me! I absolutely adore hearing about your triumphs, your clever variations, and seeing your beautiful creations. Tag me on social media, leave a comment below, or even send a picture. Your feedback and stories inspire me and our entire community of enthusiastic home bakers. Happy baking, and enjoy every single delightful bite!
Fluffy Dairy-Free Gluten-Free Dinner Rolls – Easy Recipe
Dairy Free Gluten Free Dinner Rolls are more than just a side dish; they’re a warm embrace, a symbol of comfort, and a true culinary triumph for anyone navigating specific dietary needs. This recipe delivers soft, pillowy rolls with incredible flavor and an airy texture.
Ingredients
Instructions
Important Information
Nutrition Facts (Per Serving)
It is important to consider this information as approximate and not to use it as definitive health advice.
Allergy Information
Please check ingredients for potential allergens and consult a health professional if in doubt.