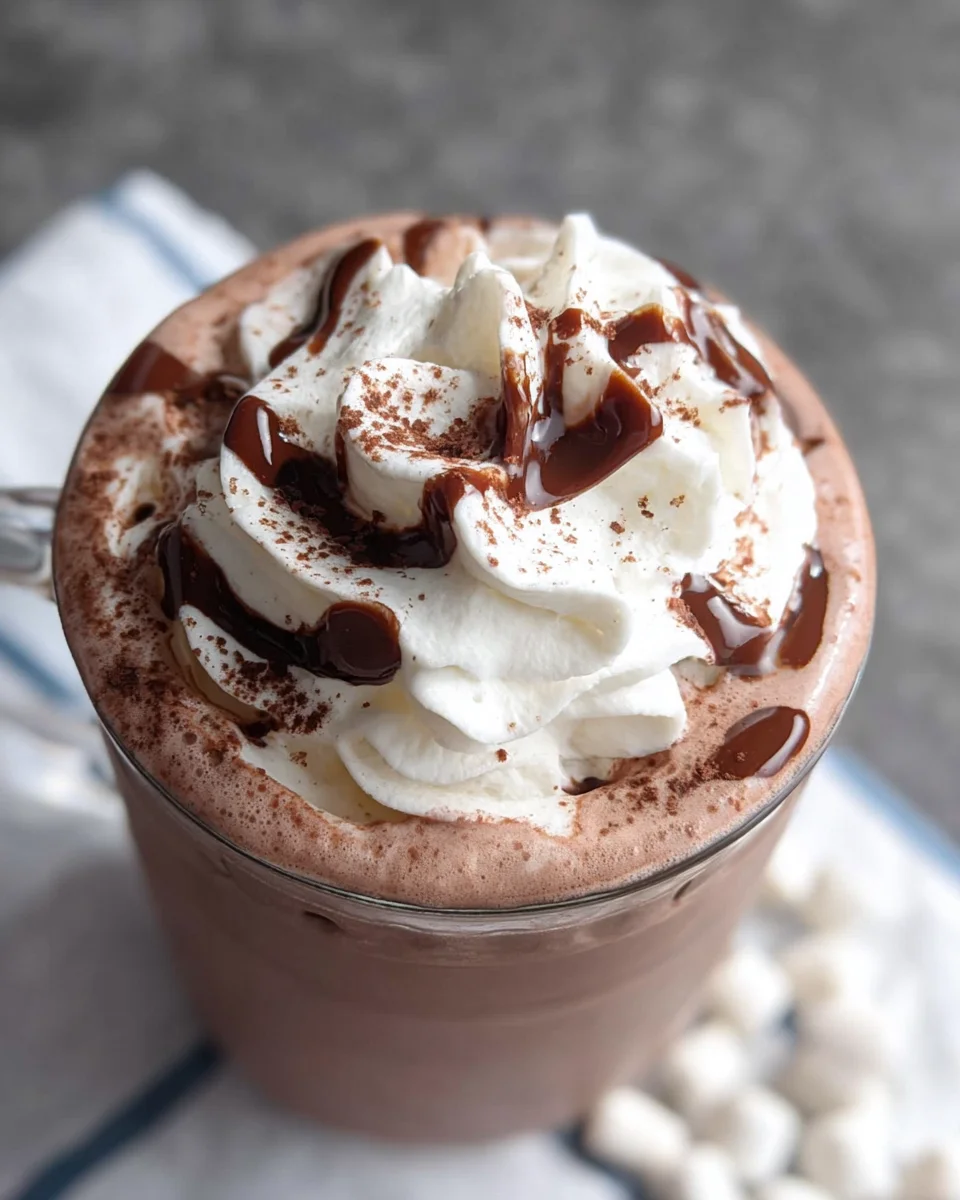
Whipped Hot Chocolate isn’t just a drink; it’s an experience, a warm, comforting hug in a mug that truly elevates the simple joy of cocoa. Imagine wrapping your hands around a steaming cup, topped with a cloud of aerated, rich chocolate foam that’s both light and incredibly decadent. This isn’t your grandma’s powdered cocoa mix, delightful as that might be; this is a gourmet treat designed to soothe your soul and tantalize your taste buds.
The journey of chocolate from a bitter Mesoamerican ceremonial drink to the sweet, beloved beverage we enjoy today is fascinating. While the concept of a ‘whipped’ drink might seem modern, drawing inspiration from European cafes and their luxurious frothy coffees, this particular iteration takes the classic hot chocolate and imbues it with an unparalleled creamy texture and an irresistible visual appeal. It’s the perfect blend of tradition and contemporary indulgence.
Why We Adore Whipped Hot Chocolate So Much
Beyond its stunning appearance, it’s the magical combination of deep chocolate flavor, a velvety smooth liquid base, and that incredibly airy, melt-in-your-mouth whipped topping. It transforms an everyday drink into a special occasion, offering a moment of pure bliss with every sip. Perfect for chilly evenings, a cozy weekend morning, or simply when you need a little extra sweetness in your life, I promise this Whipped Hot Chocolate recipe will become a cherished favorite in your home.

Ingredients:
- For the Hot Chocolate Base:
- 3 tablespoons unsweetened cocoa powder (I love using a good quality Dutch-processed cocoa powder for a richer, darker color and less bitterness, but natural cocoa powder works beautifully too if that’s what you have on hand. The quality of your cocoa really shines through in a recipe like this, so choose one you genuinely enjoy!)
- 2 to 4 tablespoons granulated sugar (This is entirely to your taste! I usually start with 3 tablespoons and adjust after tasting. Some days I crave a sweeter treat, others I prefer the deep, robust cocoa flavor to take center stage. Don’t be shy about making it your own.)
- 1 pinch of salt (Seriously, don’t skip this! Just a tiny pinch, about 1/8 teaspoon, drastically enhances the chocolate flavor and balances the sweetness. It’s a secret weapon for any chocolate lover.)
- 2 cups whole milk (Whole milk provides the ultimate creamy texture that truly makes this hot chocolate feel indulgent. You can certainly use 2% or even a non-dairy milk alternative like oat milk or almond milk, but be aware the final texture might be slightly less rich and velvety. For a truly decadent experience, whole milk is my go-to.)
- 1/2 teaspoon pure vanilla extract (Vanilla adds a beautiful aromatic depth that complements the chocolate perfectly. Make sure it’s pure vanilla extract for the best flavor; imitation vanilla just doesn’t compare.)
- For the Whipped Cocoa Topping:
- 1 cup heavy cream, very cold (Cold cream is absolutely essential for successful whipping! Keep it in the fridge right up until you’re ready to use it. The colder it is, the faster and more stable your whipped topping will be.)
- 1 tablespoon unsweetened cocoa powder (Matching the cocoa powder used in the base creates a cohesive flavor profile, but any good quality unsweetened cocoa will work wonderfully here to infuse that extra chocolatey goodness into our topping.)
- 1 to 2 tablespoons powdered sugar (Also known as confectioners’ sugar. Powdered sugar is ideal because its fine texture ensures a smooth, non-gritty topping. Adjust the amount based on your desired sweetness. I find 1 tablespoon is usually enough for a subtle sweetness that lets the cocoa shine.)
- Optional Garnishes:
- Chocolate shavings or curls
- Extra cocoa powder, dusted
- Mini marshmallows
- A drizzle of chocolate syrup
- Crushed peppermint candy (especially festive during holidays!)
Equipment You’ll Need:
- Small to medium saucepan
- Whisk (for the hot chocolate base)
- Measuring cups and spoons
- Heat-proof mugs
- Stand mixer with whisk attachment OR a large mixing bowl and a hand mixer (for the whipped topping)
- Rubber spatula
- Optional: Fine-mesh sieve for dusting cocoa
Instructions for the Ultimate Whipped Hot Chocolate:
Phase 1: Crafting the Rich Hot Chocolate Base
My journey to the perfect Whipped Hot Chocolate always begins with creating a truly exceptional hot chocolate base. This is the foundation upon which all the magic is built, so we want to make it absolutely divine – rich, smooth, and deeply satisfying.
- Combine Dry Ingredients: In a small to medium saucepan, I first whisk together the 3 tablespoons of unsweetened cocoa powder, 2 to 4 tablespoons of granulated sugar (depending on how sweet I’m feeling!), and that crucial tiny pinch of salt. It’s really important to whisk these dry ingredients together thoroughly before adding any liquid. This step helps to break up any lumps in the cocoa powder, which can be quite stubborn, and ensures they dissolve smoothly into the milk later. If you skip this, you might end up with little pockets of dry cocoa in your finished drink, and nobody wants that! I usually spend a good 30 seconds just making sure everything is evenly combined.
- Introduce the Milk: Once the dry ingredients are looking well-mixed, I pour in about a quarter cup of the whole milk from our measured 2 cups. I continue to whisk vigorously, creating a thick, smooth paste. This paste-making step is another critical trick to achieving a lump-free hot chocolate. By gradually incorporating the milk this way, we’re essentially pre-dissolving the cocoa and sugar into a smaller amount of liquid first, which prevents clumping when the rest of the milk is added. It’s a little bit like making a roux for gravy – slow and steady wins the race for smoothness. Once the paste is smooth and glossy, I then gradually whisk in the remaining 1 3/4 cups of whole milk. The mixture should now be a beautiful, uniform light brown liquid.
- Heat Gently: Now, I place the saucepan over medium heat. This is where patience truly becomes a virtue! I continue to whisk occasionally as the hot chocolate heats up. The goal here is to heat the milk until it’s steaming hot, but never, ever let it boil. Boiling milk can scald and develop an off-flavor, and it also compromises the creamy texture we’re aiming for. Keep a close eye on it; you’ll see small bubbles forming around the edges of the pan and steam rising from the surface. This usually takes about 5-7 minutes, depending on your stovetop. If you have a kitchen thermometer, you’re aiming for a temperature between 180°F and 190°F (about 82°C to 88°C).
- Add Vanilla and Serve: As soon as the hot chocolate is steaming hot and before any vigorous boiling begins, I remove the saucepan from the heat. This is the perfect moment to stir in the 1/2 teaspoon of pure vanilla extract. Adding it off the heat preserves its delicate aroma and flavor; if added too early while cooking, some of that beautiful vanilla essence can evaporate. Give it a final good stir to incorporate the vanilla. At this point, I like to quickly taste it and adjust the sweetness if necessary. Sometimes, if I’m using a particularly bitter cocoa, I might add another half-teaspoon of sugar. Pour the steaming hot chocolate immediately into your favorite heat-proof mugs, leaving a good amount of space at the top for our incredible whipped topping.
Phase 2: Whipping Up the Dreamy Cocoa Topping
Now for the truly magical part that elevates this from just “hot chocolate” to a proper Whipped Hot Chocolate! This cocoa-infused whipped cream is light, airy, and incredibly chocolatey, providing a perfect contrast to the rich base.
- Chill Your Equipment (Optional but Recommended!): This is a pro-tip that I swear by for the most stable whipped cream. If I have time, about 15-20 minutes before I plan to whip the cream, I place my mixing bowl (if using a stand mixer, just the bowl; if using a hand mixer, the bowl and the beaters) into the freezer. Cold equipment combined with cold cream is the secret to whipping cream quickly and achieving maximum volume and stability. It truly makes a noticeable difference in how quickly the cream whips up and how long it holds its beautiful peaks.
- Combine Topping Ingredients: Once my equipment is chilled (or if I’m in a rush, I skip this, knowing it might take a minute or two longer), I pour the 1 cup of very cold heavy cream into the chilled mixing bowl. Then, I add the 1 tablespoon of unsweetened cocoa powder and 1 to 2 tablespoons of powdered sugar. I find it helpful to sift the cocoa powder and powdered sugar first, especially if my cocoa has any clumps, to ensure a perfectly smooth topping. This extra step prevents any gritty texture or unmixed bits in the final whipped cream.
- Start Whipping: Using my stand mixer fitted with the whisk attachment (or my hand mixer with the beaters), I start whipping the cream mixture on low speed. I gradually increase the speed to medium-high. I watch carefully as the cream begins to thicken. It will first look frothy, then gradually develop soft ripples, and finally start holding distinct shapes.
- Whip to Soft or Medium Peaks: This is the crucial stage for texture! I continue whipping until the cream forms soft peaks. What do soft peaks look like? When you lift the whisk out of the cream, the peaks will stand up but curl over gently at the top. For a slightly firmer topping that holds its shape a bit longer on the hot chocolate, I’ll whip it a little further to medium peaks, where the peaks hold their shape more firmly but still have a slight curl or tip. I make sure to stop whipping as soon as these peaks form. Over-whipping can quickly turn your beautiful, airy cream into grainy, stiff, or even buttery concoction, which we definitely want to avoid for this Whipped Hot Chocolate! The process usually takes anywhere from 3 to 6 minutes, depending on the power of your mixer and the coldness of your ingredients.
Phase 3: Assembling Your Luxurious Whipped Hot Chocolate
Now comes the moment of truth and pure indulgence! This is where our rich hot chocolate base meets our dreamy cocoa topping, creating an experience that’s truly a cut above the rest. Get ready for a treat!
- Dollop the Whipped Topping: With your steaming hot chocolate poured into mugs, it’s time to add the star of the show – our freshly whipped cocoa topping! I like to use a large spoon or a rubber spatula to generously dollop large spoonfuls of the cocoa whipped cream directly onto the surface of each mug of hot chocolate. Don’t be shy here; the more, the merrier! I often create a beautiful, billowy cloud of whipped cream that sits proudly atop the dark, rich hot chocolate. The contrast in color and texture is simply delightful. If you have a piping bag with a star tip, you could even pipe the topping for a more elegant presentation, but for an everyday indulgence, a simple dollop is perfect. The warmth of the hot chocolate will gently melt the bottom layer of the whipped cream, creating a creamy, chocolatey swirl as you drink.
-
Add Your Favorite Garnishes (Optional, but highly recommended!): This is where you can truly personalize your Whipped Hot Chocolate and add that extra touch of flair.
- For an extra layer of chocolatey goodness, I often grab a vegetable peeler and shave some chocolate right over the top. Dark chocolate, milk chocolate, or even white chocolate shavings add a lovely visual appeal and a delicious burst of flavor.
- A light dusting of extra unsweetened cocoa powder, applied with a fine-mesh sieve, creates a sophisticated finish and enhances the cocoa aroma.
- If I’m feeling nostalgic or making this for kids (or the kid in me!), a handful of mini marshmallows nestled into the whipped cream is always a hit.
- A delicate drizzle of chocolate syrup can add an artistic touch and another layer of sweetness.
- And during the colder months, especially around the holidays, a sprinkle of crushed peppermint candy adds a wonderfully festive and refreshing twist. The cool mint against the warm chocolate and cream is absolutely divine.
Don’t underestimate the power of garnishes; they truly elevate the drinking experience from good to extraordinary.
- Serve Immediately and Enjoy: Your luxurious Whipped Hot Chocolate is now ready to be savored! I always serve it immediately, while the hot chocolate base is still wonderfully warm and the whipped topping is fresh and fluffy. The contrasting temperatures and textures are what make this drink so incredibly satisfying. Encourage everyone to stir gently to combine some of the whipped topping with the hot chocolate as they drink, or to enjoy spoonfuls of the topping on its own before diving into the drink below. Take a moment to appreciate the aroma, the beautiful presentation, and the sheer indulgence of this homemade treat. It’s more than just a drink; it’s an experience, a moment of comfort and joy in a mug.
Conclusion:
And there you have it, my friends! We’ve reached the sweet end of our journey with what I genuinely believe will become your new favorite treat. This isn’t just another hot chocolate recipe; it’s an invitation to experience a moment of pure, unadulterated bliss. What makes this recipe an absolute must-try, you ask? It’s the sheer transformation of simple, humble ingredients into something truly extraordinary. Imagine a beverage so incredibly rich, so profoundly creamy, and so wonderfully airy that it quite literally melts in your mouth, leaving behind a lingering taste of deep cocoa luxury. The effort-to-reward ratio here is off the charts; with just a little whisking magic, you elevate an everyday drink into a decadent dessert experience.
I can confidently say that once you taste the difference, you’ll find it hard to go back to ordinary hot chocolate. There’s a certain indulgence that comes with creating something this delightful in your own kitchen, a little victory in every sip. It’s perfect for those chilly evenings when all you crave is warmth and comfort, a brilliant pick-me-up on a dreary afternoon, or even a sophisticated finish to a dinner party. The velvety texture, the intense chocolate flavor, and that signature cloud-like topping create a symphony for your senses that will undoubtedly bring a smile to your face. It’s a hug in a mug, a comforting blanket for your soul, and a testament to how a few thoughtful steps can dramatically enhance a classic.
Elevate Your Experience: Serving Suggestions & Creative Variations
Now, let’s talk about making this already incredible treat even more special. While this recipe is perfectly divine on its own, there’s always room for a little personalization and extra flair! For a classic touch, a sprinkle of high-quality cocoa powder or some finely grated dark chocolate on top adds visual appeal and an extra layer of chocolatey goodness. If you’re a fan of a little crunch, mini chocolate chips or even a scattering of toasted nuts like pecans or almonds can provide a delightful textural contrast.
Feeling a bit adventurous? Here are some variations I absolutely adore. For a hint of spice, try adding a tiny pinch of cayenne pepper or a dash of cinnamon to your hot chocolate mixture while it’s simmering – it creates a wonderfully complex, warming kick, reminiscent of Mexican hot chocolate. A drop or two of pure peppermint extract transforms it into a festive, holiday-ready beverage, perfect for winter gatherings. Or, for an adult twist, a splash of your favorite liqueur like Kahlúa, Baileys, or Frangelico stirred in just before serving can turn this cozy drink into a sophisticated after-dinner delight. Don’t be afraid to experiment with different types of chocolate, too! While I recommend a good quality semi-sweet or dark chocolate for depth, a blend with milk chocolate can offer a sweeter, creamier profile. For those who enjoy a bit of salt to balance their sweet, a tiny sprinkle of sea salt flakes over the whipped topping is utterly divine.
And let’s not forget the accompaniments! This rich beverage pairs beautifully with a simple shortbread cookie, a crisp biscotti, or even fresh churros for dipping. Imagine curling up with a good book, a cozy blanket, and a mug of this deliciousness alongside your favorite sweet treat. Pure bliss!
Your Turn to Create and Share!
My ultimate hope is that you’ll feel inspired to whip up this amazing concoction in your own kitchen very soon. Trust me, the moment you take that first sip of your homemade Whipped Hot Chocolate, you’ll understand exactly what I mean. It’s more than just a drink; it’s an experience, a small luxury that you absolutely deserve to enjoy. I truly believe that the best recipes are those that bring joy, comfort, and a little bit of magic into our lives, and this one certainly does all that and more. Don’t hesitate to dive in and create this incredible treat for yourself, your family, or your friends.
And please, once you’ve tried it, I would absolutely love to hear about your experience! Did you stick to the classic, or did you venture into some exciting variations? What was your favorite part? Share your creations, your tips, and your glowing reviews. Snap a picture and let us all bask in the glory of your whipped masterpiece! Your feedback and shared moments are what truly make this culinary journey so rewarding for all of us. So go forth, whisk with gusto, and savor every single decadent drop!
Fluffy Whipped Hot Chocolate
Whipped Hot Chocolate isn’t just a drink; it’s an experience, a warm, comforting hug in a mug that truly elevates the simple joy of cocoa. Imagine wrapping your hands around a steaming cup, topped with a cloud of aerated, rich chocolate foam that’s both light and incredibly decadent. This is a gourmet treat designed to soothe your soul and tantalize your taste buds.
Ingredients
Instructions
Important Information
Nutrition Facts (Per Serving)
It is important to consider this information as approximate and not to use it as definitive health advice.
Allergy Information
Please check ingredients for potential allergens and consult a health professional if in doubt.