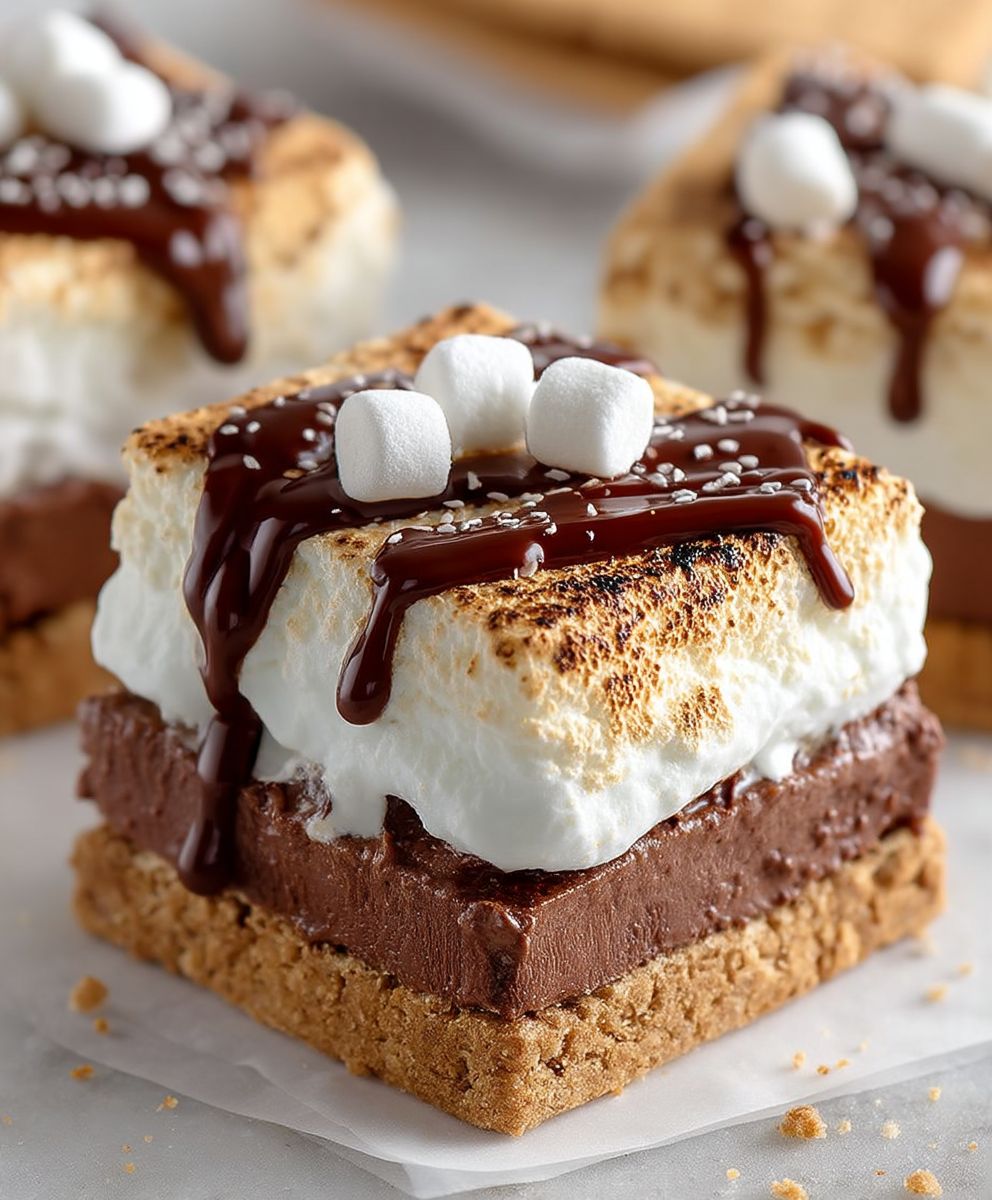
Frozen Smores: the nostalgic campfire treat, reimagined for the modern kitchen! Imagine sinking your teeth into a creamy, dreamy dessert that captures all the gooey goodness of a traditional s’more, but with a refreshing, icy twist. Forget battling melting marshmallows and smoky fires; this no-bake recipe brings the magic of summer indoors, any time of year.
S’mores, a quintessential American treat, have a history as rich and layered as the dessert itself. Believed to have originated with the Girl Scouts in the 1920s, the simple combination of graham crackers, chocolate, and toasted marshmallows quickly became a beloved tradition around campfires nationwide. But who says you can only enjoy this classic delight in the great outdoors?
People adore s’mores for their irresistible combination of textures and flavors: the crisp graham cracker, the melty chocolate, and the soft, sweet marshmallow. With Frozen Smores, we’re elevating that experience. The cool, creamy filling adds a new dimension of delight, making it the perfect dessert for hot summer days or any occasion when you crave a sweet escape. Plus, the no-bake aspect makes it incredibly convenient and easy to prepare, even for novice bakers. Get ready to experience the ultimate s’mores transformation!

Ingredients:
- 1 (14.3 ounce) package chocolate sandwich cookies, such as Oreos
- 6 tablespoons unsalted butter, melted
- 1 (16 ounce) package large marshmallows
- 2 tablespoons milk
- 1 teaspoon vanilla extract
- 1 (12 ounce) package semi-sweet chocolate chips
- 1/4 cup vegetable shortening
- Sea salt flakes, for sprinkling (optional)
Cookie Crust Preparation:
- First, we’re going to tackle the cookie crust. This is the foundation of our frozen smores, so we want to make sure it’s nice and sturdy. Grab your package of chocolate sandwich cookies. I like to use Oreos, but any similar cookie will work just fine.
- Now, you have a couple of options here. You can either use a food processor to crush the cookies into fine crumbs, or you can go the old-fashioned route and put them in a large zip-top bag and crush them with a rolling pin. If you’re using a food processor, pulse the cookies until they’re finely ground. If you’re using a rolling pin, make sure to squeeze out as much air as possible from the bag before you start crushing. This will help prevent the bag from bursting. Crush the cookies until they’re uniformly fine crumbs.
- Once the cookies are crushed, transfer them to a medium-sized bowl. Pour in the melted butter and stir until the crumbs are evenly moistened. The mixture should resemble wet sand. This is what will hold our crust together.
- Next, we need to prepare our pan. I recommend using a 9×13 inch baking dish. You can either grease the pan with cooking spray or line it with parchment paper. Lining it with parchment paper will make it much easier to remove the frozen smores later on. If you’re using parchment paper, make sure to leave some overhang on the sides of the pan. This will act as handles when you’re ready to lift the smores out.
- Now, press the cookie crumb mixture into the bottom of the prepared pan. Use the bottom of a measuring cup or your fingers to firmly press the crumbs into an even layer. You want to make sure the crust is compact and well-packed. This will prevent it from crumbling when you cut the smores.
- Once the crust is pressed, place the pan in the freezer while we prepare the marshmallow filling. This will help the crust set and prevent it from getting soggy.
Marshmallow Filling Preparation:
- Alright, let’s move on to the marshmallow filling! This is where the magic happens. Grab your package of large marshmallows. We’re going to melt these down to create a gooey, delicious filling.
- In a large, microwave-safe bowl, combine the marshmallows, milk, and vanilla extract. The milk will help the marshmallows melt smoothly, and the vanilla extract will add a touch of flavor.
- Microwave the mixture on high for 1 minute, then stir. Continue microwaving in 30-second intervals, stirring after each interval, until the marshmallows are completely melted and smooth. Be careful not to overheat the marshmallows, as they can burn easily.
- Once the marshmallows are melted, let them cool slightly for a few minutes. This will prevent them from melting the cookie crust when we pour them on top.
- Remove the pan from the freezer and pour the melted marshmallow mixture over the cookie crust. Spread the mixture evenly over the crust using a spatula.
- Place the pan back in the freezer and freeze for at least 2 hours, or until the marshmallow filling is firm. You want to make sure the filling is completely frozen before we add the chocolate topping.
Chocolate Topping Preparation:
- Now for the grand finale: the chocolate topping! This is what really makes these frozen smores irresistible. Grab your package of semi-sweet chocolate chips and the vegetable shortening.
- In a microwave-safe bowl, combine the chocolate chips and vegetable shortening. The vegetable shortening will help the chocolate melt smoothly and give it a nice, glossy finish.
- Microwave the mixture on high for 30 seconds, then stir. Continue microwaving in 15-second intervals, stirring after each interval, until the chocolate is completely melted and smooth. Be careful not to overheat the chocolate, as it can seize up and become grainy.
- Remove the pan from the freezer and pour the melted chocolate over the frozen marshmallow filling. Spread the chocolate evenly over the filling using a spatula.
- If you want to add a little extra flair, sprinkle some sea salt flakes over the chocolate topping. The salt will enhance the sweetness of the chocolate and add a nice textural contrast. This is totally optional, but I highly recommend it!
- Place the pan back in the freezer and freeze for at least 1 hour, or until the chocolate topping is firm. You want to make sure the chocolate is completely frozen before you cut the smores.
Cutting and Serving:
- Once the frozen smores are completely frozen, remove the pan from the freezer. If you lined the pan with parchment paper, use the overhang to lift the smores out of the pan. If you didn’t line the pan, you may need to run a knife around the edges of the pan to loosen the smores.
- Place the smores on a cutting board and use a sharp knife to cut them into squares. The size of the squares is up to you, but I usually cut them into about 2-inch squares.
- Serve the frozen smores immediately. They’re best enjoyed straight from the freezer!
- Store any leftover frozen smores in an airtight container in the freezer. They’ll keep for several weeks.
Tips and Variations:
- Cookie Variations: Feel free to experiment with different types of cookies for the crust. Graham crackers, chocolate graham crackers, or even peanut butter cookies would all be delicious.
- Marshmallow Flavor: You can use flavored marshmallows, such as strawberry or vanilla, to add a unique twist to the filling.
- Chocolate Options: Instead of semi-sweet chocolate chips, try using milk chocolate, dark chocolate, or even white chocolate. You can also add chopped nuts or sprinkles to the chocolate topping.
- Adding Texture: Mix crushed pretzels or chopped toffee into the cookie crust for added texture and flavor.
- Individual Servings: For individual servings, press the cookie crust into muffin tins instead of a baking dish. Follow the same steps for the marshmallow filling and chocolate topping.
- Vegan Option: Use vegan chocolate sandwich cookies, vegan marshmallows, and vegan butter to make this recipe vegan-friendly.
Enjoy your delicious homemade Frozen Smores!
Conclusion:
So there you have it! These Frozen Smores are truly a must-try, especially when you’re craving that campfire classic but don’t have the time (or the weather!) for a full-blown outdoor experience. They’re incredibly easy to make, require minimal ingredients, and deliver that perfect combination of creamy, chocolatey, and marshmallowy goodness that we all know and love. I promise, even the most discerning dessert critics in your family will be reaching for seconds (and maybe even thirds!).
What makes this recipe so special is its versatility. While the base recipe is fantastic as is, there’s plenty of room to get creative and customize it to your own preferences. Feeling adventurous? Try using different flavors of graham crackers! Honey graham crackers add a touch of sweetness, while chocolate graham crackers amplify the chocolatey intensity. You could even experiment with cinnamon graham crackers for a warm and spicy twist.
And don’t stop there! The filling is also ripe for experimentation. Consider swirling in a spoonful of peanut butter for a Reese’s-inspired treat, or adding a dash of instant coffee to the marshmallow fluff for a mocha flavor. For a more sophisticated take, you could incorporate a hint of sea salt into the chocolate ganache to balance the sweetness.
Serving suggestions are endless. These Frozen Smores are perfect straight from the freezer for a refreshing treat on a hot day. You can also let them thaw slightly for a softer, more decadent experience. For a truly impressive presentation, consider drizzling them with melted chocolate or sprinkling them with chopped nuts before serving. They’re also fantastic served alongside a scoop of vanilla ice cream or a dollop of whipped cream.
If you’re hosting a party, these Frozen Smores are a guaranteed crowd-pleaser. They’re easy to make ahead of time and can be stored in the freezer until you’re ready to serve them. You can even get your guests involved in the assembly process, creating a fun and interactive dessert experience. Imagine a Frozen Smores bar with different graham cracker flavors, toppings, and sauces – the possibilities are endless!
I truly believe that this recipe is a winner. It’s simple, delicious, and adaptable to your own tastes. It’s the perfect way to satisfy your sweet tooth without spending hours in the kitchen. Plus, it’s a fun and nostalgic treat that will bring back memories of campfires and summer nights.
So, what are you waiting for? Grab your ingredients and get ready to make some magic! I’m confident that you’ll love these Frozen Smores as much as I do. And when you do, please don’t hesitate to share your experience! I’d love to hear about your variations, your serving suggestions, and any tips or tricks you discover along the way. Share your photos and stories on social media using #FrozenSmoresRecipe – I can’t wait to see what you create! Happy baking (or should I say, freezing!) and enjoy! Let me know how your Frozen Smores turn out!
Frozen Smores: The Ultimate No-Bake Summer Treat
No-bake frozen dessert with an Oreo crust, gooey marshmallow filling, and rich chocolate topping. A cool twist on classic smores!
Ingredients
Instructions
Recipe Notes
- Cookie Variations: Experiment with different cookies like graham crackers, chocolate graham crackers, or peanut butter cookies.
- Marshmallow Flavor: Use flavored marshmallows for a unique twist.
- Chocolate Options: Try milk chocolate, dark chocolate, or white chocolate. Add chopped nuts or sprinkles to the topping.
- Adding Texture: Mix crushed pretzels or chopped toffee into the cookie crust.
- Individual Servings: Press the cookie crust into muffin tins for individual servings.
- Vegan Option: Use vegan chocolate sandwich cookies, vegan marshmallows, and vegan butter to make this recipe vegan-friendly.