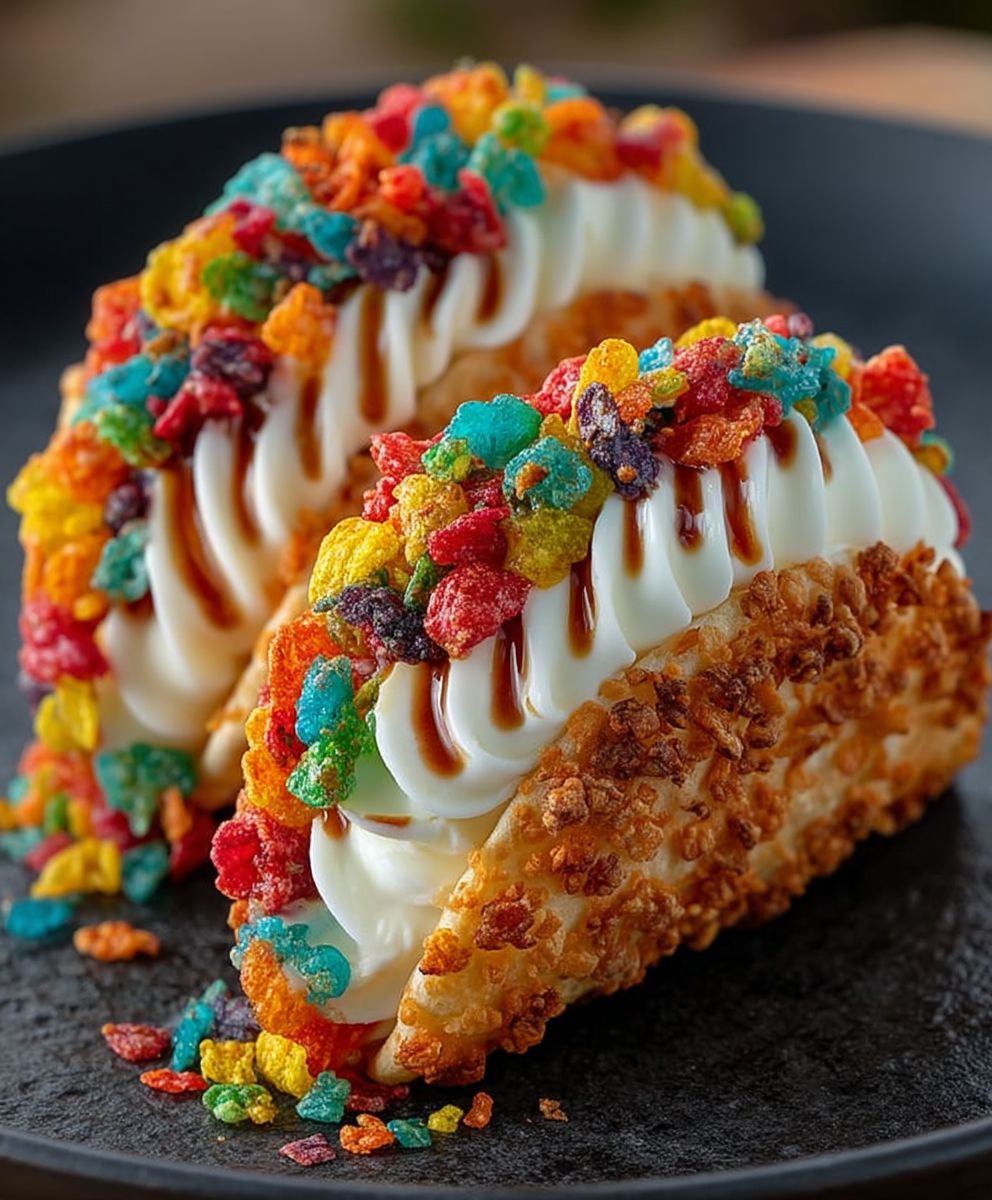
Fruity Pebbles Cheesecake Tacos: Prepare to have your mind blown! Imagine the creamy, dreamy indulgence of cheesecake, perfectly nestled inside a sweet, crunchy taco shell, all bursting with the nostalgic, vibrant flavor of Fruity Pebbles. Yes, you read that right – we’re taking dessert to a whole new level with this whimsical and utterly irresistible treat.
While the history of cheesecake itself stretches back to ancient Greece, and tacos have deep roots in Mexican cuisine, this particular fusion is a modern marvel, a playful collision of cultures and flavors designed to spark joy. It’s a testament to the creativity and adventurous spirit of contemporary dessert making. Think of it as a blank canvas where the familiar comfort of cheesecake meets the unexpected fun of a taco, all amplified by the iconic taste of our childhood.
What’s not to love? The combination of textures is simply divine – the smooth, rich cheesecake filling contrasts beautifully with the crisp, sugary taco shell. And let’s be honest, who can resist the vibrant colors and sweet, fruity flavor of Fruity Pebbles? This recipe for Fruity Pebbles Cheesecake Tacos is not only incredibly delicious but also surprisingly easy to make, making it perfect for parties, special occasions, or just a fun weekend treat. Get ready to impress your friends and family with this unique and unforgettable dessert!

Ingredients:
- For the Fruity Pebbles Taco Shells:
- 2 cups Fruity Pebbles cereal
- 4 tablespoons unsalted butter, melted
- 2 tablespoons granulated sugar
- For the Cheesecake Filling:
- 16 ounces cream cheese, softened
- 1 cup powdered sugar
- 1 teaspoon vanilla extract
- 1/2 cup heavy cream
- 1/4 cup Fruity Pebbles cereal, crushed (for mixing into the filling)
- For the Toppings:
- 1 cup whipped cream
- 1/2 cup Fruity Pebbles cereal, whole (for garnish)
- Fresh berries (strawberries, blueberries, raspberries), optional
- Chocolate syrup, optional
Preparing the Fruity Pebbles Taco Shells
Okay, let’s get started with the most fun part – making those vibrant Fruity Pebbles taco shells! This is where the magic happens, and trust me, it’s easier than you think.
- Crush the Cereal: First, you’ll need to crush the Fruity Pebbles. You can do this in a couple of ways. My preferred method is to put the cereal in a large zip-top bag and use a rolling pin to crush them into fine crumbs. You can also use a food processor, but be careful not to over-process them into a powder. You want a texture that’s still a little bit chunky.
- Combine Ingredients: In a medium bowl, combine the crushed Fruity Pebbles, melted butter, and granulated sugar. Mix everything together really well until all the cereal is coated with the butter and sugar mixture. It should resemble wet sand.
- Shape the Taco Shells: This is where you get to be creative! You’ll need a non-stick baking sheet lined with parchment paper or a silicone baking mat. Preheat your oven to 350°F (175°C).
Grab a small handful of the Fruity Pebbles mixture (about 1/4 cup) and place it on the prepared baking sheet. Use your fingers or the back of a spoon to flatten it into a circle, about 4-5 inches in diameter. Repeat this process until you’ve used up all the mixture, leaving some space between each circle.
Now, for the taco shell shape! There are a couple of ways to do this. You can either bake the circles flat and then carefully fold them into a taco shape while they’re still warm and pliable, or you can use a taco shell mold. If you don’t have a mold, you can drape the warm circles over the bar of an oven rack to create a taco shape. Be careful, as they will be hot!
Another method, which I find works well, is to gently press the warm circles into muffin tins to create a curved shape. This gives you a nice, sturdy taco shell. - Bake the Shells: Place the baking sheet in the preheated oven and bake for 8-10 minutes, or until the edges are lightly golden brown. Keep a close eye on them, as they can burn easily.
- Cool and Harden: Once the taco shells are baked, remove them from the oven and let them cool completely on the baking sheet. As they cool, they will harden and become more stable. If you used a muffin tin, gently remove the shells once they’ve cooled enough to handle. If you draped them over an oven rack, let them cool completely before carefully removing them.
- Troubleshooting: If your taco shells are too crumbly, it means they didn’t have enough butter. Next time, add a little more melted butter to the mixture. If they’re too sticky, it means they had too much butter. Next time, use a little less butter.
Preparing the Cheesecake Filling
Now that the taco shells are ready, let’s move on to the creamy, dreamy cheesecake filling. This is a no-bake filling, so it’s super easy and quick to make.
- Soften the Cream Cheese: Make sure your cream cheese is completely softened before you start. This is crucial for a smooth and lump-free filling. You can leave it out at room temperature for a couple of hours, or you can microwave it in 30-second intervals until it’s soft.
- Combine Cream Cheese and Powdered Sugar: In a large bowl, beat the softened cream cheese with the powdered sugar using an electric mixer until smooth and creamy. Make sure to scrape down the sides of the bowl occasionally to ensure everything is evenly mixed.
- Add Vanilla Extract: Add the vanilla extract to the cream cheese mixture and beat until combined.
- Whip in Heavy Cream: Gradually add the heavy cream to the cream cheese mixture, beating on medium speed until the filling is light and fluffy. Be careful not to over-beat, as this can cause the filling to become too thin. You want a nice, thick consistency.
- Fold in Crushed Fruity Pebbles: Gently fold in the crushed Fruity Pebbles cereal into the cheesecake filling. This adds a little bit of texture and extra Fruity Pebbles flavor.
- Chill the Filling: Cover the bowl with plastic wrap and refrigerate the cheesecake filling for at least 30 minutes to allow it to firm up slightly. This will make it easier to fill the taco shells.
Assembling the Fruity Pebbles Cheesecake Tacos
Alright, the moment we’ve all been waiting for! It’s time to assemble those delicious Fruity Pebbles Cheesecake Tacos. This is the fun part where you get to be creative with your toppings.
- Fill the Taco Shells: Carefully spoon or pipe the cheesecake filling into the Fruity Pebbles taco shells. Don’t overfill them, or the filling will spill out.
- Add Whipped Cream: Top each taco with a dollop of whipped cream. You can use store-bought whipped cream, or you can make your own. Homemade whipped cream is always a little bit better, in my opinion!
- Garnish with Fruity Pebbles: Sprinkle the tacos with whole Fruity Pebbles cereal for extra crunch and visual appeal.
- Add Fresh Berries (Optional): If you want to add some freshness and color, top the tacos with fresh berries like strawberries, blueberries, or raspberries.
- Drizzle with Chocolate Syrup (Optional): For an extra touch of indulgence, drizzle the tacos with chocolate syrup.
- Serve Immediately: These Fruity Pebbles Cheesecake Tacos are best served immediately, as the taco shells can become soggy if they sit for too long.
- Storage: If you have any leftovers, store them in an airtight container in the refrigerator. However, keep in mind that the taco shells will soften over time.
Tips and Variations
Here are a few extra tips and variations to make your Fruity Pebbles Cheesecake Tacos even more amazing:
- Different Cereal: You can experiment with different types of cereal for the taco shells. Cocoa Pebbles, Rice Krispies, or even Cinnamon Toast Crunch would all be delicious.
- Different Fillings: Get creative with the filling! You could try a chocolate cheesecake filling, a strawberry cheesecake filling, or even a peanut butter cheesecake filling.
- Different Toppings: The possibilities are endless when it comes to toppings! Try adding sprinkles, chopped nuts, mini chocolate chips, or even a drizzle of caramel sauce.
- Make Mini Tacos: Use smaller circles of Fruity Pebbles mixture to make mini taco shells. These are perfect for parties or for a bite-sized treat.
- Add a Crust: For an extra layer of flavor and texture, you can add a graham cracker crust to the bottom of the taco shells. Simply crush graham crackers and mix them with melted butter and sugar, then press the mixture into the bottom of the taco shells before baking.
- Freeze for Later: You can freeze the filled taco shells for a quick and easy dessert. Simply wrap them individually in plastic wrap and store them in the freezer for up to 2 months. Let them thaw slightly before serving.
Enjoy!
I hope you enjoy making and eating these Fruity Pebbles Cheesecake Tacos as much as I do! They’re a fun, colorful, and delicious treat that’s perfect for any occasion. Don’t be afraid to get creative and experiment with different flavors and toppings to make them your own. Happy baking!
Conclusion:
Okay, friends, let’s be honest – you’ve scrolled this far because the idea of Fruity Pebbles Cheesecake Tacos is just too intriguing to ignore, right? And I’m here to tell you, you absolutely shouldn’t ignore it! This isn’t just another dessert; it’s a flavor explosion, a textural masterpiece, and a guaranteed conversation starter all rolled into one unbelievably fun package. The creamy, tangy cheesecake filling perfectly complements the sweet, crunchy Fruity Pebbles shell, creating a symphony of sensations that will have your taste buds singing. It’s the kind of treat that brings out the inner child in everyone, and who doesn’t need a little more of that in their life?
But beyond the sheer deliciousness, what makes these Fruity Pebbles Cheesecake Tacos a must-try is their versatility. Think of this recipe as a blank canvas for your culinary creativity! Feeling adventurous? Try adding a layer of strawberry jam or raspberry coulis to the bottom of the taco shell before adding the cheesecake filling for an extra burst of fruity flavor. A sprinkle of white chocolate shavings or a drizzle of melted milk chocolate would also elevate the experience to a whole new level of decadence.
For serving suggestions, these tacos are perfect for parties, potlucks, or even just a fun weekend treat. Imagine the look on your guests’ faces when you present them with these colorful, whimsical desserts! They’re also incredibly easy to customize for different dietary needs. You can easily substitute the regular cream cheese with a dairy-free alternative to make them vegan-friendly, or use gluten-free Fruity Pebbles to cater to those with gluten sensitivities.
And the fun doesn’t stop there! Consider these variations:
Serving Suggestions and Variations:
* Mini Tacos: Use smaller tortillas to create bite-sized versions that are perfect for appetizers or party snacks.
* Chocolate Shell: Dip the finished Fruity Pebbles taco shells in melted chocolate for an extra layer of indulgence.
* Different Cereals: Experiment with other colorful cereals like Trix or Captain Crunch for a unique twist.
* Fruit Toppings: Add fresh fruit like sliced strawberries, blueberries, or raspberries on top of the cheesecake filling for a refreshing touch.
* Savory-Sweet: For a truly adventurous palate, try adding a pinch of sea salt to the cheesecake filling to balance the sweetness.
Ultimately, the best part about this recipe is that it’s all about having fun and letting your imagination run wild. Don’t be afraid to experiment with different flavors and textures to create your own signature version of these Fruity Pebbles Cheesecake Tacos.
So, what are you waiting for? Gather your ingredients, put on your favorite music, and get ready to embark on a culinary adventure that’s guaranteed to bring a smile to your face. I truly believe that this recipe is a winner, and I can’t wait to hear what you think.
Once you’ve tried your hand at making these delightful treats, I’d absolutely love to hear about your experience! Share your photos, your variations, and your thoughts in the comments below. Did you add any special ingredients? Did you try a different cereal? What did your friends and family think? Your feedback is invaluable, and it helps inspire others to try new things in the kitchen. Let’s create a community of Fruity Pebbles Cheesecake Taco enthusiasts! Happy baking (or should I say, taco-ing?)! I’m confident that you’ll find this Fruity Pebbles Cheesecake Taco recipe to be a delightful and memorable experience.
Fruity Pebbles Cheesecake Tacos: A Deliciously Fun Dessert Recipe
Fun, colorful dessert featuring homemade Fruity Pebbles taco shells filled with creamy cheesecake and topped with whipped cream, berries, and more Fruity Pebbles!
Ingredients
Instructions
Recipe Notes
- If taco shells are too crumbly, add more melted butter next time.
- If taco shells are too sticky, use less butter next time.
- Experiment with different cereals, fillings, and toppings.
- Make mini tacos using smaller circles of Fruity Pebbles mixture.
- Add a graham cracker crust to the bottom of the taco shells.
- Freeze filled taco shells for a quick and easy dessert.