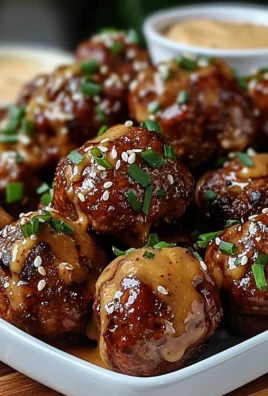
Garlic Bread Rolls: A Culinary Classic
Garlic Bread Rolls: the very words conjure up images of warm, crusty bread, bursting with the fragrant aroma of garlic and herbs. I’ve always loved the comforting smell of garlic bread baking, a scent that instantly transports me back to family gatherings and cozy evenings. This isn’t just any bread; it’s a culinary classic, a side dish that elevates any meal from simple to spectacular.
While the precise origins of garlic bread are debated, its popularity spans centuries and cultures. Variations exist across the globe, from the simple bruschetta of Italy to the richly flavored garlic bread found in countless American kitchens. The fundamental appeal, however, remains consistent: the irresistible combination of soft, yielding bread and the pungent, savory punch of garlic. It’s a testament to the power of simple ingredients, expertly combined.
What makes Garlic Bread Rolls so beloved? It’s the perfect blend of textures, of course! The soft, pillowy interior of the rolls contrasts beautifully with the crisp, golden-brown exterior, creating a delightful textural experience. The intense flavor of garlic, often enhanced with herbs like parsley or oregano, provides a savory counterpoint to sweeter dishes, while the buttery richness adds a layer of indulgence. And let’s be honest, the convenience factor is a major plus. These rolls are relatively quick and easy to make, perfect for a weeknight meal or a casual gathering with friends and family.
In this recipe, I’ll guide you through creating these irresistible Garlic Bread Rolls from scratch, ensuring a delicious and satisfying result every time. Get ready to experience the magic of this timeless classic!

Ingredients:
- 1 cup warm water (105-115°F)
- 2 ¼ teaspoons active dry yeast (1 packet)
- 1 tablespoon granulated sugar
- 1 teaspoon salt
- 4 tablespoons unsalted butter, melted, plus extra for greasing
- 4 cups all-purpose flour, plus more for dusting
- ½ cup grated Parmesan cheese
- 4 cloves garlic, minced
- ¼ cup chopped fresh parsley
- ½ cup unsalted butter, softened
- Salt and freshly ground black pepper to taste
Preparing the Dough
- In a large bowl, combine the warm water, yeast, and sugar. Let stand for 5-10 minutes, or until the yeast is foamy. This ensures your yeast is active and ready to work its magic!
- Stir in the salt and melted butter. The melted butter adds richness and helps create a tender crumb.
- Gradually add the flour, one cup at a time, mixing with a wooden spoon or a stand mixer fitted with a dough hook. I prefer using a stand mixer for this part, as it saves me a lot of elbow grease!
- Once the dough starts to come together, turn it out onto a lightly floured surface and knead for 5-7 minutes, or until the dough is smooth and elastic. If using a stand mixer, knead with the dough hook for about 5-7 minutes.
- Place the dough in a lightly oiled bowl, turning to coat. Cover the bowl with plastic wrap and let rise in a warm place for 1-1.5 hours, or until doubled in size. A warm oven (turned off) is a great place for this!
Preparing the Garlic Butter
- While the dough is rising, prepare the garlic butter. In a medium bowl, combine the softened butter, Parmesan cheese, minced garlic, and chopped parsley. Mix well until everything is thoroughly combined. I like to use fresh parsley for the best flavor, but dried will work in a pinch.
- Season the garlic butter generously with salt and freshly ground black pepper. Taste and adjust seasoning as needed. Don’t be shy with the pepper; it adds a nice kick!
Shaping and Baking the Rolls
- Once the dough has doubled in size, punch it down gently to release the air. This helps to prevent the rolls from becoming too airy.
- Divide the dough into 12 equal pieces. I find it easiest to weigh the dough first, then divide it evenly.
- Shape each piece of dough into a small round roll. You can make them perfectly round, or just slightly round – it’s up to you!
- Place the rolls on a baking sheet lined with parchment paper, leaving some space between each roll. This allows them to rise properly and prevents them from sticking together.
- Cover the rolls loosely with plastic wrap and let them rise for another 30 minutes. This second rise gives them a softer texture.
- Preheat your oven to 375°F (190°C). Make sure your oven is fully preheated before baking for the best results.
- Bake the rolls for 15-20 minutes, or until they are golden brown. Keep an eye on them to prevent burning.
- While the rolls are still warm, brush them generously with the garlic butter. This is the best part! The warm rolls soak up the garlic butter beautifully.
Serving Suggestions
- Serve the garlic bread rolls warm, alongside your favorite soup, stew, pasta dish, or salad. They’re also delicious on their own as a snack!
- For extra flavor, you can add other herbs to the garlic butter, such as oregano, thyme, or rosemary.
- To make ahead, prepare the dough and let it rise. Then, shape the rolls and freeze them on a baking sheet before transferring them to a freezer bag. Bake from frozen, adding a few minutes to the baking time.
- For a cheesy twist, sprinkle some extra Parmesan cheese over the rolls before baking.
- For a sweeter version, add a teaspoon of honey or maple syrup to the garlic butter.
Troubleshooting Tips
- If your yeast doesn’t foam, it may be dead. Try using a fresh packet of yeast.
- If your dough is too sticky, add a little more flour, a tablespoon at a time, until it becomes manageable.
- If your rolls are browning too quickly, reduce the oven temperature slightly or tent them loosely with foil.
- If your rolls are undercooked, bake them for a few more minutes.

Conclusion:
So there you have it – my recipe for incredibly delicious Garlic Bread Rolls! I truly believe this recipe is a must-try for anyone who loves the comforting aroma and satisfying taste of warm, garlicky bread. It’s more than just a side dish; it’s an experience. The soft, pillowy texture of the rolls, perfectly complemented by the fragrant garlic butter, creates a flavor combination that’s simply irresistible. From the initial kneading of the dough to the final golden-brown bake, making these rolls is a rewarding process, and the end result is well worth the effort.
What makes this Garlic Bread Rolls recipe stand out? It’s the perfect balance of simplicity and deliciousness. The ingredients are readily available, the instructions are easy to follow, even for beginner bakers, and the outcome is consistently amazing. I’ve perfected this recipe over years of baking, tweaking and refining it to achieve that perfect blend of fluffy interior and crispy exterior. And let’s be honest, who doesn’t love the satisfying crunch of a perfectly toasted garlic roll?
Beyond the basic recipe, the possibilities for variations are endless! Feel free to experiment with different herbs and spices to customize the garlic butter to your liking. A sprinkle of Parmesan cheese adds a salty, savory kick, while a dash of red pepper flakes introduces a delightful warmth. You could also incorporate fresh herbs like rosemary or thyme into the dough for an extra layer of flavor. For a truly decadent treat, try brushing the rolls with melted butter infused with garlic and herbs after baking for an extra layer of flavor and shine.
Serving suggestions are equally diverse. These Garlic Bread Rolls are the perfect accompaniment to any pasta dish, soup, or stew. They’re equally at home alongside a hearty roast chicken or a simple salad. Imagine them warm from the oven, alongside a bowl of steaming tomato soup on a chilly evening – pure comfort food bliss! They also make a fantastic addition to a casual get-together, a family dinner, or even a sophisticated dinner party. Their versatility makes them a perfect addition to any meal, elevating it from ordinary to extraordinary.
I encourage you to give this recipe a try and experience the magic of homemade Garlic Bread Rolls for yourself. The aroma alone will fill your kitchen with warmth and invite everyone to the table. Once you’ve tasted these perfectly baked rolls, you’ll understand why they’ve become a staple in my kitchen. And don’t forget to share your baking experience with me! I’d love to see your creations and hear about your own variations on this classic recipe. Share your photos and feedback on social media using #GarlicBreadRolls – I can’t wait to see what you create!
So, what are you waiting for? Gather your ingredients, preheat your oven, and get ready to bake up a batch of these irresistible Garlic Bread Rolls. You won’t regret it! Happy baking!
Garlic Bread Rolls: The Ultimate Recipe and Baking Guide
Soft, fluffy rolls packed with garlicky, cheesy flavor. Perfect for any meal!
Ingredients
Instructions
Recipe Notes
- For best results, use fresh yeast.
- Adjust flour if dough is too sticky.
- If rolls brown too quickly, tent with foil.
- Add other herbs (oregano, thyme, rosemary) to the garlic butter for extra flavor.
- Freeze shaped rolls before baking; add a few minutes to baking time.
- Sprinkle extra Parmesan cheese before baking for a cheesier roll.
- Add a teaspoon of honey or maple syrup to the garlic butter for a sweeter version.