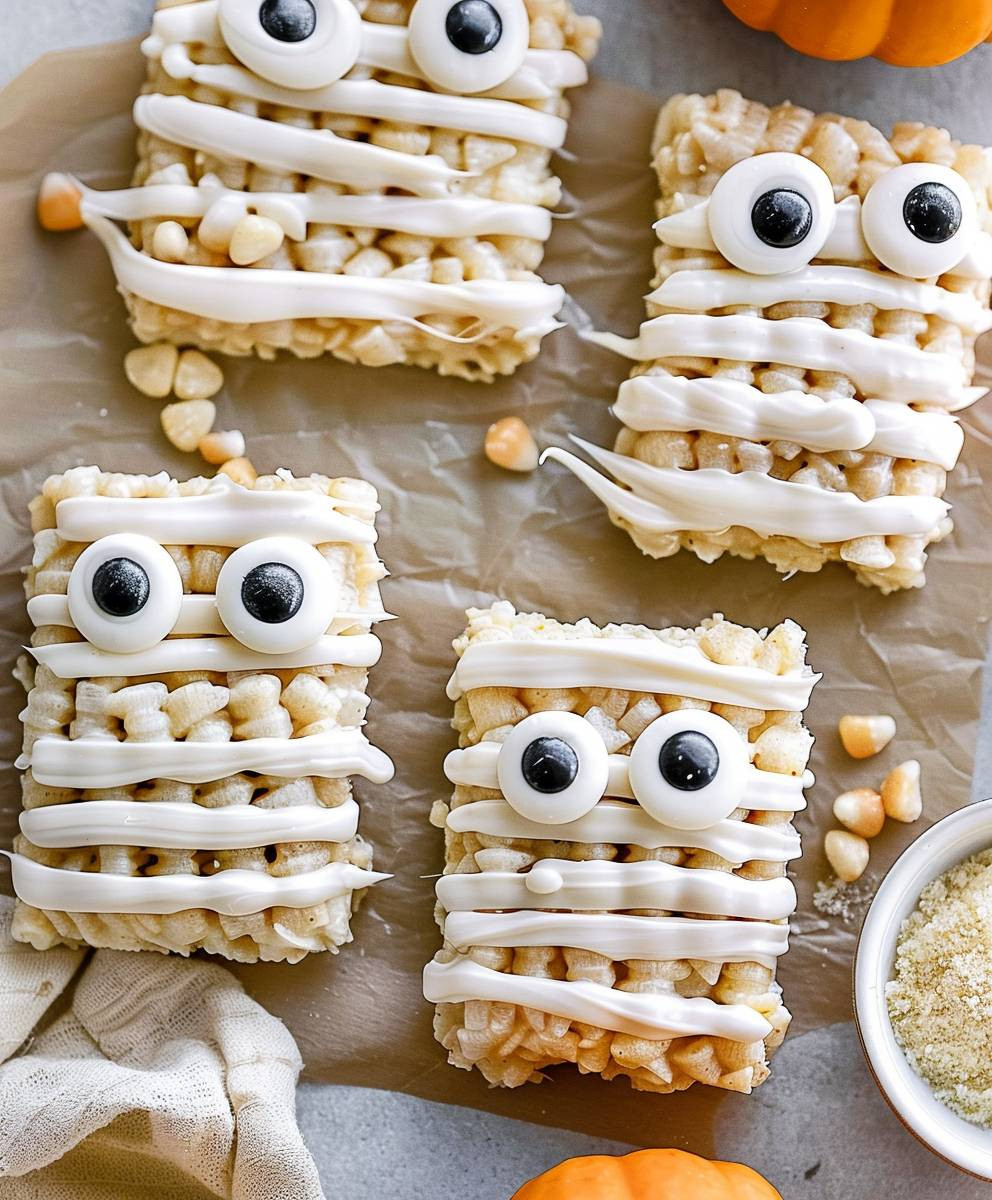
Halloween Mummy Treats
Halloween Mummy Treats are the perfect spooky yet sweet addition to your Halloween festivities! I’ve always loved creating fun and festive treats for this holiday, and these little mummies are a guaranteed crowd-pleaser, year after year. Their charmingly creepy appearance is only surpassed by their delicious taste.
While the precise origins of mummy-shaped treats are difficult to pinpoint, the concept clearly draws inspiration from the classic Halloween imagery of mummies and bandages. It’s a testament to the enduring appeal of this spooky holiday that such a simple idea can be so captivating. The tradition of creating fun, themed food for Halloween has evolved over time, with these Halloween Mummy Treats representing a modern, easily accessible take on this age-old practice.
What makes these treats so beloved? It’s the delightful combination of factors! The flaky, buttery pastry provides a wonderful textural contrast to the creamy, sweet filling. Whether you opt for a classic chocolate or a more adventurous flavor combination, the taste is undeniably satisfying. Beyond the deliciousness, these Halloween Mummy Treats are incredibly easy to make, even for novice bakers. They require minimal ingredients and preparation time, making them ideal for busy individuals or families looking for a fun and simple Halloween activity.
So, gather your ingredients, get creative with your decorating, and prepare to be amazed by how quickly you can whip up a batch of these adorable and delicious Halloween Mummy Treats. Let’s get baking!

Ingredients:
- 1 (16 ounce) package refrigerated crescent roll dough
- 1 cup creamy peanut butter
- 1/2 cup powdered sugar
- 1/4 cup milk
- 1 teaspoon vanilla extract
- 1 cup semi-sweet chocolate chips
- Mini chocolate chips (for eyes)
- White candy melts (for bandages)
- Black food coloring gel (optional, for darker bandages)
- Parchment paper
Preparing the Peanut Butter Filling
- In a medium bowl, I beat together the peanut butter, powdered sugar, milk, and vanilla extract until smooth and creamy. This is the heart of our mummy treats, so make sure it’s perfectly blended! If it’s too thick, add a tiny bit more milk, a teaspoon at a time, until you reach the desired consistency.
- Once the peanut butter filling is smooth, I set it aside. We’ll come back to this deliciousness later.
Assembling the Mummy Treats
- Preheat your oven to 375°F (190°C). Line a baking sheet with parchment paper. This prevents sticking and makes cleanup a breeze!
- Unroll the crescent roll dough. I gently separate the triangles, being careful not to tear them. Each triangle will become a mummy.
- Place a spoonful of the peanut butter filling onto the wide end of each crescent roll triangle. Don’t overload it; you want enough filling to be delicious but not so much that it spills out during baking.
- Starting at the wide end, I tightly roll the crescent roll dough around the peanut butter filling, creating a long, thin “mummy body.” Make sure the seam is sealed to prevent the filling from leaking out during baking.
- Once all the crescent rolls are rolled, I carefully place them onto the prepared baking sheet, leaving a little space between each mummy.
- Bake for 12-15 minutes, or until the crescent rolls are golden brown. Keep a close eye on them; ovens vary, and you don’t want them to burn!
- Remove the baking sheet from the oven and let the mummy treats cool completely on a wire rack. This is important; they need to cool before we add the finishing touches.
Adding the Finishing Touches
- While the mummy treats are cooling, I melt the semi-sweet chocolate chips in a microwave-safe bowl in 30-second intervals, stirring after each interval, until smooth and melted. You can also do this in a double boiler if you prefer.
- Once the chocolate is melted, I drizzle it over the cooled mummy treats. I like to make it look a little messy, like actual bandages! You can use a spoon or a piping bag for more control.
- Next, I melt the white candy melts according to the package directions. If you want darker bandages, I add a tiny bit of black food coloring gel and mix it thoroughly. A little goes a long way!
- Using a toothpick or a piping bag, I carefully draw thin lines of melted white candy melts (or the darker mixture) across the chocolate-covered mummy treats to resemble bandages. Get creative with the patterns! Some mummies can have more bandages than others.
- Finally, I add two mini chocolate chips as eyes to each mummy treat. This is the finishing touch that brings them to life (or, well, undead life!).
- Let the chocolate and candy melts set completely before serving. This usually takes about 30 minutes, but it’s worth the wait!
Tips and Variations
- For extra flavor: Add a pinch of cinnamon or nutmeg to the peanut butter filling.
- For a spooky twist: Use different colored candy melts for the bandages, like green or purple.
- For a nut-free option: Substitute the peanut butter with sunflower seed butter or another nut-free alternative.
- For a more sophisticated look: Use a piping bag to create more precise lines for the bandages.
- Make it a party: Get the kids involved in assembling and decorating the mummy treats! It’s a fun and engaging activity for a Halloween party.
- Storage: Store the finished mummy treats in an airtight container at room temperature for up to 3 days. They are best enjoyed fresh, but they will still be delicious the next day.
Troubleshooting
- Crescent rolls are too dry: Add a teaspoon of milk to the filling to make it more moist.
- Filling is too runny: Add a tablespoon of powdered sugar to thicken it.
- Chocolate is too thick: Add a teaspoon of vegetable oil to thin it out.
- Candy melts are too thick: Add a few drops of vegetable oil or shortening to thin them out.
Conclusion:
So there you have it – my recipe for spooktacular Halloween Mummy Treats! I truly believe this recipe is a must-try for several reasons. First, it’s incredibly easy. Even the most novice baker can whip up a batch of these delightful treats in a flash. The simplicity is part of its charm, allowing you to focus on the fun, creative aspects of decorating your mummies. Second, it’s incredibly versatile. You can easily adapt the recipe to suit your preferences and dietary needs. Want to make them vegan? Swap the butter for a vegan alternative. Prefer a different type of candy coating? Go for it! The possibilities are endless.
Third, and perhaps most importantly, these Halloween Mummy Treats are guaranteed to be a hit with everyone, from the youngest trick-or-treaters to the most discerning adult guests. Their adorable appearance and delicious taste make them a perfect addition to any Halloween gathering, whether it’s a family party, a spooky get-together with friends, or even a classroom celebration. The combination of the crispy, buttery pretzel rods and the creamy, sweet candy melts is simply irresistible.
Serving Suggestions:
These Halloween Mummy Treats are best served fresh, but they can be stored in an airtight container at room temperature for a couple of days. I recommend serving them alongside other Halloween-themed goodies, such as pumpkin spice cookies, caramel apples, or even a spooky punch. They also make a fantastic addition to a Halloween-themed buffet, where their unique appearance will surely draw attention. Consider arranging them on a platter with some dry ice for an extra dramatic effect! For a truly impressive presentation, try creating a “mummy graveyard” by placing them amongst some plastic tombstones or miniature pumpkins.
Variations to Try:
While the classic version is already a winner, I encourage you to experiment with different variations to personalize your Halloween Mummy Treats. Here are a few ideas to get you started:
- Chocolate Mummies: Use dark chocolate or milk chocolate candy melts instead of white chocolate for a richer, more decadent flavor.
- Colorful Mummies: Add a splash of food coloring to your candy melts to create colorful mummies in shades of orange, purple, or green.
- Nutty Mummies: Incorporate chopped nuts, such as pecans or almonds, into the candy melt mixture for added texture and flavor.
- Spooky Sprinkles: Decorate your mummies with Halloween-themed sprinkles, edible glitter, or even mini chocolate chips to add an extra touch of whimsy.
- Gourmet Mummies: Use gourmet pretzels or flavored candy melts to elevate the treat to a whole new level.
The possibilities are truly endless! Let your creativity run wild and have fun experimenting with different flavors and decorations.
Share Your Creations!
I would love to see your Halloween Mummy Treat creations! Once you’ve made your batch, share a picture on social media using the hashtag #HalloweenMummyTreats. I’ll be sure to check them out and share my favorites. Don’t forget to tag me so I can see your amazing work! I’m excited to see the unique twists you put on this recipe. Happy baking, and happy haunting!
Remember, baking should be fun! So grab your ingredients, put on some spooky music, and get ready to create some delicious and delightful Halloween Mummy Treats. You won’t regret it!
Halloween Mummy Treats: Easy No-Bake Recipe for Kids
Adorable crescent roll mummies filled with creamy peanut butter and decorated with chocolate bandages. Perfect for Halloween!
Ingredients
Instructions
Recipe Notes
- For extra flavor, add a pinch of cinnamon or nutmeg to the peanut butter filling.
- Use different colored candy melts for a spooky twist.
- Substitute peanut butter with sunflower seed butter for a nut-free option.
- Use a piping bag for more precise bandage lines.
- Get kids involved in assembling and decorating!
- Store in an airtight container at room temperature for up to 3 days.