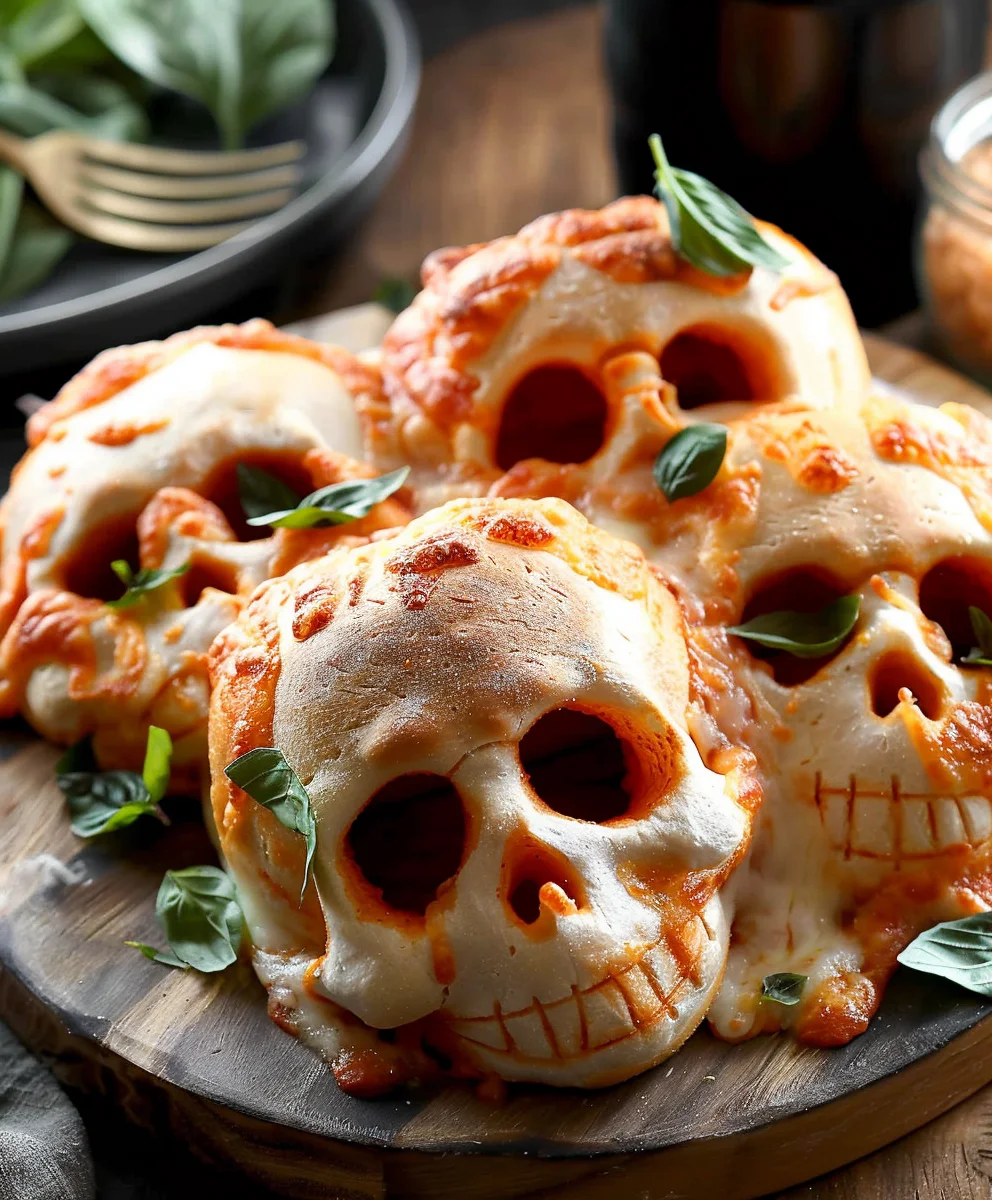
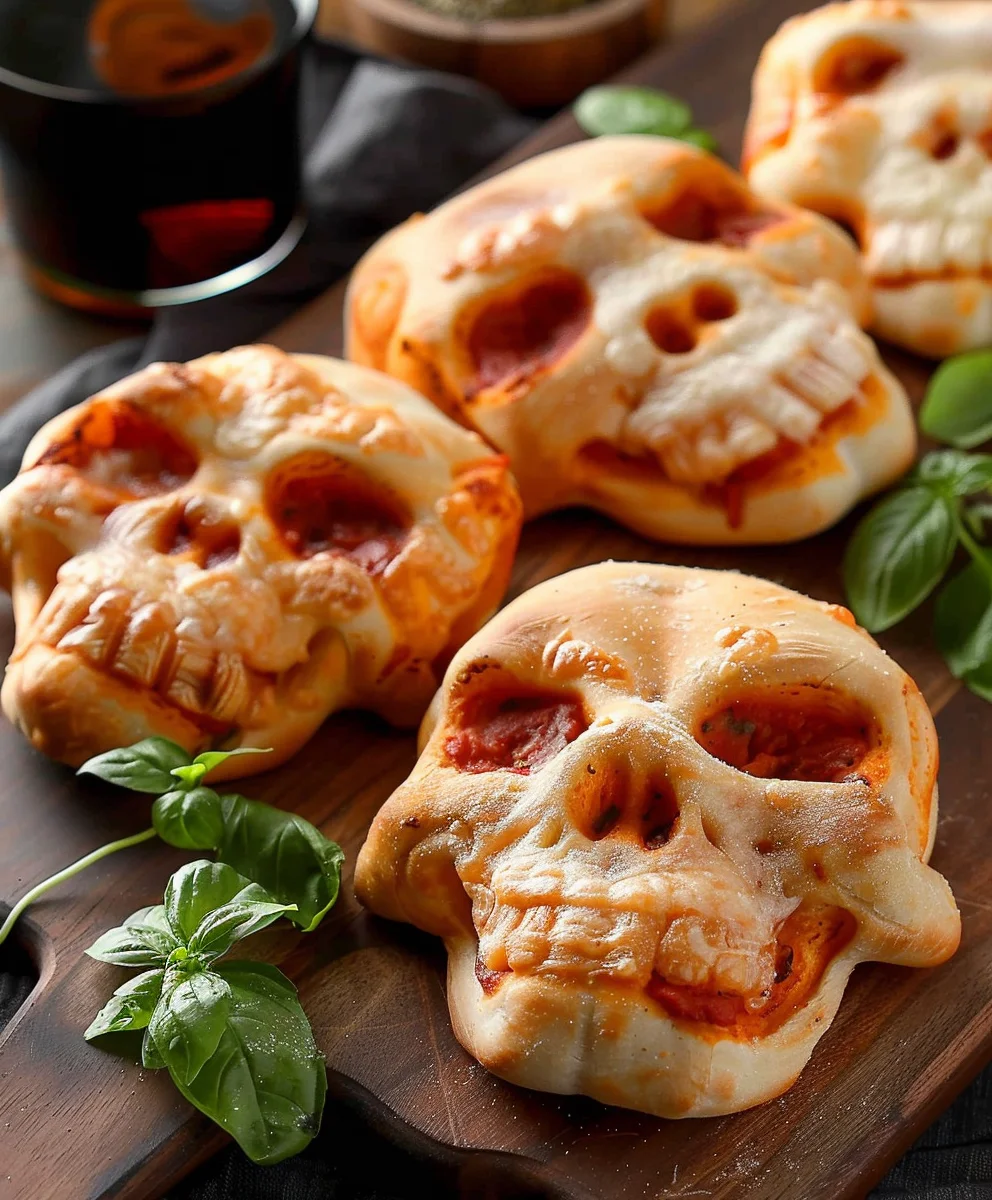
Halloween Pizza Skulls are quite possibly the most delightfully ghoulish and irresistibly delicious snack you’ll create this spooky season! As someone who cherishes the magic and creativity that Halloween brings, I’ve always found immense joy in transforming everyday food into something extraordinary and thematic. While there isn’t a centuries-old scroll detailing the ancient origins of these specific treats, their spirit perfectly embodies the modern tradition of festive, fun, and slightly macabre culinary creations that define our favorite autumnal holiday. People absolutely adore this dish not just for its undeniably charming (and slightly eerie) skull shape, but because it combines everyone’s beloved pizza flavors — savory sauce, gooey melted cheese, and customizable toppings — into a convenient, individual serving. These Halloween Pizza Skulls are incredibly versatile, making them a fantastic party appetizer or a fun dinner activity for the whole family.
Prepare to amaze your guests and delight your little monsters with this spooky, cheesy masterpiece!

Ingredients:
- For the Pizza Dough:
- 1 pound (approximately 450-500g) store-bought fresh pizza dough, or homemade pizza dough (enough for two medium pizzas). I love the convenience of store-bought, but if you have a favorite homemade recipe, now’s the time to shine!
- For the Spooky Sauce:
- 1 cup (240ml) your favorite marinara or pizza sauce. I sometimes add a pinch of red pepper flakes for a little kick!
- 1/2 teaspoon garlic powder
- 1/4 teaspoon dried oregano
- Pinch of salt and black pepper to taste
- For the Cheesy Skull Brains:
- 1.5 cups (about 170g) shredded mozzarella cheese, low-moisture, part-skim. This melts beautifully and gives us that classic pizza stretch.
- 1/2 cup (about 50g) shredded provolone cheese (optional, but adds a lovely sharp note!)
- 1/4 cup (about 25g) grated Parmesan cheese. For that extra umami punch!
- For the Frightful Fillings (Choose your favorites!):
- 1/2 cup (about 60g) small diced pepperoni, or mini pepperoni. These are perfect for fitting into our skull cavities.
- 1/4 cup (about 30g) finely diced cooked ham or Canadian bacon.
- 1/4 cup (about 30g) finely diced cooked sausage (Italian sausage works wonderfully!).
- 1/4 cup (about 30g) finely chopped mushrooms.
- 2 tablespoons finely diced red onion.
- 2 tablespoons finely diced green bell pepper.
- 2 tablespoons finely diced black olives.
- For the Ghoulish Garnishes (Decoration Time!):
- 1 small can (2.25 oz/64g) sliced black olives, drained (for eyes and nasal cavities).
- 1 small red bell pepper, thinly sliced into strips (for mouths or scars).
- A few sprigs of fresh parsley or basil for a touch of “hair” or garnish.
- Olive oil, for brushing.
Equipment You’ll Need:
- Skull-shaped silicone mold (approximately 6-8 cavities, each about 3-4 inches long). This is absolutely essential for our Halloween Pizza Skulls!
- Large baking sheet.
- Parchment paper.
- Rolling pin.
- Small mixing bowls.
- Pastry brush.
- Cutting board and sharp knife.
- Spatula or spoon for filling.
Prepping Your Pizza Skull Canvas: Dough and Molds
- Get the Dough Ready: If you’re using store-bought pizza dough, take it out of the refrigerator about 30-60 minutes before you plan to start working. This allows it to come to room temperature, making it much easier to roll out and work with. Nobody likes fighting cold, stiff dough! While it’s resting, I usually give it a gentle poke to check its elasticity.
- Preheat Your Oven: Position an oven rack in the middle of your oven and preheat to 400°F (200°C). This ensures your oven is perfectly hot and ready when your skull creations are assembled. A properly preheated oven is key to a crispy crust!
- Prepare Your Skull Molds: Lightly grease your skull-shaped silicone mold cavities with a tiny bit of olive oil or cooking spray. Even though silicone is non-stick, this extra step helps ensure our pizza skulls release beautifully and prevents any sticky surprises. I usually just use my fingertips to rub in a tiny bit of oil.
- Roll Out the Dough: On a lightly floured surface (or a piece of parchment paper, which makes cleanup easier!), roll out your pizza dough into a large, thin rectangle or circle, roughly 1/8 to 1/4 inch thick. You want it thin enough to conform to the skull mold but not so thin that it tears easily. Think of it like creating a blank canvas for our spooky art! I usually aim for a size that will allow me to cut out enough pieces to line each skull cavity twice.
- Cut Dough for Molds: Using a knife or a pastry wheel, cut the rolled-out dough into pieces large enough to line each skull cavity, with some overhang. I usually eyeball this, cutting squares or circles slightly larger than the mold opening. You’ll need one piece for the bottom layer of each skull and a second piece for the top “lid.” So, if you have an 8-cavity mold, you’ll need 16 pieces of dough.
- Line the Molds: Gently press one piece of dough into each skull cavity, stretching it carefully to fit the contours of the skull. Ensure the dough extends slightly over the edges of the mold. This forms the base and sides of your Halloween Pizza Skulls. Don’t worry if it’s not perfect; we’re going for rustic, ghoulish charm! Make sure there are no large air bubbles trapped under the dough.
Crafting Your Creepy Concoction: Sauce and Toppings
- Prepare the Sauce: In a small bowl, combine your marinara or pizza sauce with garlic powder, dried oregano, salt, and black pepper. Stir well to ensure all the flavors are melded together. Giving the sauce a little flavor boost makes a big difference!
- Mix the Cheeses: In another medium bowl, gently toss together the shredded mozzarella, provolone (if using), and grated Parmesan cheese. This pre-mixing helps distribute the cheeses evenly in our skulls.
- Chop Your Toppings: If you haven’t already, finely dice all your chosen fillings – pepperoni, ham, sausage, mushrooms, onions, bell peppers, olives. The key here is small pieces! Since our skull cavities aren’t huge, smaller pieces ensure an even distribution of flavor in every bite and make it easier to fill without tearing the dough. I usually aim for pieces no larger than a pea.
- Combine Fillings (Optional, but Recommended!): In a separate bowl, you can gently combine your diced pepperoni, ham, sausage, mushrooms, onions, bell peppers, and olives. This makes the filling process quicker and ensures each skull gets a variety of goodies. I often add just a tiny pinch of extra oregano to this mix as well.
Assembling Your Anatomical Appetizers: Filling the Skulls
- Sauce It Up: Spoon a small amount of your seasoned pizza sauce (about 1 teaspoon) into the bottom of each dough-lined skull cavity, spreading it gently with the back of the spoon. Don’t overdo it with the sauce, or your skulls might become soggy! We want just enough to coat the bottom and infuse flavor.
- Layer the Cheese: Sprinkle a small layer of your mixed cheeses (about 1 tablespoon) over the sauce in each skull. This acts as a barrier, helping to keep the dough from getting too wet from the sauce, and provides a delicious cheesy base.
- Add Your Frightful Fillings: Now, carefully spoon your chosen fillings (or the combined mix) into each skull cavity, being mindful not to overfill. You want to leave a little room at the top for more cheese and the dough lid. About 1-2 tablespoons of filling per skull is usually perfect, depending on the size of your mold. Gently press the filling down a little.
- More Cheese, Please!: Top the fillings with another generous sprinkle of your mixed cheeses. This second layer of cheese will act like glue, holding everything together and creating that irresistible cheesy goodness that oozes out when you bite into a warm skull.
- Seal the Skulls: Take your remaining pieces of rolled-out dough. Gently place one piece over the top of each filled skull cavity, creating a “lid.” Carefully press the edges of the top dough piece into the dough that’s overhanging from the bottom layer, sealing the two pieces together. You can pinch and crimp the edges to ensure a tight seal. This step is crucial to keep all those delicious fillings inside while baking. I often use a fork to press the edges firmly, just like sealing a pie. Trim any excess dough around the edges with a knife or pastry wheel for a neat finish, or leave it for a more rustic look.
- Ventilation for Your Victims (Skulls!): Using a small, sharp knife, or even the tip of a toothpick, carefully make a few small slits or holes on the top of each dough-covered skull. These vents will allow steam to escape during baking, preventing your skulls from puffing up too much and ensuring a crispy crust.
- Brush with Olive Oil: Lightly brush the tops of your assembled Halloween Pizza Skulls with a little olive oil. This will help them brown beautifully and achieve a lovely golden crust.
Baking Your Bone-Chilling Bites: The Oven Phase
- Transfer to Baking Sheet: Carefully place your skull-filled silicone mold onto a large baking sheet. This makes it easier to transfer in and out of the oven and provides stability for the flexible silicone mold.
- Bake to Perfection: Place the baking sheet with your molds into the preheated 400°F (200°C) oven. Bake for 20-25 minutes, or until the dough is golden brown and the cheese inside is bubbly and melted. Keep an eye on them! Oven temperatures can vary, so you might need a little more or less time. I always look for that beautiful golden hue on the crust.
- Cool Slightly: Once baked, carefully remove the baking sheet from the oven. Let the Halloween Pizza Skulls cool in the silicone mold for about 5-10 minutes. This cooling period is important! It allows the skulls to set up a bit, making them much easier to unmold without breaking apart.
- Unmold with Care: After the short cooling time, gently invert the silicone mold over a wire rack or a clean surface. The pizza skulls should pop out easily. If any are a bit stubborn, gently push from the bottom of the mold. They will be hot, so handle with care!
Bringing Your Skulls to Life: The Spooky Decorations
- Prepare Your Garnishes: While the skulls are cooling (or once they’ve cooled enough to handle), get your decorating ingredients ready. Drain your sliced black olives and have your red bell pepper strips close by.
- Create the Eyes: Take two sliced black olives and place them into the “eye sockets” of each pizza skull. The natural indentation of the skull shape makes this super easy! You can position them slightly off-kilter for a truly eerie gaze.
- Form the Nasal Cavities: For the nasal cavity, you can cut a black olive slice in half or into a small triangular shape and place it just below the eyes. This detail really makes them look like skulls!
- Craft the Mouths and Scars: Now for the fun part! Use thin strips of red bell pepper to create mouths. You can arrange them in a straight line for a menacing grin, or curve them into a wicked smile. For an extra ghoulish touch, use smaller, thinner strips to create “stitches” over the mouth or even “scars” on the forehead or cheekbones of the skulls. Think Frankenstein’s monster meets pizza! You can also use a very small, thin piece of olive for a missing tooth.
- Add Greenery (Optional): For a final flourish, you can tuck a tiny sprig of fresh parsley or basil behind each skull’s “ear” area, making it look like a little bit of green, undead hair. This adds a nice pop of color and freshness.
- Serve Immediately: Your Halloween Pizza Skulls are best served warm, so gather your ghoulish guests and present your spooky treats!
Chef’s Cryptic Chronicles: Tips and Variations for Your Halloween Pizza Skulls
Customization is Key to Your Cryptic Creations:
One of the best things about these Halloween Pizza Skulls is how versatile they are! Don’t feel limited to my suggested fillings. Think about what your own ghosts and goblins love. You could add finely chopped cooked chicken, artichoke hearts, sun-dried tomatoes, or even a spicy jalapeño kick. Just remember the golden rule: everything needs to be finely diced to fit neatly into the skull cavities. If you’re a fan of white pizza, you could swap the marinara for a creamy garlic sauce or a ricotta base, omitting the red bell pepper for decoration and sticking to black olives for a stark, spectral look.
Dough Dilemmas and Solutions:
If you’re working with homemade pizza dough, ensure it’s had enough time to proof, which will give you a light and airy crust. If your store-bought dough is particularly sticky, don’t hesitate to use a little extra flour on your work surface and rolling pin. Conversely, if it’s too stiff, give it more time to come to room temperature. A pliable dough is a happy dough, and a happy dough makes for easy skull shaping!
Make-Ahead Magic for Your Midnight Munchies:
These Halloween Pizza Skulls can be partially prepared in advance. You can prepare all your fillings and sauce a day ahead and store them in airtight containers in the refrigerator. You can even line the skull molds with dough the day before, cover them tightly with plastic wrap, and refrigerate. When you’re ready to bake, simply fill and seal! This makes party day much less stressful. For the best taste and texture, I always recommend baking and serving them fresh, but the prep work can definitely be done in stages.
Storage Secrets for Spooky Leftovers:
If you happen to have any leftover Halloween Pizza Skulls (a rare occurrence in my house!), they can be stored in an airtight container in the refrigerator for up to 3 days. To reheat, I suggest popping them back into a preheated oven at 350°F (175°C) for about 8-10 minutes, or until warmed through and the crust is crispy again. The microwave works in a pinch, but the crust won’t be as good. These also make fantastic lunchbox treats the next day!
Presentation Prowess:
When serving, arrange your finished Halloween Pizza Skulls on a large platter. You can garnish the platter itself with some spooky elements like cobwebs, plastic spiders, or even some dry ice (used safely in a container, of course) for a chilling smoky effect. The more dramatic the presentation, the more impressed your guests will be with your culinary necromancy!
Scaling Up for a Graveyard Bash:
If you’re hosting a truly massive Halloween party, consider getting multiple skull molds or baking in batches. This recipe is easily scalable. Just double or triple the ingredients as needed. Remember, the more skulls you make, the more joy and fright you’ll spread among your guests! These are such a hit that you’ll wish you had made more!
Conclusion:
So there you have it, my friends! We’ve journeyed together through the delightfully ghoulish process of creating these utterly irresistible, spooky, and surprisingly simple treats. What makes this recipe truly stand out is its uncanny ability to marry a thrilling visual spectacle with a taste that will have everyone reaching for more. Forget your average, mundane party snacks; these are conversation starters, edible works of art that also happen to be incredibly satisfying and easy to devour. I’ve found that the sheer delight on people’s faces when they first see these culinary curiosities, before even taking a bite, is truly priceless. It’s more than just food; it’s an experience, a moment of playful fright and delicious surprise all rolled into one.
The joy of crafting these Halloween Pizza Skulls isn’t just in the delicious outcome, but in the entire experience of bringing something so uniquely festive to life. From shaping the dough to revealing the cheesy, saucy surprise inside, every step is infused with fun. Whether you’re hosting a monstrous bash for adults or a cute, ghostly gathering for the little ones, these pizza skulls fit right in, appealing to both sophisticated palates and picky eaters alike. They manage to be both adorable and a little bit creepy, hitting that perfect Halloween sweet spot. I assure you, the effort, which is surprisingly minimal, pays off tenfold in the smiles and satisfied munching you’ll witness. Trust me, these won’t just be eaten; they’ll be talked about long after the last one disappears.
Serving Suggestions & Creative Variations:
Now, once your gruesome creations emerge golden and bubbly from the oven, what’s next? While they are absolutely divine on their own, don’t hesitate to elevate the experience with a few dipping sauces. Imagine a warm, robust marinara, a zesty garlic aioli, or even a spicy sriracha ranch for those who like a little kick with their spooky bites. For a balanced meal, pair them with a fresh, crisp green salad tossed with a light vinaigrette, or alongside some ghostly “finger” breadsticks for an extra creepy spread. If you’re hosting a full-on Halloween feast, they make an excellent appetizer that promises to set a wonderfully eerie tone for the meal to come.
But the fun doesn’t stop there! Think of this recipe as a canvas for your culinary imagination. Want to go vegetarian? Load them up with finely diced bell peppers, mushrooms, black olives, or even some crumbled plant-based sausage for a meat-free marvel. For the meat lovers, consider adding pre-cooked crumbled Italian sausage, mini pepperoni, or even some shredded BBQ chicken for a smoky flavor. Experiment with a blend of cheeses – perhaps a sharp cheddar for a bolder flavor profile alongside the classic mozzarella, or even a touch of smoked gouda for an unexpected twist. You could even try different doughs – a whole wheat dough for a healthier twist, or a gluten-free option to accommodate dietary needs, ensuring everyone can enjoy these fantastic treats. The skull shape remains the star, so feel free to play with the interior to your heart’s content. And for the busy hosts among us, remember that you can prepare the filled skulls ahead of time and refrigerate them, baking them just before your guests arrive for maximum freshness and minimal stress.
Share Your Spooky Creations!
I truly hope you feel inspired to give this recipe a whirl. There’s something incredibly satisfying about bringing a recipe to life in your own kitchen, especially one that promises so much delight and festive cheer. The magic of cooking, for me, lies in these moments of creation and sharing. When you do create your batch of these amazing pizza skulls, I would absolutely love to see them! Please, take a photo, share your experience, tell me what variations you tried, or what dips you served them with. Did your family have a favorite topping? Did you try a unique cheese blend? Your insights and culinary adventures are always a source of inspiration for me and for other readers. You can leave a comment below or tag me if you share them on your social media – I’m always thrilled to connect with fellow food enthusiasts and see your magnificent culinary creations come to life. So, gather your ingredients, unleash your inner ghoul, and prepare to impress everyone with these show-stopping treats. Happy cooking, and even happier eating! May your Halloween be filled with delicious frights and unforgettable flavors!
Halloween Pizza Skulls
Halloween Pizza Skulls are a delightfully ghoulish and irresistibly delicious snack, combining everyone’s beloved pizza flavors into a convenient, individual serving. Perfect as a party appetizer or a fun dinner activity for the whole family.
Ingredients
-
13 to 16 ounces pre-made pizza dough
-
3/4 to 1 cup pizza sauce
-
1/2 teaspoon garlic powder
-
1/4 teaspoon dried oregano
-
Pinch of salt
-
Pinch of black pepper
-
2 cups shredded mozzarella
-
1/4 cup Parmesan cheese
-
8 ounces cooked beef sausage, diced
-
6 ounces mini beef pepperoni
-
Sliced black olives
-
Chopped beef ham
-
Crumbled crispy beef bacon
-
Mini beef Italian meatballs
-
Cooked corn kernels
-
Baby spinach, finely chopped
-
Fresh basil, chopped
-
Olive oil, for brushing
-
Marinara sauce, for dipping
-
Chopped parsley or basil, for garnish
Instructions
-
Step 1
Let pizza dough come to room temperature (30-60 min). Preheat oven to 400°F (200°C). Lightly grease skull-shaped silicone mold cavities. Roll dough into a thin rectangle (1/8-1/4 inch thick). Cut dough into pieces large enough to line each skull cavity twice. Gently press one dough piece into each cavity, extending over the edges. -
Step 2
In a small bowl, combine pizza sauce with garlic powder, oregano, salt, and pepper. In another bowl, mix shredded mozzarella and Parmesan cheeses. Finely dice your chosen fillings (e.g., beef sausage, beef pepperoni, beef ham, beef bacon, beef meatballs, corn, spinach, black olives). -
Step 3
Spoon about 1 teaspoon of seasoned pizza sauce into each dough-lined skull cavity. Sprinkle a layer of mixed cheese (about 1 tablespoon) over the sauce. Add 1-2 tablespoons of your chosen fillings into each skull. Top with another generous sprinkle of mixed cheeses. Place a second dough piece over each filled skull, pressing edges firmly to seal. Make a few small slits on top for steam. Lightly brush the tops of the assembled skulls with olive oil. -
Step 4
Place the skull mold on a baking sheet. Bake for 20-25 minutes, or until dough is golden brown and cheese is bubbly. Remove from oven and cool in the mold for 5-10 minutes. Gently unmold the pizza skulls onto a wire rack. -
Step 5
For decoration, use sliced black olives for eyes and a small piece for the nasal cavity. Optionally, tuck a small sprig of fresh parsley or basil for garnish. Serve warm with marinara sauce for dipping.
Important Information
Nutrition Facts (Per Serving)
It is important to consider this information as approximate and not to use it as definitive health advice.
Allergy Information
Please check ingredients for potential allergens and consult a health professional if in doubt.