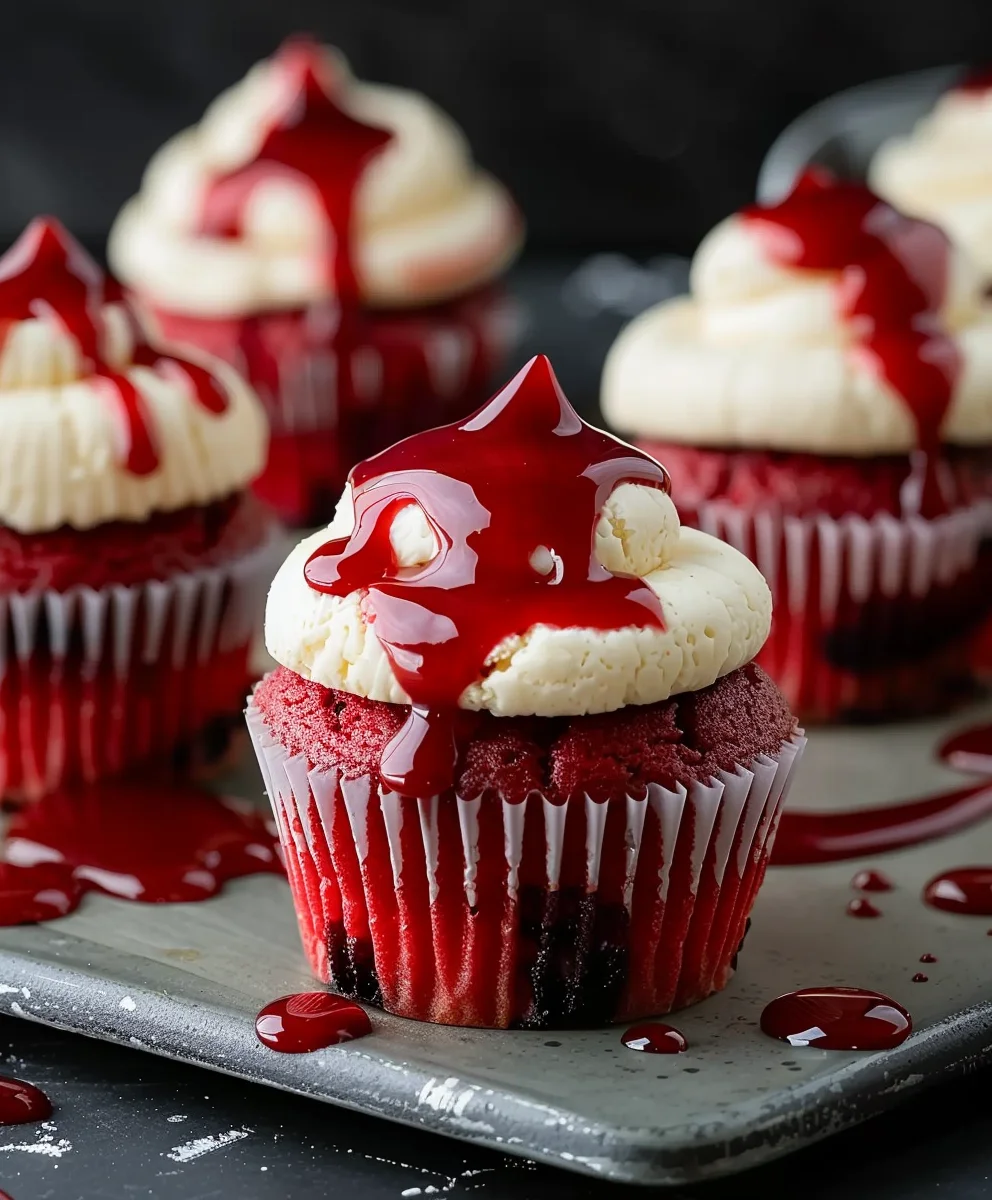
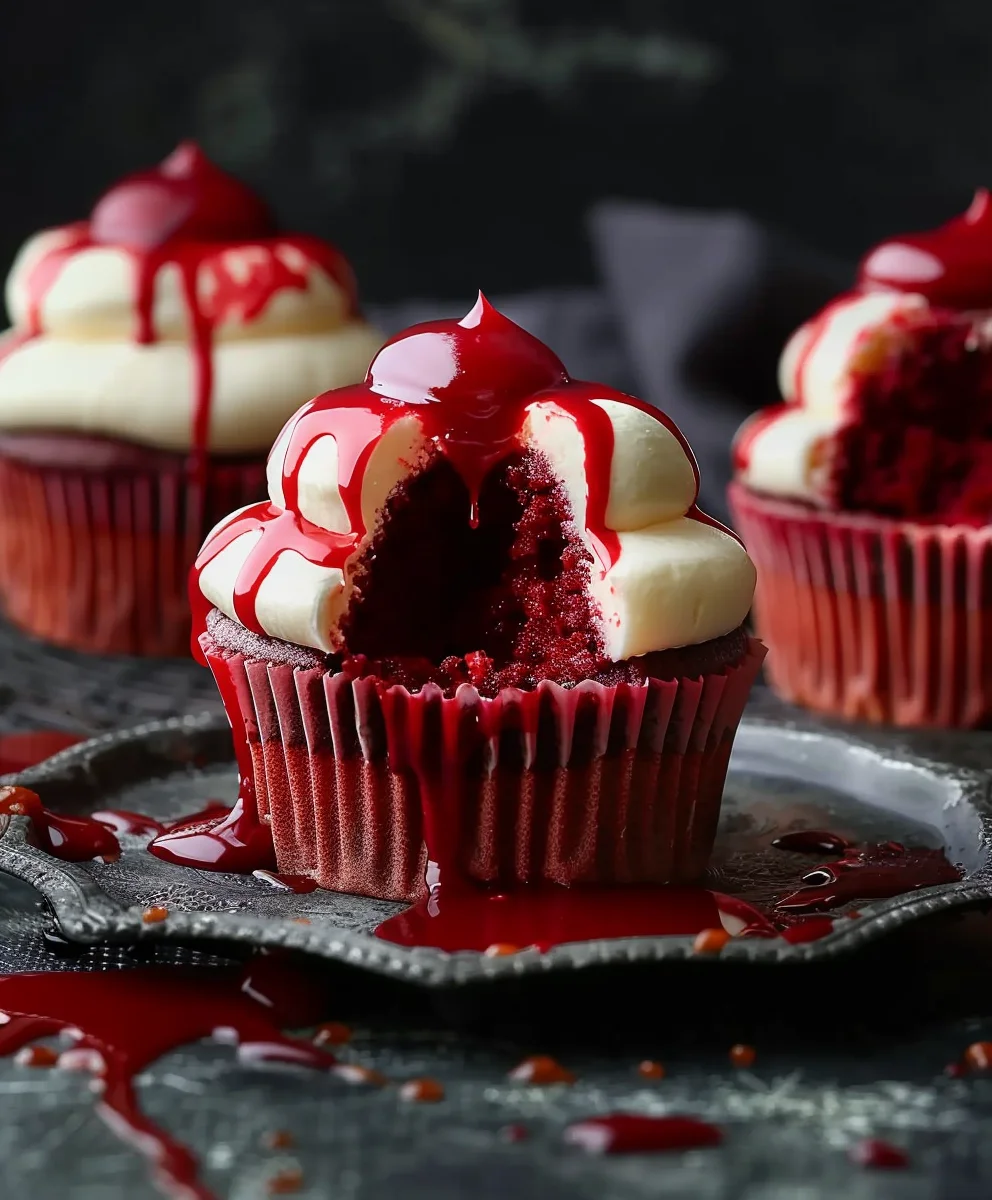
Halloween Vampire Bite Cupcakes are more than just a dessert; they are miniature works of art that capture the thrilling spirit of the season! I’ve always found immense joy in the traditions of Halloween, especially when it comes to crafting edible treats that delight both the eyes and the taste buds. There’s something uniquely satisfying about transforming simple ingredients into something playfully ghoulish, and these cupcakes embody that perfectly. While the history of baking itself is ancient, the cultural phenomenon of Halloween baking, especially creating themed treats like these, is a cherished annual ritual that brings families and friends together in festive preparation.
What makes these particular treats so universally adored? It’s their irresistible combination of a moist, fluffy cake, a rich, creamy frosting, and that unmistakable, dramatic “vampire bite” complete with a luscious crimson filling. They are an absolute showstopper at any Halloween gathering, sparking conversation and smiles. Beyond their stunning visual appeal, the process of making these Halloween Vampire Bite Cupcakes is surprisingly simple, making them an accessible and rewarding project for bakers of all skill levels. Get ready to sink your teeth into a truly unforgettable spooky season sensation!

Ingredients:
Get ready to unleash your inner mad scientist in the kitchen! To create these spooktacular Halloween Vampire Bite Cupcakes, we’ll be preparing three distinct components: the rich, dark red velvet cupcakes, a luscious cream cheese frosting, and a vibrant, deliciously gruesome berry “blood” filling. Here’s everything you’ll need:
-
For the Red Velvet Cupcakes:
- 2 ½ cups (300g) all-purpose flour, sifted
- 1 ½ cups (300g) granulated sugar
- 1 teaspoon baking soda
- 1 teaspoon fine sea salt
- 1 tablespoon unsweetened cocoa powder (Dutch-processed is great for a darker color)
- 1 cup (240ml) buttermilk, at room temperature
- ½ cup (120ml) vegetable oil (or other neutral oil)
- 2 large eggs, at room temperature
- 1 teaspoon white vinegar
- 1 teaspoon vanilla extract
- 1 to 2 ounces (approx. 2-4 tablespoons) high-quality red gel food coloring (I prefer gel for intense color!)
-
For the Cream Cheese Frosting:
- 1 stick (½ cup or 113g) unsalted butter, softened to room temperature
- 8 ounces (226g) full-fat cream cheese, softened to room temperature
- 4 cups (480g) powdered sugar, sifted
- 1 teaspoon vanilla extract
- Pinch of salt
-
For the “Blood” Filling and Drizzle:
- 2 cups (approx. 250g) fresh or frozen raspberries (or a mix of raspberries and strawberries)
- ½ cup (100g) granulated sugar
- 1 tablespoon fresh lemon juice
- 1 teaspoon cornstarch (optional, for a slightly thicker “blood”)
- 1 tablespoon cold water (if using cornstarch)
-
Optional Decorations:
- Mini chocolate chips (white or dark, for edible fangs)
- Edible red glitter or sprinkles
- Plastic vampire fangs (for display, not consumption!)
For the Red Velvet Cupcakes:
Let’s dive into making the foundation of our spooky treat: the gloriously crimson red velvet cupcakes. Achieving that deep, rich color and tender crumb is key for a truly hauntingly good cupcake!
- Prepare Your Baking Station: First things first, preheat your oven to 350°F (175°C). Line a standard 12-cup muffin tin with paper cupcake liners. You want to make sure these are ready to go once your batter is mixed, as letting the batter sit too long can affect the leavening.
- Combine Dry Ingredients: In a large mixing bowl, combine the sifted all-purpose flour, granulated sugar, baking soda, fine sea salt, and unsweetened cocoa powder. It’s crucial to sift the cocoa powder to prevent any lumps, which can lead to uneven color or texture in your cupcakes. Whisk these dry ingredients together thoroughly until they are well combined. This step ensures an even distribution of leavening agents and flavor throughout the batter.
- Whisk Wet Ingredients: In a separate, medium-sized bowl, whisk together the buttermilk, vegetable oil, large eggs (make sure they’re at room temperature for better emulsification), white vinegar, and vanilla extract. This combination forms the liquid base of our cupcakes. Now, for the magic that creates that iconic red hue: add the red gel food coloring. I always recommend gel food coloring over liquid because it gives a much more vibrant and concentrated color without thinning out your batter too much. Start with 1 ounce (about 2 tablespoons) and add more if you want a deeper, more dramatic red. Whisk until the color is evenly distributed and the mixture is a uniform crimson.
- Gently Combine Wet and Dry: Pour the wet ingredients into the dry ingredients. Using a rubber spatula or a hand mixer on low speed, mix until just combined. The most important tip here is not to overmix! Overmixing develops the gluten in the flour too much, which can result in tough, dense cupcakes instead of the light, tender crumb we’re aiming for. A few small streaks of flour are perfectly fine; they’ll disappear during baking. Trust me on this one, your cupcakes will thank you.
- Fill Cupcake Liners: Divide the batter evenly among the 12 prepared cupcake liners. Each liner should be filled about two-thirds full. This allows enough room for the cupcakes to rise beautifully without overflowing, preventing any messy clean-ups later.
- Bake to Perfection: Transfer the muffin tin to your preheated oven and bake for 18-22 minutes. Baking times can vary depending on your oven, so keep an eye on them. You’ll know they’re done when a wooden skewer or toothpick inserted into the center of a cupcake comes out clean, or with just a few moist crumbs attached. The tops should spring back gently when lightly touched.
- Cool Completely: Once baked, remove the cupcakes from the oven and let them cool in the muffin tin for about 5-10 minutes. This initial cooling helps them set up and makes them easier to handle. Then, transfer the cupcakes to a wire rack to cool completely. This step is absolutely critical before frosting! Frosting warm cupcakes will result in melted, messy frosting, and we definitely don’t want that for our spooky masterpieces. Patience is a virtue here.
For the Cream Cheese Frosting:
A rich, tangy, and velvety smooth cream cheese frosting is the perfect complement to the red velvet cupcakes. It’s like the pale skin against the blood-red, ready for those vampire bites! Getting the texture just right is key.
- Prepare Your Ingredients: Ensure both your unsalted butter and full-fat cream cheese are at room temperature. This is perhaps the most important tip for perfect cream cheese frosting! If either ingredient is too cold, your frosting will be lumpy and difficult to spread; if too warm, it might be too runny. Take them out of the fridge at least an hour before you plan to start.
- Cream the Butter: In a large mixing bowl, using an electric mixer (either a stand mixer with the paddle attachment or a hand mixer), beat the softened butter on medium speed for about 2-3 minutes. You want it to become light in color and fluffy in texture. This aeration is important for a light frosting.
- Add the Cream Cheese: Add the softened cream cheese to the bowl with the butter. Continue to beat on medium speed for another 2-3 minutes, scraping down the sides of the bowl as needed. Beat until the mixture is smooth and completely combined. Be careful not to overbeat the cream cheese at this stage, as it can sometimes become too soft or runny. We want it smooth, not whipped into oblivion.
- Gradually Add Powdered Sugar: With the mixer on low speed, gradually add the sifted powdered sugar, one cup at a time. I always recommend sifting the powdered sugar, just like with cocoa, to prevent any lumps in your final frosting. Mix until each addition is incorporated before adding the next. Once all the sugar is in, the mixture will look quite thick.
- Add Flavor and Finish: Add the vanilla extract and a tiny pinch of salt. The salt really helps to balance the sweetness of the sugar and enhance the tanginess of the cream cheese, making the flavor pop. Increase the mixer speed to medium-high and beat for another 1-2 minutes. This final whip will make your frosting incredibly light, fluffy, and perfectly spreadable or pipeable. You’re looking for a smooth, homogenous consistency that holds its shape. If it seems a little too thick, you can add a tiny splash of milk or cream, a teaspoon at a time, until you reach your desired consistency. If it’s too thin, you can try chilling it for 15-20 minutes or adding a bit more sifted powdered sugar.
For the “Blood” Filling and Drizzle:
No vampire bite cupcake would be complete without some realistic, dripping “blood”! This berry-based sauce is not only visually striking but also adds a delicious tart counterpoint to the sweet cupcake and frosting.
- Combine Ingredients in a Saucepan: In a small saucepan, combine the fresh or frozen raspberries (or berry mix), granulated sugar, and fresh lemon juice. The lemon juice is crucial here; it brightens the flavor of the berries and enhances their natural tartness, making the “blood” taste more complex and less cloyingly sweet.
- Cook the Berries: Place the saucepan over medium heat and bring the mixture to a gentle simmer, stirring occasionally. As it heats up, the berries will begin to break down and release their juices. Continue to cook for about 5-7 minutes, gently mashing the berries with the back of a spoon or a potato masher, until they are soft and the mixture has thickened slightly.
- Optional Thickening Step (for extra thick “blood”): If you want a thicker “blood” that holds its shape a bit more for filling, you can use a cornstarch slurry. In a very small bowl, whisk together the teaspoon of cornstarch with the tablespoon of cold water until smooth. Pour this slurry into the simmering berry mixture, stirring constantly. Continue to cook for another 1-2 minutes, or until the sauce thickens to your desired consistency. It should coat the back of a spoon.
- Strain for Smoothness: This step is essential for that perfect, smooth “blood” consistency. Carefully pour the berry mixture through a fine-mesh sieve set over a clean bowl. Use a rubber spatula to press firmly against the solids, extracting as much of the juice and pulp as possible. Discard the seeds and any remaining pulp. You’ll be left with a beautifully vibrant, smooth berry coulis that looks uncannily like fresh blood.
- Cool Completely: Allow the “blood” filling to cool completely to room temperature, and then transfer it to the refrigerator to chill for at least 30 minutes, or until it’s nice and cold. It’s very important that this “blood” is cold before you use it, especially when filling the cupcakes or drizzling over the frosting. A warm sauce will melt your carefully piped frosting, and we want clean, crisp “bloody” effects!
Assembling Your Halloween Vampire Bite Cupcakes:
Now for the truly fun part – transforming your lovely red velvet cupcakes into terrifyingly delicious Halloween Vampire Bite Cupcakes! This is where the magic (and a little bit of theatrical gore) happens.
- Prepare Cupcakes for Filling: Ensure your red velvet cupcakes are completely cooled. This is non-negotiable for a neat assembly. To create a cavity for our “blood” filling, you can use a cupcake corer, a small sharp knife, or even the back of a large piping tip. If using a knife, carefully cut a small cone out of the center of each cupcake, being careful not to cut all the way through to the bottom. You want to create a little well, about ¾ to 1 inch deep and ½ to ¾ inch wide. You can discard the removed cake pieces, or snack on them as a baker’s treat!
- Fill with “Blood”: Take your chilled “blood” filling. Using a small spoon or a piping bag (if you want more precision), carefully spoon or pipe about 1-2 teaspoons of the berry “blood” into the hollowed-out center of each cupcake. Don’t overfill, or it might spill out prematurely. We want a delightful surprise when someone bites into it!
- Frost Your Cupcakes: Transfer your prepared cream cheese frosting into a piping bag fitted with your favorite piping tip (a large round tip, a star tip, or even just a snipped corner of a Ziploc bag works wonderfully for a swirled effect). Pipe a generous swirl of frosting onto each filled cupcake. Aim for a nice, tall, elegant swirl that will serve as the canvas for our vampire bites. If you don’t have a piping bag, simply use an offset spatula or knife to spread the frosting evenly over the top of each cupcake.
- Create the Vampire Bite Marks: This is where the artistic terror begins!
- Method 1 (Simple Indentations): Using the back of a small spoon, a butter knife, or even your clean pinky finger (if you’re feeling brave!), gently press two small, side-by-side indentations into the frosting, near the edge of the swirl. These are our “fang marks.” Make them deep enough to hold a little “blood” but not so deep that you expose the cake beneath.
- Method 2 (Edible Fangs): For a more distinct “fang” look, you can gently press two mini white chocolate chips (pointy side down) into the frosting where the fangs would go. You might need to gently widen the holes a bit first with a small knife. This creates a very clear and edible fang impression.
- Drizzle the “Blood”: Now for the grand finale – the dripping blood! Take a small spoon or a squeeze bottle (if you have one) and carefully spoon or drizzle a small amount of the remaining chilled berry “blood” filling directly into and around the bite marks you just created. Let some of the “blood” artfully drip down the sides of the white frosting. Don’t be shy here; the more dramatic the drip, the better! The contrast of the stark white frosting with the deep red “blood” is what makes these cupcakes truly iconic for Halloween.
- Add Optional Embellishments: If you wish to add extra sparkle, lightly dust the cupcakes with edible red glitter, or sprinkle a few red sprinkles around the “blood” for added texture. For display, you can even stick small plastic vampire fangs into some of the cupcakes for an extra spooky touch, just be sure to remove them before serving!
- Chill for Setting: Once all your cupcakes are assembled and decorated, it’s a good idea to place them back into the refrigerator for at least 30 minutes. This will help the frosting firm up and set, preventing any unfortunate smudges and ensuring the “blood” stays put until it’s time to indulge.
Tips for the Perfect Vampire Bite Cupcakes:
To ensure your Halloween Vampire Bite Cupcakes are an absolute scream and a hit at any spooky gathering, here are a few extra tips and tricks I’ve picked up along the way:
-
Achieving the Deepest Red:
For that truly sinister, blood-red velvet color, investing in a high-quality gel food coloring is paramount. Liquid food colorings just won’t give you the same intensity without altering the consistency of your batter. I recommend brands like Americolor or Wilton’s “No-Taste Red” gel. Don’t be afraid to use a good amount – typically 1 to 2 ounces for a batch this size, but always add gradually until you achieve your desired hue. Remember, the color tends to deepen slightly as it bakes!
-
Room Temperature Ingredients are Key:
I cannot stress this enough, especially for the cream cheese frosting! Butter and cream cheese at true room temperature (soft enough to indent easily but not melted) will emulsify properly, creating a smooth, lump-free, and beautifully airy frosting. Cold ingredients will lead to a lumpy, difficult-to-work-with frosting, while too-warm ingredients can result in a soupy mess. Plan ahead and take them out of the fridge at least an hour before you start mixing.
-
Don’t Overmix the Batter:
When combining your wet and dry ingredients for the cupcakes, mix only until just combined. A few small streaks of flour are okay! Overmixing develops gluten, leading to a tougher, chewier cupcake texture, and we’re aiming for a moist, tender crumb.
-
Cooling is Crucial:
Be patient! Your cupcakes must be completely cool before you attempt to frost them or add the “blood.” Warm cupcakes will melt your beautiful frosting into a gooey mess, ruining the aesthetic. A wire rack provides good air circulation, speeding up the cooling process.
-
Smooth “Blood” Sauce:
Straining the berry “blood” through a fine-mesh sieve is an extra step that makes a huge difference. It removes all the pesky seeds and any remaining pulp, giving you a smooth, vibrant, and eerily realistic “blood” consistency that drips perfectly. It’s worth the effort!
-
Make-Ahead Tips:
- Cupcakes: The red velvet cupcakes can be baked a day in advance. Store them in an airtight container at room temperature.
- Frosting: The cream cheese frosting can be made up to 2 days in advance. Store it in an airtight container in the refrigerator. Before using, let it come to room temperature for about 30 minutes, then re-whip it briefly with an electric mixer until light and fluffy again.
- “Blood” Filling: The berry “blood” filling can be made up to 3-4 days in advance and stored in an airtight container in the refrigerator. Ensure it is well chilled before use.
- Assembly: For the freshest look, I recommend assembling the cupcakes no more than a few hours before serving. The “blood” can sometimes start to soak into the frosting if left for too long.
-
Storage for Assembled Cupcakes:
Due to the cream cheese frosting, assembled Halloween Vampire Bite Cupcakes should be stored in an airtight container in the refrigerator. They will keep well for 2-3 days. For the best flavor and texture, allow them to come to room temperature for about 20-30 minutes before serving.
-
Creative “Fang” Alternatives:
If you don’t have mini chocolate chips, you can also cut small triangles from white chocolate bark or even use sliced almonds to represent the fangs. For a less messy approach, some people just use the two indentations in the frosting and let the “blood” do all the talking.
-
Varying the “Blood”:
While raspberries offer a fantastic tartness, you can experiment with other red fruits. Cherry pie filling (without the whole cherries, just the gel), pomegranate juice reduction, or even a simple mixture of corn syrup and red food coloring can create a different “blood” effect. Just be mindful of the sweetness levels.
-
Embrace the Mess:
When it comes to dripping the “blood,” don’t be afraid to let it be a little messy! Part of the charm of these Halloween Vampire Bite Cupcakes is the gruesome, drippy effect. A little artistic splatter makes them look even more authentic and deliciously frightening!
Conclusion:
Why These Spooktacular Treats Are a Must-Bake!
Well, my fellow bakers and Halloween enthusiasts, we’ve reached the end of our thrilling culinary journey, and I genuinely hope you’re as excited as I am about the prospect of bringing these incredible treats to life in your own kitchen! What truly makes this recipe for Halloween Vampire Bite Cupcakes an absolute must-try isn’t just their undeniable visual appeal, though let’s be honest, that’s a huge part of their charm. It’s the magical combination of a moist, tender cupcake base – imagine your favorite chocolate or velvety red velvet, perfectly baked to fluffy perfection – paired with a rich, creamy frosting that provides the ideal canvas for our ghastly, yet glorious, final touches. The true genius, I believe, lies in the dramatic “blood” drizzle, which isn’t just for show; it adds a delightful fruity tang that cuts through the sweetness, creating a surprisingly balanced and utterly addictive flavor profile. These aren’t just any ordinary Halloween desserts; they are miniature works of edible art, designed to elicit gasps of delight and maybe just a tiny shiver of delicious horror at your next gathering. They embody the spirit of the season: fun, a little bit spooky, and incredibly memorable. Every single bite is a delicious adventure, a perfect blend of sweetness, texture, and playful horror that will have everyone, young and old, reaching for another one. Trust me when I say, once you’ve seen the smiles (and playful fangs!) these cupcakes inspire, you’ll understand why they’re destined to become a staple in your Halloween baking repertoire. They’re straightforward enough for even novice bakers, yet impressive enough to wow the most seasoned party guests. Get ready to impress and delight with these truly unique and unforgettable treats!
Elevate Your Bite: Serving & Customization Ideas
Now that you’re armed with the knowledge to create these show-stopping treats, let’s talk about how to make them even more special. The beauty of these Halloween Vampire Bite Cupcakes is their versatility. For serving, imagine them artfully arranged on a tiered stand, perhaps amidst some dry ice for a truly atmospheric touch at your Halloween party. They pair wonderfully with a robust cup of coffee for the adults, or a glass of chilled milk for the younger ghouls and goblins. Don’t limit them just to the main dessert table; they make fantastic take-home favors, individually wrapped in cello bags with a spooky tag. Think about presenting them alongside other themed treats like “mummy” brownies or “spiderweb” cookies to create an entire haunted dessert spread. For an extra touch of flair, consider garnishing the serving platter with plastic spiders or cobwebs. These small details can transform a simple dessert into a truly immersive experience that everyone will talk about long after the last bite.
But why stop there? The fun truly begins when you start to experiment with variations! While our core recipe is fantastic, feel free to unleash your inner mad scientist. For the cupcake base, you could try a rich, dark chocolate for an even more intense flavor, or perhaps a vibrant orange pumpkin spice cupcake to lean into autumnal vibes. If you’re feeling daring, a bold red velvet cupcake would perfectly complement the “vampire bite” theme, making the inner crumb a delightful surprise. When it comes to the frosting, consider adding a hint of almond extract for a sophisticated twist, or even a touch of cream cheese to lighten the texture and add a tangy counterpoint. The “blood” element itself offers a canvas for creativity; while raspberry jam gives a classic look and taste, consider a deep cherry pie filling for a thicker, more viscous effect, or even a tart cranberry sauce for a different flavor profile. For an adult-only twist, a tiny drop of red food coloring in a clear liqueur like vodka or white rum can create a stunning, boozy “blood” effect – just ensure it’s clearly marked for grown-ups! You could also embed small, edible fangs into the frosting before adding the “blood” for an even more dramatic effect, or sprinkle black edible glitter for an extra touch of gothic glamour. And for those who prefer less gore but still want the spooky fun, simply use black or purple frosting and omit the “bite” for a more subtle, yet still festive, Halloween treat. These small tweaks can transform your batch into something uniquely yours, reflecting your personal taste and party theme perfectly, ensuring every treat is a delicious, custom-made delight.
Your Turn to Create Spooky Magic!
Now, dear reader, the recipe has been shared, the inspiration has been sparked, and all that’s left is for you to dive in! I genuinely believe that once you try your hand at these fantastic Halloween Vampire Bite Cupcakes, you’ll be absolutely thrilled with the results. There’s something so incredibly satisfying about crafting these themed treats from scratch, seeing the joy on people’s faces as they bite into them, and knowing you’ve created something truly memorable for the spooky season. Don’t be afraid to put your own spin on them; baking is, after all, an art form! Once you’ve whipped up your batch of these wonderfully eerie and delicious delights, please, please, please share your experience with me! I absolutely adore seeing your creations. Snap some photos of your masterpieces, tell me about your favorite variations, or even share a funny story from your baking adventure in the comments below. Your feedback and creativity inspire not just me, but our entire community of enthusiastic home bakers. So, preheat your ovens, gather your ingredients, and prepare for a deliciously frightful baking session. Happy baking, and happy Halloween!
Halloween Vampire Bite Cupcakes
Capture the thrilling spirit of Halloween with these easy and spooky Vampire Bite Cupcakes. Featuring moist red velvet cake, creamy cream cheese frosting, and a dramatic crimson ‘blood’ filling, these treats are a showstopper at any gathering!
Ingredients
-
1 ½ cups all-purpose flour
-
1 cup granulated sugar
-
½ cup unsweetened cocoa powder
-
1 teaspoon baking powder
-
½ teaspoon baking soda
-
½ teaspoon salt
-
2 large eggs
-
½ cup vegetable oil
-
1 cup buttermilk
-
1 teaspoon vanilla extract
-
1 to 2 ounces red gel food coloring
-
1 stick (½ cup or 113g) unsalted butter, softened
-
8 ounces (226g) full-fat cream cheese, softened
-
4 cups powdered sugar, sifted
-
1 teaspoon vanilla extract
-
Pinch of salt
-
1 cup raspberry or strawberry jam
-
Mini chocolate chips (optional, for fangs)
-
Edible red glitter or sprinkles (optional)
Instructions
-
Step 1
Preheat oven to 350°F (175°C). Line a 12-cup muffin tin. In a large bowl, whisk together flour, granulated sugar, cocoa powder, baking powder, baking soda, and salt. -
Step 2
In a separate bowl, whisk eggs, vegetable oil, buttermilk, vanilla extract, and red gel food coloring until vibrant and evenly colored. Pour wet ingredients into dry; mix on low speed until just combined, do not overmix. -
Step 3
Divide batter evenly among liners, filling each two-thirds full. Bake for 18-22 minutes, or until a toothpick inserted into the center comes out clean. Cool in the tin for 5-10 minutes, then transfer to a wire rack to cool completely. -
Step 4
Beat softened butter until light and fluffy (2-3 min). Add softened cream cheese and beat until smooth (2-3 min). Gradually add sifted powdered sugar. Stir in vanilla extract and salt. Beat on medium-high for 1-2 minutes until light, fluffy, and spreadable. -
Step 5
Gently warm raspberry or strawberry jam in a small saucepan over low heat until slightly runny. Let cool completely, then chill in the refrigerator. -
Step 6
Once cupcakes are fully cooled, use a small knife or corer to scoop out a cavity (¾-1 inch deep) from the center of each. Spoon 1-2 teaspoons of the chilled jam “blood” into each cavity. -
Step 7
Pipe or spread a generous swirl of cream cheese frosting onto each filled cupcake. Create “fang marks” by gently pressing two small indentations into the frosting, or insert two mini chocolate chips (pointy side down) for edible fangs. -
Step 8
Drizzle remaining chilled jam “blood” into and around the fang marks, letting some drip artistically down the sides. Optional: Garnish with fresh raspberries, edible red glitter, or sprinkles. Refrigerate assembled cupcakes for at least 30 minutes to set before serving.
Important Information
Nutrition Facts (Per Serving)
It is important to consider this information as approximate and not to use it as definitive health advice.
Allergy Information
Please check ingredients for potential allergens and consult a health professional if in doubt.