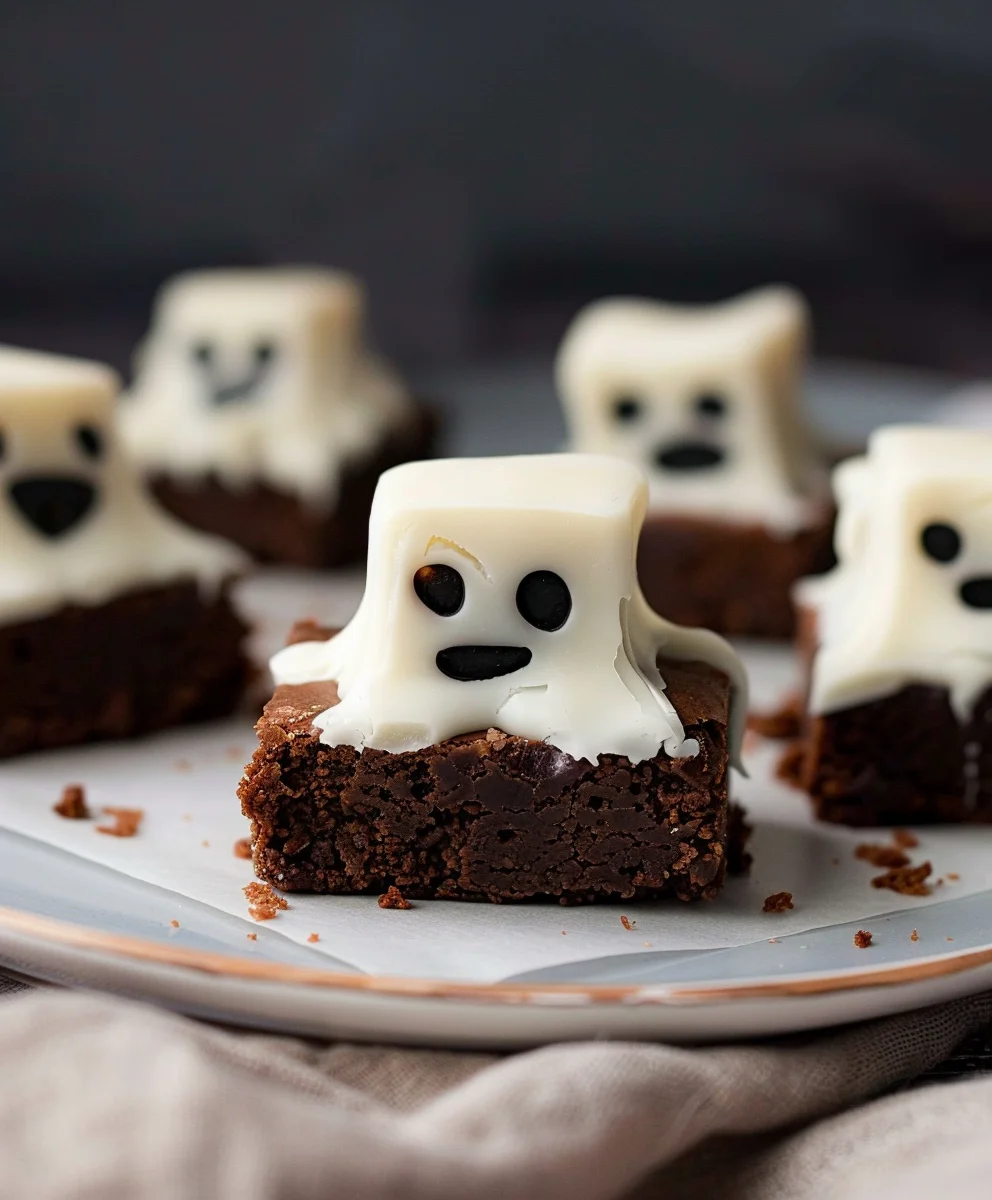
Ghost Brownies are not merely a dessert; they are a delightful invitation to infuse your gatherings with a touch of whimsical charm and irresistible flavor. Imagine presenting a plate of intensely rich, fudgy brownies, each adorned with an adorable, slightly spooky ghost figure – a visual treat that promises an equally enchanting taste experience. This isn’t just baking; it’s crafting a memorable moment that brings smiles and a touch of playful mystery to any table.
While the venerable brownie boasts a long and cherished history, evolving from a happy accident into a global phenomenon, these specific Ghost Brownies represent a modern, playful evolution. They emerged as a creative confectionery perfect for celebrating holidays like Halloween, or simply for bringing a smile to faces young and old with their unique, thematic appeal. I find immense joy in crafting these spectral sweets because they encapsulate everything I adore about a classic, perfectly baked brownie: that coveted crinkly top, the dense, chewy, and deeply chocolatey interior, all elevated by an incredibly charming and personalizable presentation.
People universally adore this dish for a multitude of reasons.
Beyond their undeniably cute and festive appearance, it’s the sublime combination of textures and flavors that truly captivates. The profound, comforting sweetness of the fudgy chocolate base, with its satisfying chew, perfectly complements the lighter, often creamy or marshmallowy sweetness of the ghost topping. This recipe is meticulously designed to deliver that quintessential fudgy, ultra-chewy texture that keeps everyone coming back for more, making it a guaranteed crowd-pleaser for any occasion.

Ingredients:
- For the Fudgy Ghost Brownies:
- 1 cup (2 sticks or 226g) unsalted butter, melted
- 2 cups (400g) granulated sugar
- 4 large eggs, at room temperature
- 1 teaspoon pure vanilla extract
- 1 cup (85g) unsweetened cocoa powder, high-quality Dutch-processed recommended for deep color and flavor
- 1 cup (125g) all-purpose flour
- ½ teaspoon salt
- 1 cup (170g) semi-sweet chocolate chips or chopped chocolate (optional, but highly recommended for extra fudge factor)
- For the Ethereal Cream Cheese Ghost Frosting:
- 8 ounces (226g) full-fat cream cheese, softened to room temperature
- ½ cup (1 stick or 113g) unsalted butter, softened to room temperature
- 4 cups (480g) powdered sugar (confectioners’ sugar), sifted to prevent lumps
- 1 teaspoon pure vanilla extract
- 2-4 tablespoons milk or heavy cream, as needed for desired consistency
- Pinch of salt
- For Ghostly Decoration:
- Mini chocolate chips or edible black food marker for ghost eyes
Prepping for Perfection: Gathering Your Tools and Setting the Scene
Before we dive into the delightful process of creating these hauntingly delicious Ghost Brownies, it’s crucial to ensure you have all your tools and ingredients at the ready. Trust me, a little organization goes a long way in making your baking experience smooth and enjoyable. I always find that having everything measured out and within arm’s reach prevents any last-minute scrambles and allows me to focus purely on the craft.
- First things first, preheat your oven to 350°F (175°C). This ensures a consistent baking temperature from the moment your brownies enter the oven, which is key for that perfect fudgy texture.
- Next, prepare a 9×13 inch baking pan. I like to line mine with parchment paper, leaving an overhang on the sides. This creates convenient “handles” that make lifting the cooled brownies out of the pan an absolute breeze, significantly simplifying the cutting process. After lining, give the parchment paper and any exposed pan areas a light spray with non-stick cooking spray or grease them lightly with butter. This double-layer of protection ensures not a single crumb sticks, preserving the beautiful edges of your Ghost Brownies.
- Take a moment to ensure your eggs and cream cheese are at room temperature. This isn’t just a suggestion; it’s a critical step for achieving the best results. Room temperature eggs emulsify much better with the other ingredients, leading to a smoother, more uniform batter. Similarly, softened cream cheese and butter are essential for a lump-free, creamy frosting that will pipe beautifully. If you’re short on time, you can quickly warm eggs by placing them in a bowl of warm water for 5-10 minutes. For cream cheese, you can unwrap it and let it sit on the counter for about 30 minutes, or carefully microwave it on low power for 10-15 seconds, checking frequently.
Crafting the Fudgy Ghost Brownie Batter
This is where the magic truly begins – creating the rich, chocolatey foundation for our Ghost Brownies. The goal here is a dense, fudgy brownie with a crackly top, and I’ll walk you through exactly how to achieve it.
- In a large mixing bowl, combine the melted unsalted butter and granulated sugar. I like to use a sturdy whisk for this. Vigorously whisk them together for about 1-2 minutes until the mixture is well combined and slightly lighter in color. This step is important because it helps dissolve some of the sugar, contributing to that desirable shiny, crackly top on your brownies. Don’t underestimate the power of a good whisking here!
- Add the four large room temperature eggs one at a time, whisking well after each addition. It’s crucial to incorporate each egg fully before adding the next. This progressive addition helps to create an emulsion, locking in moisture and resulting in an incredibly fudgy brownie. You’ll notice the mixture becoming thicker, glossy, and beautifully smooth. Once all eggs are incorporated, stir in the pure vanilla extract. The aroma alone is enough to get your mouth watering!
- Now, it’s time for the cocoa powder. Sift the unsweetened cocoa powder directly into the wet ingredients. Sifting is a small step that makes a big difference, preventing any lumps of cocoa from forming in your batter and ensuring an even distribution of that deep chocolate flavor. Gently fold the cocoa powder into the mixture using a spatula until just combined. Be careful not to overmix at this stage; we want to preserve the airy texture we’ve built. The batter should be thick, dark, and wonderfully fragrant.
- In a separate, smaller bowl, whisk together the all-purpose flour and salt. The salt, though a small amount, is vital here; it enhances all the other flavors, particularly the rich chocolate, balancing the sweetness.
- Gradually add the dry ingredients (flour and salt mixture) to the wet chocolate mixture. Using a spatula, fold them together gently until just combined. This is another critical juncture where overmixing can lead to a tough, cake-like brownie instead of the fudgy delight we’re aiming for. Stop folding as soon as you no longer see streaks of dry flour. A few small lumps are perfectly fine and will disappear during baking.
- If you’re using chocolate chips or chopped chocolate, now is the time to fold them into the batter. These additional pockets of chocolate will melt into luscious pools, adding another layer of indulgence to our Ghost Brownies. Distribute them evenly throughout the thick batter.
- Pour the glorious brownie batter into your prepared 9×13 inch baking pan. Use your spatula to spread it evenly into all corners, ensuring a uniform thickness. This will help the brownies bake evenly and achieve that consistent texture we’re after. Give the pan a gentle tap or two on the counter to release any trapped air bubbles.
The Baking Journey: From Batter to Brownie Bliss
Baking brownies is an art form that balances time and temperature. My aim is always that perfect chewy edge and a moist, fudgy center, and I’ll guide you to achieve just that for your Ghost Brownies.
- Carefully place the baking pan into your preheated 350°F (175°C) oven. The baking time for these fudgy Ghost Brownies will typically be between 25-30 minutes. However, oven temperatures can vary significantly, so it’s always best to keep a close eye on them.
- How to tell when they’re done: This is arguably the trickiest part of baking fudgy brownies. You’re looking for the edges to be set and lightly pulling away from the sides of the pan. The center should still look slightly moist and perhaps a little underdone, but not wet or jiggly. When you insert a wooden skewer or toothpick into the center, it should come out with moist crumbs attached, but not wet batter. If it comes out completely clean, your brownies might be on their way to being overbaked and more cake-like. We want that delightful fudginess!
- Once baked to perfection, remove the pan from the oven. This next step is crucial for ultimate fudginess and flavor development. Allow the brownies to cool completely in the pan, on a wire rack, for at least 2-3 hours. Better yet, if you have the patience, let them cool to room temperature and then transfer them to the refrigerator for another hour or two. Cooling slowly and thoroughly allows the internal structure of the brownies to set, enhancing their dense, fudgy texture and making them much easier to cut cleanly. Resisting the urge to cut into warm brownies is tough, I know, but it’s a commitment that pays off handsomely!
- Once completely cool, use the parchment paper overhang to carefully lift the entire brownie slab out of the pan and transfer it to a cutting board. Now you can cut them into individual squares. For our Ghost Brownies, I usually opt for squares roughly 2×2 inches, which yield about 24 brownies from a 9×13 pan. Clean cuts are easier with a large, sharp knife, wiped clean between each cut.
Creating the Ethereal Cream Cheese Ghost Frosting
This light, fluffy, and slightly tangy frosting is what transforms our rich brownies into whimsical Ghost Brownies. Its creamy texture provides the perfect canvas for our spectral decorations.
- In a large mixing bowl, using an electric mixer (either a stand mixer with a paddle attachment or a hand mixer), beat the softened cream cheese and softened unsalted butter together on medium speed. You want to beat them until they are incredibly smooth, light, and fluffy, with no lumps of cream cheese remaining. This usually takes about 2-3 minutes. Scrape down the sides of the bowl frequently to ensure everything is incorporated evenly. Achieving this smooth base is fundamental for a perfect frosting consistency.
- Reduce the mixer speed to low. Gradually add the sifted powdered sugar, about a cup at a time, beating until each addition is fully incorporated before adding more. Sifting the powdered sugar beforehand is highly recommended; it prevents those pesky lumps that can mar an otherwise perfect frosting. As you add the sugar, the frosting will thicken significantly.
- Once all the powdered sugar has been incorporated, add the pure vanilla extract and a pinch of salt. The salt, even in a sweet frosting, plays a vital role in balancing the flavors and preventing the frosting from tasting overly sweet. Beat on low speed until combined.
- Now, increase the mixer speed to medium-high and beat for another 2-3 minutes. This final beating incorporates air into the frosting, making it wonderfully light and spreadable, perfect for piping our ghosts.
- If the frosting seems too stiff for piping (which it often will be after all that sugar), add milk or heavy cream, one tablespoon at a time, beating after each addition, until you reach your desired piping consistency. You’re looking for a frosting that holds its shape well but is still soft enough to flow smoothly through a piping bag. I usually find 2-3 tablespoons to be just right. Be careful not to add too much liquid at once; you can always add more, but you can’t easily take it away!
Bringing the Ghosts to Life: Assembling and Decorating
This is the truly fun part where our delicious brownies take on their ghostly appearance! Get ready to unleash your inner artist.
- Transfer the cream cheese frosting into a piping bag fitted with a large round tip (or simply snip off a corner of a sturdy Ziploc bag for a homemade piping bag). The large round tip works best for creating the “body” of the ghost.
- Take your cooled and cut brownie squares. Hold one brownie gently. Start piping the frosting onto the center of each brownie. Begin by piping a relatively large dollop for the base of the ghost, then, in a continuous motion, swirl upwards, gradually decreasing the pressure as you pull the bag away to create a tapered, ghostly “head” and “tail.” Think of it as a soft-serve ice cream swirl, but with a more ethereal, elongated shape. Don’t worry about perfection; every ghost has its unique charm! Some might be tall and slender, others short and plump – that’s part of the fun of creating Ghost Brownies!
- Repeat this process for all of your brownie squares. As you pipe, you’ll get a better feel for the pressure needed and how the frosting responds, making each subsequent ghost even better.
- Once all the “bodies” are piped, it’s time to give our ghosts some personality with eyes. You have two excellent options here:
- Mini Chocolate Chips: This is my preferred method for ease and a little extra chocolate crunch. Gently place two mini chocolate chips onto the piped frosting for each ghost to create their eyes. Position them close together near the top, giving your ghosts a slightly startled or friendly expression. The warmth of your fingers will slightly adhere them to the frosting.
- Edible Black Food Marker: If you prefer a more drawn-on look, or want to add mouths, an edible black food marker works wonderfully. Simply draw two dots for eyes. This method offers a bit more precision for expression.
- Allow the decorated Ghost Brownies to set for about 15-30 minutes at room temperature, or briefly in the refrigerator, to allow the frosting to firm up slightly. This makes them easier to handle and ensures the ghost shapes hold beautifully.
Serving and Storing Your Hauntingly Delicious Ghost Brownies
Now that your incredible Ghost Brownies are complete, it’s time to enjoy the fruits of your labor and consider how to best preserve their deliciousness.
- Serving: These Ghost Brownies are absolutely perfect for any gathering, especially around holidays like Halloween, or simply as a delightful treat for friends and family. Serve them on a pretty platter and watch them disappear! The rich brownie base paired with the tangy, sweet cream cheese frosting creates a harmonious balance of flavors and textures that everyone will adore. The visual appeal alone is often enough to elicit gasps of delight.
- Storage: Because our ethereal frosting is cream cheese-based, it’s important to store any leftover Ghost Brownies properly. Place them in an airtight container and refrigerate them for up to 3-5 days. The cold will firm up the frosting, making it quite stable.
- Serving from Refrigeration: If you’ve stored them in the fridge, I recommend taking them out about 15-30 minutes before serving to allow the frosting to soften slightly and the brownie to return to its optimal texture. A chilled brownie with slightly softened frosting is truly a treat!
- Freezing (Optional): If you want to make these Ghost Brownies ahead of time or save them for a longer period, they freeze surprisingly well. Once the frosting is completely set (a quick chill in the fridge helps), arrange them in a single layer on a baking sheet and freeze until solid. Then, transfer the frozen brownies to an airtight, freezer-safe container, separating layers with parchment paper to prevent sticking. They can be frozen for up to 2-3 months. Thaw them in the refrigerator overnight or at room temperature for a few hours before serving. The texture might be slightly softer after thawing, but the flavor remains fantastic.
And there you have it! A batch of truly spectacular and spooktacular Ghost Brownies, ready to impress and delight. I hope you enjoy making and sharing these as much as I do. Happy baking!
So there you have it, my wonderful fellow bakers and chocolate enthusiasts! We’ve journeyed together through the delightful process of creating what I genuinely believe are some of the most extraordinary brownies you’ll ever have the pleasure of tasting. This isn’t just a recipe; it’s an invitation to experience sheer, unadulterated chocolate bliss. You see, the magic of these brownies lies not only in their deeply rich, almost otherworldly chocolate flavor, but also in that perfect, irresistible texture. We’re talking about that elusive balance of an impossibly fudgy center that melts in your mouth, contrasted beautifully with a delicate, crinkly top that whispers of homemade perfection. Every single bite is a testament to the fact that simplicity, when combined with quality ingredients and a little bit of love, can yield truly spectacular results.
I cannot emphasize enough why you simply must try this recipe. It transcends the ordinary brownie, elevating a classic treat to something truly special. Whether you’re a seasoned baker looking for a new go-to, or a novice eager to impress, this recipe promises success. It’s forgiving, it’s fun, and the reward is absolutely magnificent. You’ll quickly discover why I’ve fallen head over heels for these delights; they’re the kind of treat that brightens any day, makes any gathering feel more festive, and acts as the perfect comforting companion on a quiet evening in. The aroma alone, as they bake to perfection in your oven, is enough to get hearts fluttering and taste buds tingling with anticipation. And trust me, the taste delivers on every single promise.
Serving Suggestions & Creative Variations
Now, while these brownies are undeniably sublime on their own, a little creativity can transform them into an even more unforgettable experience. My absolute favorite way to enjoy them is slightly warm, paired with a generous scoop of good quality vanilla bean ice cream. The cold, creamy ice cream melting into the warm, fudgy brownie is a symphony of textures and temperatures that is simply heavenly. For a touch of elegance, a dollop of freshly whipped cream, perhaps infused with a hint of espresso or a splash of orange liqueur, can elevate the experience further. Consider a light dusting of cocoa powder or a delicate sprinkle of flaky sea salt right before serving to intensify the chocolate notes and add a sophisticated finish. A drizzle of raspberry coulis provides a tart counterpoint to the richness, creating a gourmet dessert that will impress anyone.
But why stop there? The beauty of these brownies lies in their versatility. For those who love a little crunch, fold in a cup of chopped walnuts, pecans, or even roasted hazelnuts into the batter just before baking. If you’re feeling adventurous, introduce a flavor twist: a quarter teaspoon of pure peppermint extract for a festive kick, or a hint of almond extract for a subtle, sophisticated undertone. You could even swirl in a spoonful of cream cheese batter (made by whisking cream cheese with a little sugar and an egg yolk) for a delightful cheesecake brownie hybrid. For a fun, visual twist, consider adding colorful sprinkles to the top just after they come out of the oven, while they’re still warm and sticky, or perhaps some mini chocolate chips for an extra burst of chocolate. Imagine transforming them into an epic brownie sundae bar, complete with various toppings like hot fudge, caramel sauce, chopped nuts, and cherries. The possibilities are truly endless, allowing you to tailor this incredible base recipe to any occasion or preference. And yes, you can even cut them into fun shapes before serving, embracing the playful spirit that the name, Ghost Brownies, suggests – perhaps using cookie cutters after they’ve cooled completely to create adorable, bite-sized specters of deliciousness for a themed party!
Your Turn: Bake, Savor, Share!
Now, it’s your turn to bring this magic to life in your own kitchen. I truly hope you feel inspired to gather your ingredients, preheat your oven, and embark on this delicious baking adventure. There’s an immense joy that comes from creating something so delicious from scratch, and even more joy in sharing it with those you love. These aren’t just any brownies; these are the incomparable Ghost Brownies, destined to become a staple in your recipe repertoire, a go-to treat for every occasion. I am absolutely certain that once you taste that first incredible bite, you’ll understand why I’m so passionate about them. So, please, dive in, enjoy the process, and most importantly, savor every single moment of devouring your freshly baked batch. I absolutely adore seeing your creations and hearing about your baking triumphs. Don’t hesitate to share your experiences with me; tell me how your batch turned out, what serving suggestions you tried, or any creative variations you came up with. Your feedback and photos truly make my day and fuel my passion for sharing these recipes. Happy baking, my friends, and get ready to fall in love with your new favorite brownie!
Hauntingly Good Ghost Brownies: Fudgy Halloween Dessert
Ghost Brownies are a delightful invitation to infuse your gatherings with whimsical charm and irresistible flavor. These intensely rich, fudgy brownies, each adorned with an adorable, slightly spooky ghost figure, are a visual treat promising an equally enchanting taste experience.
Ingredients
-
18 ounces boxed brownie mix
-
⅓ cup butter, melted
-
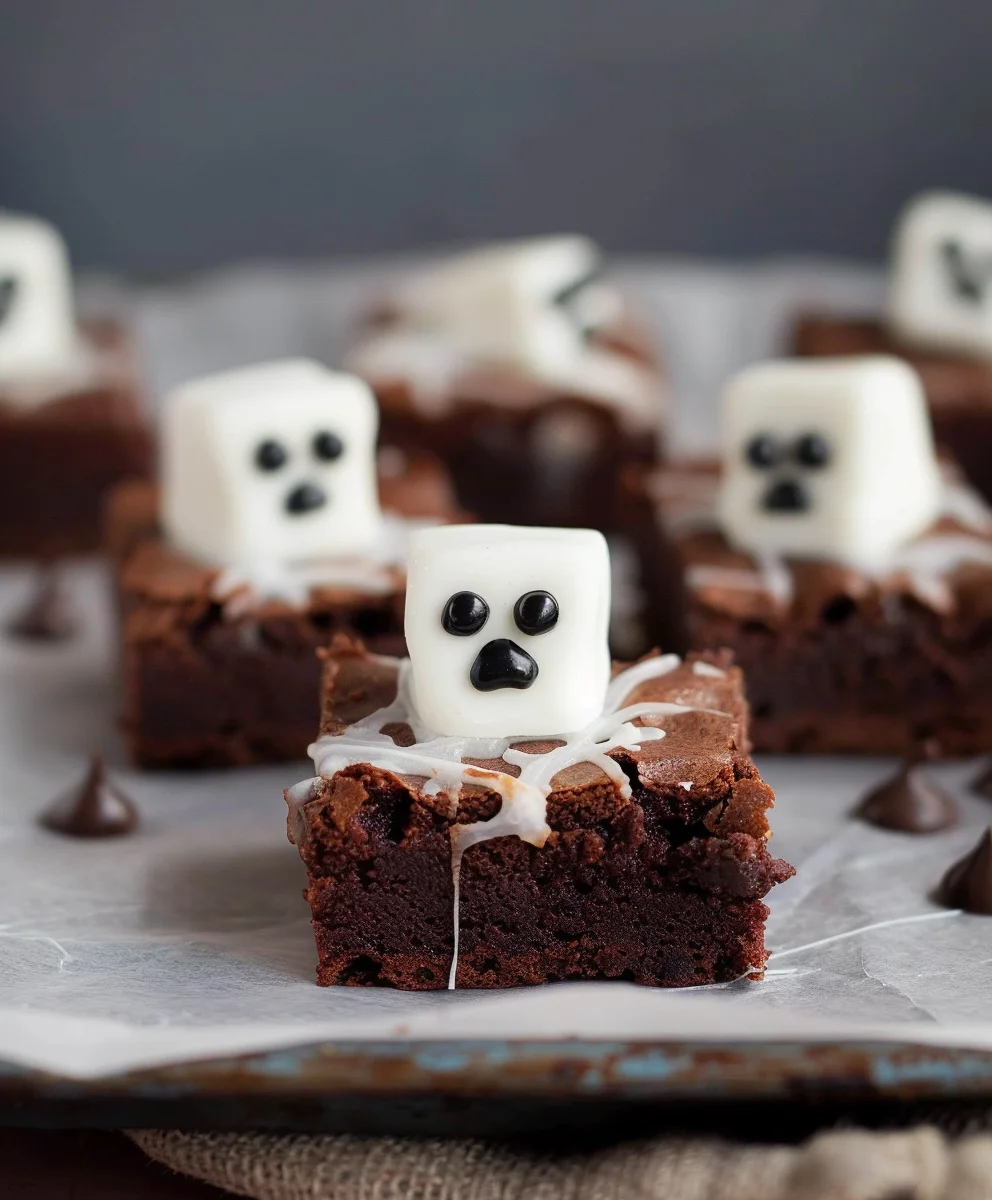
9 large marshmallows
-
4 ounces vanilla frosting
-
1 tube black writing gel
Instructions
-
Step 1
Preheat oven to 350°F (175°C). Line a 9×13 inch baking pan with parchment paper, leaving an overhang on the sides, and lightly grease. -
Step 2
Prepare the boxed brownie mix according to package directions, incorporating the ⅓ cup melted butter. Pour the batter into the prepared pan and spread evenly. -
Step 3
Bake for 25-30 minutes, or until the edges are set and a wooden skewer inserted into the center comes out with moist crumbs attached (not wet batter). -
Step 4
Remove brownies from oven and cool completely in the pan on a wire rack for at least 2-3 hours. Once cool, use the parchment paper overhang to lift the entire brownie slab onto a cutting board. Cut into 24 squares (roughly 2×2 inches). -
Step 5
Place one large marshmallow on top of each cooled brownie square. -
Step 6
Gently warm the vanilla frosting until slightly softened and spreadable. Pipe or spread the frosting over each marshmallow, covering it entirely and tapering upwards to create a ghost-like shape. -
Step 7
Use the black writing gel to draw two small dots for eyes on each ghost. -
Step 8
Allow the decorated Ghost Brownies to set for 15-30 minutes at room temperature or briefly in the refrigerator before serving. Store leftovers in an airtight container in the refrigerator for up to 3-5 days.
Important Information
Nutrition Facts (Per Serving)
It is important to consider this information as approximate and not to use it as definitive health advice.
Allergy Information
Please check ingredients for potential allergens and consult a health professional if in doubt.