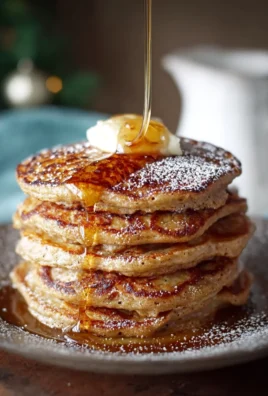
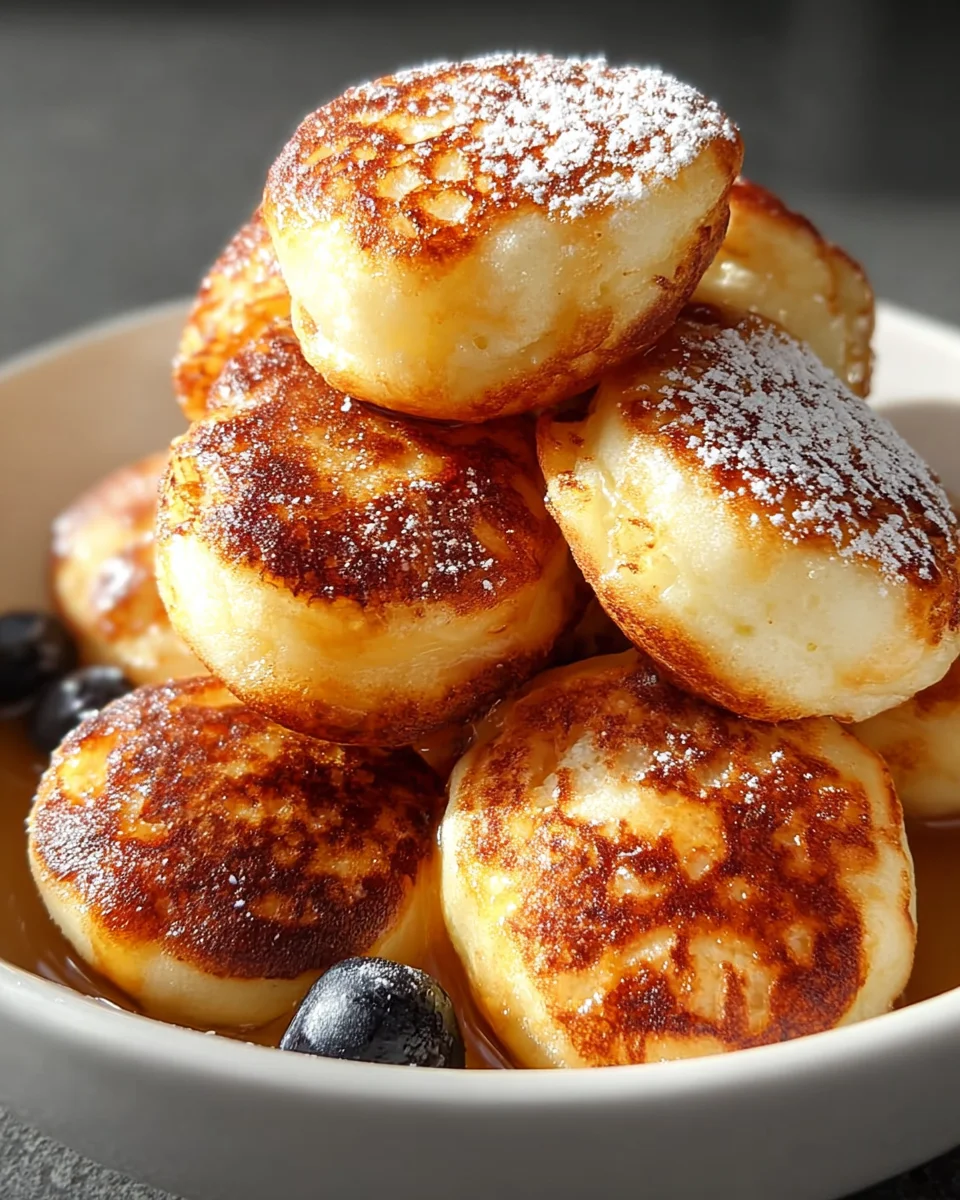
Pancake Poppers are an absolute game-changer for breakfast and brunch enthusiasts alike. Imagine all the fluffy, sweet goodness of your favorite pancakes, but perfectly portioned into delightful, bite-sized morsels! As someone who truly appreciates a relaxed morning, I’ve found these convenient treats to be a revelation. While the history of pancakes dates back centuries, evolving from simple griddle cakes to the beloved breakfast staple we know today, the innovation of making them into ‘poppers’ speaks to our modern desire for deliciousness without the fuss.
People adore this dish not just for its incredible taste and wonderfully soft texture, but particularly for its sheer convenience. Gone are the days of struggling with sticky syrup and oversized stacks; these delightful Pancake Poppers offer a mess-free, on-the-go solution that both adults and children can enjoy. They are incredibly versatile, serving as a perfect canvas for everything from a simple dusting of powdered sugar to a lavish dunk in maple syrup or a dollop of fresh fruit compote. I’m truly excited to share how you can bring this burst of breakfast joy into your home.

Ingredients:
- 2 cups (240g) all-purpose flour
- 2 tablespoons (25g) granulated sugar
- 2 teaspoons baking powder
- 1 teaspoon baking soda
- ½ teaspoon salt
- 1 ¾ cups (420ml) buttermilk (I often use a trick if I don’t have buttermilk: 1 ¾ cups regular milk with 1 tablespoon white vinegar or lemon juice, let it sit for 5 minutes until it curdles slightly)
- 2 large eggs, lightly beaten
- ¼ cup (60ml) unsalted butter, melted and cooled slightly, plus more for greasing the pan
- 1 teaspoon vanilla extract
- Optional mix-ins: ½ cup mini chocolate chips, ½ cup fresh blueberries, ¼ cup finely chopped cooked bacon, or even small pieces of cooked sausage. These are fantastic additions to make your Pancake Poppers truly unique!
- Non-stick cooking spray or additional butter for greasing your mini muffin tin or pancake popper maker.
- For serving: Maple syrup, powdered sugar, whipped cream, fresh berries, fruit compote.
Preparing the Pancake Batter for Your Delicious Pancake Poppers
- Gather Your Tools and Ingredients: Before you even think about mixing, I always find it helpful to lay out all my ingredients and equipment. This means getting out your measuring cups, spoons, two large mixing bowls, a whisk, and a spatula. Make sure your buttermilk is at room temperature; it helps create a smoother batter. If you’re using the milk and vinegar/lemon juice trick, now is the time to mix that up so it can sit and curdle while you prepare your dry ingredients.
- Whisk Together Dry Ingredients: In your first large mixing bowl, combine the 2 cups of all-purpose flour, 2 tablespoons of granulated sugar, 2 teaspoons of baking powder, 1 teaspoon of baking soda, and ½ teaspoon of salt. Use your whisk to thoroughly mix these ingredients together. This step is crucial because it ensures that the leavening agents (baking powder and baking soda) are evenly distributed throughout the flour, which will give your Pancake Poppers that beautiful, fluffy rise. I like to whisk for about 30 seconds to a minute, making sure there are no lumps of baking powder or flour remaining.
- Combine Wet Ingredients: In your second large mixing bowl, whisk together the 1 ¾ cups of buttermilk (or your homemade curdled milk mixture), the 2 lightly beaten large eggs, the ¼ cup of melted and slightly cooled unsalted butter, and the 1 teaspoon of vanilla extract. Make sure the butter isn’t too hot, as hot butter can “cook” the eggs prematurely, which we definitely don’t want in our batter. Whisk until all these wet ingredients are well combined and the mixture looks uniform.
- Gently Combine Wet and Dry Mixtures: Now for the magic! Pour the wet ingredients mixture from your second bowl into the bowl with your dry ingredients. Using your spatula or a wooden spoon, gently fold the wet into the dry. This is where patience comes in. The key to tender Pancake Poppers is not to overmix the batter. You want to mix just until the dry ingredients are moistened. It’s perfectly fine, and even desirable, if there are still a few small lumps in the batter. Overmixing develops the gluten in the flour, leading to tough, chewy pancakes instead of light, fluffy ones. I usually stop mixing once I don’t see any streaks of dry flour.
- Incorporate Optional Mix-Ins (If Using): If you’re planning to add any delightful mix-ins like mini chocolate chips, fresh blueberries, or finely chopped cooked bacon, gently fold them into the batter at this stage. Distribute them as evenly as possible without stirring too much. These additions truly elevate your Pancake Poppers, offering little bursts of flavor in every bite.
- Rest the Batter (Optional but Recommended): For even fluffier Pancake Poppers, I highly recommend letting the batter rest for 5 to 10 minutes at room temperature. This brief rest allows the gluten to relax and the baking powder and baking soda to start reacting, resulting in a lighter and more tender texture. While the batter rests, you can preheat your cooking equipment!
Cooking the Pancake Poppers to Golden Perfection
-
Preheat Your Cooking Device: This step is critical for evenly cooked and beautifully golden Pancake Poppers.
- If using a mini muffin tin: Preheat your oven to 375°F (190°C). Generously grease each cup of the mini muffin tin with butter or non-stick cooking spray. I like to use a pastry brush to ensure every nook and cranny is coated, preventing sticking.
- If using a specific electric pancake popper maker (like a cake pop maker or specific popper machine): Plug it in and allow it to preheat according to the manufacturer’s instructions, typically until the indicator light signals it’s ready. Lightly grease the cavities with cooking spray or a small amount of oil on a paper towel.
A properly preheated surface is paramount for achieving that lovely golden-brown exterior and ensuring the Pancake Poppers cook through without drying out.
-
Fill the Cavities:
- For mini muffin tins: Carefully spoon the pancake batter into each prepared mini muffin cup. I aim to fill each cup about two-thirds full. This allows room for the Pancake Poppers to rise without overflowing. An ice cream scoop or a small measuring spoon can be very helpful here for consistency.
- For an electric pancake popper maker: Pour or spoon the batter into each cavity, again filling about two-thirds full. Be mindful not to overfill, as the batter will expand during cooking.
Consistency in filling will lead to consistency in cooking time and size, making for a beautiful presentation of your batch of Pancake Poppers.
-
Cook Your Pancake Poppers:
- In the oven (mini muffin tin): Place the filled mini muffin tin into the preheated oven. Bake for approximately 10-15 minutes, or until the Pancake Poppers are golden brown on top and a wooden skewer or toothpick inserted into the center of a popper comes out clean. Cooking times can vary based on your oven and the exact size of your muffin cups, so keep an eye on them after the 10-minute mark. You’ll notice they puff up wonderfully.
- In an electric pancake popper maker: Close the lid of your maker and cook for about 3-6 minutes, or until they are golden brown and cooked through. The cooking time will largely depend on the specific model of your appliance. Most makers have an indicator light or you can carefully lift the lid to check for doneness and desired browning. The beauty of these machines is they often cook both sides simultaneously, creating perfectly round Pancake Poppers.
Don’t rush this step! Undercooked Pancake Poppers can be doughy, while overcooked ones might be dry. You’re looking for that perfect balance of tender interior and slightly crispy, golden exterior.
-
Remove from Pan: Once cooked, carefully remove the Pancake Poppers from their cooking vessel.
- From a mini muffin tin: Use a small spatula or butter knife to gently pry them out of the cups. They should release fairly easily if the tin was well-greased. Transfer them to a wire rack to cool slightly.
- From an electric popper maker: Use a wooden or silicone spatula to lift them out. Be careful, as they will be hot. Place them on a wire rack.
Allowing them to cool slightly on a wire rack prevents the bottoms from getting soggy from condensation and allows for optimal texture.
- Repeat as Needed: Depending on the size of your mini muffin tin or popper maker, you’ll likely need to cook the Pancake Poppers in batches. Repeat the greasing, filling, and cooking steps until all the batter is used. I always make sure to re-grease between batches, even if using a non-stick surface, to ensure easy release and consistent results every time.
Serving Your Delicious Pancake Poppers
- Serve Warm: Pancake Poppers are absolutely best served warm, straight off the cooking surface (after a brief moment to cool slightly so you don’t burn your mouth!). Their fluffy texture and warm aroma are most appealing when fresh.
- Classic Toppings: A drizzle of warm maple syrup is a timeless choice and perfectly complements the slightly sweet batter. A dusting of powdered sugar adds a touch of elegance and extra sweetness.
- Elevate with Extras: Don’t stop at just syrup! Consider serving your Pancake Poppers with a dollop of whipped cream, a side of fresh berries (strawberries, raspberries, or blueberries work wonderfully), or a spoonful of homemade fruit compote. I find that a little bit of tang from the fruit cuts through the richness beautifully.
- Savory Pairings (for savory poppers): If you opted for savory mix-ins like bacon or sausage, consider a small side of scrambled eggs, a drizzle of hot sauce, or even a savory dip like a light cheese sauce for a truly unique breakfast experience.
- Perfect for Sharing: Arrange your Pancake Poppers on a platter with various dipping options. They’re fantastic for breakfast, brunch, or even as a fun dessert. They’re also incredibly convenient for little hands, making them a hit with children. They are excellent for entertaining because of their bite-sized nature, allowing guests to easily pick them up and enjoy without the need for a fork and knife.
- Storage and Reheating: If you happen to have any leftover Pancake Poppers (which is rare in my household!), store them in an airtight container in the refrigerator for up to 2-3 days. To reheat, you can pop them in the microwave for a few seconds, toast them lightly in a toaster oven, or warm them in a regular oven at 300°F (150°C) until heated through. They still maintain a good texture, though they are undeniably best fresh. This makes them a great make-ahead option for busy mornings!
Conclusion:
Well, we’ve reached the end of our delightful journey, and I genuinely hope you’re feeling as excited as I am about these incredible little treats. If there’s one recipe you absolutely must add to your breakfast repertoire, it’s this one. These aren’t just pancakes; they’re a revelation, transforming a beloved classic into something utterly convenient, infinitely fun, and surprisingly versatile. I’ve found that the magic of these bite-sized wonders lies in their effortless grab-and-go appeal, perfect for busy mornings when time is precious but quality and deliciousness cannot be sacrificed. Forget the messy stacks and the need for a knife and fork; with our focus keyword, Pancake Poppers, you get all the fluffy goodness in a perfectly portioned, dippable sphere. They’re a game-changer for families, a fantastic party appetizer, or even a cozy treat for a quiet weekend morning. I promise, once you experience the ease and joy of these, you’ll wonder how you ever managed breakfast without them.
Now, let’s talk about taking your Pancake Poppers from fantastic to absolutely unforgettable with a few serving suggestions and creative variations. The beauty of these little gems is how wonderfully they adapt to whatever cravings you might have. For the classic sweet tooth, a drizzle of warm maple syrup is, of course, non-negotiable – it’s the perfect sweet embrace for the light, airy texture. But don’t stop there! Imagine them piled high with a generous dollop of freshly whipped cream and a cascade of mixed berries – think vibrant strawberries, juicy blueberries, and tart raspberries. A dusting of powdered sugar adds an elegant touch, making them feel extra special. For something a little richer, a warm fruit compote, perhaps apple cinnamon or a mixed berry blend, elevates the experience, adding layers of flavour and a delightful warmth. And for the ultimate indulgence, consider a swirl of chocolate hazelnut spread or a simple chocolate sauce – a definite hit with kids and adults alike!
But the versatility of these Pancake Poppers truly shines when you start to experiment with variations. Don’t be afraid to get creative with the batter itself! Before cooking, you could gently fold in a handful of mini chocolate chips, a sprinkle of cinnamon and nutmeg for a warming spice kick, or even a tablespoon of citrus zest for a bright, refreshing note. For a burst of natural sweetness and texture, small diced apples or mashed banana can be incorporated into the batter, offering a delightful surprise in every bite. And who says pancakes always have to be sweet? Venture into the savory realm by adding finely chopped cooked bacon or sausage, a sprinkle of shredded cheddar cheese, and a pinch of chives to the batter. Serve these savory poppers with a side of salsa, a dollop of sour cream, or even a fried egg for a complete and utterly satisfying breakfast or brunch. They make for an exciting alternative to your usual breakfast routine, perfect for those mornings when you want something comforting yet out of the ordinary.
I truly believe this recipe will become a cherished favourite in your home, just as it has in mine. It’s more than just a recipe; it’s an invitation to create delicious memories, whether it’s a quick breakfast before school, a leisurely brunch with friends, or a fun dessert experience. So, I urge you, don’t just read about them – roll up your sleeves and give these fantastic Pancake Poppers a try this weekend. You’ll be amazed at how quickly they disappear! And when you do, please, please share your experience. I absolutely love hearing about your culinary adventures. What toppings did you choose? Did you experiment with a savory version? Let me know all about your creations and how these little pockets of joy brightened your day. Happy cooking, and get ready to fall in love with your new favorite breakfast sensation!
Homemade Pancake Poppers
Pancake Poppers are an absolute game-changer for breakfast and brunch enthusiasts alike. Imagine all the fluffy, sweet goodness of your favorite pancakes, but perfectly portioned into delightful, bite-sized morsels! These convenient, mess-free treats are versatile and perfect for both adults and children.
Ingredients
Instructions
Important Information
Nutrition Facts (Per Serving)
It is important to consider this information as approximate and not to use it as definitive health advice.
Allergy Information
Please check ingredients for potential allergens and consult a health professional if in doubt.