Hot Fudge Pie is a delightful dessert that has captured the hearts of many with its rich, gooey chocolate goodness. This indulgent treat is not just a pie; it’s an experience that brings warmth and comfort to any gathering. Originating from the classic American dessert repertoire, Hot Fudge Pie has roots in the mid-20th century, when home bakers sought to create simple yet decadent desserts that could impress family and friends.
What I love most about Hot Fudge Pie is its incredible texture—crispy on the outside and irresistibly fudgy on the inside. Each bite melts in your mouth, delivering a burst of chocolate flavor that is simply unforgettable. People adore this dish not only for its taste but also for its convenience; it requires minimal ingredients and can be whipped up in no time. Whether served warm with a scoop of vanilla ice cream or enjoyed on its own, Hot Fudge Pie is sure to become a favorite in your dessert repertoire. Join me as we dive into this delicious recipe that promises to satisfy your sweet tooth!

Ingredients:
- 1 cup granulated sugar
- 1/2 cup all-purpose flour
- 1/2 cup unsweetened cocoa powder
- 1/4 teaspoon salt
- 1/2 cup unsalted butter, melted
- 2 large eggs
- 1 teaspoon vanilla extract
- 1 cup semi-sweet chocolate chips
- 1 cup chopped nuts (optional, I love walnuts or pecans)
- Whipped cream or vanilla ice cream for serving
Preparing the Batter
1. **Preheat the Oven**: First things first, I preheat my oven to 350°F (175°C). This ensures that the pie bakes evenly and comes out perfectly gooey. 2. **Mix Dry Ingredients**: In a large mixing bowl, I combine the granulated sugar, flour, cocoa powder, and salt. I whisk these together until they are well blended. This step is crucial because it helps to distribute the cocoa evenly throughout the batter. 3. **Add Wet Ingredients**: Next, I pour in the melted butter, eggs, and vanilla extract. Using a spatula, I mix everything together until just combined. I love to be careful not to overmix; a few lumps are perfectly fine. The batter should be thick and glossy. 4. **Incorporate Chocolate Chips and Nuts**: Now, I fold in the semi-sweet chocolate chips and chopped nuts (if using). This is where the magic happens! The chocolate chips will melt slightly during baking, creating pockets of gooey chocolate throughout the pie.Baking the Pie
5. **Prepare the Baking Dish**: I grab a 9-inch pie dish and lightly grease it with butter or cooking spray. This helps prevent the pie from sticking and makes for easier serving later. 6. **Pour the Batter**: I pour the batter into the prepared pie dish, spreading it out evenly with my spatula. It’s okay if it looks a bit uneven; it will settle as it bakes. 7. **Bake**: I place the pie in the preheated oven and bake for about 25-30 minutes. The edges should be set, while the center remains soft and fudgy. I like to check it around the 25-minute mark; if a toothpick inserted into the center comes out with a few moist crumbs, it’s perfect! 8. **Cool the Pie**: Once baked, I remove the pie from the oven and let it cool in the dish for about 10-15 minutes. This cooling time allows the pie to firm up a bit, making it easier to slice.Assembling and Serving
9. **Slice the Pie**: After the pie has cooled slightly, I use a sharp knife to cut it into wedges. I find that a warm pie is best, but it can also be served at room temperature. 10. **Add Toppings**: I love to serve my hot fudge pie with a generous dollop of whipped cream or a scoop of vanilla ice cream on top. The contrast of the warm pie with the cold ice cream is simply divine! 11. **Drizzle with Extra Fudge (Optional)**: If I’m feeling indulgent, I might drizzle some extra hot fudge sauce over the top. It adds an extra layer of chocolatey goodness that’s hard to resist. 12. **Enjoy**: Finally, I dig in! Each bite is a rich, chocolatey experience that’s sure to satisfy any sweet tooth. I often find myself going back for seconds (or thirds!).Storage Tips
13. **Storing Leftovers**: If there are any leftovers (which is rare!), I let the pie cool completely, then cover it with plastic wrap or aluminum foil. It can be stored in the refrigerator for up to 3 days. I recommend reheating individual slices in the microwave for about 15-20 seconds before serving to bring back that warm, fudgy texture. 14. **Freezing the Pie**: For longer storage, I can freeze the pie. I wrap it tightly in plastic wrap and then in aluminum foil. It can be frozen for up to 2 months. When I’m ready to enjoy it again, I let it thaw in the refrigerator overnight and then reheat as mentioned above.Variations and Tips
15. **Experiment with Flavors**: I love to experiment with different flavors! Sometimes, I’ll add a teaspoon of espresso powder to enhance the chocolate flavor. Other times, I might swap out the vanilla extract for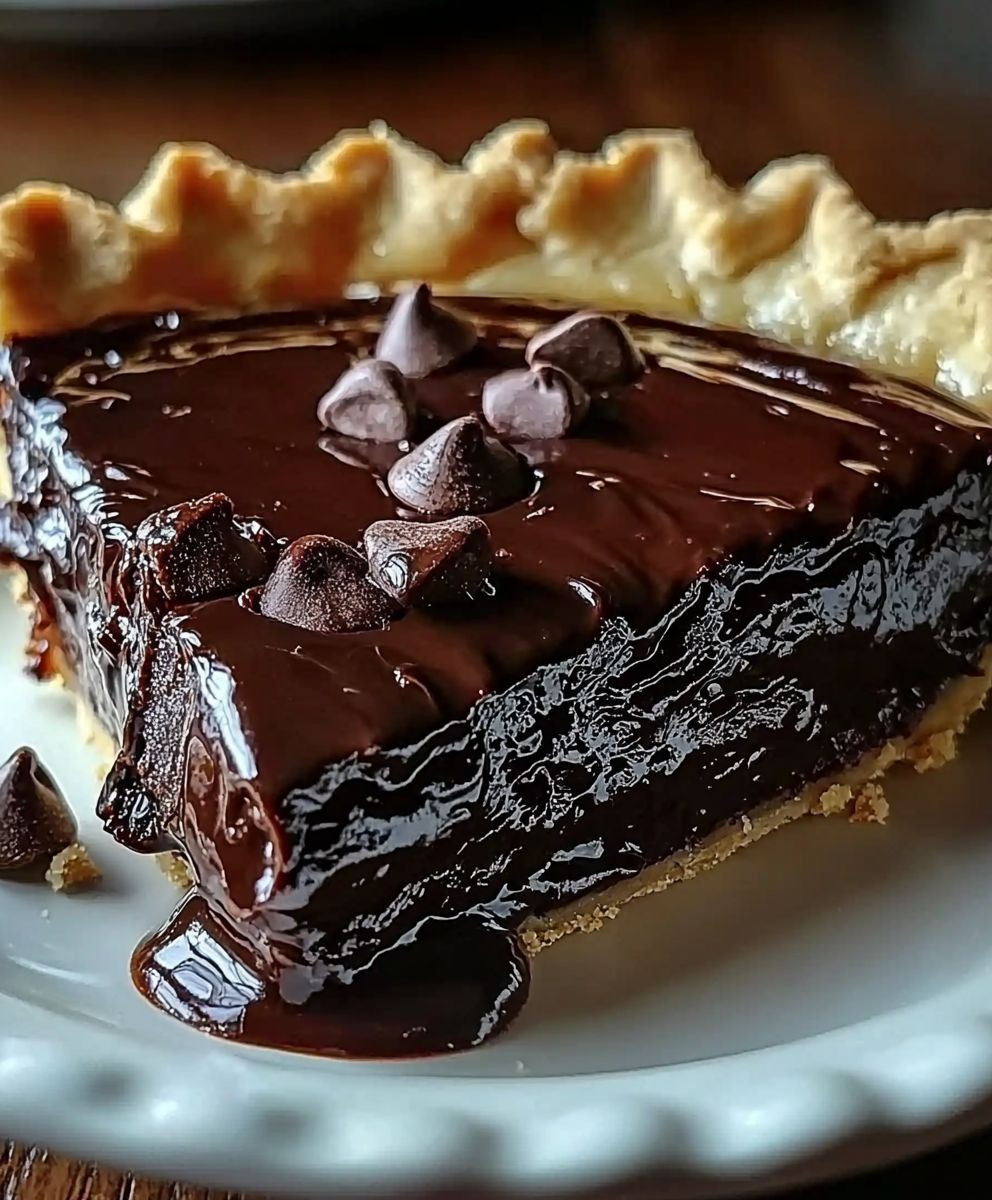
Conclusion:
In summary, this Hot Fudge Pie is an absolute must-try for anyone who loves rich, chocolatey desserts that are both indulgent and easy to make. The combination of a gooey fudge center with a slightly crisp crust creates a delightful contrast that will have your taste buds dancing with joy. Whether you’re serving it warm with a scoop of vanilla ice cream on top or enjoying it chilled with a dollop of whipped cream, this pie is sure to impress your family and friends. For those looking to mix things up, consider adding a sprinkle of sea salt on top for a sweet and salty twist, or try incorporating some chopped nuts for added texture. You can even experiment with different types of chocolate, like dark or milk chocolate, to customize the flavor to your liking. I wholeheartedly encourage you to give this Hot Fudge Pie a try! It’s perfect for gatherings, celebrations, or simply as a treat for yourself after a long day. Once you’ve made it, I’d love to hear about your experience—feel free to share your thoughts and any variations you tried. Trust me, this recipe will quickly become a favorite in your dessert repertoire! Print
Hot Fudge Pie: The Ultimate Decadent Dessert Recipe You Need to Try
- Total Time: 45 minutes
- Yield: 8 servings 1x
Description
Savor the decadence of this Hot Fudge Pie, featuring a rich chocolate base with optional nuts, baked to perfection and served warm with whipped cream or vanilla ice cream. Ideal for satisfying your sweet cravings at any gathering!
Ingredients
- 1 cup granulated sugar
- 1/2 cup all-purpose flour
- 1/2 cup unsweetened cocoa powder
- 1/4 teaspoon salt
- 1/2 cup unsalted butter, melted
- 2 large eggs
- 1 teaspoon vanilla extract
- 1 cup semi-sweet chocolate chips
- 1 cup chopped nuts (optional, walnuts or pecans recommended)
- Whipped cream or vanilla ice cream for serving
Instructions
- Preheat your oven to 350°F (175°C) to ensure even baking.
- In a large mixing bowl, whisk together the granulated sugar, flour, cocoa powder, and salt until well blended.
- Pour in the melted butter, followed by the eggs and vanilla extract. Whisk until the batter is smooth and glossy, with a few lumps remaining.
- Fold in the semi-sweet chocolate chips and chopped nuts, ensuring even distribution throughout the batter.
- Lightly grease a 9-inch pie dish with butter or cooking spray.
- Pour the batter into the prepared pie dish, spreading it out evenly with a spatula.
- Bake in the preheated oven for 25-30 minutes. The edges should be set, while the center remains soft and fudgy. Check for doneness with a toothpick; it should come out with a few moist crumbs.
- Remove the pie from the oven and let it cool in the dish for 10-15 minutes to set.
- Once slightly cooled, slice the pie into wedges using a sharp knife.
- Serve warm with whipped cream or a scoop of vanilla ice cream on top.
- Drizzle with chocolate sauce or sprinkle extra chocolate chips and nuts for added flavor and presentation.
- If there are leftovers, let the pie cool completely, then cover with plastic wrap or aluminum foil. Store in the refrigerator for up to 3 days. Reheat individual slices in the microwave for 15-20 seconds before serving.
- For longer storage, slice the pie into wedges, wrap each piece tightly in plastic wrap, and place in a freezer-safe container. It can be frozen for up to 2 months. Thaw in the refrigerator overnight and reheat as needed.
- Use high-quality cocoa powder and chocolate chips for the best flavor.
- Ensure the center remains soft and slightly gooey for the perfect texture.
Notes
- Der Teig darf während der Ruhezeit nicht bewegt werden.
- Für ein intensiveres Knoblaucharoma können mehr Zehen verwendet werden.
- Use high-quality cocoa powder and chocolate chips for the best flavor.
- Ensure the center remains soft and slightly gooey for the perfect texture.
- Prep Time: 15 minutes
- Cook Time: 30 minutes