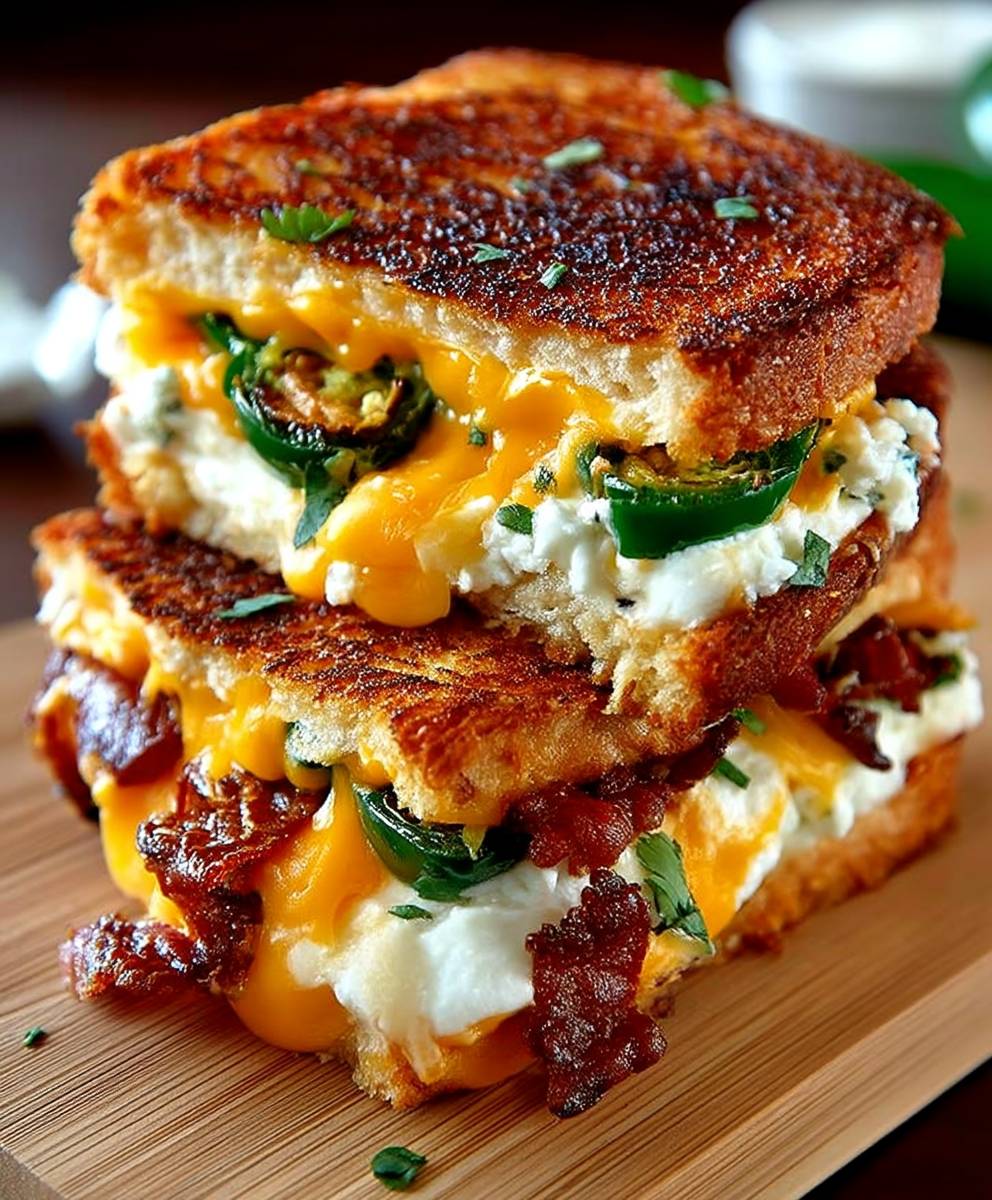
Jalapeno Popper Grilled Cheese: Prepare to experience a flavor explosion that will redefine your definition of comfort food! Imagine the creamy, cheesy goodness of a classic grilled cheese sandwich, but amplified with the spicy kick of jalapeno poppers. It’s an unexpected yet utterly delightful combination that will leave you craving more.
While the exact origins of this particular fusion are shrouded in mystery (likely born from a late-night craving!), both grilled cheese and jalapeno poppers hold significant places in culinary history. The grilled cheese, a simple yet satisfying staple, has been warming hearts and bellies for generations. Jalapeno poppers, with their Southwestern flair, bring a touch of heat and excitement to any gathering. Marrying these two iconic dishes creates a symphony of flavors that’s both familiar and thrilling.
People adore this Jalapeno Popper Grilled Cheese because it’s the perfect balance of textures and tastes. The crisp, golden-brown bread gives way to a molten core of cheese, punctuated by the creamy filling and spicy bite of the jalapenos. It’s quick, easy to make, and incredibly satisfying – ideal for a weeknight dinner, a weekend lunch, or even a late-night snack. Trust me, once you try this Jalapeno Popper Grilled Cheese, it will become a regular in your recipe rotation!

Ingredients:
- 8 slices sourdough bread
- 4 tablespoons butter, softened
- 8 ounces cream cheese, softened
- 1 cup shredded cheddar cheese
- 1/2 cup shredded Monterey Jack cheese
- 1/4 cup pickled jalapenos, finely chopped (more or less to taste)
- 2 tablespoons pickled jalapeno juice (optional, for extra kick)
- 1/4 teaspoon garlic powder
- 1/4 teaspoon onion powder
- Pinch of salt
- Pinch of black pepper
- Optional: Cooked bacon crumbles for added flavor
Preparing the Jalapeno Popper Spread:
Okay, let’s get started by making the heart of this amazing grilled cheese – the jalapeno popper spread! This is where all the magic happens, so pay close attention.
-
Soften the Cream Cheese: First things first, make sure your cream cheese is nice and soft. If you forgot to take it out of the fridge ahead of time (we’ve all been there!), you can microwave it for about 15-20 seconds, but be careful not to melt it completely. You want it soft and spreadable.
-
Combine the Cheeses: In a medium-sized bowl, combine the softened cream cheese, shredded cheddar cheese, and shredded Monterey Jack cheese. Make sure the bowl is large enough to comfortably mix everything without making a mess.
-
Add the Jalapenos: Now for the star of the show – the pickled jalapenos! Finely chop them and add them to the cheese mixture. The amount you use is totally up to you and your spice preference. If you like things really hot, feel free to add a bit more. If you’re a little more sensitive to spice, start with a smaller amount and taste as you go.
-
Spice it Up: Add the garlic powder, onion powder, salt, and pepper to the bowl. If you’re feeling adventurous and want an extra kick, add the jalapeno juice. This will really amplify the jalapeno flavor and add a bit of heat. Start with a tablespoon and add more to taste. Remember, you can always add more, but you can’t take it away!
-
Mix it Well: Using a spoon or spatula, thoroughly mix all the ingredients together until everything is evenly combined. You want to make sure the jalapenos and spices are distributed throughout the cheese mixture. There shouldn’t be any clumps of cream cheese or pockets of spices.
-
Optional: Add Bacon: If you’re a bacon lover (and who isn’t?), now’s the time to add some cooked bacon crumbles to the mixture. This will add a smoky, savory flavor that complements the jalapenos and cheese perfectly. About 1/4 cup of bacon crumbles should be enough, but feel free to add more if you’re feeling extra indulgent.
-
Taste and Adjust: Give the mixture a taste and adjust the seasonings as needed. Does it need more salt? More jalapenos? Now’s your chance to make it perfect. Remember, this is your jalapeno popper grilled cheese, so make it exactly how you like it!
-
Set Aside: Once you’re happy with the flavor, set the jalapeno popper spread aside while you prepare the bread.
Assembling the Grilled Cheese Sandwiches:
Now that the jalapeno popper spread is ready, it’s time to assemble the grilled cheese sandwiches. This is a pretty straightforward process, but there are a few tips and tricks to ensure a perfectly grilled sandwich.
-
Butter the Bread: Spread a thin layer of softened butter on one side of each slice of bread. This will help the bread brown evenly and create a crispy, golden crust. Make sure the butter is softened, otherwise, you’ll tear the bread.
-
Spread the Jalapeno Popper Mixture: On the unbuttered side of four slices of bread, spread a generous layer of the jalapeno popper mixture. Don’t be shy! You want to make sure there’s enough filling to give you that cheesy, spicy goodness in every bite. Aim for about 1/4 of the mixture per sandwich.
-
Top with Bread: Place the remaining four slices of bread on top of the jalapeno popper mixture, buttered side up. You should now have four assembled grilled cheese sandwiches.
-
Press Gently: Gently press down on each sandwich to help the filling adhere to the bread. This will also help the sandwich cook evenly.
Grilling the Sandwiches:
Alright, we’re in the home stretch! Now it’s time to grill these bad boys to golden-brown perfection. The key to a great grilled cheese is low and slow cooking, which allows the cheese to melt completely without burning the bread.
-
Preheat the Pan: Heat a large skillet or griddle over medium-low heat. You want the pan to be hot enough to brown the bread, but not so hot that it burns before the cheese melts. A good way to test the temperature is to sprinkle a few drops of water on the pan. If the water sizzles and evaporates quickly, the pan is ready.
-
Grill the Sandwiches: Place the sandwiches in the preheated skillet, making sure not to overcrowd the pan. If you have a small skillet, you may need to cook the sandwiches in batches.
-
Cook Until Golden Brown: Cook the sandwiches for about 3-5 minutes per side, or until the bread is golden brown and the cheese is melted and gooey. Keep a close eye on the sandwiches and adjust the heat as needed to prevent burning. If the bread is browning too quickly, reduce the heat to low.
-
Flip Carefully: Use a spatula to carefully flip the sandwiches. Be gentle, as the filling can be quite melty and may try to escape. If any filling does spill out, simply scoop it back onto the sandwich.
-
Press Down (Optional): If you want a flatter, more compact grilled cheese, you can gently press down on the sandwiches with a spatula while they’re cooking. This will also help the bread brown more evenly.
-
Check for Doneness: To check if the sandwiches are done, gently lift one corner with a spatula. The bread should be golden brown and crispy, and the cheese should be completely melted and gooey. If the cheese isn’t fully melted, continue cooking for a minute or two longer per side.
-
Remove from Pan: Once the sandwiches are cooked to your liking, remove them from the skillet and place them on a cutting board.
Serving and Enjoying:
Congratulations, you’ve just made the most amazing jalapeno popper grilled cheese sandwiches! Now it’s time to slice them up and enjoy the fruits of your labor.
-
Slice and Serve: Use a sharp knife to slice each sandwich in half diagonally. This makes them easier to handle and also looks more appealing.
-
Serve Immediately: Serve the grilled cheese sandwiches immediately while they’re still hot and gooey. They’re best enjoyed fresh off the griddle.
-
Optional Garnishes: If you’re feeling fancy, you can garnish the sandwiches with a sprinkle of chopped fresh cilantro or a dollop of sour cream. This will add a touch of freshness and coolness to balance out the spice.
-
Pairing Suggestions: These jalapeno popper grilled cheese sandwiches are delicious on their own, but they also pair well with a variety of sides. Some popular choices include tomato soup, potato chips, coleslaw, or a simple green salad.
-
Enjoy! Take a bite and savor the cheesy, spicy, and savory flavors of this incredible grilled cheese. You’ll be amazed at how delicious it is!
Tips and Variations:
-

Conclusion:
So, there you have it! This Jalapeno Popper Grilled Cheese isn’t just another sandwich; it’s a flavor explosion waiting to happen. It’s the perfect marriage of comforting, cheesy goodness and that irresistible jalapeno kick that will leave you wanting more. I truly believe this recipe is a must-try for anyone who loves a little spice in their life and appreciates a good, gooey grilled cheese.
But why is it a must-try, you ask? Well, beyond the obvious deliciousness, it’s incredibly easy to make. We’re talking minimal ingredients and a straightforward process that even the most novice cook can master. Plus, it’s a fantastic way to elevate your lunch game or create a quick and satisfying dinner. Forget boring sandwiches; this Jalapeno Popper Grilled Cheese is a guaranteed crowd-pleaser.
Now, let’s talk serving suggestions and variations because the possibilities are endless! I personally love serving this with a side of creamy tomato soup for dipping – the coolness of the soup perfectly complements the heat of the jalapenos. You could also pair it with a crisp green salad for a lighter meal.
For variations, get creative! If you’re not a fan of cream cheese, try using softened goat cheese for a tangy twist. Want even more heat? Add a pinch of cayenne pepper to the cheese mixture or use pepper jack cheese instead of cheddar. Bacon lovers, rejoice! Crispy bacon bits sprinkled inside the sandwich take it to a whole new level of indulgence. Another fun idea is to use different types of bread. Sourdough adds a nice tang, while brioche creates a richer, more decadent experience. You can even grill it on Texas toast for an extra buttery and satisfying crunch.
Don’t be afraid to experiment and make this recipe your own. That’s the beauty of cooking, right? It’s all about finding what you love and creating something delicious that you can share with others.
I’m so excited for you to try this Jalapeno Popper Grilled Cheese recipe! I know you’re going to love it as much as I do. It’s the perfect blend of comfort food and spicy adventure, and it’s guaranteed to become a new favorite in your household.
So, what are you waiting for? Gather your ingredients, fire up your skillet, and get ready to experience grilled cheese like never before. And most importantly, don’t forget to share your creations with me! I’d love to see your photos and hear about your variations. Tag me on social media and let me know what you think. I can’t wait to see your cheesy, spicy masterpieces! Happy cooking, and enjoy every delicious bite of your homemade Jalapeno Popper Grilled Cheese! I am confident that this recipe will become a staple in your kitchen.
Jalapeno Popper Grilled Cheese: The Ultimate Spicy Comfort Food
Creamy, cheesy grilled cheese with a jalapeno kick! This sandwich is a flavor explosion in every bite.
By: TessaCategory: LunchDifficulty: EasyCuisine: AmericanYield: 4 sandwichesDietary: VegetarianIngredients
Instructions
Recipe Notes
- Adjust the amount of jalapenos to your spice preference.
- For an extra kick, add jalapeno juice to the cheese mixture.
- Cook the grilled cheese over medium-low heat to prevent burning and ensure the cheese melts completely.
- Serve immediately for the best taste and texture.
- Optional: Add cooked bacon crumbles to the mixture.
Frequently Asked Questions
→ How do I ensure the bread stays moist?Use fresh, ripe ingredients and avoid overmixing the batter. Store in an airtight container.→ Can I substitute ingredients?Yes, you can substitute similar ingredients while maintaining the basic ratios for best results.→ How long does this bread keep?Store tightly wrapped at room temperature for 2-3 days, or refrigerate for up to a week.→ What if I don't have all the spices?You can adjust spices to taste or substitute with similar warming spices.→ Can I freeze this bread?Yes, wrap individual slices and freeze for up to 3 months. Thaw at room temperature before serving.