Japanese Egg Sandwich, or “Tamago Sando” as it’s affectionately known, is more than just a sandwich; it’s a culinary experience that will redefine your understanding of comfort food. Have you ever bitten into something so unexpectedly creamy, fluffy, and subtly sweet that it made you close your eyes and savor the moment? That’s the magic of this iconic Japanese creation, and I’m thrilled to share my version with you!
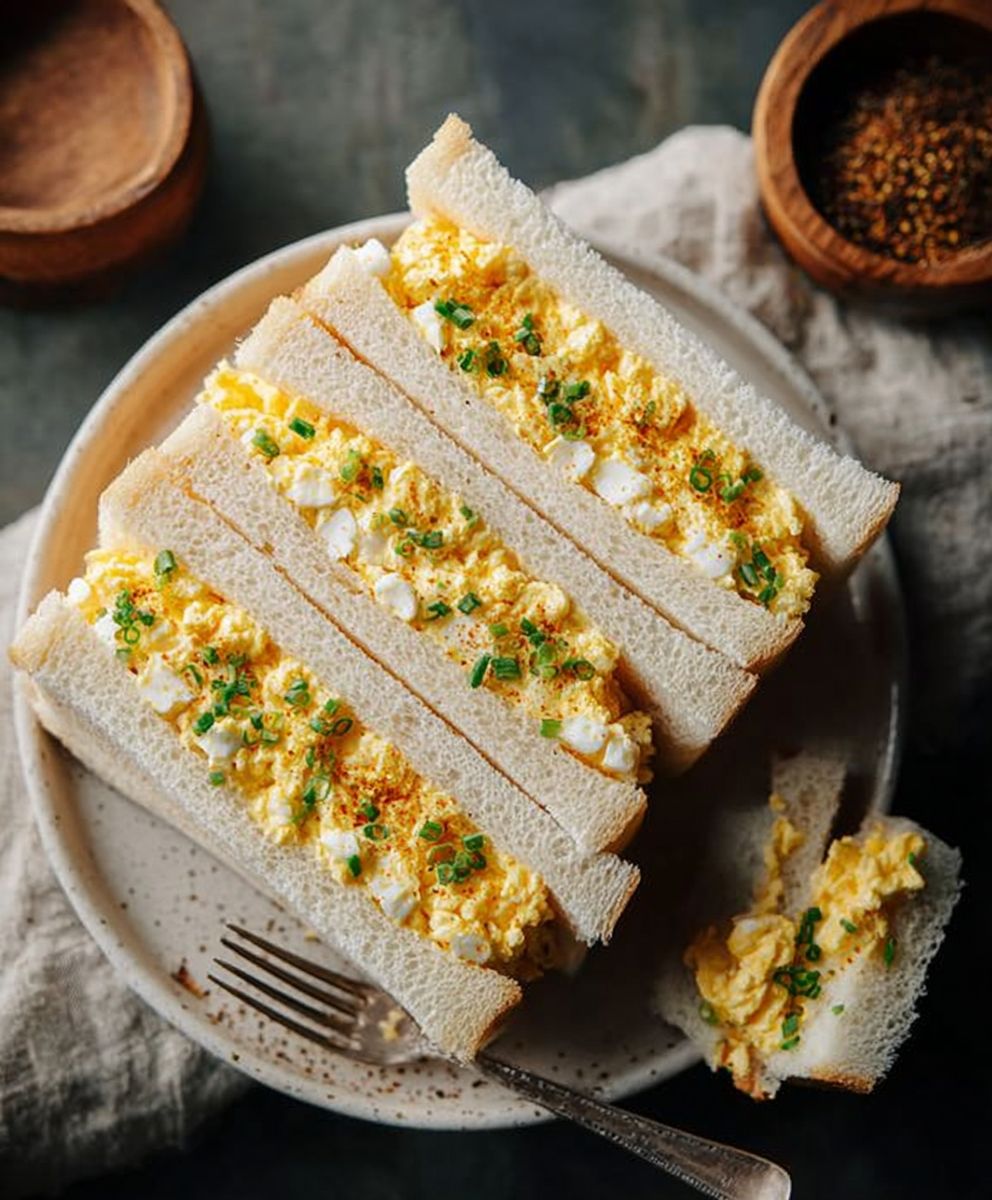
While seemingly simple, the Tamago Sando holds a special place in Japanese culture. It’s a staple in convenience stores (konbini) and cafes across the country, offering a quick yet satisfying bite. Its popularity stems from the meticulous attention to detail that goes into its preparation. The perfectly cooked, custardy egg filling, nestled between slices of soft, crustless white bread, is a testament to Japanese culinary precision.
People adore the Japanese Egg Sandwich for its unique combination of textures and flavors. The creamy, almost melt-in-your-mouth egg filling contrasts beautifully with the pillowy bread. The subtle sweetness, often achieved with a touch of Japanese mayonnaise and sometimes a hint of mustard, elevates it beyond a simple egg salad sandwich. It’s incredibly convenient, easy to eat on the go, and offers a comforting, satisfying experience that keeps people coming back for more. So, let’s dive in and create this delightful treat together!

Ingredients:
- For the Eggs:
- 6 large eggs
- 1/4 cup mayonnaise (Japanese Kewpie mayonnaise preferred for its richer flavor)
- 1 tablespoon milk or heavy cream
- 1/2 teaspoon Dijon mustard
- 1/4 teaspoon sugar
- Pinch of salt
- Pinch of white pepper (optional, but recommended)
- For the Bread:
- 6 slices of Japanese milk bread (Shokupan), crusts removed
- 2 tablespoons unsalted butter, softened
- Optional Garnishes:
- Finely chopped chives
- A sprinkle of paprika
Preparing the Eggs:
Alright, let’s get started with the heart of this sandwich – the creamy, dreamy egg filling! This is where the magic happens, so pay close attention to the details.
- Hard-Boil the Eggs: Place the eggs in a saucepan and cover them with cold water. The water should be about an inch above the eggs. Bring the water to a rolling boil over medium-high heat. Once boiling, immediately remove the pan from the heat, cover it with a lid, and let it sit for exactly 10 minutes. This is crucial for perfectly cooked yolks that aren’t dry or rubbery.
- Ice Bath: While the eggs are cooking, prepare an ice bath in a large bowl. This will stop the cooking process and make the eggs easier to peel.
- Cool and Peel: After 10 minutes, carefully transfer the eggs to the ice bath. Let them cool completely, about 10-15 minutes. Once cooled, gently tap the eggs on a hard surface to crack the shells all over. Peel the eggs under cool running water. This helps to remove any stubborn shell fragments.
- Mash the Eggs: In a medium-sized bowl, use a fork or a potato masher to thoroughly mash the hard-boiled eggs. You can leave some small chunks for texture, or mash them completely smooth – it’s up to your personal preference! I personally like a little bit of texture, so I don’t mash them *too* much.
- Add the Mayonnaise: Add the mayonnaise to the mashed eggs. Kewpie mayonnaise is the traditional choice and adds a unique richness and tanginess, but if you can’t find it, regular mayonnaise will work in a pinch.
- Add the Milk/Cream: Pour in the milk or heavy cream. This will help to create a creamier, more luxurious texture. Heavy cream will result in a richer filling, while milk will keep it a bit lighter.
- Add the Dijon Mustard: Stir in the Dijon mustard. This adds a subtle tang and depth of flavor that complements the richness of the eggs and mayonnaise. Don’t skip this!
- Add the Sugar: Sprinkle in the sugar. This might seem odd, but a touch of sweetness balances the savory flavors and enhances the overall taste.
- Season with Salt and Pepper: Season with salt and white pepper to taste. White pepper is preferred for its delicate flavor and to avoid black specks in the filling, but black pepper can be used if you don’t have white pepper on hand. Be careful not to over-salt!
- Mix Well: Gently mix all the ingredients together until well combined. Be careful not to overmix, as this can make the filling tough.
- Chill (Optional): For the best flavor and texture, cover the egg mixture and refrigerate it for at least 30 minutes before assembling the sandwiches. This allows the flavors to meld together and the filling to firm up slightly.
Preparing the Bread:
The bread is just as important as the egg filling! Japanese milk bread (Shokupan) is the ideal choice for its soft, slightly sweet flavor and incredibly fluffy texture. If you can’t find Shokupan, you can use another soft, white bread, but the texture won’t be quite the same.
- Remove the Crusts: Using a sharp serrated knife, carefully trim the crusts from all six slices of bread. This is essential for the authentic Japanese egg sandwich experience. The crustless bread creates a softer, more delicate texture.
- Butter the Bread: Spread a thin, even layer of softened butter on one side of each slice of bread. The butter adds flavor and helps to prevent the bread from becoming soggy. Make sure the butter is softened, not melted, so it spreads easily.
Assembling the Sandwiches:
Now for the fun part – putting it all together! This is where your patience and attention to detail will pay off.
- Divide the Egg Filling: Divide the chilled egg filling evenly among three slices of buttered bread. Spread the filling all the way to the edges of the bread. Don’t be shy with the filling – these sandwiches are known for their generous portions!
- Top with Bread: Carefully place the remaining three slices of buttered bread on top of the egg filling, buttered-side down.
- Wrap Tightly (Optional but Recommended): This step is crucial for achieving the perfect shape and texture. Wrap each sandwich tightly in plastic wrap. This helps the filling to meld with the bread and creates a more cohesive sandwich.
- Chill (Important): Place the wrapped sandwiches in the refrigerator for at least 30 minutes, or up to a few hours. This allows the sandwiches to firm up and the flavors to meld together even further. This step is what makes the sandwich so good!
- Cut and Serve: After chilling, remove the sandwiches from the refrigerator and unwrap them. Using a sharp serrated knife, carefully cut each sandwich in half or into thirds. Cutting them in half diagonally is the most common presentation.
- Garnish (Optional): If desired, garnish the sandwiches with finely chopped chives or a sprinkle of paprika for a pop of color and flavor.
- Serve Immediately: Serve the Japanese egg sandwiches immediately and enjoy! They are best enjoyed fresh, but can be stored in the refrigerator for up to 24 hours.
Tips for Success:
- Use High-Quality Ingredients: The quality of your ingredients will directly impact the taste of your sandwiches. Use fresh eggs, good-quality mayonnaise (Kewpie is highly recommended), and soft, fluffy bread.
- Don’t Overcook the Eggs: Overcooked eggs will result in a dry, rubbery filling. Follow the instructions carefully for hard-boiling the eggs to ensure perfectly cooked yolks.
- Chill the Filling and Sandwiches: Chilling the egg filling and assembled sandwiches is crucial for achieving the best flavor and texture. It allows the flavors to meld together and the sandwiches to firm up.
- Wrap Tightly: Wrapping the sandwiches tightly in plastic wrap helps them to hold their shape and prevents the bread from drying out.
- Experiment with Flavors: Feel free to experiment with different flavors and ingredients. You can add a pinch of curry powder to the egg filling for a unique twist, or use different types of bread.
Variations:
- Spicy Egg Sandwich: Add a pinch of chili flakes or a dash of hot sauce to the egg filling for a spicy kick.
- Curry Egg Sandwich: Add 1/2 teaspoon of curry powder to the egg filling for a warm, aromatic flavor.
- Wasabi Egg Sandwich: Add a small amount of wasabi paste to the egg filling for a subtle, pungent flavor. Be careful not to add too much, as wasabi can be quite strong.
- Avocado Egg Sandwich: Add mashed avocado to the egg filling for a creamy, healthy twist.
- Bacon Egg Sandwich: Add crumbled cooked bacon to the egg filling for a smoky, savory flavor.
I hope you enjoy making and eating these delicious Japanese egg sandwiches! They are a perfect snack, light meal, or addition to a bento box. Let me know in the comments if you try this recipe and what you think!
Conclusion:
This isn’t just another egg sandwich; it’s a culinary experience! The creamy, subtly sweet, and unbelievably fluffy filling nestled between slices of soft, pillowy bread makes this Japanese Egg Sandwich a true masterpiece. Trust me, once you’ve tasted this, you’ll never look at an egg sandwich the same way again. The unique preparation method, focusing on achieving that perfect custard-like consistency, elevates it far beyond your average breakfast or lunch option. It’s a comforting, satisfying, and surprisingly elegant treat that’s perfect for any time of day.
But why is this recipe a must-try? It’s simple: the flavor profile is unlike anything you’ve experienced. The touch of sweetness from the Japanese mayonnaise, combined with the savory eggs and a hint of mustard, creates a harmonious blend that dances on your palate. The texture is equally important – the incredibly soft bread complements the creamy filling perfectly, creating a melt-in-your-mouth sensation that’s simply divine. It’s a delightful departure from the ordinary, offering a taste of Japanese comfort food right in your own kitchen.
Looking for serving suggestions or variations? This sandwich is fantastic on its own, perfect for a quick breakfast, a light lunch, or even a satisfying snack. However, feel free to get creative! For a heartier meal, try pairing it with a side of miso soup or a crisp green salad. If you’re feeling adventurous, you could add a sprinkle of furikake (Japanese seasoning) to the filling for an extra burst of umami flavor. Another delicious variation involves using toasted shokupan (Japanese milk bread) for a slightly crispier texture. You could also experiment with different types of mustard, such as Dijon or whole-grain, to customize the flavor to your liking. For a vegetarian option, consider adding finely chopped chives or scallions to the egg mixture for a fresh, herbaceous note. And if you’re feeling particularly indulgent, a thin layer of avocado on the bread adds a creamy richness that complements the egg filling beautifully. Don’t be afraid to experiment and find your perfect combination!
Ready to embark on this culinary adventure?
I wholeheartedly encourage you to try this recipe. It’s surprisingly easy to make, even for beginner cooks, and the results are absolutely worth the effort. The key is to follow the instructions carefully and pay attention to the details, especially when cooking the eggs. Achieving that perfect creamy consistency is crucial for the overall success of the sandwich.
Once you’ve made your own Japanese Egg Sandwich, I’d love to hear about your experience! Did you enjoy the unique flavor and texture? Did you try any of the variations I suggested, or did you come up with your own creative twist? Share your thoughts, photos, and tips in the comments below. Let’s create a community of egg sandwich enthusiasts and inspire each other with our culinary creations! I can’t wait to see what you come up with. Happy cooking!
Japanese Egg Sandwich: The Ultimate Guide to Making Tamago Sando
Creamy Japanese Egg Sandwiches (Tamago Sando) with a rich egg filling nestled between soft, crustless milk bread. A delightful treat!
Ingredients
Instructions
Recipe Notes
- Use high-quality ingredients for the best flavor.
- Don’t overcook the eggs.
- Chilling the filling and sandwiches is crucial.
- Wrap tightly in plastic wrap.
- Experiment with flavors (curry powder, chili flakes, wasabi, avocado, bacon).
- Kewpie mayonnaise is highly recommended for authentic flavor.
- Shokupan bread is ideal, but other soft white bread can be substituted.