Maple Donut Bars are more than just a sweet treat; they are a delightful journey back to simpler times, reimagined for modern convenience. Imagine the irresistible allure of a classic maple-glazed donut – its tender crumb and sugary coating – now transformed into an easy-to-share bar that brings joy with every bite. I’m incredibly excited to guide you through creating this cherished dessert, which perfectly blends nostalgia with innovative ease.
Maple, a cornerstone of North American culinary tradition, boasts a rich history, particularly in Canada where it symbolizes warmth and natural bounty. Donuts, too, have a fascinating past, evolving from simple fried dough into countless beloved variations. Our recipe for these incredible Maple Donut Bars captures that timeless essence, offering a soft, cake-like texture enveloped in a shimmering, sweet maple glaze.
Why Everyone Adore These Maple Donut Bars
People simply adore this dish for its incredible depth of flavor – that distinctive, warm maple sweetness is utterly comforting – and its perfect balance of chewiness and melt-in-your-mouth tenderness. Plus, let’s be honest, making bars instead of individual donuts is a brilliant shortcut to happiness, allowing you to enjoy all the magic without the fuss. Each square promises a bite of pure, maple-infused bliss, making them perfect for sharing, parties, or simply a cozy afternoon indulgence.

Ingredients:
- For the Maple Donut Bars:
- 2 ½ cups (300g) all-purpose flour, spooned and leveled
- 1 tablespoon baking powder
- ½ teaspoon salt
- ½ cup (113g) unsalted butter, softened to room temperature
- ¾ cup (150g) granulated sugar
- 2 large eggs, room temperature
- 1 teaspoon pure vanilla extract
- 1 cup (240ml) whole milk, room temperature
- Optional: ½ teaspoon ground nutmeg (for that authentic donut flavor)
- For the Maple Glaze:
- 2 cups (240g) powdered sugar (confectioners’ sugar), sifted
- ¼ cup (60ml) pure maple syrup (grade A or B for richer flavor)
- 3-4 tablespoons whole milk or cream, adjust as needed
- ½ teaspoon pure vanilla extract
- Pinch of salt
- For Optional Toppings:
- Finely chopped toasted pecans or walnuts
- A light dusting of cinnamon sugar
- Crispy crumbled bacon bits (for a sweet and savory twist)
Preparing the Perfect Maple Donut Bars Dough
- Preheat and Prepare: My first step, and it’s an important one for ensuring baking success, is to prepare the stage for our delicious Maple Donut Bars. Preheat your oven to a cozy 350°F (175°C). Then, grab a 9×13 inch baking pan. I like to grease it really well, then lightly flour it, making sure every corner is coated thoroughly. This creates a non-stick surface that is absolutely essential for easy removal. Alternatively, for even easier cleanup and guaranteed release, you can line the pan with parchment paper, leaving a generous overhang on the sides – this makes lifting the finished bars out incredibly easy. A little non-stick cooking spray can also be a great base before the parchment paper to ensure absolutely no sticking, creating a perfect foundation for your Maple Donut Bars. This diligent prep ensures our beautiful donut bars will come out cleanly and perfectly formed, without any frustrating sticking.
- Whisk the Dry Ingredients: In a medium-sized bowl, let’s combine our dry heroes for these Maple Donut Bars. I always start by sifting together the 2 ½ cups of all-purpose flour, 1 tablespoon of baking powder, and ½ teaspoon of salt. Sifting isn’t just for show; it genuinely helps to aerate the flour, breaking up any lumps and ensuring a light, tender, and evenly textured crumb in our finished Maple Donut Bars. If you’re opting for that wonderful, warm, classic donut flavor, now is the perfect time to add your ½ teaspoon of ground nutmeg. This subtle spice elevates the overall taste profile. Give these dry ingredients a good whisk with a balloon whisk until they are thoroughly combined and airy. This even distribution of leavening agents is key to a consistent rise. Set this bowl aside for a moment, ready for its turn.
- Cream the Butter and Sugar: Now for the heart of the batter, where flavor and texture truly begin to develop! In a large mixing bowl, preferably with an electric mixer (a stand mixer with the paddle attachment or a hand-held mixer, either works great), we’re going to cream together ½ cup (113g) of softened unsalted butter and ¾ cup (150g) of granulated sugar. I usually beat this mixture on medium speed for about 3-5 minutes, allowing ample time for the ingredients to transform. You’ll know it’s ready when the mixture becomes delightfully light, fluffy, and a pale yellow color. This creaming process is vital because it incorporates air into the butter and sugar mixture, which, in turn, creates tiny pockets of air that expand during baking, contributing significantly to a wonderfully tender and airy texture in our Maple Donut Bars. Don’t rush this step, as it’s foundational for the final product’s quality!
- Add Eggs and Vanilla: Once your butter and sugar are beautifully creamed and aerated, it’s time to incorporate the binding and flavoring agents. Add the 2 large eggs, one at a time, beating well after each addition. It’s important to ensure each egg is fully integrated into the mixture and the batter looks cohesive before adding the next one. This prevents the batter from separating or curdling, maintaining a smooth emulsion. After the eggs have been thoroughly mixed in, stir in the 1 teaspoon of pure vanilla extract. The vanilla adds such a comforting warmth and depth of flavor, acting as a perfect aromatic complement to the star maple flavor we’ll introduce later. Be sure to scrape down the sides of the bowl with a spatula to ensure everything is evenly mixed and no pockets of uncombined ingredients remain.
- Alternate Dry and Wet: This is where our Maple Donut Bars batter truly comes together, building its structure. With your mixer on low speed, or gently by hand with a sturdy spatula, we’re going to alternately add the dry ingredients and the whole milk to the wet mixture. Start by adding about one-third of the dry ingredient mixture, mixing only until just combined – overmixing here is detrimental. Then, pour in half of the 1 cup of whole milk, mixing gently until smooth and incorporated. Repeat this process: add another third of the dry ingredients, then the remaining half of the milk, and finally, the last third of the dry ingredients. It’s absolutely paramount not to overmix at this stage! Overmixing develops the gluten in the flour too much, which can lead to tough, dense Maple Donut Bars, and we are striving for a light, tender, and cakey texture, reminiscent of a classic baked donut. Mix just until no streaks of flour remain visible and the batter is uniform. The batter will be thick, but still pourable, with a lovely consistency.
- Bake to Perfection: Gently pour the prepared batter into your meticulously greased and floured (or parchment-lined) 9×13 inch baking pan. Use an offset spatula or the back of a spoon to delicately spread the batter evenly to all corners of the pan, ensuring a uniform thickness for even baking. Place the pan in your preheated oven. Bake for approximately 25-30 minutes. Baking times can vary slightly depending on your specific oven, so it’s always wise to keep a close eye on them! You’ll know these Maple Donut Bars are perfectly done when a wooden skewer or toothpick inserted into the very center comes out clean or with just a few moist crumbs attached – not wet batter. The top should be beautifully golden brown and spring back lightly when gently touched, indicating a fully baked interior.
- Cooling Down: Once baked to golden perfection, remove the pan from the oven and carefully place it on a wire rack. This allows air to circulate underneath, preventing the bottom from becoming soggy. Let the donut bars cool in the pan for about 10-15 minutes. This initial cooling period is crucial as it allows the bars to set up properly and firm up before we attempt to move them, reducing the risk of breakage. After this initial cooling, if you used parchment paper with an overhang, you can carefully lift the entire slab of donut bars out of the pan and transfer them directly to the wire rack to cool completely. This is a critical step before glazing; if the bars are even slightly warm, the glaze will melt right off and create a messy pool, rather than a beautiful coating! Trust me, I’ve learned that the hard way from impatient moments.
Crafting the Irresistible Maple Glaze
- Gather and Sift: While your Maple Donut Bars are diligently cooling to the correct temperature, let’s whip up that glorious, essential maple glaze! In a medium bowl, accurately measure out your 2 cups of powdered sugar. I always, always sift my powdered sugar for glazes. It’s a small but significant step that removes any pesky lumps and ensures a consistently silky-smooth, pourable finish. Trust me, a lumpy glaze on your beautiful Maple Donut Bars is just not the vibe we’re going for; we want a glaze that looks as professional as it tastes.
- Combine Glaze Ingredients: To the freshly sifted powdered sugar, now add ¼ cup of pure maple syrup. Using pure maple syrup is non-negotiable here, my friends! Its authentic, rich, and complex flavor is what truly defines these Maple Donut Bars, setting them apart from any imitation. Then, add ½ teaspoon of pure vanilla extract, which beautifully enhances the maple notes, and a tiny pinch of salt. The salt really helps to balance the sweetness of the sugar and maple, surprisingly bringing out and intensifying the maple flavor even more, creating a more rounded and nuanced taste.
- Achieve the Perfect Consistency: Now, begin whisking these glaze ingredients together. Start by adding 3 tablespoons of whole milk or cream. Whisk vigorously and continuously until everything is combined and beautifully smooth. The goal here is a glaze that is thick enough to generously coat the back of a spoon but still wonderfully pourable, allowing it to spread easily over the bars without being too runny. If, after initial mixing, it’s too thick and doesn’t cascade off the whisk easily, add more milk, a tiny bit (half a teaspoon) at a time, whisking well after each addition, until you reach that desired pourable consistency. Conversely, if by some chance it becomes too thin and watery, you can rescue it by whisking in a little more sifted powdered sugar until it thickens appropriately. Remember, we want a glaze that sets nicely, creating a beautiful, slightly crackly, and opaque top on our Maple Donut Bars, not one that just drips away into oblivion.
Assembling and Finishing Your Maple Donut Bars
- Glazing the Bars: Once your Maple Donut Bars are completely cool – and I mean absolutely cool to the touch, no lingering warmth whatsoever – it’s time for the grand finale that truly makes them shine! Place the cooling rack with the bars over a large sheet of parchment paper or aluminum foil. This simple trick will effectively catch any glaze drips and make your cleanup an absolute breeze. Carefully and evenly pour the prepared maple glaze over the cooled bars. Using an offset spatula or the back of a spoon, gently spread the glaze to cover the entire surface, making sure to get it right to the very edges for a complete, uniform coating. Some glaze will inevitably cascade down the sides, which just adds to the rustic, homemade charm and provides extra deliciousness!
- Adding Optional Toppings: This is where you can truly personalize and elevate your Maple Donut Bars with a delightful textural contrast! If you’re using any optional toppings like finely chopped toasted pecans, walnuts, a delicate dusting of cinnamon sugar, or even adventurous crispy crumbled bacon bits (oh, the intriguing sweet and savory delight!), sprinkle them over the wet glaze immediately after spreading. This immediate application is crucial as it ensures they adhere nicely and become embedded into the glaze before it begins to set. I particularly love the satisfying crunch of toasted nuts against the soft bar and smooth glaze; it adds another layer of texture that is just divine and truly enhances the eating experience.
- Setting the Glaze: Let the glazed Maple Donut Bars sit undisturbed on the wire rack for at least 30 minutes, or even longer, until the glaze has fully set. You’ll know it’s perfectly set when it forms a firm, slightly opaque, and slightly tacky surface that doesn’t easily smudge when gently touched. If your kitchen is particularly warm or humid, this setting process might take a little longer, so be patient. This patience is a virtue here, as a well-set glaze is absolutely crucial for achieving clean, beautiful cuts later on. Rushing this step will result in a messy glaze that drags with the knife.
- Slicing and Serving: Once the glaze is firm and perfectly set, it’s time to slice into these beauties and admire your handiwork! Using a very sharp knife, carefully cut the large slab into individual bars. I usually aim for about 12-16 bars, depending on how generous I’m feeling or the desired portion size. For the cleanest, most aesthetically pleasing cuts, I highly recommend wiping your knife clean with a damp cloth between each slice, especially after the first few cuts through the glaze. This prevents the glaze from sticking and tearing as you cut subsequent bars. Arrange your gorgeous Maple Donut Bars on a serving platter. They are absolutely perfect served alongside a warm cup of coffee, a refreshing glass of cold milk, or as a delightful treat any time of day.
- Storage Instructions: If by some miracle you happen to have any leftover Maple Donut Bars (which, in my house, is a rare and often debated occurrence!), it’s important to store them properly to maintain their freshness and deliciousness. Store them in an airtight container at room temperature for up to 3-4 days. While they are undoubtedly best enjoyed fresh on the day they are made, they remain wonderfully moist and flavorful for a few days, making them perfect for meal prepping a week’s worth of treats. I find placing a piece of parchment paper or wax paper between layers of bars helps prevent them from sticking together and keeps the glaze intact. Just be sure they are completely cool and the glaze is fully set before attempting to stack them. Enjoy every single bite of these homemade delights, knowing you’ve created something truly special!
Conclusion:
And there you have it! We’ve journeyed through the simple steps to create a truly remarkable treat, and I sincerely hope you’re as excited as I am about the prospect of bringing this warmth and deliciousness into your own kitchen. There’s a special magic that happens when you bake something from scratch, and this recipe for homemade goodness is particularly rewarding. It’s not just about the final product; it’s about the inviting aroma that fills your home, the anticipation as they cool, and the pure joy of that first bite. This isn’t just another dessert; it’s an experience waiting to unfold.
I truly believe these incredible bars are a must-try for so many reasons. For starters, the ease of preparation belies the sophisticated flavor profile. You get all the comforting, sweet satisfaction of a classic donut, but without the fuss and mess of deep-frying. The texture is simply divine: perfectly soft and tender, with that delightful slight chewiness that makes a donut so irresistible, all perfectly balanced by a rich, sweet maple glaze that crackles just so. It’s a harmonious blend of simple ingredients coming together to create something truly extraordinary. Whether you’re a seasoned baker or just dipping your toes into the world of homemade treats, this recipe is incredibly forgiving and delivers spectacular results every single time. The sheer delight of sinking your teeth into these homemade Maple Donut Bars is something truly special, a taste of comfort and indulgence that feels both familiar and exciting.
Now, let’s talk about how to truly savor these beauties. While they are undeniably glorious on their own, fresh from the cooling rack, there are so many ways to elevate the experience. Imagine a lazy Sunday morning: a warm plate of these alongside a steaming mug of strong coffee or a comforting cup of tea. They are absolutely perfect for a weekend breakfast or brunch, serving as a delightful centerpiece that will surely impress your family and guests. For an afternoon pick-me-up, pair a bar with a cold glass of milk, transporting you straight back to childhood memories. And of course, they make a fantastic dessert. You could serve them slightly warmed, perhaps with a scoop of vanilla bean ice cream that slowly melts into the maple glaze, creating an absolutely decadent pairing. A sprinkle of fresh berries, like raspberries or blueberries, can add a lovely tart contrast if you’re looking for a fresh touch.
Feeling adventurous? These bars are incredibly versatile and lend themselves beautifully to customization. For a touch of crunch, consider sprinkling some finely chopped toasted pecans or walnuts over the still-wet maple glaze – the nutty notes would complement the maple wonderfully. A drizzle of dark chocolate or white chocolate over the finished bars could also add another layer of sweetness and visual appeal. You could even experiment with different extracts in the glaze, perhaps a hint of almond or even a touch of bourbon for a more grown-up flavor profile. For a spiced variation, a pinch of cinnamon or nutmeg stirred into the dry ingredients before baking would infuse the bars with an extra layer of warmth and complexity, especially delightful during the cooler months. The possibilities are truly endless, allowing you to tailor this recipe to your own taste preferences and creative whims. Don’t be afraid to make them your own; that’s part of the fun of baking!
So, what are you waiting for? This is more than just a recipe; it’s an invitation to create, to share, and to enjoy. I wholeheartedly encourage you to roll up your sleeves, gather your ingredients, and give these marvelous donut bars a try. Experience the satisfaction of baking something truly delicious from scratch, something that will undoubtedly bring smiles to the faces of everyone who tastes them. I promise you, the effort is minimal, and the reward is absolutely maximal. Once you’ve made them, please, don’t keep the experience to yourself! I would absolutely love to hear about your baking adventures. Share your triumphs, your clever variations, or even just a simple photo of your delicious creations. Tag me or drop a comment to let me know how they turned out for you. Happy baking, my friends!
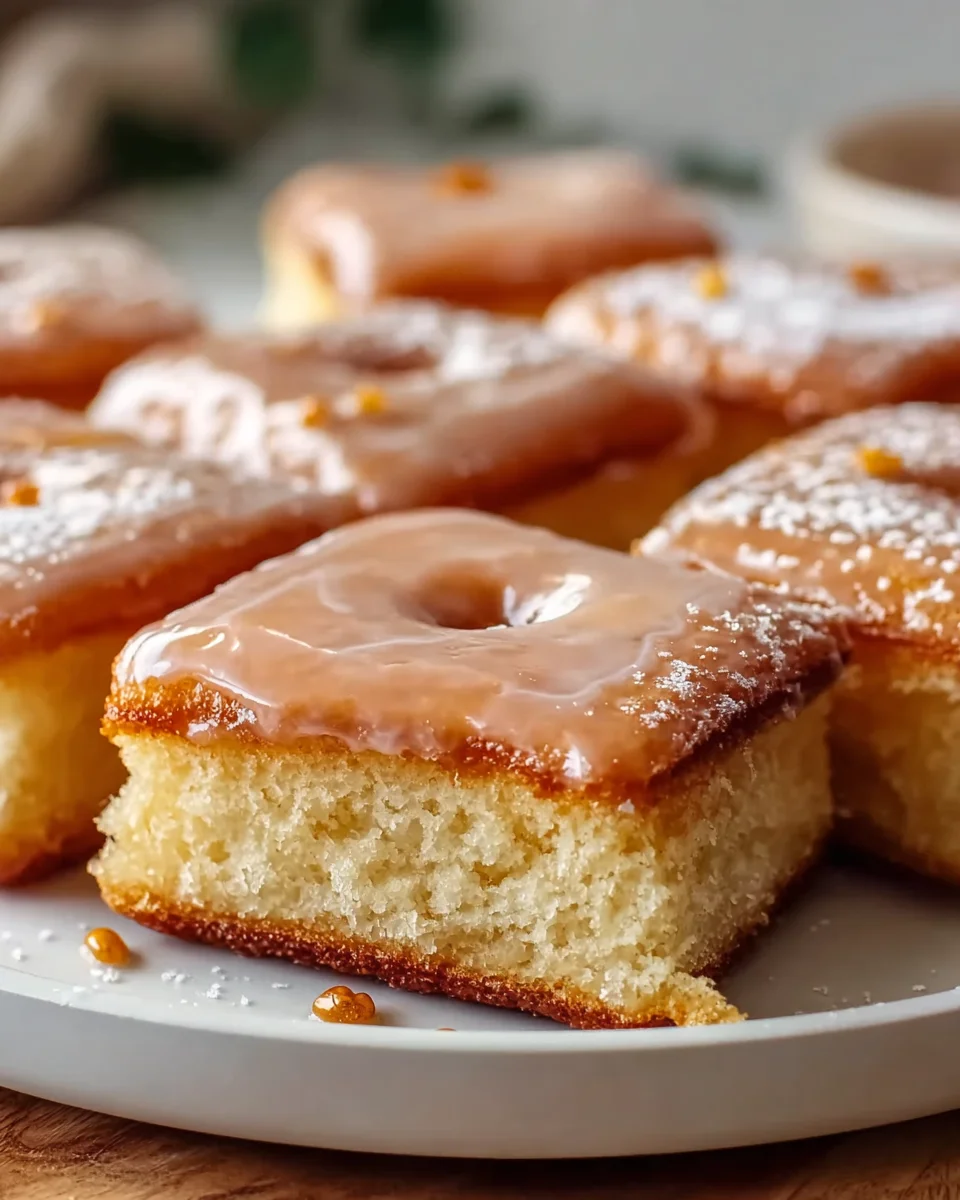
Maple Donut Bars
Every once in a while, a recipe comes along that feels like it was made for cozy mornings, slow weekends, and the irresistible smell of warm maple drifting through the house. These Maple Donut Bars are exactly that kind of recipe. The first time I made them, I set the tray on the counter to cool and within minutes my family had gathered around, each one “just taking a small piece.” Those small pieces quickly turned into half the pan—because the tender crumb, buttery donut flavor, and glossy maple glaze are simply impossible to walk away from. They taste like a mashup of an old-fashioned cake donut and a bakery maple bar, but in the easiest, most shareable bar form you can imagine.
Ingredients
Instructions
Important Information
Nutrition Facts (Per Serving)
It is important to consider this information as approximate and not to use it as definitive health advice.
Allergy Information
Please check ingredients for potential allergens and consult a health professional if in doubt.