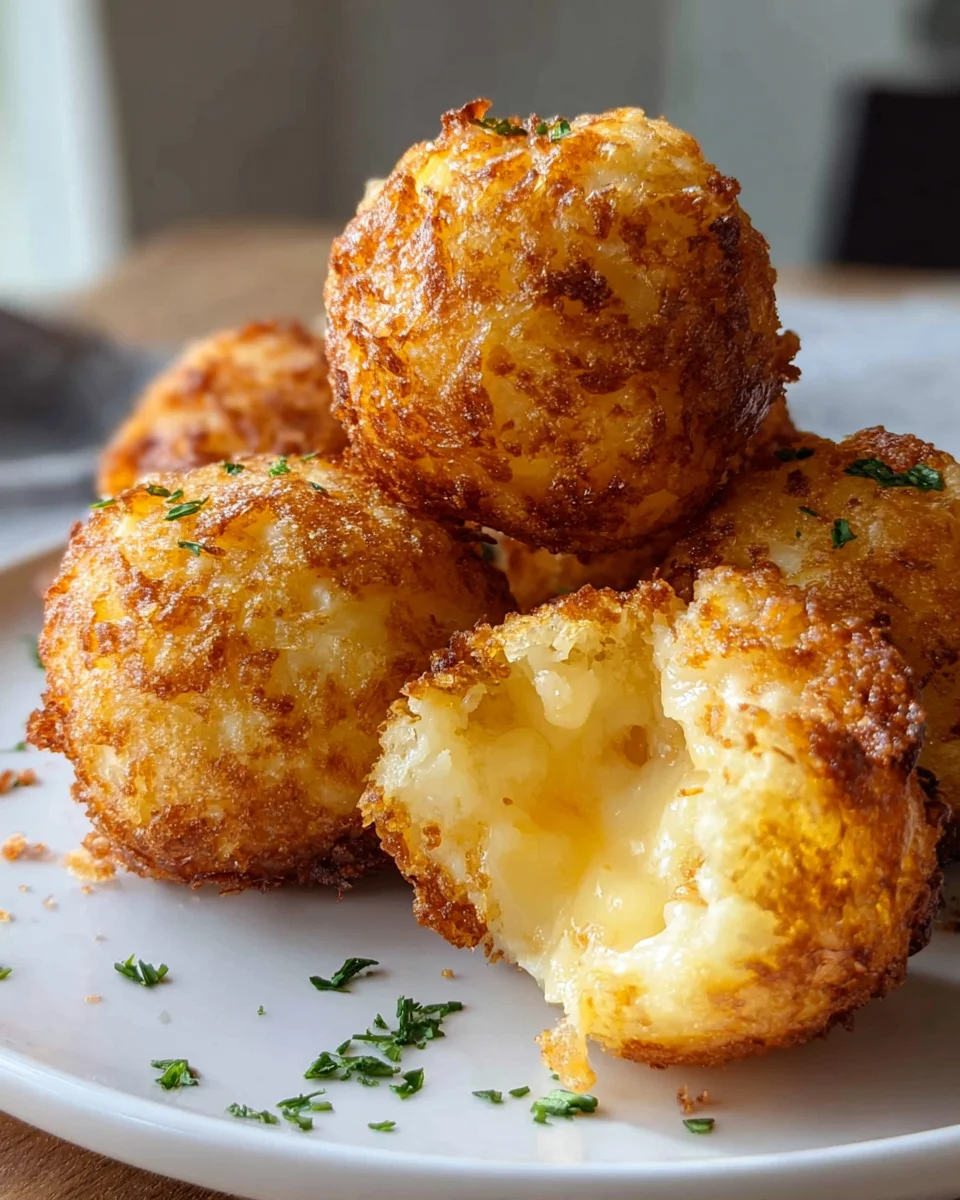
Mashed Potato Cheese Puffs Recipe – now that’s a phrase designed to bring a smile to your face, isn’t it? Imagine a culinary creation that takes the humble, comforting mashed potato and elevates it into something truly extraordinary: a golden-brown, crispy-on-the-outside, incredibly soft and cheesy-on-the-inside bite of pure joy. We all adore mashed potatoes, a timeless side dish gracing tables across countless cultures, from traditional American Thanksgiving dinners to hearty European stews. But what if you could transform those beloved leftovers, or even a fresh batch, into an irresistible appetizer or a delightful side dish that disappears in minutes?
Why You’ll Love This Transformation of a Classic Side
People absolutely adore this dish for so many wonderful reasons. It offers an incredibly satisfying textural contrast – the satisfying crunch of the exterior gives way to a warm, pillowy, cheesy interior that simply melts in your mouth. This isn’t just about taste; it’s an experience. The savory blend of perfectly seasoned potatoes with rich, gooey cheese is a match made in culinary heaven. Furthermore, the convenience factor is unparalleled; it’s an ingenious way to revitalize leftover mashed potatoes, reducing food waste and creating something entirely new and exciting. Whether you’re seeking a crowd-pleasing party snack, a comforting addition to your family dinner, or simply a delicious treat, the Mashed Potato Cheese Puffs Recipe is your answer. Get ready to discover your new favorite way to enjoy potatoes!

Ingredients:
- For the Mashed Potato Cheese Puffs:
- 3 cups (approximately 720g) cold mashed potatoes – This is the star of our show! Using cold mashed potatoes is absolutely crucial for the best texture and ease of handling. If you’re starting from scratch, make your favorite mashed potatoes and allow them to cool completely in the refrigerator for at least 2 hours, or even overnight. They should be firm and not watery.
- 1 cup (approximately 113g) shredded sharp cheddar cheese – I love the classic tang of sharp cheddar, but feel free to get adventurous! Gruyère offers a nutty complexity, while Monterey Jack provides a lovely melt and milder flavor. A blend of cheeses can also be fantastic here.
- 1 large egg, lightly beaten – Our essential binder, helping everything hold together beautifully.
- 1/4 cup (approximately 30g) all-purpose flour – Just enough to give our puffs some structure without making them dense.
- 1 teaspoon baking powder – This little secret ingredient helps create a lighter, fluffier interior. Don’t skip it!
- 2 tablespoons fresh chives, finely chopped – For a delicate oniony flavor and a pop of color. Fresh is always best here!
- 1 teaspoon garlic powder – Adds a wonderful aromatic depth.
- 1/2 teaspoon onion powder – Complements the garlic and enhances the savory notes.
- 1/2 teaspoon salt – Adjust to your taste, especially if your mashed potatoes were already well-seasoned.
- 1/4 teaspoon black pepper – Freshly ground, if possible, for the best flavor.
- Optional: A pinch of cayenne pepper or red pepper flakes for a subtle kick – If you like a little heat, this is a delightful addition!
- For Baking and Serving:
- 1-2 tablespoons olive oil or melted butter, for brushing the puffs – This helps achieve that irresistible golden-brown crust.
- Optional garnishes: extra fresh chives, a sprinkle of paprika, or a dollop of sour cream for serving.
- Optional dipping sauces: ketchup, sriracha mayonnaise, ranch dressing, or a simple sour cream and chive dip.
Equipment You’ll Need:
- Large mixing bowl – Essential for combining all our delicious ingredients.
- Baking sheet(s) – To bake our puffs evenly. Having two can be handy if you’re making a big batch.
- Parchment paper or silicone baking mats – Crucial for preventing sticking and ensuring easy cleanup. I always line my baking sheets!
- Measuring cups and spoons – For accurate ingredient measurements.
- Spatula or sturdy wooden spoon – For mixing and scraping the bowl.
- Small ice cream scoop (about 1.5-2 tablespoons capacity) – My absolute favorite tool for portioning uniform puffs. It makes the process so much faster and ensures even baking.
- Wire cooling rack – Allows air circulation to keep the bottoms crispy as they cool slightly.
Phase 1: Preparing Your Mashed Potato Base
-
Gather and Assess Your Mashed Potatoes:
The very first step, and arguably the most important, is to ensure your mashed potatoes are truly cold and firm. I’ve found that potatoes taken straight from the refrigerator are much easier to work with. If they are too warm or too loose, the mixture will be sticky and difficult to form into puffs. If your mashed potatoes are a bit too wet (perhaps you added too much milk or butter), you can gently press them between a few layers of paper towels to absorb some excess moisture. This might sound unusual, but trust me, it makes a significant difference in the final texture of your puffs, preventing them from spreading too much during baking. We’re aiming for a consistency that feels moldable, almost like a soft dough, not a liquidy purée.
-
Combine the Dry Ingredients and Cheese:
In your large mixing bowl, combine the cold mashed potatoes, shredded sharp cheddar cheese, all-purpose flour, baking powder, finely chopped fresh chives, garlic powder, onion powder, salt, and black pepper. If you’re feeling adventurous and want a little warmth, now is the time to add that optional pinch of cayenne pepper or red pepper flakes. I love a subtle hint of spice; it really wakes up the flavors!
-
Add the Egg and Mix Gently:
Pour the lightly beaten large egg over the mixture. Now, with a sturdy spatula or a wooden spoon, begin to mix all the ingredients together. The key here is to mix until just combined. Overmixing can develop the gluten in the flour too much, leading to tougher puffs, and it can also make the mashed potatoes gummy. Gently fold and press the ingredients together until they form a cohesive, slightly sticky, but manageable “dough.” You should see all the ingredients evenly distributed, with flecks of green chives and orange cheese throughout the potato base. Don’t be afraid to get your hands in there if you prefer to feel the consistency; just ensure they are clean!
-
Perform a Quick Taste Test (Optional but Recommended!):
This is my favorite part! Take a tiny pinch of the mixture and give it a quick taste. This is your chance to adjust the seasoning. Does it need a little more salt? A dash more garlic powder? Perhaps a bit more black pepper to really bring out the flavors? Remember, once they’re baked, you can’t really change the internal seasoning, so make it perfect now.
Phase 2: Forming the Puffs
-
Preheat Your Oven and Prepare Your Baking Sheets:
Before you start forming, preheat your oven to 400°F (200°C). This ensures the oven is at the correct temperature when your puffs go in, which is vital for even baking and a good crust. Line one or two large baking sheets with parchment paper or silicone baking mats. This step is not just for easy cleanup (though it’s a huge bonus!), it also helps prevent the puffs from sticking and encourages even browning on the bottom. I’ve made the mistake of not lining them before, and trust me, it’s not fun to scrape stuck puffs off a baking sheet!
-
Scoop and Shape Your Puffs:
Now for the fun part! Using a small ice cream scoop (I find a 1.5 to 2-tablespoon size perfect for bite-sized puffs), scoop out portions of the mashed potato mixture. If you don’t have a scoop, you can use two spoons or simply roll the mixture between your palms. Gently roll each scoop into a neat ball. Aim for consistency in size; this ensures that all your puffs bake at the same rate. I usually aim for balls about 1.5 inches (3-4 cm) in diameter.
-
Arrange on Baking Sheets:
Place the formed potato balls onto your prepared baking sheets, leaving about 1 inch (2.5 cm) of space between each puff. This spacing is important to allow proper air circulation around each puff, promoting even cooking and crispy edges. Don’t overcrowd the baking sheet; if you have a lot of mixture, use a second sheet. Overcrowding can lead to steaming instead of baking, resulting in softer, less crispy puffs.
-
Brush with Oil or Melted Butter:
Lightly brush the tops of each potato puff with olive oil or melted butter. This step is key for achieving that beautiful golden-brown color and a deliciously crispy exterior. The fat helps conduct heat and creates a wonderful textural contrast with the soft interior.
Phase 3: Baking Your Golden Puffs
-
Initial Bake:
Carefully place the baking sheet(s) into your preheated 400°F (200°C) oven. Bake for 15-20 minutes. During this initial baking period, the puffs will start to firm up, and the cheese inside will begin to melt, creating an incredible aroma throughout your kitchen. You’ll notice the edges starting to turn a light golden color.
-
Flip for Even Browning:
After 15-20 minutes, remove the baking sheet from the oven. Using a sturdy spatula, carefully flip each potato puff over. This step is crucial for ensuring both sides get equally crispy and golden-brown. I find that a thin, flexible metal spatula works best for this task. If you’re gentle, they should flip easily without breaking apart.
-
Continue Baking Until Golden and Crispy:
Return the baking sheet(s) to the oven and continue baking for another 10-15 minutes, or until the puffs are deeply golden brown and wonderfully crispy on all sides. The exact baking time can vary depending on your oven and the size of your puffs, so keep a close eye on them during this final stage. You’re looking for a rich, uniform golden-brown color and a firm, slightly crunchy exterior when gently pressed. When they reach this stage, they are perfect!
-
Cool Slightly and Serve:
Once baked to perfection, remove the baking sheet from the oven. If you have a wire cooling rack, transfer the potato cheese puffs to it immediately. This allows air to circulate underneath them, preventing the bottoms from becoming soggy. Let them cool on the rack for 5-10 minutes before serving. They will be incredibly hot straight out of the oven, and cooling them slightly allows them to set up further and makes them easier to handle. These are best served warm, when the cheese is still gooey and the exterior is delightfully crisp.
Phase 4: Serving Suggestions and Variations
-
Delightful Dipping Companions:
These Mashed Potato Cheese Puffs are absolutely fantastic on their own, but they truly shine when paired with a delicious dipping sauce. My personal favorites include a classic ketchup, a zesty sriracha mayonnaise (simply mix mayonnaise with sriracha to taste), or a cool and creamy ranch dressing. For something a little more sophisticated, try a homemade sour cream and chive dip, or even a warm marinara sauce. Don’t underestimate a simple dab of plain sour cream; its tanginess provides a lovely contrast to the rich, savory puffs.
-
Garnish for Flair and Flavor:
A simple garnish can elevate your presentation and add another layer of flavor. A sprinkle of fresh, finely chopped chives echoes the flavor within the puffs and adds a vibrant green touch. A dusting of paprika, especially smoked paprika, not only provides a beautiful red hue but also a subtle smoky aroma that complements the cheese and potatoes wonderfully.
-
Creative Add-Ins for Customization:
The beauty of this recipe is how easily it can be adapted to suit your taste or what you have on hand.
- Meat Lovers: Finely diced cooked bacon bits are a phenomenal addition, bringing smoky, salty crunch. Cooked, crumbled sausage or finely diced ham also work incredibly well. Just make sure any meat additions are fully cooked and cooled before mixing them in.
- Cheese Explorations: Don’t limit yourself to cheddar! Try adding a mix of shredded mozzarella for an extra stretchy melt, crumbled feta for a salty tang, or even a bit of smoked Gouda for a deeper, more complex flavor. A touch of Parmesan Reggiano can also provide a wonderful umami boost.
- Herbal Infusions: Beyond chives, consider incorporating other fresh herbs. Finely chopped fresh parsley or dill can add a refreshing note, while a hint of dried thyme or rosemary (use sparingly, as they are potent) can introduce an earthy, aromatic quality.
- Spicy Kicks: If you love heat, finely minced jalapeños (deseeded for less heat) or a pinch of your favorite chili powder can really turn up the volume.
- Vegetable Power: For a hidden veggie boost, consider finely grating some zucchini (squeeze out excess moisture!) or carrots into the mixture. They add nutrients and a touch of sweetness without altering the texture too much.
The possibilities are truly endless! I encourage you to experiment with your favorite flavors and make this recipe your own.
-
Make-Ahead and Storage Tips:
These Mashed Potato Cheese Puffs are fantastic for meal prep!
- Make Ahead (Refrigerate): You can prepare the mashed potato mixture and form the balls up to 24 hours in advance. Arrange them on a parchment-lined baking sheet, cover tightly with plastic wrap, and refrigerate. When ready to bake, brush with oil/butter and bake as directed, adding a few extra minutes to the baking time since they are starting cold.
- Freezing (Unbaked): For longer storage, flash freeze the formed, unbaked puffs on a baking sheet until solid (about 1-2 hours). Once frozen, transfer them to a freezer-safe bag or airtight container. They can be stored in the freezer for up to 3 months. When ready to bake, you can bake them from frozen (do not thaw), adding about 10-15 minutes to the total baking time and checking for doneness.
- Reheating Baked Puffs: Leftover baked puffs can be stored in an airtight container in the refrigerator for 3-4 days. To reheat and regain their crispiness, place them on a baking sheet and warm them in a 350°F (175°C) oven or a toaster oven for 10-15 minutes, or until heated through and re-crisped. Avoid the microwave, as it will make them soft and rubbery.
These Mashed Potato Cheese Puffs are a versatile and delicious snack, appetizer, or side dish that I know you and your loved ones will adore. Enjoy creating and devouring these crispy, cheesy bites!
Conclusion:
Well, my friends, we’ve reached the delicious culmination of our culinary journey, and I genuinely hope you’re as excited as I am about what we’ve just explored. This isn’t just another recipe; it’s an invitation to experience pure comfort, joy, and irresistible flavor. I truly believe that once you try these incredible little bites, you’ll understand why they’re destined to become a staple in your kitchen and a favorite at any gathering. They offer the perfect balance of a delightfully crispy exterior and a wonderfully fluffy, cheesy interior that simply melts in your mouth. It’s that magical combination of textures and flavors that makes them truly unforgettable, transforming humble ingredients into something extraordinary. This recipe solves the universal craving for something satisfying, savory, and utterly delightful, whether you’re looking for a quick snack, an impressive appetizer, or a comforting side dish. The ease with which these come together, coupled with the profound satisfaction they deliver, makes them a non-negotiable addition to your cooking repertoire.
What makes these so incredibly special, you ask? Beyond their undeniable deliciousness, it’s their versatility and the sheer happiness they bring. Imagine biting into that golden crust, revealing a warm, tender, and incredibly cheesy center – it’s a moment of culinary bliss. They are perfect for using up leftover mashed potatoes, transforming them from a humble side into a star attraction, preventing food waste in the most delicious way possible. But don’t let that convenience fool you; these are fantastic even when made with freshly prepared mashed potatoes, designed specifically for this purpose. The effort-to-reward ratio here is off the charts. With minimal fuss, you create something that looks gourmet and tastes absolutely divine, suitable for a casual family dinner or an elegant party spread. Every single time I make them, I’m reminded of the simple pleasure of good food made with love, and I watch them disappear faster than I can bring them out, a testament to their universal appeal across all ages and palates.
Elevate Your Dining Experience with Serving Suggestions:
Now, let’s talk about how to best enjoy these golden treasures. While they are absolutely divine on their own, a few simple additions can take them to the next level. For dipping, consider a dollop of cool sour cream topped with fresh chives, a zesty homemade ranch dressing, or even a spicy sriracha mayo for those who like a little kick. Ketchup is always a classic, kid-friendly option too! As a side dish, they pair wonderfully with hearty main courses like roasted chicken, a juicy steak, slow-cooked pot roast, or even alongside your favorite barbecue ribs. Imagine serving these alongside a holiday meal; they provide a delightful textural contrast to traditional sides. For parties and get-togethers, arrange them artfully on a platter with toothpicks, making them easy finger food that guests will gravitate towards. Don’t forget brunch – they make an excellent accompaniment to scrambled eggs and crispy bacon, adding a savory, comforting element to your morning spread. They’re also an absolute game-day champion, guaranteed to be a crowd-pleaser while you cheer on your favorite team.
Unleash Your Creativity with Variations:
The beauty of this recipe also lies in its adaptability. Don’t be afraid to experiment and make it truly your own! Want to change up the cheese? Go for it! Sharp cheddar offers a robust flavor, mozzarella delivers incredible gooeyness, Parmesan adds a salty, nutty depth, while Monterey Jack melts beautifully. For a touch of heat, pepper jack is an excellent choice. You can also incorporate other delicious mix-ins directly into your mashed potatoes before forming and baking. Think crispy bacon bits, finely chopped jalapeños for a spicy surprise, caramelized onions for a sweet and savory note, or a sprinkle of garlic or onion powder to enhance the savory profile. Fresh herbs like finely chopped chives, spring onions, rosemary, or thyme can add a fragrant dimension. For an extra crispy exterior, consider rolling them in panko breadcrumbs or even crushed cornflakes before baking. And for those with dietary restrictions, fear not! You can easily adapt this recipe by using plant-based butter, non-dairy milk, and your favorite vegan cheese shreds to create a equally delicious dairy-free version. You can even prepare them ahead of time – form the puffs, place them on a baking sheet, freeze until solid, then transfer to a freezer-safe bag. When ready to bake, just add a few extra minutes to the baking time, straight from the freezer!
So, there you have it. My heartfelt plea for you to give this phenomenal recipe a try. I promise you, it’s more than just a dish; it’s an experience waiting to happen in your very own kitchen. I’ve shared all my tips and tricks, and now it’s your turn to create some magic. Don’t be intimidated; the process is straightforward, and the results are incredibly rewarding. Go ahead, gather your ingredients, turn on your favorite tunes, and enjoy the process of bringing this wonderful Mashed Potato Cheese Puffs Recipe to life. And once you’ve tasted the pure delight of these cheesy, fluffy, crispy bites, please, please, please come back and share your experience with me! What variations did you try? How did your family react? Did they disappear as quickly in your house as they do in mine? Your feedback and stories truly inspire me and help our community grow. Happy cooking, and I can’t wait to hear all about your delicious adventures!
Mashed Potato Cheese Puffs: Crispy, Cheesy & Easy Recipe!
Golden-brown, crispy-on-the-outside, incredibly soft and cheesy-on-the-inside bites of pure joy. An irresistible appetizer or delightful side dish, perfect for revitalizing leftover mashed potatoes.
Ingredients
Instructions
Important Information
Nutrition Facts (Per Serving)
It is important to consider this information as approximate and not to use it as definitive health advice.
Allergy Information
Please check ingredients for potential allergens and consult a health professional if in doubt.