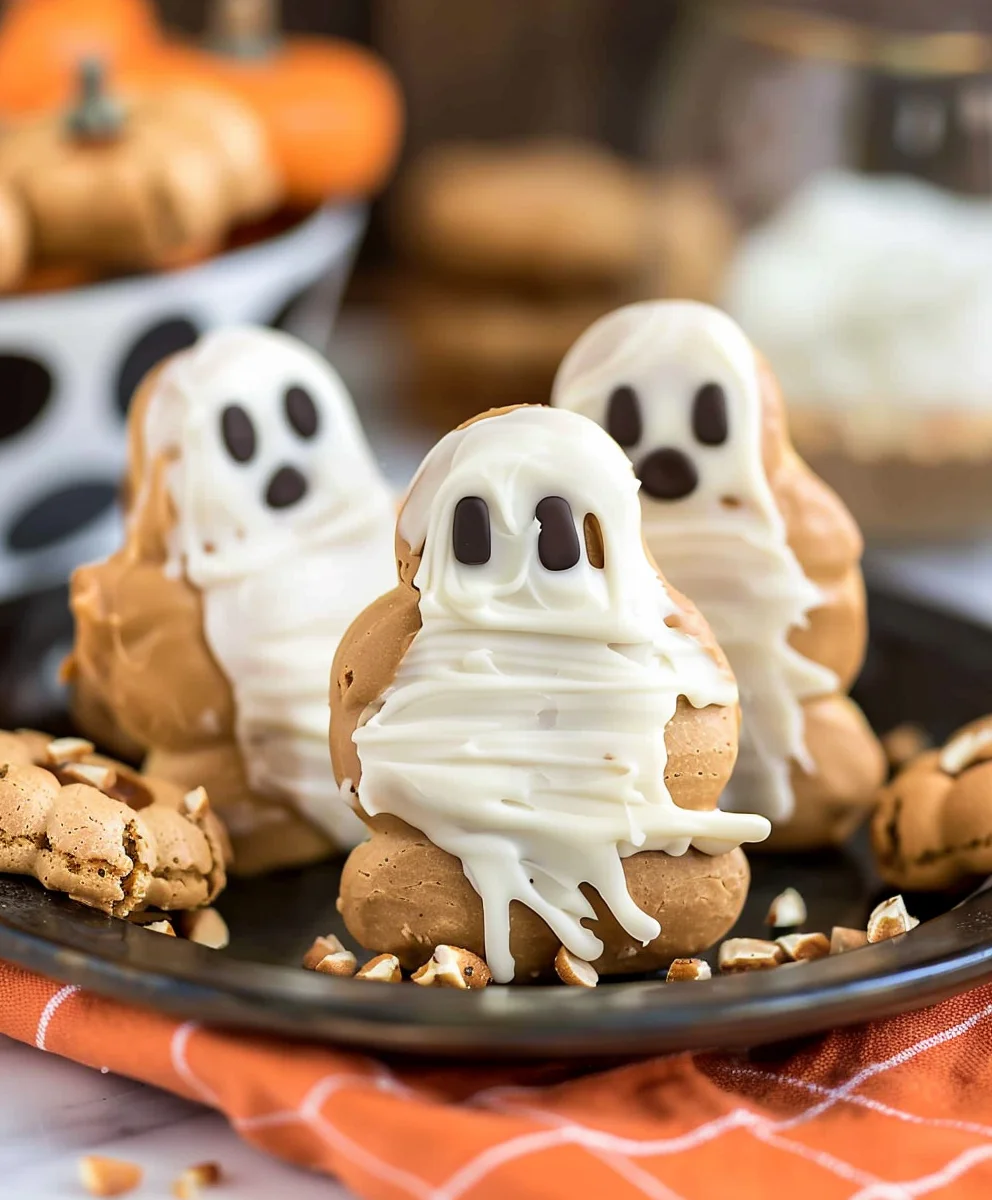
Nutty Nutter Butter Ghosts – these delightful little spooks are not just a treat for the eyes, but an absolutely fantastic way to embrace the spirit of the Halloween season! I absolutely adore how effortlessly these come together, transforming simple, beloved ingredients into something truly enchanting and memorable. While they may not boast centuries of culinary history, their cultural significance shines brightest during autumn festivities, serving as the perfect playful addition to any spooky gathering or a wonderfully engaging activity for a chilly afternoon.
People absolutely love this dish not only for its undeniable cuteness but for the irresistible combination of creamy peanut butter and crunchy cookie, all cloaked in a sweet white chocolate shell.
This creates a textural sensation that is simply divine and deeply satisfying. Beyond the incredible taste, their undeniable charm and the sheer ease with which even young chefs can help assemble them make these
Nutty Nutter Butter Ghosts
a cherished and eagerly anticipated family tradition each year. They are a true testament to how simple ingredients can bring immense joy and create lasting memories.

Ingredients:
- One (1) 16-ounce package Nutter Butter cookies: These are the delightful peanut butter sandwich cookies that will form the body of our charming “Nutty Nutter Butter Ghosts.” Their distinctive shape and irresistible peanut flavor are absolutely perfect for this fun project. Make sure you have enough, as these tend to disappear quickly even before decorating!
- Two (2) 12-ounce bags good quality white candy melts or white chocolate chips: For creating that classic ghostly white exterior. Candy melts are often easier to work with as they melt smoothly and set firmly, but good quality white chocolate chips (like Ghirardelli or Guittard) also work wonderfully. If using white chocolate, a touch of shortening or coconut oil might be needed to achieve the right dipping consistency.
- One (1) tablespoon shortening or coconut oil (optional, for thinning chocolate): This is your secret weapon if your white chocolate or candy melts are too thick for smooth dipping. Just a little bit, melted in, can make a huge difference in achieving a perfectly smooth, even coat for your “Nutty Nutter Butter Ghosts.”
- One (1) 4-ounce bag mini chocolate chips: These will become the adorable, haunting eyes of our ghosts. Mini chips are ideal because their size is just right for creating expressive little peepers without overwhelming the cookie.
- One (1) tablespoon regular chocolate chips or dark candy melts (for piping mouths, optional): If you want to give your “Nutty Nutter Butter Ghosts” little mouths, a small amount of dark chocolate will do the trick. You can melt this down and use a piping bag with a tiny hole, or even a toothpick for detail work. Alternatively, a food-safe black marker can also be used if you prefer.
- 1/4 cup finely crushed roasted peanuts (optional, for extra nutty flavor): To truly lean into the “Nutty” part of our “Nutty Nutter Butter Ghosts,” you can sprinkle a little of this over the wet white chocolate before it sets. It adds a lovely texture and an intensified peanut flavor that complements the Nutter Butter cookies beautifully.
- Parchment paper or wax paper: Essential for preventing your dipped ghosts from sticking to your work surface as they set. Line your baking sheets with this for easy cleanup and removal.
- Baking sheets or large plates: To hold your parchment-lined paper and provide a flat surface for your ghosts to cool and set.
- A deep, microwave-safe bowl or double boiler: For melting your white candy melts or chocolate. A deeper bowl helps ensure the entire cookie can be submerged easily.
- A fork or dipping tools: For handling the cookies during dipping. Dipping tools designed for candy making can be very helpful, but a simple dinner fork will work just as well in a pinch.
- Toothpicks or a small paintbrush: For applying the eyes and, if desired, drawing the mouths.
Preparing Your Workspace for Ghostly Creations:
Before we even think about melting chocolate or dipping our delightful Nutter Butter cookies, it’s crucial to set up a smooth and efficient workspace. Trust me, a little preparation goes a long way in ensuring your “Nutty Nutter Butter Ghosts” come out looking spectacular and your stress levels stay low! First things first, gather all of your ingredients and tools. I like to lay everything out on my counter so I can easily grab what I need.
Next, grab a couple of baking sheets or large platters. Line these generously with parchment paper or wax paper. This is absolutely essential because as your gorgeous white chocolate-covered cookies set, they will lift right off the paper without sticking, preserving their perfect ghostly shape. You’ll need enough space to lay out all your dipped cookies in a single layer without them touching each other, as they will fuse together if they bump while still wet. If you’re planning to make a large batch of “Nutty Nutter Butter Ghosts,” prepare several lined sheets and clear some space in your refrigerator or a cool area where they can set quickly.
I also like to have a small bowl ready for my mini chocolate chips, and if I’m using them, another small bowl for the crushed peanuts. This keeps everything organized and makes the decorating step much more fluid. You’ll thank yourself later when you’re not scrambling for supplies with chocolate-covered fingers! Remember, we’re aiming for a fun, not frantic, baking experience.
Mastering the Melt: White Chocolate Dipping Perfection
This step is arguably the most crucial for achieving beautifully smooth “Nutty Nutter Butter Ghosts.” Getting the white candy melts or chocolate to the perfect consistency is key to a flawless coating. I generally prefer candy melts for ease of use, as they are formulated to melt smoothly and set quickly without tempering. However, if you’re using white chocolate chips, good quality ones will yield a richer flavor.
Using the Microwave Method:
If you’re using the microwave, which is my go-to for speed and convenience, pour your white candy melts or white chocolate chips into a deep, microwave-safe bowl. A deep bowl is important because it allows you to fully submerge the Nutter Butter cookie without making a huge mess. Start by microwaving on 50% power for 30-second intervals. After each interval, stir the melts thoroughly, even if they don’t look completely melted. Residual heat will continue to melt the chips as you stir.
Stirring is vital to prevent scorching and to ensure even melting. Continue this process, reducing the time to 15-second intervals as the chocolate becomes more liquid. It’s much better to go slow and steady than to overheat the chocolate, which can make it seize and become unusable. You’ll know it’s ready when it’s completely smooth, lump-free, and has a fluid consistency that coats the back of a spoon without being too thick or too thin.
Using a Double Boiler Method:
If you prefer the stovetop, a double boiler is an excellent option for controlled melting. Fill a saucepan with about an inch or two of water and bring it to a gentle simmer. Place a heat-proof bowl (glass or metal) over the saucepan, ensuring the bottom of the bowl does not touch the simmering water. Add your white candy melts or chocolate chips to the top bowl. The steam from the simmering water will gently heat the bowl, melting the chocolate. Stir constantly with a clean, dry spatula until the chocolate is completely smooth and melted. Again, patience is key here to avoid scorching.
Achieving the Perfect Consistency:
Once your white chocolate or candy melts are fully melted, assess the consistency. If it seems too thick, especially if you’re using white chocolate chips, this is where your optional shortening or coconut oil comes in. Add it in small increments (about half a teaspoon at a time) and stir thoroughly until fully incorporated. You’re looking for a consistency that allows the Nutter Butter cookie to be fully coated smoothly, with any excess chocolate dripping off relatively quickly. A too-thick coating will be clumpy and detract from the ghostly appearance, while a too-thin coating won’t provide full coverage. Aim for something like a warm, thick honey or a slightly thinner yogurt.
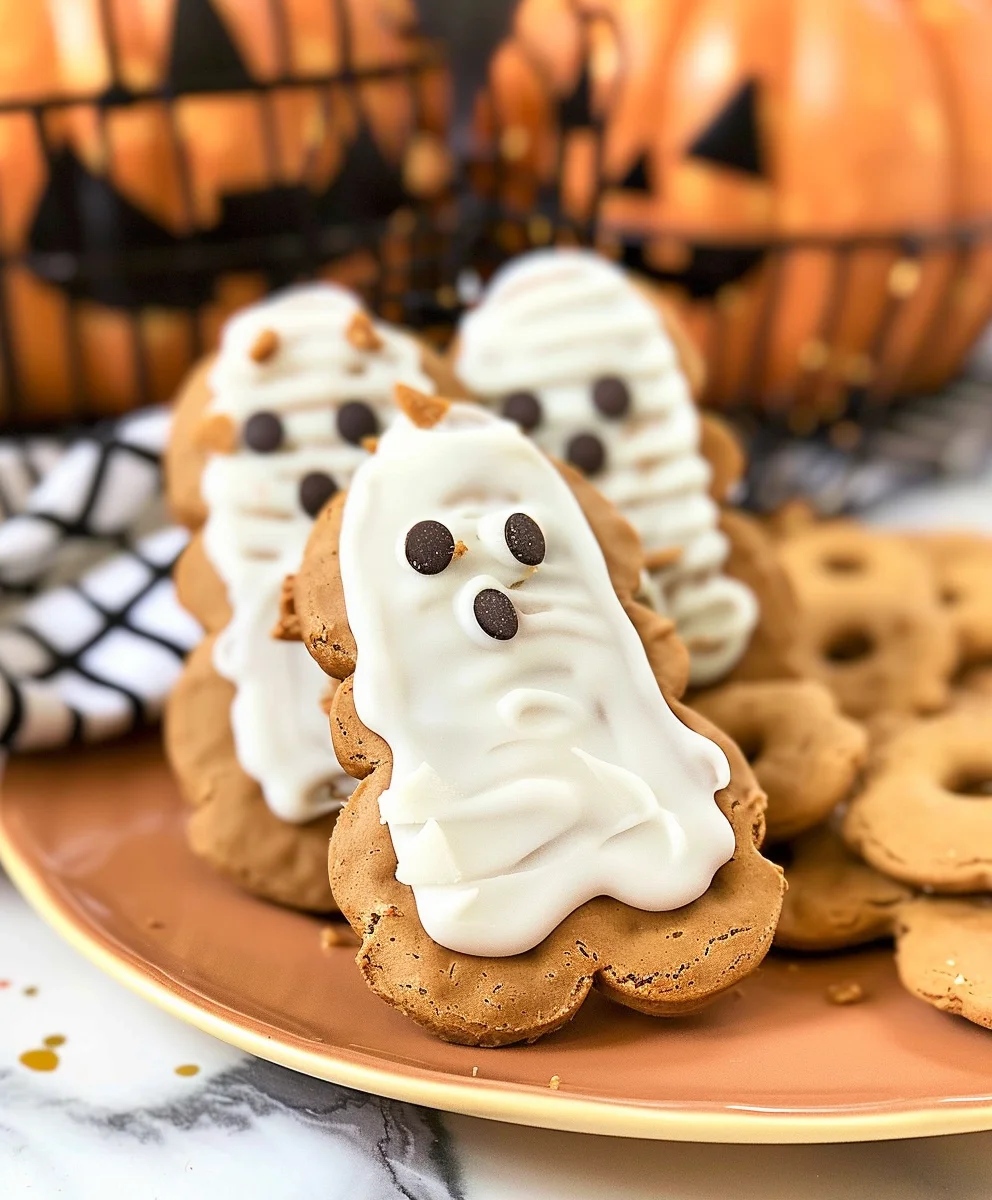
Dipping and Decorating Your “Nutty Nutter Butter Ghosts”:
Now for the fun part – transforming those delicious Nutter Butter cookies into adorable, spooky “Nutty Nutter Butter Ghosts”! This is where the magic really happens, so let’s get dipping and decorating.
- The Dipping Dance: Carefully pick up a Nutter Butter cookie. I find that holding it by one end with my fingers works best for initial dipping, but you can also use a fork or a specialized dipping tool. Gently submerge the entire cookie into your melted white candy melts or chocolate. Make sure it’s fully coated. Lift the cookie out slowly, allowing any excess chocolate to drip back into the bowl. You can gently tap your wrist against the side of the bowl or use a fork to help shake off the extra chocolate, ensuring a smooth, even layer. This creates that wonderfully ethereal, flowing ghost shape we’re aiming for.
- Placing Your Ghost: As soon as the excess chocolate has dripped off, carefully transfer the coated cookie onto your parchment-lined baking sheet. Leave a little space between each cookie to prevent them from sticking together as they set. You’ll want to work relatively quickly here, as the chocolate will start to set.
- Bringing Your Ghosts to Life with Eyes: While the white chocolate is still wet and tacky, immediately grab two mini chocolate chips for each ghost. Place them carefully onto the upper third of the cookie, pointy side down, to create the eyes. The wet chocolate will act as an adhesive. You can use a toothpick or a small pair of clean tweezers to precisely place the mini chips. Take your time to ensure the eyes are symmetrical and give your “Nutty Nutter Butter Ghosts” their unique personalities! Some might look surprised, others mischievous.
- Optional: Adding a “Nutty” Boost: If you’re going for that extra “Nutty” punch, this is the moment to sprinkle a pinch of your finely crushed roasted peanuts over the still-wet white chocolate. Focus on the bottom half of the ghost for a nice textural contrast, or sparingly over the entire body if you like. This will really highlight the “Nutty Nutter Butter Ghosts” name and add a fantastic crunch.
- Setting the Ghosts: Once you’ve dipped and decorated a full baking sheet of “Nutty Nutter Butter Ghosts,” gently transfer the sheet to a cool place to allow the chocolate to set completely. This could be your refrigerator (for about 10-15 minutes) or simply a cool spot on your counter (which might take 30-60 minutes, depending on your room temperature and humidity). The chocolate should be firm to the touch before you attempt to move them.
- Optional: Giving Your Ghosts a Mouth: If you want to add mouths, melt your tablespoon of regular chocolate chips or dark candy melts. You can do this in a tiny bowl in the microwave or a makeshift double boiler. Transfer the melted dark chocolate to a small piping bag with a very tiny hole cut at the tip, or simply use a toothpick or a very fine-tipped clean paintbrush. Once your white chocolate ghosts are completely set, carefully draw on little “O” mouths, wavy mouths, or even surprised expressions below the eyes. This step adds an extra layer of character to your “Nutty Nutter Butter Ghosts”!
- Repeat and Enjoy: Continue this process, dipping, decorating, and setting, until you’ve transformed all your Nutter Butter cookies into your delightful “Nutty Nutter Butter Ghosts.”
Tips, Tricks, and Enhancements for Your “Nutty Nutter Butter Ghosts”:
Making these “Nutty Nutter Butter Ghosts” is incredibly fun, but a few insider tips can elevate your experience and ensure your treats are nothing short of spectacular.
Troubleshooting Common Chocolate Issues:
- Thickening Chocolate: If your white chocolate or candy melts start to thicken as you’re working, especially if you’re taking your time, gently reheat it. Pop it back in the microwave for 10-15 second bursts, stirring well after each. Alternatively, you can place your bowl back over a very low double boiler. Remember to add a tiny bit more shortening or coconut oil if needed to maintain that smooth, dippable consistency.
- Seized Chocolate: This is when your chocolate becomes a clumpy, unusable mess. It usually happens if it gets too hot or if even a tiny drop of water gets into it. Unfortunately, seized chocolate is very difficult to rescue. The best prevention is careful, slow melting and ensuring all your tools and bowls are completely dry.
Enhancing the Nutty Flavor:
Since we’re making “Nutty Nutter Butter Ghosts,” why not lean into that incredible peanut butter flavor even more?
- Crushed Peanut Power: As mentioned in the main instructions, sprinkling finely crushed roasted peanuts over the wet chocolate adds a wonderful crunch and a burst of concentrated peanut flavor. You can even mix a small amount (1-2 tablespoons per bag of melts) of very finely ground peanuts directly into your melted white chocolate for a subtle, integrated nutty taste, just be mindful it might slightly alter the smoothness of your coating.
- Peanut Butter Drizzle: For the ultimate peanut butter lover, after your white chocolate has fully set, you could drizzle a thin layer of melted peanut butter over the ghosts. Just warm a couple of tablespoons of creamy peanut butter in the microwave for 15-20 seconds until it’s pourable, then drizzle it with a fork or a piping bag.
Perfecting Your Ghostly Appearance:
- Smooth Edges: To get that perfect, slightly wavy ghost bottom, once you dip the cookie, gently drag the bottom edge against the rim of your bowl as you lift it out. This helps remove excess chocolate and creates a clean, slightly rounded base.
- Expressive Eyes: Don’t be afraid to experiment with the placement of the mini chocolate chip eyes. Close together for a surprised look, wider apart for a more bewildered ghost. You can even use different sizes of sprinkles or small candy eyes for variation.
- Mouth Masterclass: For mouths, if you don’t have a piping bag, a simple Ziploc bag with a tiny corner snipped off works wonders. Practice drawing a few mouths on a piece of parchment paper first to get the hang of it. You can create “O” mouths, little “U” shapes for friendly ghosts, or even zig-zags for spooky ones.
Storage and Gifting Your “Nutty Nutter Butter Ghosts”:
- Proper Storage: Once your “Nutty Nutter Butter Ghosts” are completely set, store them in an airtight container at room temperature. If your kitchen is very warm, you can store them in the refrigerator, but let them come to room temperature for about 10-15 minutes before serving for the best texture and flavor. They should stay fresh and delicious for up to 1-2 weeks.
- Gifting Ideas: These make fantastic homemade gifts or party favors! Stack them in clear cellophane bags tied with festive ribbons, or arrange them artfully in a decorative box. They’re sure to bring smiles to anyone who receives them.
Making Ahead and Party Planning:
These “Nutty Nutter Butter Ghosts” are absolutely perfect for making ahead, which is a huge advantage when you’re preparing for a party or a special event. You can easily make them a few days in advance and store them as described above. This allows you to focus on other party preparations on the day of your event, reducing stress and ensuring you have a beautifully presented treat ready to go. They are always a crowd-pleaser and disappear quickly, so consider making an extra batch!
Involving the Family:
This recipe is fantastic for getting kids involved in the kitchen! The dipping and decorating stages are particularly fun for little hands (with adult supervision, especially around melted chocolate). It’s a wonderful way to create lasting memories while making delicious, edible art.
I genuinely hope these detailed instructions and helpful tips inspire you to create the most delightful and spooky “Nutty Nutter Butter Ghosts” that will enchant everyone who tries them. Happy decorating, and enjoy your delicious, peanut buttery treats!
Conclusion:
So there you have it, folks! We’ve journeyed through the simple steps to create a treat that’s more than just a snack; it’s an experience. If you’re looking for a dessert that’s guaranteed to bring smiles, spark joy, and disappear faster than a ghost in a haunted house, then our recipe for Nutty Nutter Butter Ghosts is an absolute must-try. I genuinely believe this recipe stands out because it perfectly marries delightful simplicity with incredible flavor. You’re not just making a dessert; you’re crafting a memory, a conversation starter, and a true crowd-pleaser that appeals to all ages. The crunchy, peanut-buttery goodness of the Nutter Butter cookie, encased in a smooth, creamy white chocolate shell, and finished with those adorable, spooky eyes – it’s a symphony of textures and tastes that truly delights. It’s sweet, it’s salty, it’s crunchy, it’s smooth, and it offers that satisfying melt-in-your-mouth quality that keeps everyone coming back for more. What I love most about these particular treats is how they defy the stereotype of complex baking. You don’t need a pastry chef’s skills or a fully equipped professional kitchen to achieve spectacular results. This is a recipe designed for success, for fun, and for pure, unadulterated deliciousness. It’s the kind of project that feels rewarding without feeling like a chore, making it perfect for last-minute party preparations or just a fun afternoon activity with the kids. The visual appeal alone is enough to make them a centerpiece on any dessert table, and the taste truly delivers on that promise of delightful indulgence. Seriously, once you taste that combination of rich peanut butter and sweet white chocolate, you’ll understand why these are so incredibly special.
Now that you’ve mastered the art of creating these delightful ghoulish goodies, let’s talk about how to present and personalize them! For serving, I absolutely adore arranging a platter of these Nutty Nutter Butter Ghosts alongside a steaming mug of hot chocolate or a tall glass of cold milk. The combination is simply unbeatable, especially on a chilly evening. You could also individually wrap them in clear cellophane bags with a festive ribbon – they make fantastic party favors or treats to hand out to trick-or-treaters (if you’re feeling extra generous and want to impress!). Imagine the smiles when kids receive a homemade ghost instead of a generic candy bar! For a more adult gathering, consider serving them with a robust coffee or even a sweet dessert wine; the creamy white chocolate pairs surprisingly well with a variety of beverages. Don’t be afraid to experiment with your presentation. A dark-colored serving tray can really make the white ghosts pop, creating a dramatic and eye-catching display.
And when it comes to variations, the sky’s the limit for your creative spirit! While the classic white chocolate is incredibly charming, why not try dipping some of your ghosts in milk or dark chocolate for a delicious contrast? You could even do a half-dip in each for a marbled effect. Instead of just plain candy eyes, look for different expressions or colors to give each ghost a unique personality – some can be goofy, some spooky, some surprised! A fun idea is to use edible food markers to draw tiny mouths or eyebrows after the chocolate has set, adding another layer of character. Consider a sprinkle of Halloween-themed nonpareils or colored sugar on the wet chocolate coating before it sets for an extra touch of sparkle and crunch. If you’re feeling adventurous, you could even mix a tiny bit of food coloring into a small portion of melted white chocolate to create pastel ghosts (think pink, purple, or green!) for a whimsical touch, perfect for a non-Halloween themed party or just for fun. For those with dietary considerations, while the Nutter Butter cookie is key to the texture, you might explore gluten-free peanut butter sandwich cookies as a base, ensuring everyone can enjoy these spooky treats. The core method remains the same, allowing for endless customization and personalization.
So, what are you waiting for? I wholeheartedly encourage you to roll up your sleeves, gather your ingredients, and dive into the delightful process of creating your very own batch of these incredible ghosts. Trust me, the satisfaction of seeing these cute, delicious treats come to life is immense, and the joy they bring to those who taste them is even greater. This isn’t just a recipe; it’s an invitation to create, to share, and to indulge in a little bit of magic. And once you’ve made them, I would absolutely love to hear all about your experience! Did you stick to the classic design, or did you get creative with your decorations? What kind of reactions did you get from your friends and family? Share your triumphs, your tips, and even your funny anecdotes from the kitchen. Your insights are invaluable and help our community grow and inspire each other. Please, don’t hesitate to snap a photo of your finished treats and share them on your favorite social media platforms, tagging us or using a relevant hashtag so I can see your amazing creations! There’s nothing more rewarding for me than seeing your success and knowing that this recipe brought a little extra sweetness and fun into your home. So go on, give these Nutty Nutter Butter Ghosts a try – I promise, you won’t regret it! Happy baking, and happy feasting!
Nutty Nutter Butter Ghosts
These delightful Nutter Butter Ghosts are an effortless, spooky, and sweet Halloween treat. Beloved for their irresistible combination of peanut butter cookie and white chocolate, they are easy to make and perfect for any autumn gathering or family activity.
Ingredients
-
12 Nutter Butter cookies
-
1 cup white candy melts
-
24 candy eyeballs
-
12 mini chocolate chips (for mouths, optional)
-
Parchment paper
-
Baking sheets
-
Dipping tools (fork, toothpicks)
Instructions
-
Step 1
Prepare your workspace: Line baking sheets with parchment paper. Gather all ingredients and tools. -
Step 2
Melt white candy melts: Place white candy melts in a deep, microwave-safe bowl. Microwave on 50% power in 30-second intervals, stirring thoroughly after each, until smooth and fluid. Alternatively, use a double boiler. -
Step 3
Dip cookies: Hold a Nutter Butter cookie and fully submerge it in the melted white chocolate. Lift, gently tapping to allow excess chocolate to drip off, ensuring a smooth, even coating. -
Step 4
Decorate eyes: While the white chocolate is still wet, immediately place two candy eyeballs onto the upper third of each dipped cookie to create eyes. -
Step 5
Set ghosts: Carefully transfer the dipped and decorated cookie to the parchment-lined baking sheet. Repeat for all cookies, leaving space between each. Place the sheets in a cool area or refrigerator for 10-15 minutes until the chocolate is completely set. -
Step 6
Add mouths (optional): Melt the mini chocolate chips. Using a toothpick or small piping bag, carefully draw little mouths onto the set ghosts. -
Step 7
Store: Once fully set, store your Nutty Nutter Butter Ghosts in an airtight container at room temperature for up to 1-2 weeks. If your kitchen is warm, refrigerate and bring to room temperature before serving.
Important Information
Nutrition Facts (Per Serving)
It is important to consider this information as approximate and not to use it as definitive health advice.
Allergy Information
Please check ingredients for potential allergens and consult a health professional if in doubt.