Peanut Butter Spider Cookies
Peanut Butter Spider Cookies: Just the name conjures up images of spooky fun, doesn’t it? But these aren’t your average Halloween treat; they’re a delightful blend of creamy peanut butter, chewy cookie goodness, and delightfully creepy spider decorations that both kids and adults adore. I’ve been making these Peanut Butter Spider Cookies for years, and they’re always a huge hit at every gathering, from casual family get-togethers to elaborate Halloween parties.
While the precise origin of spider-shaped cookies is difficult to pinpoint, the combination of peanut butter and cookies is a classic American treat, deeply rooted in our love for simple, satisfying desserts. Peanut butter’s rich, nutty flavor and creamy texture have captivated generations, and its versatility makes it a perfect base for countless baked goods. These cookies take that beloved flavor profile and add a fun, festive twist, perfect for autumn and Halloween celebrations.
What makes these Peanut Butter Spider Cookies so irresistible? It’s the perfect balance of flavors and textures. The cookies themselves are delightfully chewy, with a deep peanut butter flavor that isn’t overly sweet. The addition of the pretzel stick legs adds a satisfying salty crunch that complements the sweetness perfectly. And let’s be honest, the adorable (and slightly spooky!) spider decorations are the icing on the cake – or rather, the cookie!
So, whether you’re a seasoned baker or a kitchen novice, get ready to unleash your inner artist and create a batch of these enchanting treats. This recipe is surprisingly simple, requiring minimal ingredients and even less time. Let’s get baking!

Ingredients:
- 1 cup (2 sticks) unsalted butter, softened
- 1 ½ cups granulated sugar
- 1 cup packed light brown sugar
- 2 large eggs
- 2 teaspoons vanilla extract
- 3 cups all-purpose flour
- 1 teaspoon baking soda
- 1 teaspoon salt
- 1 cup creamy peanut butter
- 1 cup semi-sweet chocolate chips
- Miniature chocolate chips (for spider eyes)
- Black decorating icing (or melted dark chocolate)
Preparing the Cookie Dough
- First, I preheat my oven to 375°F (190°C) and line two baking sheets with parchment paper. This is crucial for easy cleanup and prevents sticking.
- In a large bowl, I cream together the softened butter, granulated sugar, and brown sugar until the mixture is light and fluffy. I use an electric mixer for this step; it makes it so much easier and faster. Don’t rush this part! The more air you incorporate, the lighter and fluffier your cookies will be.
- Next, I beat in the eggs one at a time, then stir in the vanilla extract. Make sure everything is well combined before moving on to the next step.
- In a separate bowl, I whisk together the flour, baking soda, and salt. This ensures that the leavening agent is evenly distributed throughout the dough.
- Gradually add the dry ingredients to the wet ingredients, mixing on low speed until just combined. Be careful not to overmix; overmixing can lead to tough cookies.
- Now for the peanut butter! I stir in the cup of creamy peanut butter until it’s evenly distributed throughout the cookie dough. I love the extra nutty flavor and texture it adds.
- Finally, I fold in the semi-sweet chocolate chips. I try to distribute them evenly, but a few extra chocolate chips in some cookies is always a welcome surprise!
Scooping and Baking the Cookies
- Using a cookie scoop or a spoon, I drop rounded tablespoons of cookie dough onto the prepared baking sheets, leaving about 2 inches between each cookie. This gives them enough room to spread out while baking.
- I bake the cookies for 9-11 minutes, or until the edges are golden brown and the centers are still slightly soft. Oven temperatures can vary, so keep a close eye on them and adjust baking time as needed. I usually start checking them around the 9-minute mark.
- Once baked, I carefully remove the baking sheets from the oven and let the cookies cool on the sheets for a few minutes before transferring them to a wire rack to cool completely. This prevents them from becoming soggy.
Decorating the Spider Cookies
- Once the cookies are completely cool, it’s time for the fun part – decorating! I start by carefully placing two miniature chocolate chips onto each cookie to create the spider’s eyes. I like to position them close together, like a real spider’s eyes.
- Next, I use the black decorating icing (or melted dark chocolate) to create the spider’s legs. I pipe eight thin lines extending from the eyes, creating a spider-like shape. If using melted chocolate, I use a toothpick or a piping bag with a small tip for precision.
- For extra flair, I sometimes add a tiny drop of icing or melted chocolate in the center of the spider’s body to make it look more defined. It’s a small detail, but it makes a big difference!
- Tip: If the icing is too thick, you can thin it out with a little bit of water. If it’s too thin, you can add a little more powdered sugar.
- Allow the icing to set completely before serving or storing the cookies. This usually takes about 15-20 minutes, depending on the humidity.
Storage
- Once completely cool and decorated, I store my Peanut Butter Spider Cookies in an airtight container at room temperature for up to a week. They’re best enjoyed fresh, but they’ll still be delicious for a few days.
- For longer storage, you can freeze the undecorated cookies for up to 3 months. Thaw them completely before decorating.
Conclusion:
So there you have it – my recipe for incredibly delicious Peanut Butter Spider Cookies! I truly believe this recipe is a must-try for several reasons. First, the flavor combination is simply irresistible. The rich, nutty peanut butter base perfectly complements the sweet and slightly tart candy coating, creating a delightful balance that will leave you wanting more. Second, these cookies are incredibly easy to make, even for beginner bakers. The straightforward instructions and readily available ingredients mean you can whip up a batch in no time at all, perfect for a quick treat or a fun baking project with the kids.
Third, and perhaps most importantly, these Peanut Butter Spider Cookies are incredibly versatile. They’re perfect for Halloween, of course, but their appealing appearance and delicious taste make them suitable for any occasion. Need a treat for a school bake sale? These cookies are a guaranteed hit. Planning a casual get-together with friends? They’re the perfect addition to your spread. And let’s not forget the sheer fun of decorating them – it’s a wonderfully engaging activity for all ages!
Serving Suggestions & Variations:
While the recipe provides a classic approach, feel free to experiment and make these cookies your own! I love serving them with a tall glass of cold milk, but they also pair wonderfully with a cup of hot cocoa or even a strong, dark coffee. For a more intense peanut butter flavor, consider adding a teaspoon of peanut butter extract to the dough. If you want to add a touch of chocolate, try dipping the finished cookies in melted dark chocolate before adding the candy spider legs. You could also get creative with the candy decorations – use different colored candies to create colorful spiders, or even add sprinkles for extra flair. For a festive twist, try using red and green candies around Christmas time!
Another fun variation is to use different types of peanut butter. Creamy peanut butter will give you a smoother cookie, while crunchy peanut butter will add a delightful textural element. You can even experiment with other nut butters, such as almond butter or cashew butter, to create unique flavor profiles. Just remember to adjust the amount of liquid in the dough as needed, depending on the type of nut butter you choose. The possibilities are truly endless!
Don’t be afraid to get creative and personalize these Peanut Butter Spider Cookies to your liking. The beauty of baking is in the experimentation, and I encourage you to try different variations and find your perfect combination of flavors and textures.
Give it a Try and Share Your Experience!
I sincerely hope you enjoy making and eating these Peanut Butter Spider Cookies as much as I do. They’re a guaranteed crowd-pleaser, and I’m confident they’ll become a new favorite in your household. Once you’ve tried the recipe, I’d love to hear about your experience! Share your photos and feedback on social media using the hashtag #PeanutButterSpiderCookies – I can’t wait to see your delicious creations! Let’s connect and share our baking adventures together. Happy baking!
Remember, even small changes can make a big difference, so don’t hesitate to experiment and find what works best for you. These Peanut Butter Spider Cookies are a testament to the joy of baking and the delicious possibilities that arise when we combine simple ingredients with a little creativity. So, gather your ingredients, put on your apron, and get ready to create some spooky-delicious treats! You won’t regret it.
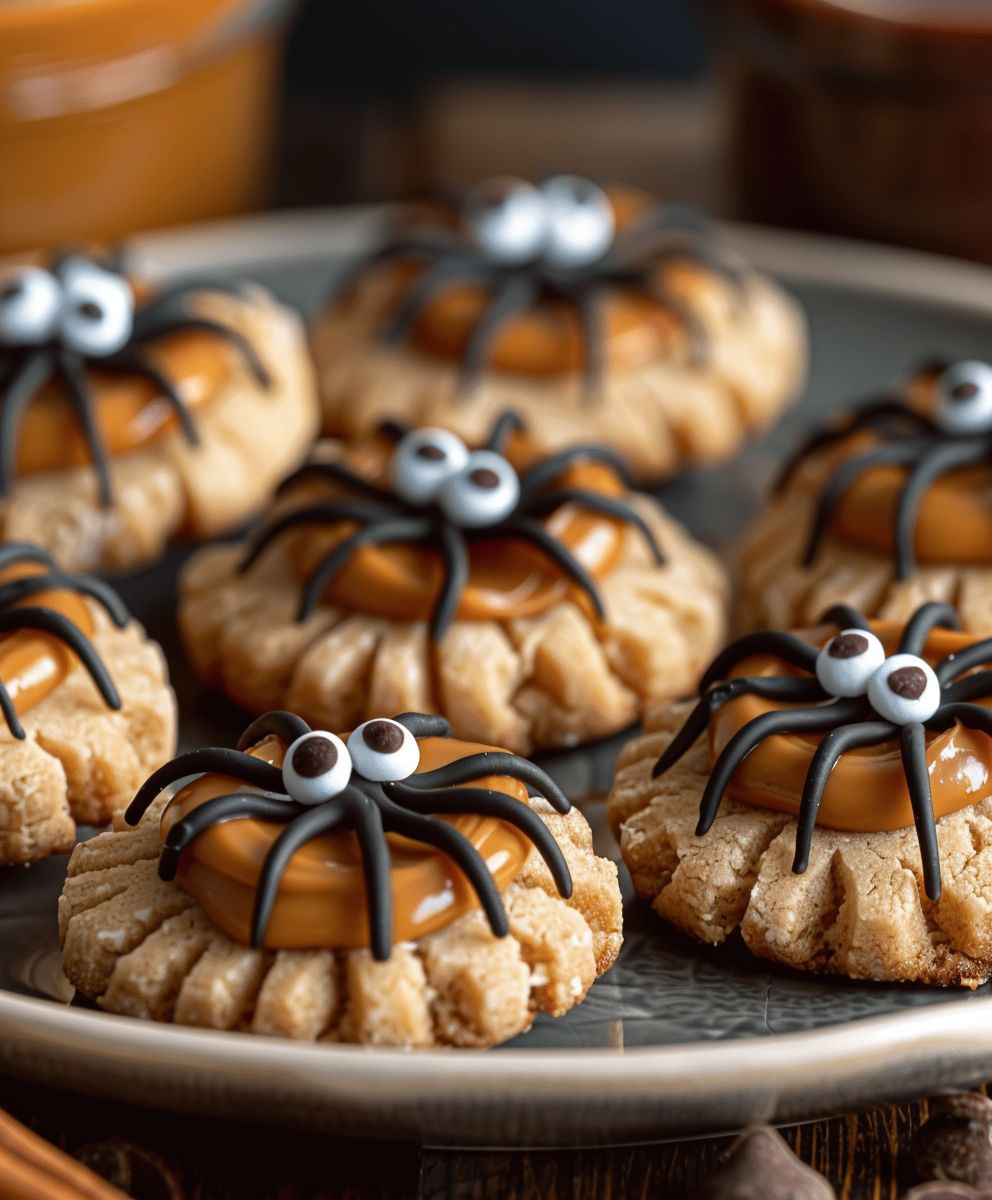
Peanut Butter Spider Cookies: A Spooky Halloween Treat
Chewy peanut butter cookies decorated as spooky spiders for Halloween.
Ingredients
Instructions
Recipe Notes
- Don’t rush creaming the butter and sugars – it’s key to fluffy cookies!
- Oven temperatures vary; adjust baking time as needed.
- If icing is too thick, thin with water; if too thin, add powdered sugar.
- Store cookies in an airtight container at room temperature for up to a week. Undecorated cookies can be frozen for up to 3 months.