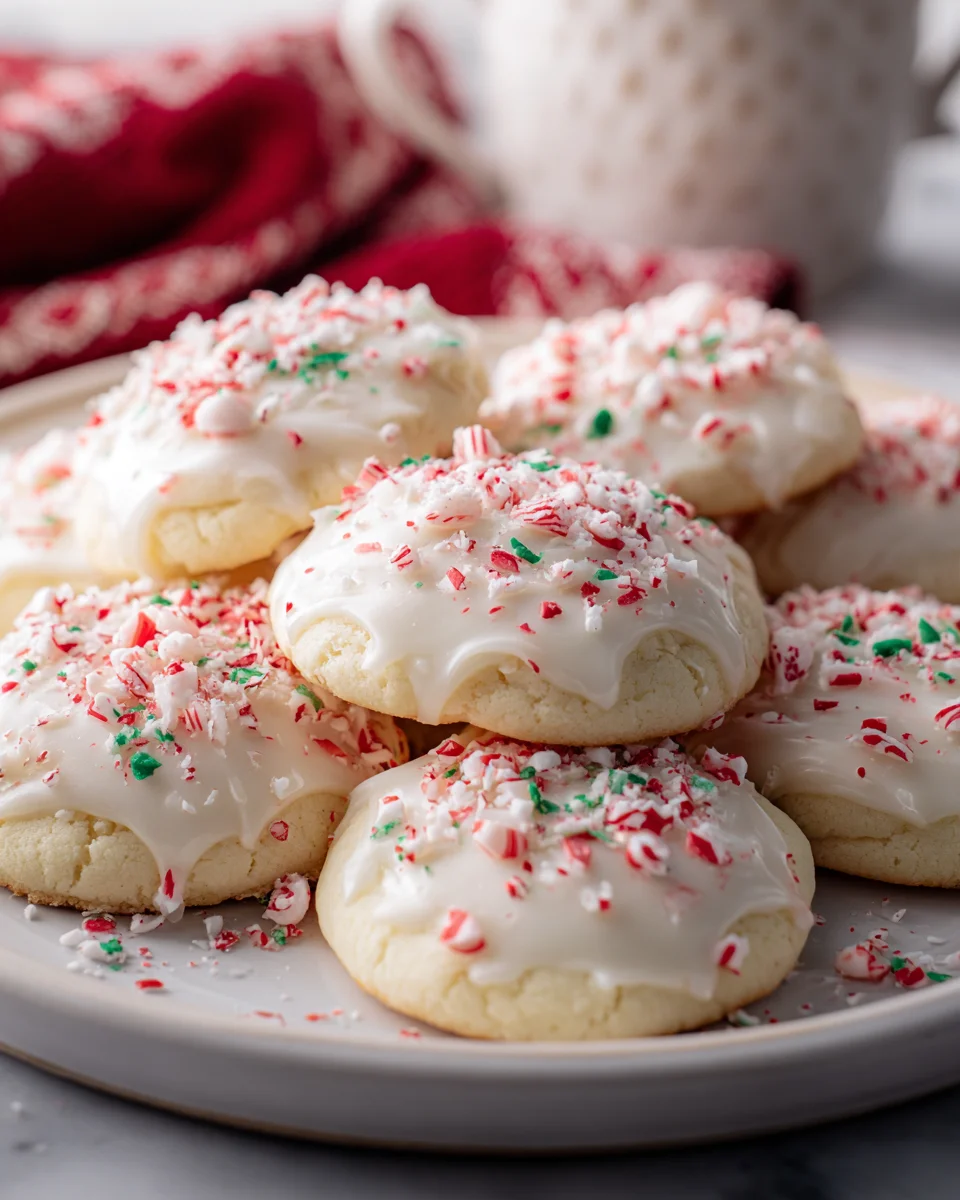
Peppermint Meltaway Cookies Holiday Recipe
There’s just something magical about the holidays, isn’t there? For me, it’s all about creating those warm, cozy moments, and often, those moments involve a plate of delicious, festive cookies. And let me tell you, this Peppermint Meltaway Cookies Holiday Recipe is about to become your new holiday obsession! What makes these cookies so special, you ask? It’s all in the name – they literally melt away in your mouth, leaving behind a delightful burst of cool, refreshing peppermint.
I absolutely adore making these every year because they truly capture the spirit of the season. Imagine a buttery, tender cookie that’s incredibly light, infused with just the right amount of peppermint, and often adorned with a sprinkle of festive crushed candy canes. They’re visually stunning and taste even better! You’ll love how simple they are to whip up, making them perfect for last-minute holiday baking, cookie exchanges, or just a sweet treat for your family. They’re a guaranteed crowd-pleaser and will have everyone asking for the recipe. Trust me, once you try these melt-in-your-mouth peppermint wonders, they’ll become a beloved tradition in your own home too!

Ingredient Notes
Oh, the magic of baking these Peppermint Meltaway Cookies starts with a few simple yet crucial ingredients. Getting these right is key to that delightful, melt-in-your-mouth texture we’re all after this holiday season!
- Unsalted Butter (softened): This is the foundation of our cookies. Using unsalted butter gives us control over the salt content, and making sure it’s properly softened (not melted!) is vital for creaming with the sugar. It creates air pockets, leading to a light, tender crumb. If you’re looking for a dairy-free option, good quality vegan butter sticks work wonderfully here – just ensure they’re softened to room temperature just like regular butter.
- Powdered Sugar (Confectioners’ Sugar): This is where the “meltaway” truly comes from! Unlike granulated sugar, powdered sugar dissolves beautifully, contributing to that incredibly tender, almost crumbly texture that melts on your tongue. There isn’t really a substitute for powdered sugar in this recipe; it’s essential for the unique consistency.
- All-Purpose Flour: Our main dry ingredient. I always recommend spooning your flour into the measuring cup and leveling it off with a straight edge to avoid packing too much in, which can make your cookies tough. For my gluten-free friends, a good quality 1:1 gluten-free all-purpose flour blend (one that includes xanthan gum) can be used. Just be mindful not to overmix the dough once the flour is added.
- Cornstarch: This is our secret weapon for the “meltaway” effect! A small amount of cornstarch significantly tenderizes the cookies, making them incredibly soft and giving them that signature texture. Don’t skip it! There’s no direct substitute that provides the same exact tenderizing effect, so I truly encourage using it.
- Peppermint Extract: The star flavor of our holiday cookies! Use a good quality pure peppermint extract for the best, brightest flavor. Avoid mint extracts, which can sometimes have a toothpaste-like taste. If you prefer to use peppermint oil, remember it’s much more potent, so you’ll want to use about half the amount the recipe calls for, or even less, and adjust to your taste.
- Red Food Coloring (optional): For that festive swirl! I often use gel food coloring because it provides a vibrant color without adding much liquid to the dough. You can easily opt for natural food colorings if you prefer, or simply skip it for beautifully plain white meltaways.
- Crushed Candy Canes: My absolute favorite topping for these holiday delights! The crunchy texture and extra burst of peppermint are just perfect. If candy canes aren’t available or you prefer something else, peppermint sprinkles, coarse sparkling sugar, or even a dusting of extra powdered sugar can make a lovely finish.
Step-by-Step Instructions
Let’s get baking! Crafting these Peppermint Meltaway Cookies is a joyful process, and I’ll walk you through each step to ensure your cookies turn out perfectly tender and delicious.
- Preparation is Key: First things first, preheat your oven to 350°F (175°C). Line two baking sheets with parchment paper or silicone baking mats. This prevents sticking and helps with even baking, making cleanup a breeze.
- Cream the Butter and Sugar: In a large mixing bowl, using an electric mixer, beat your softened unsalted butter until it’s light and creamy, about 1-2 minutes. Then, gradually add the powdered sugar, beating on medium speed until the mixture is light, fluffy, and almost white in color – this usually takes about 3-5 minutes. This step is crucial for incorporating air, which contributes to the meltaway texture of our cookies.
- Add the Peppermint Flavor: With the mixer on low speed, beat in the peppermint extract until it’s just combined. You’ll already start to smell that wonderful holiday aroma!
- Combine Dry Ingredients: In a separate medium bowl, whisk together the all-purpose flour and cornstarch. Whisking ensures they are well combined and evenly distributed throughout the dough.
- Slowly Add Dry to Wet: Gradually add the dry ingredient mixture to the wet ingredients, mixing on low speed until just combined. Be careful not to overmix once the flour is added, as this can develop the gluten and lead to tough cookies. Mix only until no streaks of flour remain.
- Optional Holiday Swirl (or Color): If you want to add a festive red swirl, divide your dough in half. Leave one half plain and gently knead a few drops of red food coloring into the other half until evenly colored. Then, for a swirled effect, lightly twist the two dough colors together a few times and form into balls. Alternatively, you can keep the colors separate for distinct red and white cookies.
- Chill the Dough (Briefly): Cover the dough and refrigerate for about 15-20 minutes. This short chill time helps the dough firm up slightly, making it easier to handle and preventing the cookies from spreading too much in the oven, maintaining their beautiful shape.
- Form the Cookies: Once chilled, roll the dough into small, 1-inch balls. Place them about 2 inches apart on your prepared baking sheets. For an extra festive touch, you can lightly press a fork into the top of each cookie to create a crosshatch pattern, though it’s not necessary for the flavor!
- Bake to Perfection: Bake for 8-10 minutes, or until the edges are just barely set and the cookies are still very pale in the center. These Peppermint Meltaway Cookies don’t really brown much, so watch them closely to avoid overbaking. Overbaking will take away from their melt-in-your-mouth quality.
- Cool and Decorate: Let the cookies cool on the baking sheets for about 5 minutes before carefully transferring them to a wire rack to cool completely. Once cool, they are ready for glazing and decorating!
- Simple Peppermint Glaze (Optional but Recommended!): In a small bowl, whisk together 1 cup of powdered sugar, 1-2 tablespoons of milk (or non-dairy milk alternative), and 1/4 teaspoon of peppermint extract until smooth. You want a consistency that’s thick enough to cling but thin enough to drizzle. Drizzle over the cooled cookies or dip the tops. Immediately sprinkle with crushed candy canes before the glaze sets. Let the glaze set completely before stacking.
Tips & Suggestions
Achieving the perfect Peppermint Meltaway Cookie is all about a few little tricks and careful execution. Here are my favorite tips to ensure your holiday cookies are nothing short of spectacular:
- Don’t Overmix the Dough: I cannot stress this enough! Once you add the flour, mix only until just combined. Overmixing develops the gluten in the flour, which leads to tough, chewy cookies instead of the delicate, tender meltaway texture we’re aiming for. Less is definitely more here.
- Properly Softened Butter is Crucial: Your butter should be soft enough to easily indent with your finger, but not greasy or melted. If it’s too cold, it won’t cream properly; if it’s too warm, your cookies might spread excessively. Pull it out of the fridge about an hour before you plan to bake.
- Measure Flour Accurately: Use the spoon-and-level method for measuring flour. Spoon the flour into your measuring cup until it’s overflowing, then use a straight edge (like the back of a knife) to level it off. Scooping directly from the bag can compact the flour, leading to too much in your dough and dry, crumbly cookies.
- Don’t Skip the Cornstarch: This is the magic ingredient for that true “meltaway” texture. It makes these cookies incredibly tender and delicate, so please don’t omit it!
- Watch Your Baking Time: These cookies don’t heavily brown. They are meant to stay quite pale. Look for edges that are just barely set, and a center that looks cooked but still soft. If they start to get golden, they’re likely overbaked and will lose some of their signature tenderness.
- Customize Your Holiday Colors: While red and white are classic, feel free to use green food coloring, or even a combination, to match your holiday decor or personal preference. The more colors, the merrier!
- Vary the Toppings: Crushed candy canes are wonderful, but you could also try dusting them with just powdered sugar for a snowy look, or using festive sprinkles. For a non-peppermint version, you could swap the peppermint extract for vanilla or almond, and use different sprinkles.
- Gifting Idea: These cookies make incredible holiday gifts! Stack them carefully in pretty tins or cellophane bags, tied with a festive ribbon. They look beautiful and are always a welcome treat.
Storage
Once you’ve baked a batch of these delightful Peppermint Meltaway Cookies, you’ll want to ensure they stay fresh and delicious for as long as possible. Here’s how I recommend storing them:
- At Room Temperature:
Once your cookies have completely cooled and any glaze has fully set, store them in an airtight container at room temperature. I like to place a piece of parchment paper between layers of cookies to prevent them from sticking, especially if they are glazed or decorated with candy canes. Stored this way, your Peppermint Meltaway Cookies will stay wonderfully fresh and tender for up to 5-7 days. Avoid direct sunlight or warm spots in your kitchen.
- In the Refrigerator:
While not strictly necessary for most cookies, you can refrigerate these if your home is particularly warm or if you want to extend their freshness slightly beyond a week. Place them in an airtight container, again with parchment paper between layers. They will keep well for up to 10 days in the fridge. However, sometimes refrigeration can slightly alter the texture of cookies, making them a little firmer, so I generally prefer room temperature storage for these specific meltaway cookies.
- Freezing Baked Cookies:
These Peppermint Meltaway Cookies freeze beautifully, which is fantastic for holiday meal prep! To freeze, first ensure the cookies are completely cooled and any glaze is fully set and dry. Arrange them in a single layer on a baking sheet and flash freeze for about 30 minutes to an hour until firm. This prevents them from sticking together. Then, transfer the frozen cookies to a freezer-safe airtight container or heavy-duty freezer bag, layering with parchment paper. They will maintain their quality for up to 2-3 months. To thaw, simply remove them from the freezer and let them come to room temperature on the counter before serving.
- Freezing Cookie Dough:
If you want to get a head start, you can also freeze the raw cookie dough. Roll the dough into balls as instructed, then arrange them on a baking sheet and flash freeze until solid. Once frozen, transfer the dough balls to a freezer-safe bag or container. When you’re ready to bake, you can bake them directly from frozen, adding a couple of extra minutes to the baking time, or let them thaw slightly in the fridge first.
Final Thoughts
And there you have it! I truly hope you’re inspired to bring the magic of the holiday season into your kitchen with this delightful Peppermint Meltaway Cookies Holiday Recipe. There’s something truly special about these cookies – from their incredible melt-in-your-mouth texture that practically dissolves on your tongue, to the vibrant, refreshing burst of peppermint that perfectly captures the spirit of winter festivities.
This isn’t just another cookie; it’s a little bite of holiday cheer, a sweet gesture perfect for sharing with loved ones, gifting to neighbors, or simply savoring yourself with a warm mug of hot cocoa. I promise you, once you taste the delicate balance of buttery sweetness and cool peppermint, you’ll understand why this Peppermint Meltaway Cookies Holiday Recipe is destined to become a cherished part of your annual traditions. Go ahead, bake a batch, and let the joy unfold!

Peppermint Meltaway Cookies: Festive Holiday Treat!
- Total Time: 25 minutes
- Yield: 24 cookies 1x
Description
These Peppermint Meltaway Cookies are a delightful holiday treat that melt in your mouth, leaving a refreshing burst of peppermint. Perfect for cookie exchanges and festive gatherings, they are sure to become a cherished tradition.
Ingredients
- 1 cup Unsalted Butter (softened)
- 1 cup Powdered Sugar (Confectioners' Sugar)
- 2 cups All-Purpose Flour
- 1/4 cup Cornstarch
- 1 teaspoon Peppermint Extract
- Red Food Coloring (optional)
- 1/2 cup Crushed Candy Canes
Instructions
- Preheat your oven to 350°F (175°C). Line two baking sheets with parchment paper or silicone baking mats.
- In a large mixing bowl, using an electric mixer, beat your softened unsalted butter until it's light and creamy, about 1-2 minutes. Gradually add the powdered sugar, beating on medium speed until the mixture is light, fluffy, and almost white in color, about 3-5 minutes.
- With the mixer on low speed, beat in the peppermint extract until just combined.
- In a separate medium bowl, whisk together the all-purpose flour and cornstarch.
- Gradually add the dry ingredient mixture to the wet ingredients, mixing on low speed until just combined. Be careful not to overmix.
- If desired, divide your dough in half. Leave one half plain and knead a few drops of red food coloring into the other half until evenly colored. Lightly twist the two dough colors together for a swirled effect.
- Cover the dough and refrigerate for about 15-20 minutes.
- Once chilled, roll the dough into small, 1-inch balls and place them about 2 inches apart on the prepared baking sheets.
- Bake for 8-10 minutes, or until the edges are just barely set and the cookies are still very pale in the center.
- Let the cookies cool on the baking sheets for about 5 minutes before transferring them to a wire rack to cool completely.
- For the optional glaze, whisk together 1 cup of powdered sugar, 1-2 tablespoons of milk, and 1/4 teaspoon of peppermint extract until smooth. Drizzle over the cooled cookies and immediately sprinkle with crushed candy canes before the glaze sets.
- Prep Time: 15 mins
- Cook Time: 10 mins
- Category: Dessert
- Method: Baking
- Cuisine: American
Nutrition
- Serving Size: 1 cookie
- Calories: 100
- Sugar: 8 g
- Sodium: 50 mg
- Fat: 5 g
- Saturated Fat: 3 g
- Unsaturated Fat: 2 g
- Trans Fat: 0 g
- Carbohydrates: 12 g
- Fiber: 0 g
- Protein: 1 g
- Cholesterol: 20 mg
Keywords: Don't overmix the dough to maintain a tender texture. Properly softened butter is crucial for the best results. Use the spoon-and-level method for measuring flour to avoid tough cookies.