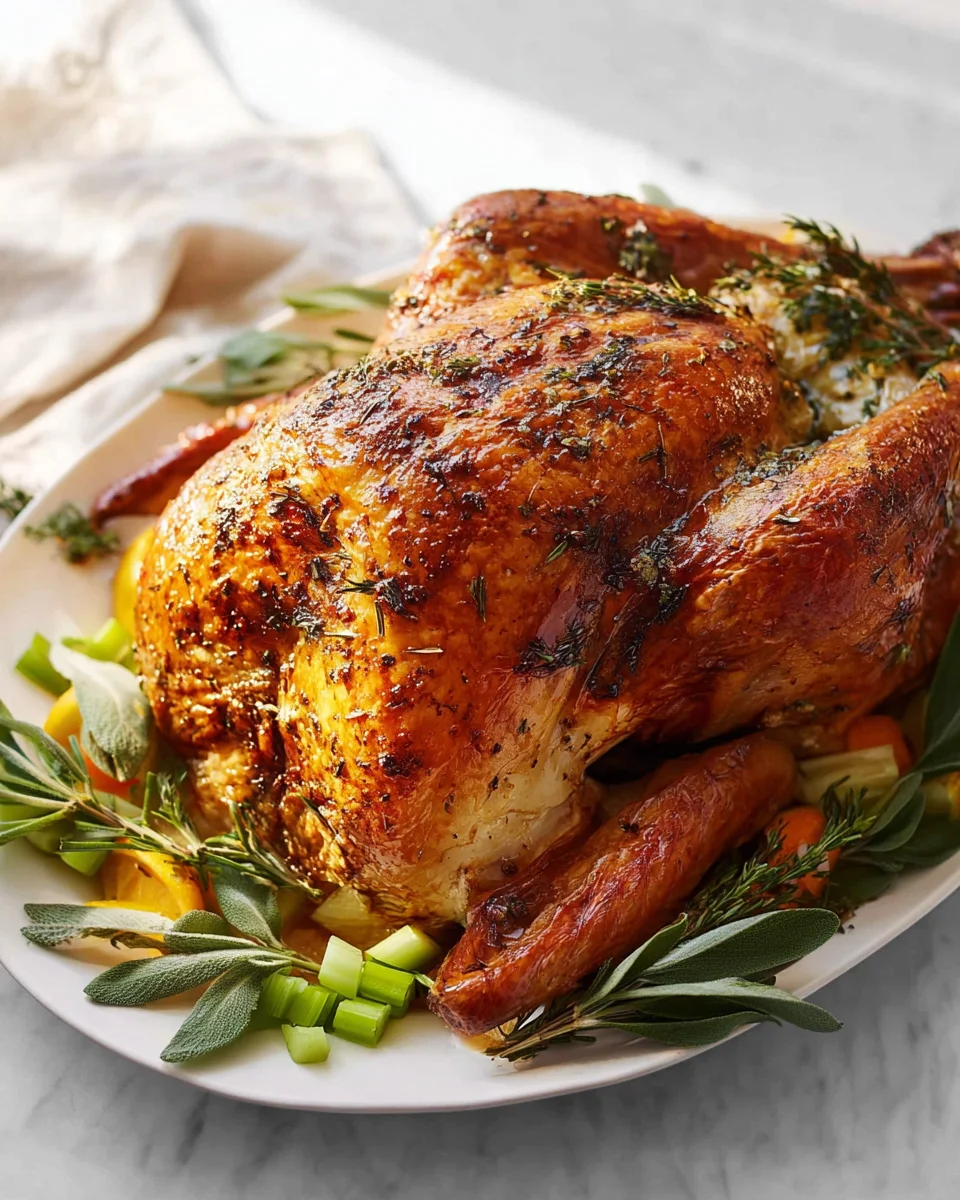
Thanksgiving Turkey Recipe is the undisputed star of the holiday feast, a magnificent centerpiece that instantly evokes feelings of warmth, family, and abundance. I believe there’s nothing quite like the sight and smell of a perfectly roasted turkey emerging from the oven, its golden-brown skin glistening, promising succulent meat within. This iconic dish isn’t just food; it’s a cherished tradition, rooted deeply in American history since the earliest harvest celebrations. For generations, families have gathered around the Thanksgiving table, eager to carve into this grand bird, sharing stories and making memories, cementing its place as the heart of gratitude and gathering.
What makes a Thanksgiving turkey so universally beloved? Beyond its historical significance, it’s the incredible versatility and comfort it brings to the table. The crispy, flavorful skin, the tender, juicy breast, and the rich, savory dark meat all contribute to an unforgettable culinary experience that satisfies every palate. It’s a dish that, when done right, offers a spectrum of textures and tastes, forming the foundation of not only the main meal but also many delectable leftovers! Every year, mastering the art of the perfect Thanksgiving Turkey Recipe becomes a delightful challenge, ensuring that every guest leaves feeling satisfied and full of holiday cheer. It’s truly more than just a meal; it’s the centerpiece of celebration.

Ingredients:
- One (1) whole turkey, fresh or thawed, typically 12-18 pounds (choose size based on your guest count, budgeting about 1.5 lbs per person)
- For the Brine (Optional, but highly recommended for a juicy Thanksgiving Turkey Recipe):
- 1 gallon vegetable broth
- 1 cup kosher salt
- 1/2 cup granulated sugar or brown sugar
- 2 tablespoons whole black peppercorns
- 4-5 bay leaves
- 1 orange, quartered
- 1 head garlic, halved horizontally
- A few sprigs fresh rosemary, thyme, and sage
- Additional 1-2 gallons cold water (as needed to submerge turkey)
- Large brining bag or food-safe bucket
- For the Herb Butter Rub:
- 1 cup (2 sticks) unsalted butter, softened
- 1/4 cup finely chopped fresh sage
- 1/4 cup finely chopped fresh rosemary
- 1/4 cup finely chopped fresh thyme
- 2 tablespoons minced garlic
- 1 tablespoon lemon zest
- 1 teaspoon black pepper
- 1 teaspoon kosher salt
- 1/2 teaspoon paprika (optional, for color)
- For the Aromatic Cavity Stuffing (not for eating):
- 2 medium yellow onions, quartered
- 2-3 celery stalks, cut into 2-inch pieces
- 2 medium carrots, cut into 2-inch pieces
- 1 large orange or lemon, halved
- A generous handful of fresh sage, rosemary, and thyme sprigs
- 1 head garlic, halved horizontally
- For Basting:
- 2 cups chicken or turkey broth
- 1/2 cup dry white wine (like Sauvignon Blanc or Pinot Grigio, optional)
- 2 tablespoons melted butter
- Equipment:
- Large roasting pan with a V-rack
- Meat thermometer (instant-read is best)
- Aluminum foil
- Twine for trussing (optional)
- Thaw the Turkey: If your turkey is frozen, plan ahead! A general rule is 24 hours of thawing time in the refrigerator for every 4-5 pounds of turkey. So, a 15-pound turkey will need approximately 3-4 days to thaw completely. Ensure it’s fully thawed before proceeding. A partially frozen turkey will cook unevenly, leading to dry spots and undercooked areas.
- Prepare the Brine (If Brining): In a large stockpot, combine the vegetable broth, kosher salt, sugar, peppercorns, bay leaves, quartered orange, halved garlic head, and fresh herbs. Bring this mixture to a boil over medium-high heat, stirring until the salt and sugar are completely dissolved. Once dissolved, remove the pot from the heat and allow the brine to cool completely to room temperature. This step is crucial; adding a hot brine to the turkey can partially cook it and promote bacterial growth.
- Chill the Brine: Once at room temperature, transfer the cooled brine to the refrigerator and chill thoroughly for at least 4-6 hours, or ideally overnight. You want the brine to be as cold as possible before adding the turkey.
- Brine the Turkey: Once the brine is chilled, remove the turkey from its packaging. Remove the neck and giblets from both the main cavity and the neck cavity (these can be saved for gravy if you wish). Rinse the turkey thoroughly inside and out with cold water and pat it completely dry with paper towels. Place the turkey into a large brining bag or a clean, food-safe bucket. Pour the chilled brine over the turkey, ensuring it is fully submerged. If needed, add additional cold water until the turkey is completely covered. Seal the bag or cover the bucket tightly.
- Refrigerate for Brining: Place the brining turkey in the refrigerator for 12-24 hours. For turkeys under 15 pounds, 12-18 hours is usually sufficient. For larger birds, you can go up to 24 hours. Do not brine for longer than 24 hours, as the turkey can become too salty or develop a mushy texture.
- Rinse and Dry (Post-Brine): After brining, remove the turkey from the brine solution. Discard the brine. Rinse the turkey very well under cold running water, both inside and out, to remove any excess salt. This is a crucial step to prevent an overly salty turkey. Pat the turkey absolutely dry with paper towels. A dry skin is essential for crispy, golden-brown skin. You can even place the turkey uncovered in the refrigerator for a few hours or overnight after rinsing to further dry out the skin, which significantly contributes to crispiness.
- No Brine Prep: If you’re not brining, simply remove the turkey from its packaging, remove the neck and giblets, rinse thoroughly, and pat completely dry, inside and out, with paper towels.
- Preheat Oven and Prep Roasting Pan: Position an oven rack in the lowest third of your oven. Preheat your oven to 425°F (220°C). Place your V-rack inside a large, sturdy roasting pan.
- Prepare the Herb Butter Rub: In a medium bowl, combine the softened unsalted butter with the finely chopped fresh sage, rosemary, thyme, minced garlic, lemon zest, black pepper, kosher salt, and paprika (if using). Mix thoroughly until all ingredients are well incorporated. This fragrant butter will be the key to a beautifully flavored and moisturized bird.
- Prepare the Aromatic Cavity Stuffing: Roughly chop the onions, celery, and carrots. Halve the orange or lemon and the head of garlic. Gather your fresh herb sprigs. These aromatics will infuse the turkey with flavor from the inside as it roasts, but they are not intended for consumption.
- Apply the Herb Butter: Carefully loosen the skin over the turkey breasts and thighs with your fingers, creating pockets. Be gentle to avoid tearing the skin. Take about half of the prepared herb butter and spread it evenly under the skin over the breast and thigh meat. This is where most of the moisture and flavor will come from, helping to keep the white meat juicy.
- Coat the Exterior: Rub the remaining herb butter generously all over the exterior of the turkey, ensuring an even coating everywhere, including the legs and wings. This will contribute to a gorgeous golden-brown and crispy skin.
- Stuff the Cavity: Loosely stuff the prepared aromatic vegetables, citrus, garlic, and herb sprigs into the main cavity of the turkey. Do not pack it tightly, as this will hinder air circulation and prevent the turkey from cooking evenly.
- Truss the Turkey (Optional but Recommended): If you wish, you can truss the turkey. This involves tying the drumsticks together with kitchen twine and tucking the wing tips under the body. Trussing helps the turkey cook more evenly and results in a neater presentation, making your Thanksgiving Turkey Recipe look picture-perfect.
- Season the Exterior: Lightly sprinkle the exterior of the turkey with a little extra kosher salt and black pepper for added seasoning.
- Initial High Heat Roast: Carefully place the prepared turkey, breast-side up, on the V-rack in the roasting pan. Transfer the roasting pan to your preheated 425°F (220°C) oven. Roast for 30-45 minutes at this higher temperature. This initial blast of heat helps to crisp the skin and brown it beautifully.
- Reduce Heat and Start Basting: After the initial high-heat roasting period, reduce the oven temperature to 325°F (160°C). In a small bowl, whisk together the chicken/turkey broth, dry white wine (if using), and melted butter for basting.
- First Baste and Tent: Remove the turkey from the oven. Carefully baste the turkey with about 1/4 of your basting liquid. If the breast skin is already getting too dark, loosely tent the turkey breast with aluminum foil. This prevents over-browning while the rest of the turkey continues to cook.
- Continue Roasting and Basting: Return the turkey to the oven. Continue roasting, basting the turkey with the liquid in the pan and your prepared basting mixture every 45-60 minutes. Each time you open the oven door, you lose heat, so try to be efficient with your basting. This regular basting helps keep the skin moist and flavorful and encourages an even golden color.
- Total Roasting Time: The total roasting time will vary significantly depending on the size of your turkey, your oven, and whether it was brined. As a general guideline:
- 12-pound turkey: 3 to 3.5 hours
- 15-pound turkey: 3.5 to 4 hours
- 18-pound turkey: 4 to 4.5 hours
- For a stuffed turkey (if you chose to stuff with edible stuffing, which is not recommended for this recipe for safety and even cooking), add an additional 30-60 minutes to the total cooking time.
Always rely on temperature, not time, for doneness.
- Monitor Internal Temperature: Begin checking the internal temperature of the turkey with your meat thermometer about 1 hour before the estimated end of the cooking time. Insert the thermometer into the thickest part of the turkey thigh, making sure it does not touch the bone. The turkey is done when the internal temperature reaches 165°F (74°C) in the thickest part of the thigh, 165°F (74°C) in the thickest part of the breast, and 165°F (74°C) in the wing joint. If you’ve stuffed the turkey with edible stuffing (again, not recommended for this specific recipe), the center of the stuffing must also reach 165°F (74°C).
- Adjust Foil as Needed: Throughout the cooking process, if any part of the turkey (especially the breast or wing tips) starts to brown too quickly, you can cover it more securely with aluminum foil. This is often necessary for the breast to ensure it doesn’t dry out while the thighs finish cooking.
- Achieving Crispy Skin: If your skin isn’t as crispy as you’d like in the last 30-45 minutes of cooking, you can remove the foil tent and increase the oven temperature back to 400°F (200°C) for a short burst, carefully monitoring it to prevent burning.
- Remove from Oven: Once the turkey reaches the target temperature of 165°F (74°C) in all three locations, carefully remove the roasting pan from the oven. The juices should run clear when the thigh is pierced with a knife.
- The Critical Rest Period: This step is arguably the most important for a juicy turkey. Transfer the cooked turkey from the roasting pan to a large cutting board or serving platter. Loosely tent the turkey with aluminum foil. Let the turkey rest for a minimum of 20-30 minutes for smaller birds, and up to 45-60 minutes for larger birds (18+ pounds). Do not skip this step! Resting allows the juices, which have been pushed to the surface during cooking, to redistribute throughout the meat. If you carve too early, all those delicious juices will run out onto your cutting board, leaving you with dry meat.
- Prepare for Carving: While the turkey rests, you can prepare your gravy (see next section) or get your carving station ready. Ensure you have a sharp carving knife and a sturdy carving fork.
- Carving the Turkey: Once rested, remove the foil. Begin carving by removing the legs and thighs. Then, carefully slice down the breastbone to remove each breast half, and slice them against the grain into desired thickness. Separate the wings. Arrange the carved turkey beautifully on a platter, ready for serving your magnificent Thanksgiving Turkey Recipe.
- Collect Pan Drippings: After removing the turkey from the roasting pan, carefully pour all the pan drippings into a fat separator. Let it sit for a few minutes to allow the fat to rise to the top.
- Make a Roux (Optional): While the fat separates, you can make a roux directly in the roasting pan. Place the roasting pan on two stovetop burners over medium heat (if your pan is stovetop safe). Add 1/4 cup of butter (or the separated turkey fat) and melt it. Whisk in 1/4 cup of all-purpose flour, cooking and whisking constantly for 1-2 minutes until it forms a pale golden paste.
- Deglaze and Add Broth: Pour about 1/2 cup of dry white wine or chicken/turkey broth into the pan and scrape up any browned bits from the bottom with a wooden spoon. This adds immense flavor. Then, slowly whisk in about 3-4 cups of the defatted pan drippings (and additional chicken/turkey broth if needed) into the roux mixture. Continue to whisk until the gravy thickens to your desired consistency.
- Season and Serve: Bring the gravy to a simmer, whisking frequently, until it’s smooth and thickened. Taste and adjust seasoning with salt and freshly ground black pepper. You can also add a touch of fresh chopped herbs like sage or thyme. Strain the gravy through a fine-mesh sieve for an extra-smooth consistency, if desired. Serve your homemade gravy hot alongside your perfect Thanksgiving turkey. This gravy truly completes the Thanksgiving Turkey Recipe experience.
Prepping the Turkey (Brining Optional but Recommended!)
Preparing the Aromatic Stuffing and Herb Butter
Roasting the Thanksgiving Turkey
Resting and Carving the Turkey
Making the Gravy (Optional but Highly Recommended!)
Conclusion:
After diving deep into the nuances of this truly exceptional method, I hope you’re as excited as I am about what this recipe brings to your table. What makes this particular preparation not just good, but an absolute game-changer, is its unique ability to deliver a bird that is consistently moist, incredibly flavorful, and beautifully golden-brown every single time. We’re talking about a turkey that not only looks stunning as the centerpiece but also melts in your mouth with every bite. The ingenious techniques we’ve explored, from the precise seasoning to the thoughtful cooking temperatures, work in harmony to lock in juices and infuse the meat with an aromatic depth that will linger long after the last serving. Forget dry, bland turkey; this recipe is engineered for success, transforming what can often be a daunting culinary task into a genuinely rewarding experience. It’s more than just cooking; it’s about creating unforgettable memories around a truly spectacular meal. I am confident that this will become your go-to, the very Thanksgiving Turkey Recipe everyone raves about, year after year. The simplicity yet profound impact of the steps ensures that even novice cooks can achieve results that taste like they came straight from a professional kitchen, while seasoned chefs will appreciate the subtle improvements and perfected techniques. This isn’t merely another recipe; it’s a commitment to culinary excellence, a promise of a deeply satisfying and delicious outcome that will undoubtedly impress all your guests and leave them asking for your secret.
Now that you’ve mastered the art of creating the perfect turkey, let’s talk about how to make your entire meal shine. The beauty of a perfectly cooked turkey is its versatility, making it the star of almost any spread. For a traditional feast, consider pairing your magnificent bird with classic accompaniments like creamy, buttery mashed potatoes – perhaps infused with roasted garlic or a hint of chives – and a rich, savory gravy made directly from the flavorful pan drippings. Don’t forget a vibrant, zesty cranberry sauce, whether homemade with fresh cranberries and orange zest, or a high-quality store-bought option that complements the bird. A hearty stuffing or dressing, baked to golden perfection with savory herbs and perhaps some sausage or mushrooms, is also an absolute must. And, of course, a fresh green bean casserole or simple roasted root vegetables like carrots, parsnips, and Brussels sprouts can add wonderful texture and complementary flavors to your plate, completing a truly wholesome and satisfying meal.
But don’t limit yourself to the classics! If you’re looking for lighter fare or exploring new culinary horizons, try serving thin slices of your turkey with a fresh, crisp autumn salad featuring ingredients like mixed greens, toasted pecans, crumbled goat cheese, and a light vinaigrette. Or, for a more adventurous take, you could experiment with a different herb rub next time – perhaps a smoky paprika and cumin blend for a touch of warmth and spice, or a Mediterranean-inspired mix of oregano, thyme, and lemon zest for a brighter, herbaceous profile. The possibilities are truly endless, and each variation offers a chance to personalize your meal and make it uniquely yours. Consider serving your turkey with a side of wild rice pilaf for an elegant touch, or even alongside a sweet potato gratin for a comforting and rich accompaniment. The robust flavor profile of this turkey stands up beautifully to a wide array of side dishes, allowing your creativity to flourish.
And let’s not forget the glorious leftovers! A well-cooked turkey provides a bounty for days, transforming into entirely new culinary delights. Imagine crafting gourmet turkey sandwiches piled high with cranberry sauce and arugula, or simmering a comforting turkey noodle soup that warms you from the inside out on a chilly evening. Turkey pot pies, hearty casseroles, or even flavorful turkey tacos are fantastic ways to enjoy every last morsel, ensuring no delicious piece goes to waste. My personal favorite is a simple turkey salad, mixed with celery, grapes, and a light dressing, perfect for a quick lunch or a light dinner. The robustness of this turkey recipe means the meat retains its flavor and moisture even after refrigeration, making it ideal for these secondary culinary creations. Consider carving your turkey at the table for an impressive presentation that will awe your guests, or carve it in the kitchen and arrange it artfully on a platter with fresh herb garnishes to truly elevate the visual appeal of your feast.
So, there you have it! I genuinely encourage you to roll up your sleeves and give this incredible recipe a try. You deserve to experience the joy and satisfaction of bringing such a magnificent dish to life in your own kitchen. There’s a special kind of pride that comes with serving a meal that elicits gasps of delight and requests for second helpings, and I promise you this recipe will deliver precisely that. Don’t be shy about experimenting a little; feel free to add your own personal touch, whether it’s a different herb, a special spice, or a unique side dish that reflects your family’s traditions. Cooking should be an adventure, a creative outlet, and above all, a source of immense pleasure. Once you’ve wowed your family and friends, please do me a huge favor: come back and share your experience! I absolutely love hearing about your successes, seeing your photos, and learning about any delightful modifications you’ve made. Your insights and stories inspire me and our entire community of food lovers.
Let’s make this the year your turkey becomes the talk of the town, an undisputed champion of flavor and tenderness. Go on, make some magic in your kitchen!
Perfect Thanksgiving Turkey: Juicy, Flavorful, Easy Recipe
This recipe for a juicy, flavorful Thanksgiving turkey ensures a golden-brown, crispy skin and succulent meat, making it the perfect centerpiece for your holiday feast. It’s an easy-to-follow guide to a cherished culinary tradition, promising unforgettable flavors and delicious leftovers.
Ingredients
Instructions
Important Information
Nutrition Facts (Per Serving)
It is important to consider this information as approximate and not to use it as definitive health advice.
Allergy Information
Please check ingredients for potential allergens and consult a health professional if in doubt.