Pistachio Dacquoise Cake is more than just a dessert; it’s an exquisite culinary experience that promises to captivate your senses from the very first glance to the last, lingering bite. Have you ever craved a dessert that perfectly balances delicate crispness with a rich, creamy indulgence, all while delivering an intensely sophisticated nutty flavour? Prepare to be enchanted by this truly magnificent creation that stands out in any culinary repertoire!
Originating from the elegant patisseries of France, the traditional dacquoise is a celebration of meringue, often layered with cream or ganache. Our version, the Pistachio Dacquoise Cake, takes this classic to new heights by infusing every element with the vibrant, earthy notes of pistachios. I believe it’s this unique combination of crispy, airy pistachio meringue layers, delicately chewy on the inside, interspersed with luscious pistachio cream or buttercream, that makes it truly irresistible.
People adore this dish not only for its stunning presentation, making it a showstopper at any gathering, but also for its complex textures and unparalleled flavour profile. It offers a delightful contrast – the light, almost ethereal meringue against the smooth, opulent cream – creating a symphony of sensations that is both refreshing and deeply satisfying. This cake is a perfect choice for special occasions, offering an impressive culinary feat that tastes as extraordinary as it looks.

Ingredients:
- For the Pistachio Dacquoise Layers:
- 6 large egg whites (about 180g), at room temperature
- ½ cup (100g) granulated sugar
- ½ cup (50g) powdered sugar, sifted
- ¾ cup (75g) almond flour, finely ground
- ¾ cup (75g) shelled, unsalted pistachios, finely ground (ideally blanched for brighter green color)
- 2 tablespoons (16g) cornstarch
- ½ teaspoon vanilla extract
- ¼ teaspoon cream of tartar (optional, but recommended for stable meringue)
- Pinch of salt
- For the Italian Meringue Pistachio Buttercream:
- 1 ½ cups (300g) granulated sugar
- ½ cup (120ml) water
- 6 large egg whites (about 180g), at room temperature
- 1 ½ pounds (680g) unsalted butter, very soft but not melted, cut into 1-inch cubes
- ½ cup (120g) pure pistachio paste (unsweetened, 100% pistachios)
- 1 teaspoon vanilla extract
- ¼ teaspoon salt
- Green gel food coloring (optional, to enhance color)
- For the Raspberry Coulis (Optional, but highly recommended for balance):
- 1 ½ cups (180g) fresh or frozen raspberries
- ¼ cup (50g) granulated sugar
- 1 tablespoon fresh lemon juice
- 1 teaspoon cornstarch mixed with 2 tablespoons cold water (for thickening, if desired)
- For Garnish:
- ¼ cup chopped shelled pistachios
- Fresh raspberries
- Edible gold leaf (optional)
Phase 1: Preparing the Pistachio Dacquoise Layers
- Preheat and Prepare: My first step is always to get the oven ready and my baking sheets lined. Preheat your oven to 300°F (150°C). Line two large baking sheets with parchment paper. Draw three 8-inch (20cm) circles on the parchment paper. If you only have two sheets, you’ll need to bake in batches. Make sure to flip the parchment paper so the pencil marks are on the underside, preventing transfer to your dacquoise.
- Combine Dry Ingredients: In a medium bowl, whisk together the sifted powdered sugar, almond flour, finely ground pistachios, and cornstarch. This mixture needs to be uniform and free of lumps. I always take my time with this step, ensuring everything is well combined; it makes a huge difference in the final texture of the dacquoise.
- Whip Egg Whites: In a very clean stand mixer bowl (no grease whatsoever, otherwise your meringue won’t whip), fitted with the whisk attachment, add the egg whites, cream of tartar (if using), and salt. Start whipping on medium speed until the whites become frothy and soft peaks form. This usually takes a couple of minutes.
- Gradually Add Sugar: With the mixer still running on medium speed, gradually add the granulated sugar, about a tablespoon at a time. Increase the speed to medium-high and continue whipping until the meringue is glossy, thick, and holds very stiff peaks. You should be able to turn the bowl upside down without the meringue moving an inch! This stage is critical for a stable dacquoise.
- Fold in Vanilla and Dry Ingredients: Gently fold in the vanilla extract into the meringue. Then, in three additions, carefully fold in the dry ingredient mixture using a rubber spatula. Use a cutting and folding motion, trying not to deflate the meringue. It’s okay if a few small lumps of nuts remain, but you want to incorporate the dry ingredients as evenly as possible without overmixing. Overmixing will lead to a tough, flat dacquoise, and we want light, airy layers for our Pistachio Dacquoise Cake.
- Pipe the Dacquoise: Transfer the dacquoise batter into a large piping bag fitted with a large round tip (or simply snip off a ½-inch hole at the end of the bag). Pipe the batter evenly within the drawn circles on your parchment paper, starting from the center and spiraling outwards to fill the circle. You should aim for three even layers. If you prefer, you can also use an offset spatula to spread the batter gently within the circles.
- Bake to Perfection: Place the baking sheets in the preheated oven. Bake for 30 minutes, then reduce the oven temperature to 250°F (120°C) and continue baking for another 30-45 minutes, or until the dacquoise layers are firm to the touch, lightly golden, and dry. They should feel crisp. The long, slow bake dries them out beautifully, giving them that signature crunchy-chewy texture.
- Cool Completely: Turn off the oven, prop the oven door open slightly, and let the dacquoise layers cool completely inside the oven for at least 1 hour. This slow cooling prevents cracking and ensures they dry out further. Once cool, carefully peel them off the parchment paper. They will be delicate, so handle with care. If baking in batches, ensure the oven is completely cooled before baking the next batch, or adjust timing.
Phase 2: Crafting the Silky Pistachio Buttercream
- Prepare the Syrup: In a small, heavy-bottomed saucepan, combine the granulated sugar and water. Cook over medium-high heat, stirring occasionally until the sugar dissolves. Once dissolved, stop stirring. Bring the syrup to a boil and cook until it reaches 240°F (115°C) on a candy thermometer. Accuracy here is key for a stable Italian meringue!
- Whip Egg Whites: While the sugar syrup is cooking, in a very clean stand mixer bowl fitted with the whisk attachment, begin whipping the egg whites on medium speed. Whip until soft peaks form.
- Stream in Hot Syrup: Once the sugar syrup reaches 240°F (115°C), immediately remove it from the heat. With the mixer running on low speed, slowly and carefully pour the hot sugar syrup in a thin, steady stream down the side of the mixer bowl, avoiding the whisk itself. This is important to prevent the syrup from splattering and crystallizing. Once all the syrup is added, increase the mixer speed to high and continue whipping until the meringue is very thick, glossy, and has cooled down significantly (the bowl should no longer feel warm to the touch). This can take 10-15 minutes. A well-cooled meringue prevents your butter from melting when added.
- Incorporate Butter: Switch to the paddle attachment. With the mixer on medium-low speed, begin adding the very soft butter, one cube at a time, allowing each piece to be fully incorporated before adding the next. This process might look a bit messy at first, and the buttercream might even appear to curdle or separate – don’t panic! This is normal. Just keep mixing. After about 5-10 minutes of continuous mixing, it will magically come together into a smooth, fluffy buttercream.
- Add Flavor and Color: Once the buttercream is smooth, add the pure pistachio paste, vanilla extract, and salt. Mix on medium-low until fully combined. If you desire a brighter green color for your Pistachio Dacquoise Cake, add a few drops of green gel food coloring and mix until the desired hue is achieved. I often find the natural pistachio paste color a bit dull, so a touch of gel coloring really makes it pop!
- Final Whip: Increase the speed to medium-high and whip for another minute or two until the buttercream is extra light and fluffy. Your luxurious pistachio buttercream is now ready for assembly.
Phase 3: Making the Bright Raspberry Coulis (Optional, but Recommended!)
- Cook Raspberries: In a small saucepan, combine the raspberries, granulated sugar, and lemon juice. Cook over medium heat, stirring frequently, until the raspberries break down and the mixture starts to simmer, about 5-7 minutes.
- Strain for Smoothness: Remove from heat. For a perfectly smooth coulis, press the mixture through a fine-mesh sieve into a clean bowl, using the back of a spoon to extract all the juice and pulp, leaving behind the seeds. If you prefer a rustic coulis with seeds, you can skip this step.
- Thicken (Optional): If you want a slightly thicker coulis that holds its shape better in the cake, return the strained coulis to the saucepan. Bring to a gentle simmer. Whisk in the cornstarch slurry (cornstarch mixed with cold water). Cook, stirring constantly, for 1-2 minutes until the coulis thickens to your desired consistency. It will thicken further as it cools.
- Cool Completely: Transfer the coulis to a small bowl and let it cool completely to room temperature, then refrigerate until chilled and ready to use. This vibrant coulis provides a wonderful tart counterpoint to the rich pistachio flavors.
Phase 4: Assembling Your Magnificent Pistachio Dacquoise Cake
- Prepare Your Base: Place one Pistachio Dacquoise layer on your serving plate or cake stand. If the layers are slightly uneven, you can carefully trim them with a serrated knife for a cleaner edge.
- Pipe a Buttercream Dam: Using a piping bag fitted with a round tip (or just a snipped corner), pipe a dam of pistachio buttercream around the perimeter of the first dacquoise layer. This creates a barrier to hold the coulis in place.
- Add Raspberry Coulis: Spoon about half of the chilled raspberry coulis into the center of the buttercream dam. Spread it gently and evenly.
- Layer and Repeat: Carefully place the second dacquoise layer on top. Repeat the process: pipe a buttercream dam, then spoon in the remaining raspberry coulis.
- Top with Third Layer: Gently place the third and final dacquoise layer on top.
- Apply Crumb Coat: Using an offset spatula, apply a thin, even layer of pistachio buttercream all over the top and sides of the cake. This is your “crumb coat,” which traps any loose crumbs and creates a smooth base for your final frosting layer. A good crumb coat is the secret to a professional-looking cake! Chill the cake in the refrigerator for 20-30 minutes to set the crumb coat.
- Final Frosting: Once the crumb coat is firm, apply the remaining pistachio buttercream generously over the entire cake. Use an offset spatula or a bench scraper to create smooth sides and a flat top. For decorative swirls, you can use the back of a spoon or a small offset spatula.
- Decorate Your Masterpiece: Garnish the sides of the cake with chopped pistachios, gently pressing them into the buttercream. Arrange fresh raspberries artfully on top. If you’re feeling extra fancy, carefully apply small pieces of edible gold leaf for an elegant touch.
- Chill Before Serving: Refrigerate the assembled Pistachio Dacquoise Cake for at least 1-2 hours before serving. This allows the layers to set and the flavors to meld beautifully.
- Serve and Enjoy: When ready to serve, remove the cake from the refrigerator about 15-20 minutes beforehand to allow the buttercream to soften slightly for the best texture. Slice with a sharp, warm knife for clean cuts. Enjoy the delightful crunch, chew, and creamy richness of your homemade Pistachio Dacquoise Cake!
Conclusion:
I truly hope you’ve enjoyed diving into the intricacies of this delightful recipe. What we’ve explored together isn’t just a dessert; it’s an experience, a journey into textures and flavors that are truly unforgettable. If there’s one recipe I could implore you to try from my kitchen, this would absolutely be it. The sheer elegance and profound satisfaction derived from creating and sharing this masterpiece are unparalleled, and I believe every home baker deserves to revel in that joy.
Why This Recipe is an Absolute Must-Try
Let me reiterate why this particular dessert holds such a special place in my heart and why I am so confident it will capture yours too. Imagine a perfect symphony of textures: the initial delicate crispness of the meringue shell yielding to an incredibly chewy, almost marshmallow-like interior, infused with the subtle yet distinct aroma of toasted pistachios. This beautiful foundation is then exquisitely contrasted by a lavish, velvety-smooth cream filling, often lightened and enriched with even more finely ground pistachios, creating a luxurious mouthfeel that melts away, leaving behind a lingering, sophisticated sweetness. It’s not just a cake; it’s a revelation, offering a complexity that belies its relatively straightforward construction once you get the hang of it. This isn’t your everyday sponge cake or brownie; it’s a showstopper, a conversation starter, a dessert that announces itself with grace and sophistication. The combination of its impressive appearance and its utterly divine taste makes the effort completely worthwhile. Every bite offers a different nuance, a delicate balance of nutty, sweet, and creamy, making it an extraordinarily special treat for any occasion, big or small. The unique structural integrity of the dacquoise itself means it holds up beautifully, making it an excellent choice for entertaining, as you can often prepare components in advance.
Elevate Your Dessert Experience: Serving Suggestions & Creative Variations
One of the many charms of this spectacular dessert is its versatility. While the Pistachio Dacquoise Cake is absolutely stunning served unadorned, allowing its unique textures and vibrant green hues to take center stage, there are countless ways to customize and enhance it. For a simple yet elegant presentation, a light dusting of confectioners’ sugar or a scattering of extra chopped pistachios provides a lovely finishing touch. Imagine a slice served alongside a fresh berry coulis, the tartness of raspberries or blackberries cutting through the richness of the cream, creating a delightful contrast. A delicate drizzle of white chocolate ganache or a very thin caramel sauce can also add another layer of indulgence without overwhelming the star flavors. Consider serving it with a dollop of crème fraîche or a scoop of high-quality vanilla bean ice cream for an even more decadent experience.
But don’t stop there! The beauty of baking lies in experimentation. Why not try a variation on the filling? Instead of a purely pistachio cream, you could fold in a spoonful of rosewater for an exotic, floral note, or a hint of orange blossom water to transport your guests to a Mediterranean garden. For a fruity twist, a thin layer of raspberry or cherry compote nestled between the cream layers before chilling would be absolutely divine. And while pistachio is king here, you could experiment with other nut flours for the dacquoise itself – perhaps almond for a classic French touch, or hazelnut for a richer, deeper flavor profile, though I maintain pistachio is the superior choice for this particular creation! If you’re feeling adventurous, smaller, individual dacquoise cakes (mini dacquoise) can be made, perfect for plated desserts at a dinner party, offering a sophisticated single-serving option that truly impresses. These can be assembled in dessert rings for a perfectly round, elegant presentation, allowing for individual artistic flair with garnishes. Think about seasonal fruit additions too; perhaps figs in the autumn or a light mango purée in the summer could beautifully complement the nutty base. The possibilities are truly endless once you master the core technique.
Your Kitchen Awaits: Share Your Culinary Journey!
Now, it’s your turn. I truly believe that every home chef, regardless of their experience level, can achieve magnificent results with this recipe. Don’t be intimidated by the name or the elegant appearance; approach it with curiosity and a touch of enthusiasm, and you’ll be amazed at what you can create. There’s an immense sense of accomplishment that comes with presenting a dessert as exquisite as this to your friends and family, watching their eyes light up with delight. It’s more than just baking; it’s about creating memories and sharing joy. So, please, gather your ingredients, set aside an afternoon, and embark on this wonderful culinary adventure. I am so excited for you to experience the magic of making this. Once you’ve baked your own stunning creation, I absolutely encourage you to share your experience with me! Did you add a unique twist? Did you discover a new favorite serving suggestion? What did your loved ones think? Share your photos, your triumphs, and even your little learning moments in the comments below. Your feedback and creativity inspire us all and foster a wonderful community of enthusiastic bakers. Happy baking, and I can’t wait to hear all about your beautiful Pistachio Dacquoise Cake!
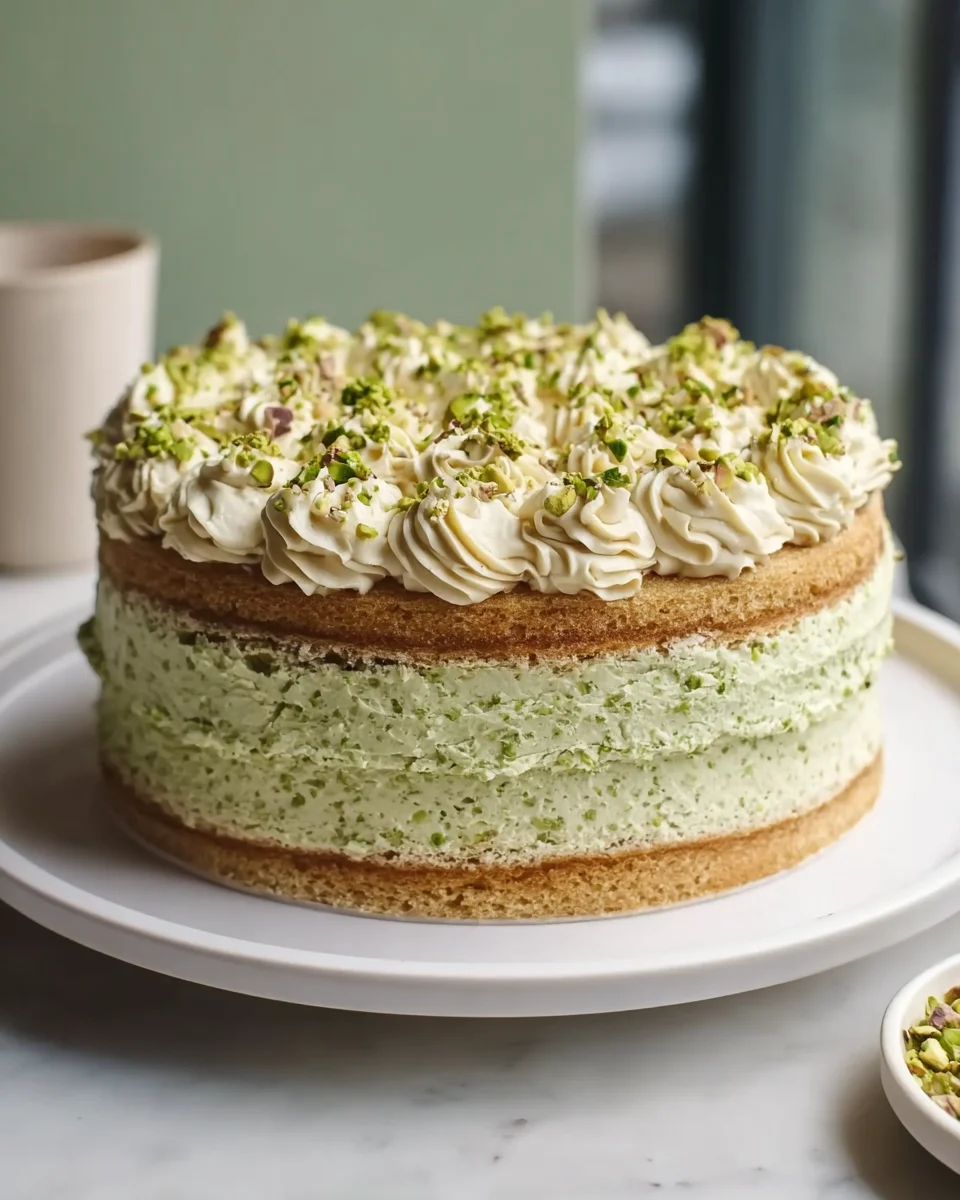
Pistachio Dacquoise Cake: Crispy, Chewy, Divine Dessert!
An exquisite culinary experience, this Pistachio Dacquoise Cake perfectly balances delicate crispness with rich, creamy indulgence. Originating from elegant French patisseries, this version infuses every element with vibrant, earthy pistachios, creating a showstopper dessert for any special occasion.
Ingredients
Instructions
Important Information
Nutrition Facts (Per Serving)
It is important to consider this information as approximate and not to use it as definitive health advice.
Allergy Information
Please check ingredients for potential allergens and consult a health professional if in doubt.