Pumpkin Energy Balls are here to revolutionize your snack game this autumn! As the leaves turn golden and a crisp chill fills the air, our cravings often shift towards comforting, spiced flavors. But what if you could indulge in those cozy, autumnal tastes without any guilt, and with maximum convenience? That’s exactly what these delightful, no-bake treats offer. I’m truly thrilled to share a recipe that perfectly captures the essence of fall in every single bite, making healthy eating effortlessly delicious.
While the concept of grab-and-go energy balls is a relatively modern innovation born from the wellness movement, the star ingredient, pumpkin, holds a deeply rooted history in seasonal celebrations and hearty, nourishing dishes, particularly in North American culture. From Thanksgiving pies to comforting lattes, pumpkin evokes feelings of warmth, tradition, and harvest. Our recipe for these incredible Pumpkin Energy Balls beautifully marries this beloved seasonal flavor with the modern demand for quick, wholesome fuel, creating a snack that feels both nostalgic and refreshingly new.
Why do people absolutely adore this dish?
It’s simple: they offer an unbeatable combination of delightful seasonal spice, a satisfyingly chewy texture, and undeniable convenience. These make a fantastic way to enjoy the essence of fall in a portable, healthy bite, perfect for busy mornings, a post-workout refuel, or an afternoon pick-me-up. I’m confident you’ll find them an indispensable addition to your seasonal snack repertoire, providing sustained energy and incredible flavor with every bite!

Ingredients:
I absolutely adore these Pumpkin Energy Balls, and part of their charm is the simplicity of the ingredients. You’ll find most of these staples likely already in your pantry! The key to truly spectacular Pumpkin Energy Balls lies in using high-quality ingredients, so always go for the best you can find. I always tell my friends that good ingredients are the first step to a great dish, and these no-bake treats are no exception.
- 1 cup (240g) Pumpkin Puree:Make sure you’re grabbing pure pumpkin puree, not pumpkin pie filling! The pie filling contains added sugars and spices that will throw off the balance of our recipe, and we want to control our sweetness and spice levels perfectly. I personally love using organic pumpkin puree for its rich, authentic flavor and vibrant color. This is the star of our show, providing that quintessential autumnal taste and a lovely moist texture to our energy balls. It’s naturally packed with beneficial nutrients like Vitamin A (beta-carotene, which gives it that gorgeous orange hue) and a good amount of fiber, making these treats not just delicious, but also incredibly nourishing and satisfying. It contributes significantly to the overall moisture and consistency, so getting the right type is crucial.
- 2 cups (160g) Old-Fashioned Rolled Oats:These are the foundation of our Pumpkin Energy Balls, providing essential structure, a delightful chewiness, and a good dose of complex carbohydrates for sustained energy throughout your day. It’s important to use old-fashioned rolled oats here; don’t use instant oats, as they tend to absorb liquid too quickly and can result in a mushy, less appealing texture. Old-fashioned oats give that perfect hearty bite and bulk. If you’re sensitive to gluten or have celiac disease, be sure to opt for certified gluten-free rolled oats to keep this recipe suitable for your dietary needs. I often buy them in bulk because I use them in so many healthy recipes, from overnight oats to homemade granola!
- 1/2 cup (120g) Creamy Nut Butter:My go-to here is almond butter for its mild flavor and excellent binding properties, but peanut butter, cashew butter, or even sunflower seed butter (for a fantastic nut-free option) work wonderfully. Just ensure it’s a natural, creamy variety with no added sugars or hydrogenated oils – the ingredient list should ideally just be “nuts” or “nuts and salt.” This provides healthy fats, a good boost of plant-based protein, and acts as a fantastic binder, holding our Pumpkin Energy Balls together perfectly. It also lends a lovely richness and depth of flavor. If your nut butter has separated, give it a really good stir before measuring. If it’s a bit stiff, you might want to warm it gently in the microwave for 15-20 seconds to make it easier to mix thoroughly into the other ingredients.
- 1/4 cup (60ml) Maple Syrup (or Honey/Agave):This is our natural sweetener, providing just enough sweetness without being overwhelming or leading to a sugar crash. I prefer pure maple syrup (grade A or B) for its distinct, earthy flavor that complements pumpkin beautifully, but raw honey or agave nectar are excellent alternatives. Feel free to adjust the amount based on your preference – if you like things a little less sweet, start with 3 tablespoons and taste before adding the rest. Always go for high-quality, pure syrups; those artificial pancake syrups won’t give you the same delightful taste, nutritional benefits, or proper consistency for these Pumpkin Energy Balls.
- 1 tablespoon Pumpkin Pie Spice:This classic blend is what really brings out the cozy, autumnal vibes we all crave! It typically includes a wonderful medley of cinnamon, nutmeg, ginger, and cloves, sometimes with allspice. If you don’t have a pre-made blend, you can easily create your own with 2 teaspoons ground cinnamon, 1/2 teaspoon ground ginger, 1/2 teaspoon ground nutmeg, and 1/4 teaspoon ground cloves. Don’t skimp on this; it’s absolutely crucial for that signature pumpkin spice flavor we know and love. The aroma alone will make your kitchen smell incredibly inviting and festive!
- 1 teaspoon Vanilla Extract:A good quality vanilla extract enhances all the other flavors in the Pumpkin Energy Balls. It adds a subtle warmth, a touch of floral sweetness, and a complexity that really rounds out the taste profile. I always recommend pure vanilla extract over imitation for the best results; it makes a surprising difference in the overall deliciousness and depth of flavor of these simple treats. A little bit goes a long way to elevate the entire mixture.
- 1/4 teaspoon Fine Sea Salt:A tiny pinch of fine sea salt is absolutely essential! It doesn’t make the Pumpkin Energy Balls taste salty, but rather it brilliantly balances the sweetness from the maple syrup and brings out all the individual flavors of the spices, pumpkin, and nut butter. It’s a fundamental flavor enhancer that you absolutely shouldn’t skip. Think of it as the secret ingredient that makes everything else taste better.
Optional Mix-ins for Extra Oomph:
This is where you can really customize your Pumpkin Energy Balls and add extra nutrients, textures, and flavors! Feel free to choose one or a combination of these fantastic additions based on your preferences or what you have on hand. Remember, if you add several mix-ins, you might want to slightly reduce the amount of each to avoid overpowering the base flavor or altering the texture too much.
- 1/4 cup Chia Seeds:These tiny powerhouses are packed with omega-3 fatty acids, dietary fiber, and plant-based protein. They also have an amazing ability to absorb moisture, which can give your energy balls a slightly firmer texture and help them hold together even better. Plus, they add a fun, subtle crunch that I personally love.
- 1/4 cup Ground Flaxseed:Another excellent source of omega-3s, lignans, and fiber. Ground flaxseed integrates seamlessly into the mixture and adds a mild, nutty flavor without being too prominent. It’s a fantastic addition for an extra nutritional boost, especially for digestive health.
- 1/4 cup Hemp Hearts:Rich in easily digestible protein and healthy fats, hemp hearts have a soft texture and a delicate nutty flavor. They’re a fantastic addition for an extra protein punch and a lovely subtle chewiness, making these Pumpkin Energy Balls even more satisfying.
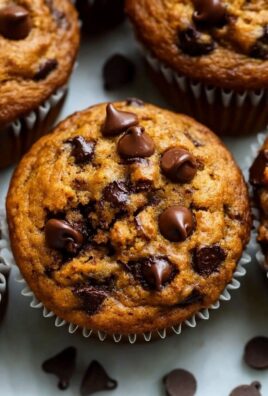
- 1/4 cup Mini Chocolate Chips (dark chocolate recommended):Because who can say no to a touch of chocolate? Mini chips distribute better throughout the mixture compared to standard-sized chips. Dark chocolate (70% cocoa or higher) pairs wonderfully with pumpkin and adds a touch of indulgence without being overly sweet. It’s a perfect treat for those moments when you crave something a little extra special and decadent.
- 1/4 cup Shredded Coconut (unsweetened):Adds a lovely tropical note and a bit of delightfully chewy texture. Unsweetened is best to control the overall sweetness of the Pumpkin Energy Balls and let the natural flavors shine.
- 1/4 cup Finely Chopped Nuts (pecans, walnuts, almonds):For an added crunch, a boost of healthy fats, and extra protein. Make sure they are finely chopped so they integrate well into the balls and don’t make them crumble or fall apart during rolling. Toasting them lightly before chopping can enhance their flavor even more.
- 1 scoop (approx. 20-30g) Vanilla or Unflavored Protein Powder:If you’re looking to significantly increase the protein content, a scoop of your favorite protein powder (whey, casein, or plant-based) can be a great addition, especially for a post-workout snack. You might need to add an extra tablespoon or two of nut butter or a splash more maple syrup to compensate for the powder absorbing moisture, as different protein powders can affect the consistency of your Pumpkin Energy Balls differently. Always add gradually and adjust liquid as needed to maintain a rollable consistency.
Optional Coatings for Fun and Flavor:
These coatings not only make your Pumpkin Energy Balls look incredibly appealing and professional, but they can also add an extra layer of flavor, texture, and help prevent them from sticking together during storage. It’s a wonderful way to personalize your batch and add a little extra flair!
- Shredded Coconut (unsweetened):A classic and beloved choice. It adds a beautiful textural contrast and a subtle tropical sweetness. I love how it makes them look like little snowballs, especially fitting for autumn and winter months.
- Cocoa Powder:For a rich, slightly bitter contrast that beautifully complements the pumpkin and spices. Use unsweetened cocoa powder for the best results to avoid making them overly sweet. It gives them a sophisticated, almost truffle-like appearance.
- Crushed Pecans or Walnuts:Adds a wonderful crunch and nutty flavor to the exterior. Just give them a quick pulse in a food processor or chop them very finely by hand. This is a great way to double down on the nutty flavor if you’re a fan.
- Cinnamon Sugar:A simple blend of granulated sugar and ground cinnamon for an extra sweet and spicy kick. This is particularly good if you want a more dessert-like feel for your Pumpkin Energy Balls, reminiscent of a churro or snickerdoodle.
Preparing Your Workspace and Ingredients:
- Gather Your Tools and Ingredients: Before we dive into the deliciousness of mixing, make sure you have all your ingredients measured out and ready to go. This essential step, often called “mise en place” in culinary terms, makes the entire process smoother, more efficient, and much more enjoyable. You’ll need a large mixing bowl, a sturdy rubber spatula or a strong spoon, accurate measuring cups and spoons, and a parchment-lined baking sheet or a large plate. Having everything laid out in front of you helps prevent those “oops, I forgot something!” moments and ensures a stress-free experience. Trust me, organized prep is your best friend in the kitchen, especially when making something as simple and satisfying as these Pumpkin Energy Balls.
- Prepare Your Pumpkin Puree: The consistency of pumpkin puree can sometimes vary. If your pumpkin puree has been sitting in the fridge, it might be quite thick and stiff. You want it to be easily mixable with the other wet ingredients. If it’s very cold or firm, let it come to room temperature for about 15-20 minutes, or you can gently warm it in the microwave for 10-15 seconds (don’t cook it!). Some people find that certain brands of pumpkin puree can be a bit watery; if you suspect yours is particularly moist, you can gently blot it with a paper towel to remove any excess liquid. However, I usually find this step unnecessary unless I’m working with a noticeably watery batch, as the oats will absorb a good deal of moisture.
- Line a Baking Sheet: Take a standard baking sheet or a large, flat plate and line it completely with parchment paper. This will be where we place our rolled Pumpkin Energy Balls before they chill, preventing them from sticking to the surface and making cleanup an absolute breeze. If you don’t have parchment paper readily available, wax paper can work as an alternative, or you can lightly grease the plate, though parchment is definitely preferred for its superior non-stick properties and ease of use.
Mixing Up the Magical Dough:
- Combine Wet Ingredients: In your large mixing bowl, combine the pumpkin puree, creamy nut butter, maple syrup, and vanilla extract. Give these a good, thorough stir with your sturdy spatula or spoon until they are completely smooth and homogenous. You’re aiming for a uniform, creamy mixture where no streaks of individual ingredients are visible. It might take a minute or two of vigorous stirring to fully incorporate the nut butter, especially if it’s on the thicker side. This step is crucial because it ensures all the sweet, creamy, and flavorful elements are evenly distributed throughout our Pumpkin Energy Balls, providing a consistent taste in every bite.
- Stir in the Spices and Salt: Now, add the generous tablespoon of pumpkin pie spice and the pinch of fine sea salt to the wet mixture. Mix thoroughly again, folding and stirring until the spices are evenly distributed throughout the creamy pumpkin base. As you mix, you should begin to smell that wonderful, intoxicating autumnal aroma filling your kitchen – a true sign that deliciousness is on its way! Don’t underestimate the power of salt here; it really enhances all the other flavors and prevents the mixture from tasting flat or overly sweet. Make sure there are no clumps of spice, as we want every bite of our Pumpkin Energy Balls to be perfectly seasoned.
- Add the Rolled Oats: This is where our mixture really starts to take shape! Gradually add the old-fashioned rolled oats to the wet ingredients. I recommend adding them in two batches: start by adding one cup, mix it in well until mostly incorporated, and then add the second cup. Use your spatula to fold the oats into the pumpkin mixture until everything is just combined. You want to make sure every single oat flake is coated with the pumpkin mixture. The mixture will start to thicken considerably at this stage as the oats begin to absorb the moisture. You’re looking for a thick, cohesive “dough” that holds together when pressed and can eventually be easily formed into balls.
Expert Tip on Consistency:
The consistency of your mixture is absolutely key to perfectly formed Pumpkin Energy Balls that aren’t too sticky or crumbly. If, after adding all the oats, your mixture seems too wet and sticky to roll easily, this could be due to a particularly moist batch of pumpkin puree, a thinner nut butter, or even humid weather. Don’t panic! You have options. You can add an extra tablespoon or two of rolled oats, or even a tablespoon of ground flaxseed or chia seeds, which are excellent at absorbing excess moisture. After adding these, let the mixture sit for an additional 5-10 minutes to allow them to soak up some liquid. Conversely, if your mixture seems too dry and crumbly, struggling to hold together, it might be that your nut butter was too thick or your pumpkin puree was on the drier side. In this case, add a small splash (about a teaspoon at a time) of maple syrup or a tiny bit more nut butter until it reaches a workable consistency. We’re looking for a dough that holds together when pressed firmly but isn’t overly sticky or falling apart.
- Fold in Optional Mix-ins (if using): If you’re adding any of the wonderful optional ingredients like chia seeds, ground flaxseed, hemp hearts, mini chocolate chips, shredded coconut, or finely chopped nuts, now is the time to gently fold them into the mixture. Be careful not to overmix, just ensure they are evenly distributed throughout the entire batch. These add-ins not only boost nutrition and flavor but can also slightly alter the texture of your Pumpkin Energy Balls, adding a delightful crunch, chewiness, or a burst of chocolatey goodness. If adding protein powder, mix it in along with the oats, then check the consistency and adjust liquid if needed, as different protein powders can be quite absorbent and might require a bit more moisture to reach the desired consistency.
Chilling for Optimal Rolling:
- Refrigerate the Mixture: This step is absolutely non-negotiable for perfectly firm, easy-to-roll, and delicious Pumpkin Energy Balls! Cover your mixing bowl with plastic wrap or transfer the mixture to an airtight container. Place it securely in the refrigerator for at least 30 minutes to 1 hour. I often leave mine in for an hour, or even longer if I’m preparing it ahead of time (it can even chill overnight!). This crucial chilling period allows several important things to happen: the oats fully hydrate and soften, the flavors have time to meld beautifully and deepen, and most importantly, the entire mixture firms up significantly. This firming makes it infinitely easier to handle and roll into neat, uniform balls without a sticky mess. If you skip this step, your mixture will almost certainly be too sticky and soft, resulting in messy, misshapen balls that are difficult to work with and might not hold their shape well. Don’t rush this part – patience here pays off!
Why Chilling is Crucial for Your Pumpkin Energy Balls:
The oats in our recipe are dry when added, and they need time to fully absorb the moisture from the pumpkin puree, nut butter, and maple syrup. This process, known as hydration, causes them to soften and swell, creating a more cohesive, less crumbly, and more pleasant chewy texture. Furthermore, chilling solidifies the fats in the nut butter, which acts as a vital binder. When the nut butter is cold, it becomes much firmer, giving the entire mixture a better, more stable structure. This firming up is what prevents your Pumpkin Energy Balls from being too sticky and falling apart during the rolling process. It also helps to prevent them from becoming overly soft once they are at room temperature. Think of it like dough for cookies; chilling often improves both the texture and the flavor, allowing complex notes to develop. The spices also get a chance to infuse more deeply into the pumpkin and oats, leading to a more pronounced, harmonious, and satisfying flavor profile in every single bite.
Rolling into Deliciousness:
- Prepare Your Coating Station (if using): While your mixture is chilling its way to perfection, get your optional coatings ready. Pour your desired coating – whether it’s shredded coconut, cocoa powder, finely crushed nuts, or a cinnamon sugar blend – into a shallow dish or a small plate. Having this ready will make the rolling process much more efficient, quicker, and significantly less messy. If you’re feeling adventurous, having a few different coating options can be a lot of fun, allowing you to create a delightful variety of Pumpkin Energy Balls from just one batch!
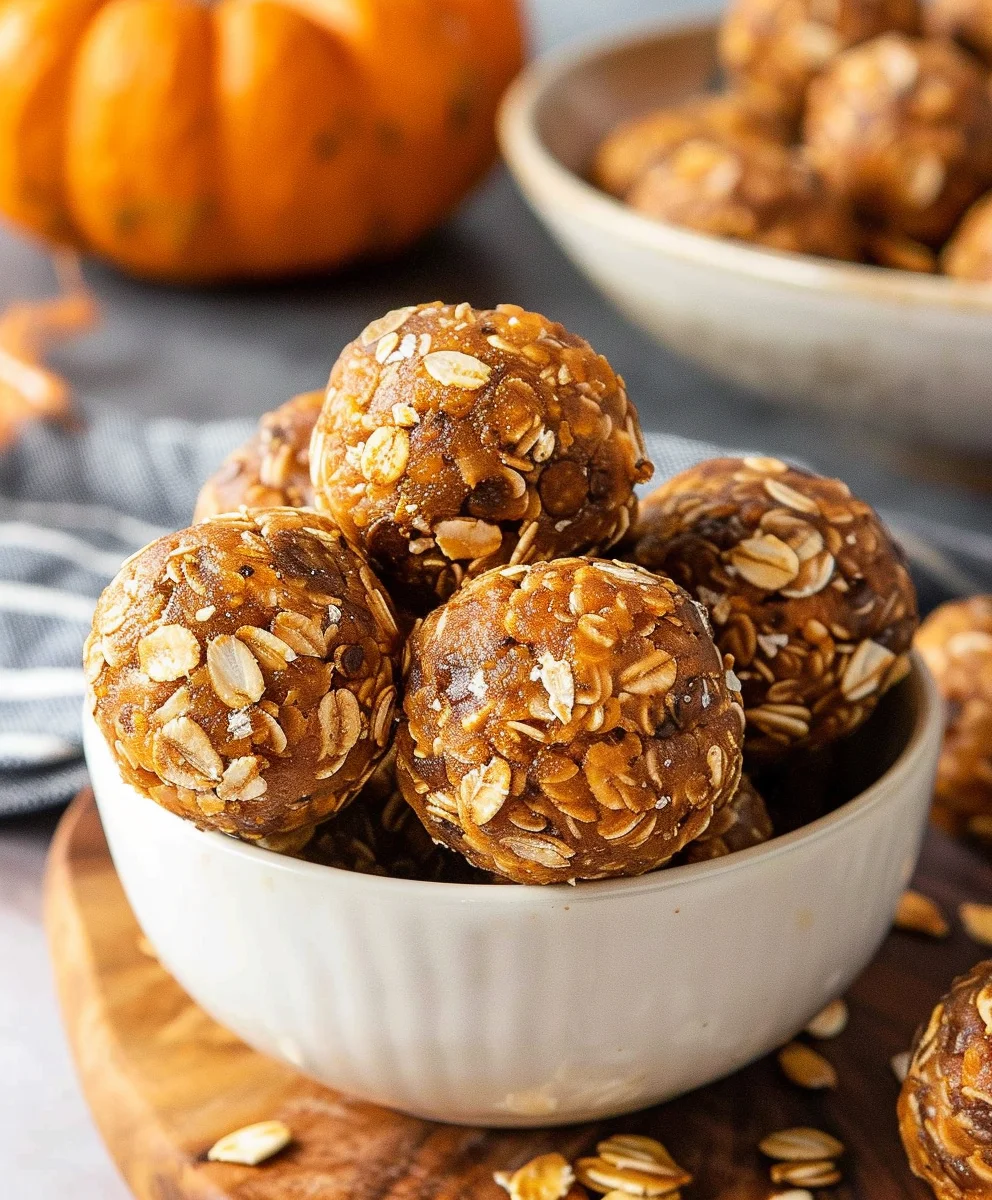
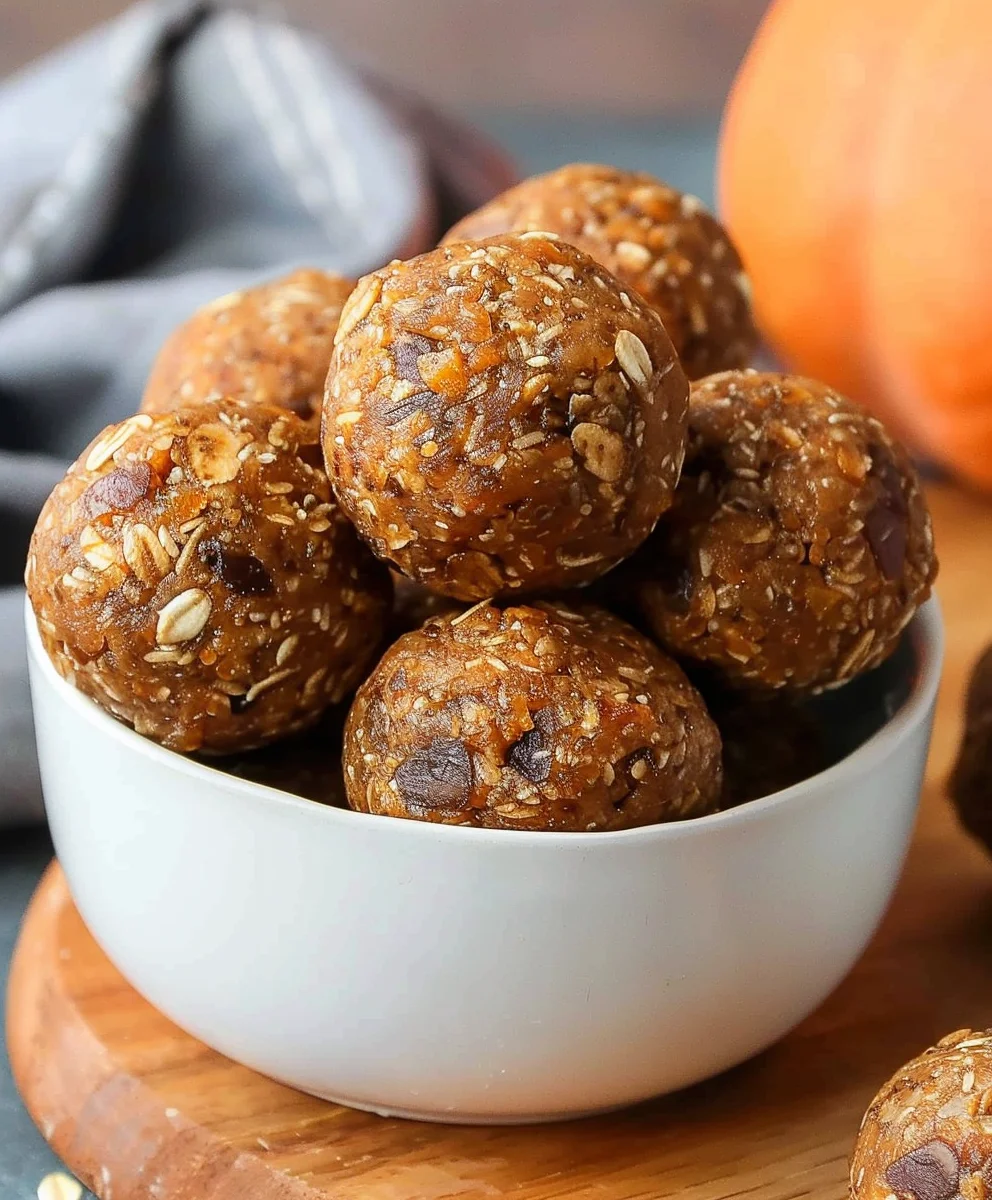
- Scoop and Roll the Balls: Once the pumpkin energy ball mixture is thoroughly chilled and firm, remove it from the refrigerator. Using a small cookie scoop (about 1-1.5 tablespoons capacity) is ideal for consistent sizing, but a regular tablespoon also works perfectly well. Scoop out portions of the mixture, then gently roll each portion between your clean palms to form neat, uniform balls. If you find the mixture is sticking to your hands more than you’d like, try lightly dampening your hands with a little water or rubbing them with a tiny bit of coconut oil – this often helps immensely with stickiness and makes the rolling process much smoother. Aim for consistency in size so that all your Pumpkin Energy Balls chill and serve evenly. I usually get about 20-24 delicious energy balls from this recipe, depending on the exact size I choose to make them.
Achieving the Perfect Shape:
Don’t press too hard when rolling; instead, use gentle, but firm, continuous pressure to ensure the mixture compacts and holds together effectively. If you find the mixture is still a bit too crumbly or loose even after chilling, try squeezing the portion tightly in your hand a few times before you start rolling it. This compacts the mixture and helps it bind together better. If it’s still excessively sticky, a quick return to the fridge for another 15-20 minutes can work wonders, or if all else fails, add a tiny bit more oats or ground flaxseed to absorb more moisture. The ultimate goal is a ball that is smooth, firm, doesn’t fall apart easily, and doesn’t leave excessive residue on your hands.
- Coat Your Pumpkin Energy Balls (optional): If you’re using one of the delightful coatings, immediately roll each formed ball in your chosen coating. Gently press and roll the ball to ensure the coating adheres evenly and completely on all sides. Once coated, carefully place the Pumpkin Energy Balls back onto your parchment-lined baking sheet. This coating step not only adds wonderful aesthetic appeal and an extra layer of flavor and texture, but it also serves a practical purpose: it helps prevent the balls from sticking to each other in storage, which is a common occurrence with many no-bake treats. Plus, they just look so much prettier!
Final Chill and Storage:
- Final Chill: Once all your Pumpkin Energy Balls are rolled, and optionally coated, return the entire baking sheet to the refrigerator for another 15-30 minutes. This final chill is like the grand finale for their structure and texture; it helps them set completely, firming up both the interior and any coatings, ensuring they hold their shape beautifully at room temperature and are perfectly ready for snacking. This step is particularly helpful if your kitchen is warm or if you found the mixture getting a bit soft during the rolling process. A well-chilled energy ball is a perfect energy ball!
- Serve and Enjoy: Your delightful Pumpkin Energy Balls are now absolutely ready to be enjoyed! They make a fantastic quick breakfast on the go, a satisfying and nutrient-dense mid-afternoon snack to beat that 3 PM slump, or a healthy and convenient post-workout treat to refuel your body. I personally love grabbing one or two with my morning coffee to kickstart my day, or packing them in my bag for a much-needed boost during a busy day of errands or work. They’re so versatile, incredibly convenient, and wonderfully delicious.
- Storing Your Pumpkin Energy Balls: These energy balls store incredibly well, making them perfect for healthy meal prepping and having nutritious snacks at your fingertips throughout the week. Transfer the thoroughly chilled Pumpkin Energy Balls to an airtight container. You can layer them with small pieces of parchment paper in between each layer to prevent any sticking, especially if they are uncoated. Store them diligently in the refrigerator for up to 1 week. However, in my house, they usually don’t last that long – they get devoured far too quickly! If you want to keep them for a longer period, they freeze beautifully, which is an excellent option.
- Freezing Instructions: To freeze your Pumpkin Energy Balls, arrange them in a single layer on a parchment-lined baking sheet, making sure they aren’t touching each other. Place them in the freezer for about 1-2 hours, or until they are completely solid. This initial “flash freezing” step is crucial because it prevents them from sticking together when you eventually transfer them to a larger container or bag. Once thoroughly frozen, transfer them to a freezer-safe zip-top bag or an airtight container. They will keep beautifully in the freezer for up to 2-3 months, ready whenever you need a quick, healthy snack. When you’re ready for a snack, simply grab one or two directly from the freezer and let them thaw at room temperature for 10-15 minutes, or pop them in the fridge overnight. They taste just as fresh and delightful as the day you made them!
Why They’re the Perfect Snack:
These Pumpkin Energy Balls are more than just a tasty treat; they are a powerhouse of nutrition conveniently packed into a delicious bite. They’re brimming with fiber from the oats and pumpkin, healthy fats and protein from the nut butter and optional seeds, and natural sweetness that satisfies without the crash associated with refined sugars. This combination offers sustained energy release, making them an ideal pick-me-up. They’re also incredibly customizable, allowing you to tailor them to your specific dietary needs or taste preferences with various mix-ins and coatings. Whether you’re a busy parent needing a quick grab-and-go option, a student looking for a brain boost, an athlete needing to refuel, or just someone searching for a wholesome and delicious snack that actually tastes good, these Pumpkin Energy Balls are an absolute lifesaver. Plus, they’re so easy to make that even beginner cooks can achieve perfect results with minimal effort. They truly embody convenience, nutrition, and deliciousness all in one adorable, bite-sized package. I hope you love making and eating these as much as I do!
Conclusion:
And there you have it! We’ve journeyed through the simple steps of creating a truly remarkable treat, and I sincerely hope you’re as excited as I am about these delightful little wonders. If you’re looking for a snack that effortlessly combines incredible flavor with wholesome goodness, something that supports your active lifestyle without compromising on taste, then this recipe is, without a doubt, a must-try for your kitchen. I genuinely believe that once you whip up a batch, you’ll understand why these Pumpkin Energy Balls are poised to become a staple in your healthy eating repertoire, offering a convenient, nutritious, and utterly delicious solution for those moments when hunger strikes or when you simply crave a guilt-free indulgence.
Why These Pumpkin Energy Balls Are Your Next Go-To Snack
What makes these particular energy balls stand out from the crowd? It’s the harmonious blend of robust, autumnal pumpkin flavor infused with warm, inviting spices like cinnamon, nutmeg, and a hint of ginger, creating a sensory experience that feels both comforting and invigorating. Beyond the exquisite taste, their inherent nature as a no-bake wonder means less time in the kitchen and more time enjoying your creations. They are packed with nourishing ingredients, providing sustained energy without the sugar crash often associated with conventional snacks. Think of them as tiny powerhouses, perfectly portioned to fuel your morning commute, conquer that midday slump, or provide a much-needed boost before or after a workout. The convenience factor is immense; prepared in minutes, they store beautifully, making meal prep an absolute breeze. Plus, knowing exactly what goes into each bite gives you peace of mind, free from artificial additives or excessive sugars. They truly are a testament to how incredibly satisfying healthy eating can be when done right.
Endless Ways to Enjoy and Customize
One of the many charms of this recipe is its incredible versatility. While delicious straight from the fridge, consider these suggestions to elevate your Pumpkin Energy Balls experience even further. For a satisfying breakfast on the go, pair them with a cup of your favorite coffee or a refreshing smoothie. They also make an excellent post-dinner treat when you’re craving something sweet but don’t want to derail your healthy eating goals. Don’t be afraid to get creative with variations! You could experiment by rolling them in finely shredded coconut for an added tropical flair, or in a dusting of cocoa powder for a more decadent, chocolatey finish. For an extra boost of healthy fats and crunch, try pressing a few finely chopped pecans or walnuts into the exterior of each ball before chilling. If you’re feeling adventurous, a tiny pinch of black pepper or a dash of cardamom can truly make the spices sing, adding an unexpected layer of complexity. During the colder months, serving them alongside a warm cup of chai tea creates a truly cozy moment, or crumble one over a bowl of plain Greek yogurt for a texture-rich, flavorful snack that’s loaded with protein. For those who love a bit of chocolate, folding in some mini dark chocolate chips or cacao nibs into the mixture before rolling can transform them into an even more indulgent delight. The possibilities are truly limited only by your imagination! They are incredibly forgiving, so feel free to adapt them to your personal taste preferences or whatever wholesome ingredients you have on hand in your pantry.
Your Turn: Embrace the Joy of Homemade!
Now that you have all the tools and inspiration, it’s time to roll up your sleeves and bring this fantastic recipe to life in your own kitchen. I promise you, the minimal effort required yields maximum reward. There’s a special kind of satisfaction that comes from creating something wholesome and delicious from scratch, something you can feel good about sharing with your loved ones or simply enjoying all to yourself. I wholeheartedly encourage you to try making these Pumpkin Energy Balls today! Discover the ease, the flavor, and the incredible benefits firsthand. And please, don’t keep your culinary triumphs a secret! I would absolutely love to hear about your experience. Did you add a unique twist? What did you pair them with? Share your successes, your modifications, and your joy in the comments section below or on your favorite social media platform. Your feedback and creative ideas inspire me and our entire community of food lovers. Let’s celebrate the wonderful world of wholesome, homemade goodness together. Happy rolling, and enjoy every single bite!
Pumpkin Energy Balls
These delightful, no-bake Pumpkin Energy Balls capture the essence of fall in every bite, making healthy snacking effortlessly delicious. Perfect for busy mornings, a post-workout refuel, or an afternoon pick-me-up, they offer sustained energy and incredible flavor.
Ingredients
-
1 cup no-salt-added creamy almond butter
-
⅓ cup pumpkin puree
-
¼ tsp cinnamon
-
½ cup honey
-
½ cup vanilla protein powder
-
1 ½ cups old-fashioned rolled oats
-
Salt, to taste
-
1 ½ tsp pumpkin pie spice
-
½ cup mini chocolate chips
Instructions
- Step 1
Line a baking sheet with parchment paper. In a large mixing bowl, combine the almond butter, pumpkin puree, honey, vanilla protein powder, cinnamon, and pumpkin pie spice. Stir until completely smooth. - Step 2
Gradually add the old-fashioned rolled oats and salt to the wet mixture, mixing until a thick, cohesive dough forms and all oats are coated. Fold in the mini chocolate chips. - Step 3
Cover the bowl and refrigerate the mixture for at least 30 minutes to 1 hour. This crucial chilling period allows the oats to hydrate and the mixture to firm up, making it easier to roll. - Step 4
Once thoroughly chilled, scoop out portions (about 1-1.5 tablespoons each) and gently roll them between your palms to form neat, uniform balls. If desired, roll the formed balls in an optional coating like shredded coconut or cocoa powder. - Step 5
Place the rolled Pumpkin Energy Balls onto the prepared baking sheet. Return to the refrigerator for a final chill of 15-30 minutes to help them set completely. - Step 6
Serve and enjoy! Store leftover Pumpkin Energy Balls in an airtight container in the refrigerator for up to 1 week. For longer storage, freeze them for up to 2-3 months.
Important Information
Nutrition Facts (Per Serving)
It is important to consider this information as approximate and not to use it as definitive health advice.
Allergy Information
Please check ingredients for potential allergens and consult a health professional if in doubt.