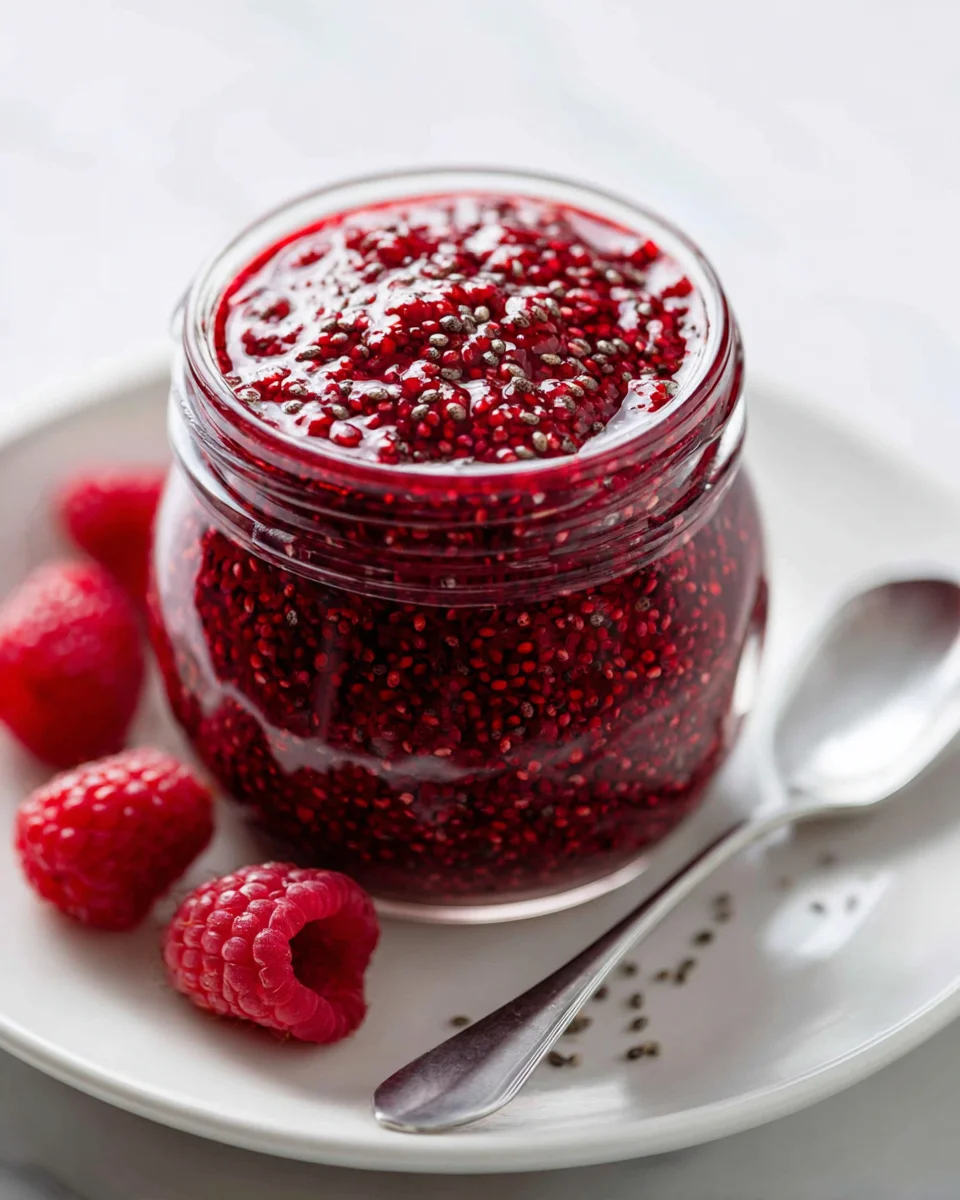
Raspberry Chia Jam (no Cook)
Oh, friends, get ready to meet your new favorite kitchen shortcut! I’m so excited to share this incredible Raspberry Chia Jam (no Cook) recipe with you because it’s truly a game-changer. What makes this jam so special, you ask? Well, for starters, it’s all in the name – no cooking required! That’s right, forget the steamy stovetop and the meticulous pectin measurements of traditional jam making. This super simple method means you can whip up a batch of vibrant, fruity jam in mere minutes, without breaking a sweat.
You are absolutely going to love this recipe! Imagine biting into a spoonful of jam that tastes incredibly fresh, bursting with sweet-tart raspberry goodness, and without all the added sugar and preservatives often found in store-bought varieties. Thanks to our superstar ingredient, chia seeds, this jam gets its perfect thickness naturally, adding a wonderful boost of healthy omega-3s and fiber too. It’s a guilt-free indulgence that’s also incredibly versatile – perfect for spreading on toast, swirling into yogurt, topping your oatmeal, or even dolloping onto pancakes.
In a nutshell, this Raspberry Chia Jam (no Cook) is a delightful concoction of fresh raspberries, a touch of sweetener, and magical chia seeds. You’ll simply mash your berries, stir in the chia seeds and sweetener, and let the mixture chill in the fridge. As it rests, the chia seeds work their magic, absorbing the liquid and transforming it into a beautifully set, spoonable jam. It’s the easiest way to enjoy homemade jam, packed with natural flavor and goodness, ready for you to enjoy any time!

Welcome to one of my absolute favorite kitchen hacks: Raspberry Chia Jam! This recipe is a game-changer because it’s incredibly simple, requires no cooking whatsoever, and delivers a fresh, vibrant flavor that store-bought jams just can’t match. If you’re looking for a quick, healthy, and delicious spread, you’ve come to the right place. I’m going to walk you through exactly how I make this delightful jam, sharing all my tips and tricks along the way.
Ingredient Notes
Making Raspberry Chia Jam is wonderfully straightforward because it relies on just a handful of simple ingredients. What I love most is how fresh and pure the flavors are, especially since there’s no cooking involved to dull them. Here’s a breakdown of the key players and why they matter, along with my favorite substitutions.
-
Fresh or Frozen Raspberries
The star of the show! I typically use about two cups of raspberries for a batch. Fresh raspberries offer a slightly brighter, more immediate flavor, but frozen raspberries work absolutely beautifully and are often more convenient, especially if fresh ones aren’t in season or are pricey. If you’re using frozen, simply let them thaw completely before you begin. You can even give them a quick gentle mash while they’re still a bit frosty, but full thawing helps in achieving a consistent texture. The natural pectin in raspberries, combined with the chia seeds, is what gives this jam its lovely set.
-
Chia Seeds
These tiny powerhouses are the secret to our no-cook jam! Chia seeds are hydrophilic, meaning they absorb a tremendous amount of liquid – up to 10-12 times their weight – and form a gel-like consistency. This natural gelling property is what replaces the need for hours of simmering and added pectin. I usually use about 2-3 tablespoons, adjusting based on how thick I want my jam. They also add a fantastic boost of fiber, omega-3 fatty acids, and protein, making this jam not just delicious but also incredibly nutritious. Don’t worry about the texture; while visible, they blend seamlessly into the jam’s body.
-
Sweetener (Maple Syrup, Honey, Agave)
This is where you get to customize your jam to your taste! My go-to is often maple syrup because its subtle flavor complements raspberries beautifully without overpowering them, and it keeps the jam vegan. Honey is another excellent choice, offering a slightly richer taste. Agave nectar is also a great option if you prefer a more neutral sweetness. I typically start with 1-2 tablespoons, but I always encourage you to taste and adjust! Some batches of raspberries are naturally sweeter than others, so trust your palate. For those looking for sugar-free alternatives, a granulated erythritol blend or stevia drops can work wonderfully; just make sure to add them gradually and taste as you go.
-
Fresh Lemon Juice
A little splash of fresh lemon juice works wonders in this jam. It brightens the flavor of the raspberries, adding a lovely tang that prevents the jam from tasting flat. Beyond flavor, lemon juice also contains natural pectin and acts as a mild preservative, helping to extend the jam’s shelf life slightly in the refrigerator. I usually add about half a tablespoon, but if your raspberries are very tart, you might use a touch less, or if they’re super sweet, a bit more to balance. Lime juice can be a good substitute if you’re out of lemons, offering a slightly different but equally pleasant citrus note.
Step-by-Step Instructions
Making this Raspberry Chia Jam is seriously one of the easiest things you’ll ever do in the kitchen. There’s no fancy equipment needed, no thermometers, and no hot splattering jam – just pure, simple goodness. Here’s how I whip up a batch:
-
Prepare Your Raspberries
First things first, I take my two cups of raspberries and place them in a medium-sized bowl. If they’re fresh, I give them a quick rinse and make sure they’re patted dry. If I’m using frozen raspberries, I make sure they’re fully thawed before this step. Once they’re in the bowl, I grab a fork or a potato masher. I like to gently mash the raspberries until they reach my desired consistency. Some people prefer a very chunky jam with lots of whole berry pieces, while others like it smoother. I aim for a consistency that has some recognizable berry bits but is mostly broken down. If you prefer a super smooth jam, you could even give them a quick pulse in a food processor, but I usually find a fork does the trick perfectly for that rustic texture.
-
Combine Ingredients
Once my raspberries are mashed to perfection, I add in the other key players. I toss in 2-3 tablespoons of chia seeds, my chosen sweetener (starting with 1-2 tablespoons of maple syrup), and about ½ tablespoon of fresh lemon juice directly into the bowl with the mashed raspberries. The order doesn’t really matter here, as long as everything ends up in the bowl together.
-
Stir Thoroughly
Now comes the crucial part for even gelling. I take a spoon or spatula and stir everything together really, really well. I make sure the chia seeds are fully dispersed throughout the raspberry mixture and aren’t clumping together at the bottom. This initial thorough stir is important because it ensures the chia seeds are evenly distributed to absorb the liquid and thicken properly. I stir for a good minute or two, making sure everything is beautifully combined.
-
Let It Sit and Thicken
This is where the magic happens! Once everything is stirred, I cover the bowl and let it sit. For a quick set, I’ll sometimes leave it on the counter for about 10-15 minutes, giving it a stir every now and then. However, for the best, most consistent results, I prefer to pop it into the refrigerator for at least 30 minutes, or even an hour. As it chills, the chia seeds will work their magic, absorbing the liquid and transforming the loose berry mixture into a lovely, jammy consistency. Don’t rush this step – patience is key to a perfectly set jam!
-
Adjust and Enjoy!
After the jam has had time to thicken, I pull it out of the fridge and give it one more good stir. This is my chance to check the consistency. If it’s too thick for my liking, I might add a tiny splash of water or a bit more lemon juice to loosen it up. If it’s not quite thick enough, I can stir in another ½ teaspoon of chia seeds and let it sit for another 15-20 minutes. This is also the perfect time to taste it and adjust the sweetness. If I think it needs a little more zing, I’ll add a touch more lemon juice. If it needs more sweetness, I’ll stir in another drizzle of maple syrup. Once I’m happy with the flavor and texture, my fresh, homemade Raspberry Chia Jam is ready to be transferred to a clean jar and enjoyed!
Tips & Suggestions
Making Raspberry Chia Jam is a breeze, but over the years, I’ve picked up a few extra tips and tricks that really elevate the experience. These suggestions can help you customize your jam perfectly and make the most of this delightful no-cook recipe.
-
Adjusting Consistency
The beauty of chia jam is how forgiving it is. If, after chilling, your jam is too thin for your liking, simply stir in an additional ½ to 1 teaspoon of chia seeds, mix well, and let it sit for another 15-20 minutes (or longer in the fridge). The chia seeds will continue to absorb liquid and thicken the jam. Conversely, if your jam becomes too thick, especially after being in the fridge for a while, you can easily thin it out by stirring in a tablespoon or two of water, a splash more lemon juice, or even a tiny bit of fruit juice until it reaches your preferred spreadable consistency. I always aim for something that’s easy to spoon but holds its shape.
-
Flavor Variations are Endless!
While raspberry is fantastic on its own, this recipe is a wonderful canvas for creativity. I often like to add a tiny splash of vanilla extract (about ¼ teaspoon) to enhance the berry flavor and give it a creamy undertone. A pinch of cinnamon can add warmth, especially if you’re serving it with oatmeal. For something a bit more adventurous, try adding a tiny bit of almond extract, which pairs wonderfully with raspberries, or even some orange zest for a bright, citrusy twist. You can also experiment with other berries like strawberries, blueberries, or even a mix of berries for a “forest fruit” chia jam!
-
Achieving Your Preferred Texture
I find that mashing with a fork gives me a lovely, rustic jam with plenty of recognizable berry pieces. If you prefer a smoother jam, a potato masher can break down the berries more thoroughly. For an ultra-smooth, seedless jam (though I personally love the texture the chia seeds add!), you could even gently warm the raspberries briefly, pass them through a fine-mesh sieve to remove seeds, and then proceed with adding the chia seeds and other ingredients. However, remember this would technically involve a tiny bit of “cooking” to soften them for sieving, which goes against the “no-cook” principle slightly, so I usually stick to mashing.
-
Serving Suggestions Beyond Toast
This Raspberry Chia Jam is incredibly versatile! Of course, it’s amazing on toast, bagels, or English muffins. But don’t stop there! I love swirling it into my morning yogurt or oatmeal, layering it in parfaits with granola, or dolloping it onto pancakes and waffles. It’s also fantastic as a topping for vanilla ice cream, spooned over cottage cheese, or even used as a filling for thumbprint cookies or homemade pastries. Sometimes, I just enjoy a spoonful straight from the jar as a healthy sweet treat!
Storage
Proper storage is key to enjoying your homemade Raspberry Chia Jam for as long as possible. Since this is a no-cook recipe and doesn’t go through a traditional canning process, its shelf life is different from commercially prepared jams. But don’t worry, it stores beautifully for both short-term and long-term enjoyment!
-
Refrigeration
Once you’ve made your jam and it has thickened, transfer it to a clean, airtight glass jar or container. I find that it keeps wonderfully in the refrigerator for about 7 to 10 days. Always make sure the lid is tightly sealed to prevent any air exposure, which can shorten its freshness. I recommend labeling your jar with the date you made it, so you can easily keep track. If you notice any unusual smells or visible mold, it’s always best to discard it.
-
Freezing for Longer Storage
One of the best things about this no-cook chia jam is how incredibly well it freezes! If you’ve made a larger batch or simply want to enjoy it beyond the 10-day refrigeration window, freezing is your answer. To freeze, spoon the jam into freezer-safe containers, leaving about half an inch of headspace at the top to allow for expansion. You can also use freezer-safe bags, squeezing out as much air as possible before sealing them flat. Another great trick is to freeze portions in an ice cube tray, and once solid, transfer the jam cubes to a freezer bag. This way, you can easily thaw just the amount you need for a single serving. Frozen chia jam will maintain its quality for up to 3 months. When you’re ready to use it, simply transfer it from the freezer to the refrigerator to thaw overnight, or let it sit at room temperature for a few hours. Give it a good stir once thawed, and it’ll be just as delicious as when you first made it!
Final Thoughts
And there you have it! I truly hope you give this incredible Raspberry Chia Jam (no Cook) a try. What I love most about it is how effortlessly it comes together – no long simmering, no special equipment, just pure, vibrant raspberry goodness made possible by the magic of chia seeds.
It’s the perfect way to enjoy a homemade treat that’s not only incredibly delicious but also packed with good-for-you ingredients. Say goodbye to overly sweet store-bought jams and hello to a fresh, fruity spread that brightens up everything from your morning toast to a simple bowl of yogurt. The natural sweetness of the raspberries shines through beautifully, creating a taste that feels both indulgent and wonderfully wholesome.
So, go ahead and whip up a batch of this fantastic Raspberry Chia Jam (no Cook). I promise, your taste buds (and your pantry) will thank you for discovering such a simple, speedy, and utterly delightful way to enjoy homemade jam!
Raspberry Chia Jam Recipe: Quick, No-Cook, Healthy!
- Total Time: 10 minutes
- Yield: Approximately 1 cup 1x
Description
This Raspberry Chia Jam is a quick and healthy alternative to traditional jams, requiring no cooking and bursting with fresh raspberry flavor. With just a few simple ingredients, you can create a delicious spread that’s perfect for any meal.
Ingredients
- 2 cups Fresh or Frozen Raspberries
- 2–3 tablespoons Chia Seeds
- 1–2 tablespoons Sweetener (Maple Syrup, Honey, or Agave)
- ½ tablespoon Fresh Lemon Juice
Instructions
- Prepare Your Raspberries: Place 2 cups of raspberries in a medium-sized bowl. If fresh, rinse and pat dry; if frozen, ensure they are fully thawed. Gently mash the raspberries with a fork or potato masher to your desired consistency.
- Combine Ingredients: Add 2-3 tablespoons of chia seeds, 1-2 tablespoons of your chosen sweetener, and ½ tablespoon of fresh lemon juice to the bowl with the mashed raspberries.
- Stir Thoroughly: Mix everything together well, ensuring the chia seeds are evenly distributed throughout the raspberry mixture.
- Let It Sit and Thicken: Cover the bowl and let it sit for 10-15 minutes at room temperature or refrigerate for at least 30 minutes to allow the chia seeds to absorb liquid and thicken the mixture.
- Adjust and Enjoy!: After chilling, stir the jam and check the consistency. Adjust with a splash of water or more lemon juice if too thick, or add more chia seeds if too thin. Taste and adjust sweetness as needed before transferring to a clean jar.
- Prep Time: 10 mins
- Cook Time: 0 mins
- Category: Condiment
- Method: No-Cook
- Cuisine: American
Nutrition
- Serving Size: 2 tablespoons
- Calories: 40
- Sugar: 5 g
- Sodium: 1 mg
- Fat: 1 g
- Saturated Fat: 0 g
- Unsaturated Fat: 1 g
- Trans Fat: 0 g
- Carbohydrates: 10 g
- Fiber: 2 g
- Protein: 1 g
- Cholesterol: 0 mg
Keywords: You can customize the sweetness with different sweeteners and add flavor variations like vanilla extract, cinnamon, or other berries. Adjust the consistency by adding more chia seeds or liquid as needed.