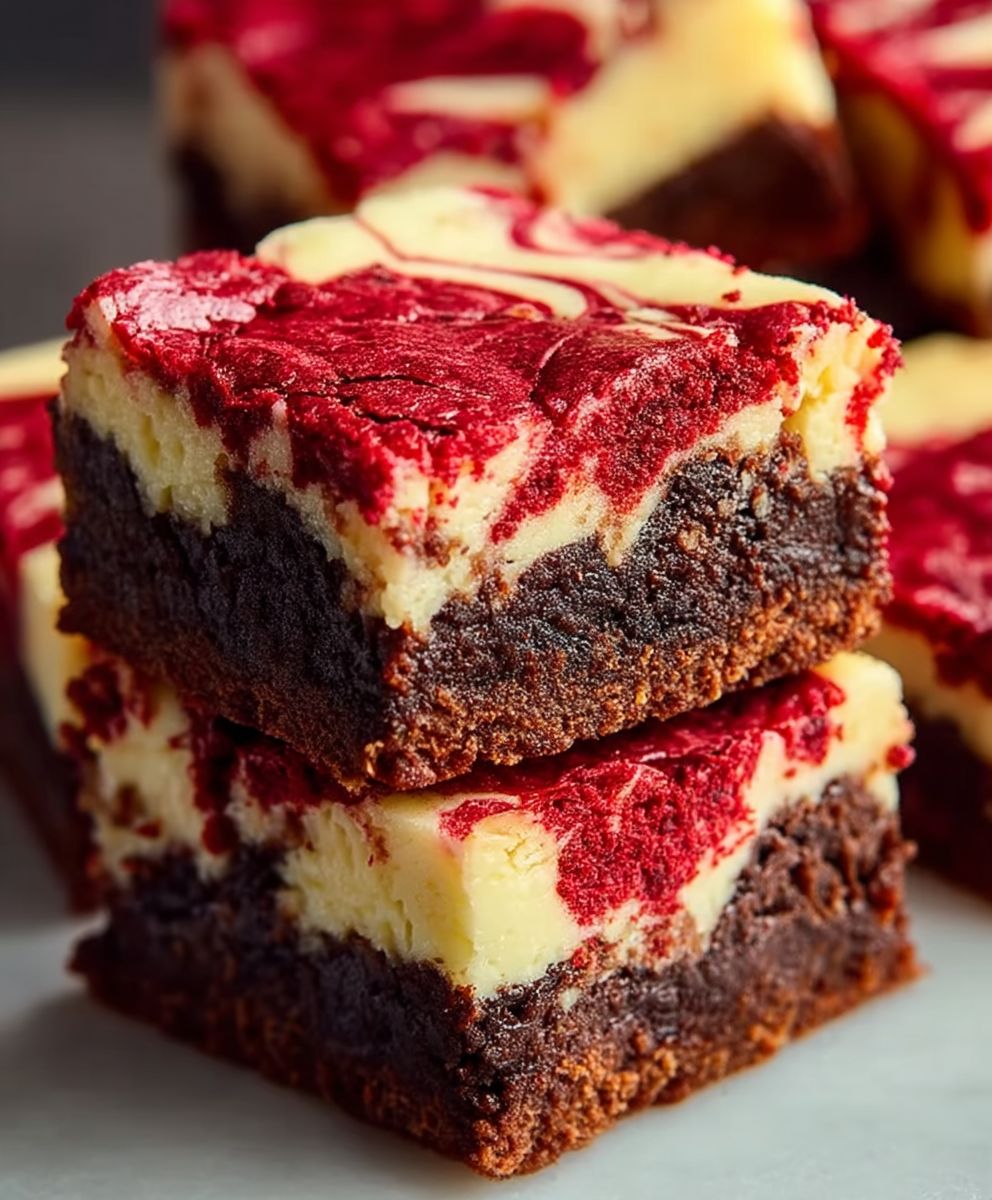
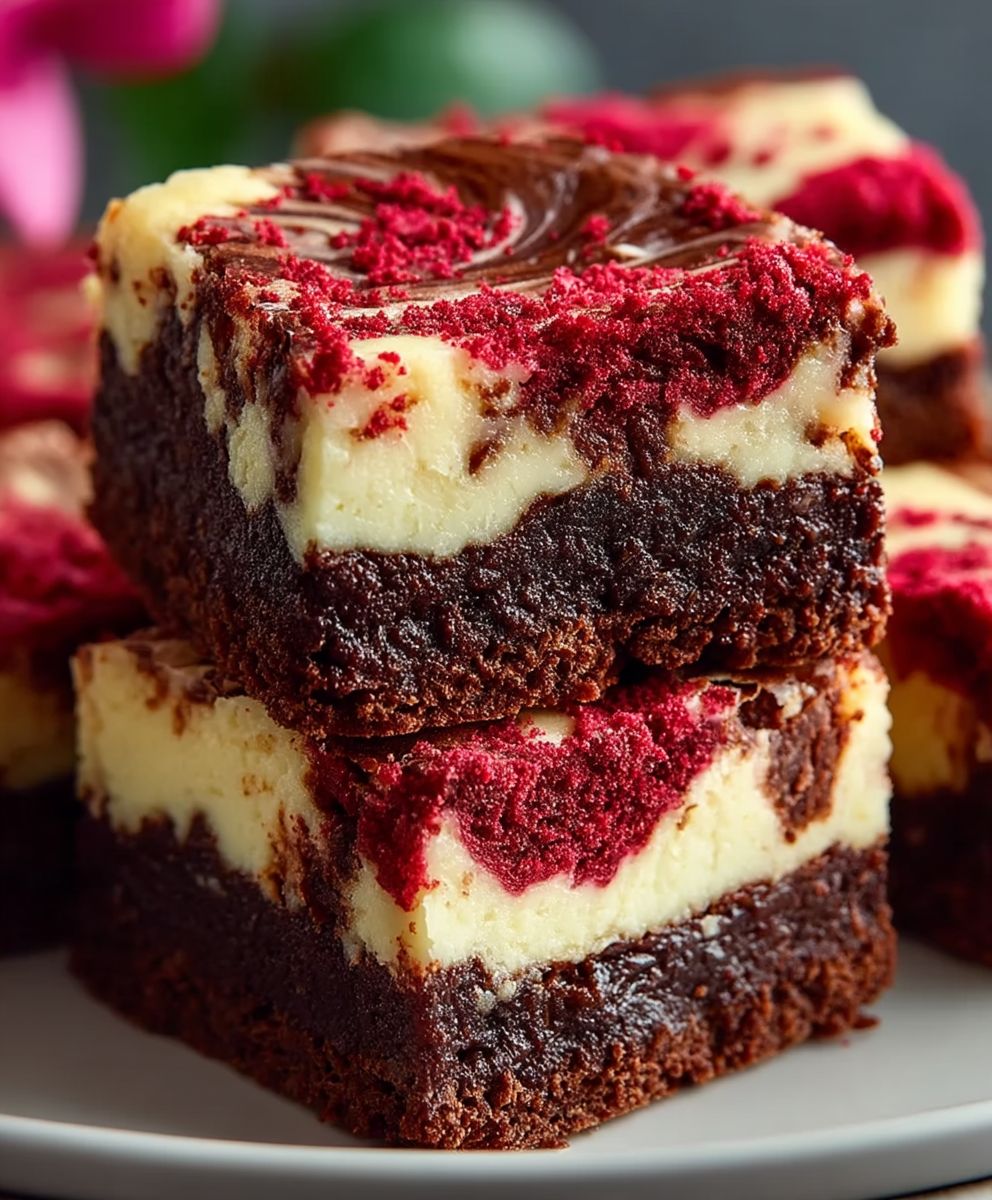
Red Velvet Cheesecake Brownies: Prepare to be utterly captivated! Imagine the fudgy, intense chocolate experience of a brownie, swirled with the tangy, creamy decadence of cheesecake, all infused with the unmistakable allure of red velvet. It’s a dessert trifecta that will redefine your definition of indulgence.
The vibrant red hue of red velvet desserts has a fascinating history, often attributed to a reaction between cocoa powder and acidic ingredients like buttermilk or vinegar. While modern recipes often rely on food coloring to achieve that signature color, the essence of red velvet remains: a slightly tangy, subtly chocolatey flavor that’s both comforting and sophisticated. This delightful flavor profile, combined with the rich textures of brownies and cheesecake, creates a truly unforgettable treat.
What’s not to love? People adore red velvet cheesecake brownies because they offer the best of all worlds. The fudgy brownie base provides a satisfyingly dense and chocolatey foundation, while the cheesecake swirl adds a creamy, tangy counterpoint that cuts through the richness. They are surprisingly easy to make, perfect for potlucks, bake sales, or simply satisfying your own sweet tooth. Get ready to experience a symphony of flavors and textures with these irresistible treats!
Ingredients:
- For the Brownie Layer:
- 1/2 cup (1 stick) unsalted butter, melted
- 1 cup granulated sugar
- 2 large eggs
- 1 teaspoon vanilla extract
- 1/4 cup unsweetened cocoa powder
- 1 teaspoon red food coloring (gel is recommended for vibrant color)
- 1/2 cup all-purpose flour
- 1/4 teaspoon salt
- For the Cheesecake Layer:
- 8 ounces cream cheese, softened
- 1/3 cup granulated sugar
- 1 large egg
- 1/2 teaspoon vanilla extract
- Optional Garnish:
- Powdered sugar, for dusting
- Red velvet cake crumbs
- White chocolate shavings
Preparing the Brownie Layer
- Melt the Butter: In a microwave-safe bowl, melt the butter. You can do this in 30-second intervals, stirring in between, until completely melted. Be careful not to overheat it!
- Combine Butter and Sugar: In a large mixing bowl, whisk together the melted butter and granulated sugar until well combined. The mixture should be smooth and slightly glossy.
- Add Eggs and Vanilla: Beat in the eggs one at a time, ensuring each egg is fully incorporated before adding the next. Then, stir in the vanilla extract. This step is crucial for a fudgy brownie texture.
- Incorporate Cocoa and Red Food Coloring: Add the unsweetened cocoa powder and red food coloring to the wet ingredients. Mix until everything is evenly colored and there are no streaks of cocoa powder or food coloring. I recommend using gel food coloring for a richer, more vibrant red. Liquid food coloring might require more to achieve the desired color, potentially affecting the brownie’s consistency.
- Add Dry Ingredients: In a separate bowl, whisk together the all-purpose flour and salt. Gradually add the dry ingredients to the wet ingredients, mixing until just combined. Be careful not to overmix the batter, as this can lead to tough brownies. A few streaks of flour are okay at this stage.
Preparing the Cheesecake Layer
- Soften the Cream Cheese: Make sure your cream cheese is properly softened. This is key to a smooth and creamy cheesecake layer. If you’re short on time, you can microwave it in 15-second intervals, but watch it closely to prevent it from melting.
- Cream Cheese and Sugar: In a separate mixing bowl, beat the softened cream cheese and granulated sugar together until smooth and creamy. You can use a hand mixer or a stand mixer for this step.
- Add Egg and Vanilla: Beat in the egg until just combined. Then, stir in the vanilla extract. Again, avoid overmixing to prevent the cheesecake layer from becoming too thin.
Assembling and Baking the Brownies
- Prepare the Baking Pan: Preheat your oven to 350°F (175°C). Grease and flour an 8×8 inch baking pan. You can also line the pan with parchment paper, leaving an overhang on the sides, for easy removal after baking. This is my preferred method!
- Pour Brownie Batter: Pour the brownie batter into the prepared baking pan and spread it evenly.
- Pour Cheesecake Batter: Gently pour the cheesecake batter over the brownie batter. You can swirl the cheesecake batter into the brownie batter using a knife or a toothpick for a marbled effect. Be careful not to over-swirl, as you want to maintain distinct layers.
- Bake: Bake in the preheated oven for 30-35 minutes, or until a toothpick inserted into the center comes out with moist crumbs attached. The cheesecake layer should be set around the edges but still slightly jiggly in the center.
- Cool Completely: Remove the brownies from the oven and let them cool completely in the pan on a wire rack. This is important for the brownies to set properly and prevent them from crumbling when you cut them.
- Chill (Optional but Recommended): For best results, chill the brownies in the refrigerator for at least 2 hours before cutting. This will make them easier to slice and enhance the flavors.
Cutting and Serving
- Cut into Squares: Once the brownies are completely cooled and chilled (if desired), carefully lift them out of the pan using the parchment paper overhang (if you used it). Cut them into squares using a sharp knife. For clean cuts, you can wipe the knife clean between each slice.
- Garnish (Optional): Dust the brownies with powdered sugar, sprinkle with red velvet cake crumbs, or drizzle with melted white chocolate for an extra touch of elegance.
- Serve and Enjoy: Serve the red velvet cheesecake brownies and enjoy! They are best enjoyed within 2-3 days, stored in an airtight container in the refrigerator.
Tips for Success:
- Use Room Temperature Ingredients: Using room temperature ingredients, especially for the cheesecake layer, helps ensure a smooth and creamy texture.
- Don’t Overbake: Overbaking will result in dry brownies. Keep a close eye on them and remove them from the oven when a toothpick inserted into the center comes out with moist crumbs.
- Chill Before Cutting: Chilling the brownies before cutting makes them easier to slice and prevents them from crumbling.
- Gel Food Coloring: Gel food coloring provides a more vibrant red color than liquid food coloring.
- Adjust Sweetness: If you prefer a less sweet brownie, you can reduce the amount of sugar in the brownie layer by a tablespoon or two.
- Variations: Feel free to add chocolate chips, nuts, or other toppings to the brownie batter for added flavor and texture.
Troubleshooting:
- Brownies are too dry: Make sure you’re not overbaking the brownies. Also, ensure you’re using the correct amount of ingredients and that your oven temperature is accurate.
- Cheesecake layer is cracked: This can happen if the cheesecake layer is overbaked or if the oven temperature is too high. Try reducing the baking time or temperature slightly.
- Brownies are too fudgy: This is usually a good thing! But if you prefer a cakier brownie, you can add an extra tablespoon or two of flour to the brownie batter.
- Brownies are sticking to the pan: Make sure you grease and flour the pan thoroughly or use parchment paper to line it.
Enjoy your baking adventure! I hope these Red Velvet Cheesecake Brownies become a new favorite in your household. They are always a hit at parties and gatherings!
Conclusion:
And there you have it! These Red Velvet Cheesecake Brownies are truly something special, a decadent treat that perfectly marries the rich, fudgy goodness of brownies with the creamy tang of cheesecake, all wrapped up in the iconic red velvet flavor. I genuinely believe this recipe is a must-try for anyone who loves baking, or simply enjoys a truly exceptional dessert. The combination of textures and flavors is simply irresistible, and I promise, one bite will have you hooked!
Why is this recipe a must-try? Well, beyond the incredible taste, it’s surprisingly easy to make. The steps are straightforward, and you don’t need any fancy equipment or advanced baking skills. Plus, it’s a real crowd-pleaser. Whether you’re baking for a special occasion, a potluck, or just a cozy night in, these brownies are guaranteed to be a hit. They’re visually stunning, too, with the vibrant red velvet swirled with the creamy white cheesecake – perfect for impressing your friends and family.
But the best part? The taste! The slightly tangy cheesecake perfectly complements the rich, chocolatey red velvet, creating a flavor explosion in every bite. The fudgy brownie base provides the perfect foundation for the creamy cheesecake swirl, resulting in a texture that’s both satisfying and indulgent. Honestly, what’s not to love?
Now, let’s talk serving suggestions and variations. These Red Velvet Cheesecake Brownies are delicious served as is, but you can also dress them up to make them even more special. A dusting of powdered sugar adds a touch of elegance, while a drizzle of melted white chocolate takes them to the next level. For a truly decadent experience, try serving them with a scoop of vanilla ice cream or a dollop of whipped cream.
If you’re feeling adventurous, you can also experiment with different variations. Try adding chocolate chips to the brownie batter for an extra dose of chocolatey goodness. Or, swirl in some raspberry jam along with the cheesecake for a fruity twist. You could even add a layer of crushed Oreos to the bottom of the pan for a cookies-and-cream vibe. The possibilities are endless!
For a festive touch during the holidays, consider adding a sprinkle of red and green sprinkles or using a cookie cutter to create fun shapes. These brownies also make a wonderful homemade gift. Package them in a pretty box or tin, and you’re sure to brighten someone’s day.
I’m so confident that you’ll love this recipe, and I can’t wait to hear about your experience. So, go ahead, gather your ingredients, preheat your oven, and get ready to bake up a batch of these amazing Red Velvet Cheesecake Brownies. I promise, you won’t regret it!
Don’t forget to share your creations with me! Tag me in your photos on social media and let me know what you think. I’m always excited to see your baking adventures and hear about your favorite variations. Happy baking, and enjoy every delicious bite of these incredible Red Velvet Cheesecake Brownies! I’m sure this recipe will become a staple in your baking repertoire. Let me know if you have any questions, and I’m happy to help!
Red Velvet Cheesecake Brownies: The Ultimate Dessert Recipe
Decadent red velvet brownies with a creamy cheesecake swirl. A perfect combination of fudgy brownie and tangy cheesecake in every bite!
Ingredients
Instructions
Recipe Notes
- Use room temperature ingredients for a smooth cheesecake layer.
- Don’t overbake the brownies.
- Chilling before cutting makes for cleaner slices.
- Gel food coloring gives a more vibrant red.
- Adjust sweetness to your preference.
- Feel free to add chocolate chips, nuts, or other toppings.

