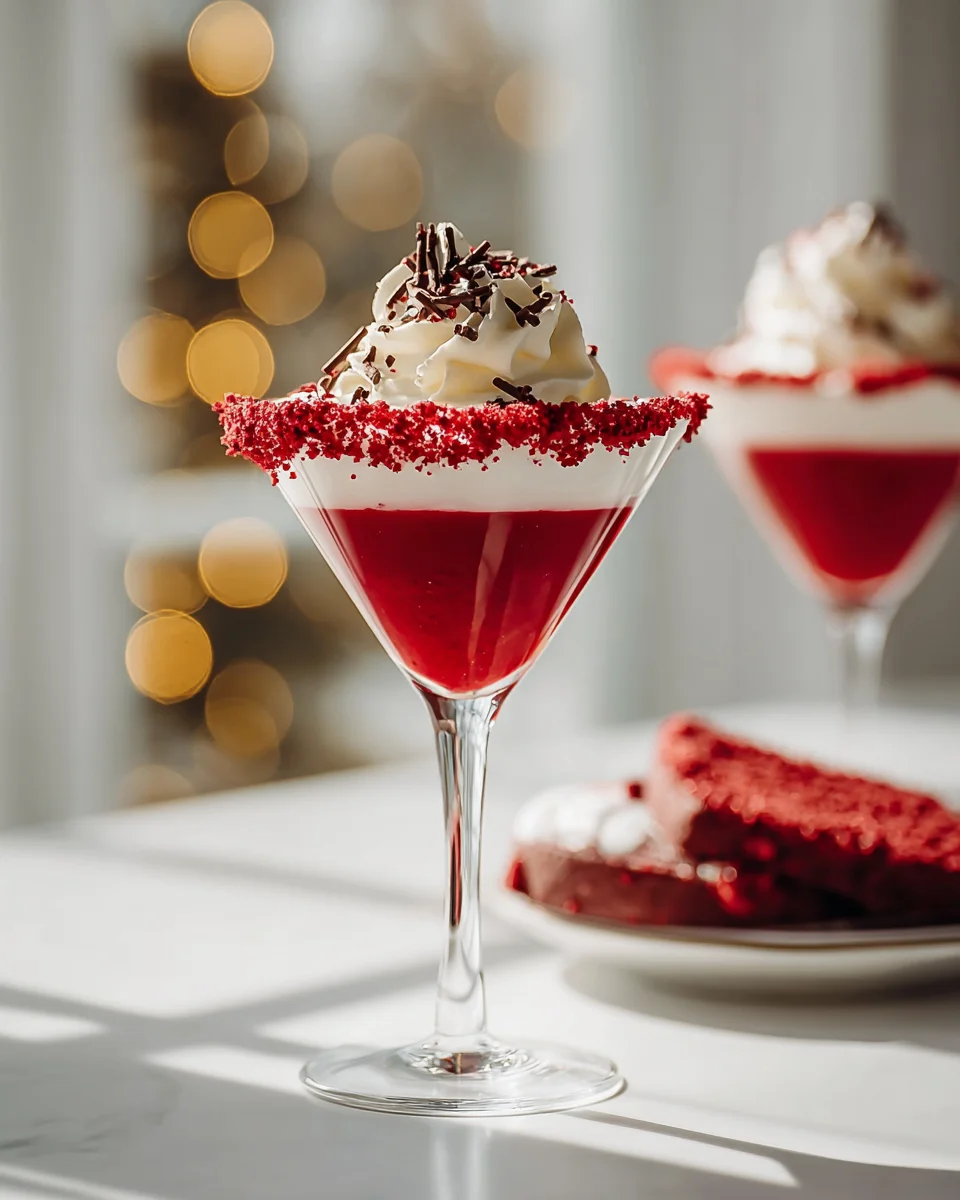
Red Velvet Martini
Oh my goodness, get ready to experience pure joy in a glass! I’m so excited to share my absolute favorite celebratory sip with you: the Red Velvet Martini. This isn’t just any ordinary drink; it’s a little piece of dessert heaven, reimagined as a gorgeous, vibrant non-alcoholic treat. What makes it so special, you ask? Well, imagine all the rich, subtly chocolatey, and creamy goodness of a classic red velvet cake, perfectly blended into a sophisticated, sippable mocktail. It’s got that signature deep crimson hue that’s just begging to be admired, often finished with a swirl of creamy “frosting” around the rim or as a float. You are absolutely going to adore this because it’s indulgent, impressive, and surprisingly easy to whip up. Whether you’re celebrating a special occasion, hosting a gathering, or simply craving a decadent pick-me-up, this Red Velvet Martini is guaranteed to bring a smile to your face. It’s sweet, velvety smooth, and utterly delightful – truly a dessert in a glass!

Ingredient Notes
Creating the perfect Red Velvet Martini, especially when we’re crafting a delicious non-alcoholic version, is all about getting those signature flavors just right. I find that a few key ingredients, thoughtfully chosen, make all the difference in achieving that rich, creamy, and subtly chocolatey profile we all adore about red velvet cake.
The Red Velvet Base
- Red Velvet Syrup or Mix: This is the heart of our martini! My go-to is a good quality red velvet flavored syrup, as it provides both the vibrant color and that unique cocoa-vanilla taste. Look for one designed for beverages.
- Homemade Alternative: If you can’t find a suitable syrup or prefer to make your own, it’s quite simple. I combine a tablespoon of unsweetened cocoa powder with about two tablespoons of granulated sugar, a splash of hot water to dissolve them into a paste, a few drops of red food coloring (gel works best for intensity), and a dash of vanilla extract. This creates a fantastic concentrated red velvet flavor.
For Creaminess and Body
- Heavy Cream or Half-and-Half: To give our martini that luscious, velvety texture, I highly recommend using heavy cream. It provides a luxurious mouthfeel that truly elevates the drink. Half-and-half is a lighter alternative if you prefer something less rich.
- Dairy-Free Options: For those who prefer a non-dairy option, full-fat coconut cream is an excellent substitute for heavy cream. It adds a wonderful richness and a subtle hint of coconut that pairs surprisingly well with red velvet. You could also use a good quality oat milk or almond milk, though they will yield a slightly thinner consistency.
Flavor Enhancers
- Milk (Any Kind): I like to add a splash of milk to round out the drink and ensure it’s not too thick. Whole milk works beautifully, but feel free to use your preferred milk—almond, oat, or soy milk are all great choices and will integrate seamlessly with the other dairy-free alternatives.
- Vanilla Extract: A touch of pure vanilla extract is essential to enhance the red velvet flavor. It brings out the sweetness and rounds off the cocoa notes.
- Unsweetened Cocoa Powder: Even if using a red velvet syrup, I sometimes add a tiny pinch of extra unsweetened cocoa powder to the mix. It deepens the chocolate notes without adding too much sweetness, giving the drink a more complex flavor profile.
- Sweetener (to taste): If you’re making your own red velvet base or find your syrup isn’t quite sweet enough, I always have a little extra granulated sugar, simple syrup, or a natural sweetener like agave nectar on hand to adjust to my liking.
Garnishes
No martini is complete without a fabulous garnish! I love to use:
- Whipped cream (dairy or non-dairy).
- Chocolate shavings or mini chocolate chips.
- Red velvet sprinkles or festive edible glitter.
- A fresh raspberry or strawberry on the rim for a pop of color.
- For an extra special touch, a mini red velvet cupcake on the side of the glass.
Step-by-Step Instructions
Crafting this stunning Red Velvet Martini is a joyful process, and I promise you, the results are worth every step. This recipe is designed to be simple enough for a weeknight treat but elegant enough for a special occasion. We’ll be making a delightful zero-proof version, perfect for everyone to enjoy!
Step 1: Gather and Chill Your Essentials
Before I even think about mixing, I like to ensure everything is perfectly chilled. Trust me, a truly cold martini is a happy martini! I recommend placing your martini glasses in the freezer for at least 15-20 minutes. If you have the space, chilling your red velvet syrup, cream, and milk beforehand also makes a big difference.
- Chill Martini Glasses: Place them in the freezer.
- Prepare Ingredients: Measure out your red velvet syrup, cream, milk, vanilla extract, and any additional cocoa powder or sweetener.
- Ice, Ice Baby: Make sure you have plenty of good quality ice cubes ready for your shaker.
Step 2: Combine in the Shaker
Now for the fun part! Into your cocktail shaker, I combine all the liquid ingredients that will form the body of our martini. This ensures everything gets thoroughly mixed and chilled together.
- Add Red Velvet Syrup: Pour 2 ounces (or about 4 tablespoons) of your red velvet syrup into the shaker. If you’re using my homemade red velvet base, add that now.
- Introduce the Cream: Next, add 1.5 ounces (about 3 tablespoons) of heavy cream (or your chosen dairy-free alternative like coconut cream).
- Splash of Milk: Pour in 1 ounce (about 2 tablespoons) of milk. This helps to thin the mixture just slightly and creates a lovely balance.
- Vanilla Boost: Add 1/4 teaspoon of vanilla extract. It truly enhances the red velvet flavor.
- Optional Cocoa: If you want a deeper chocolate note, I sometimes add a tiny pinch (about 1/8 teaspoon) of unsweetened cocoa powder at this stage.
- Taste and Sweeten (Optional): If you prefer a sweeter drink, add a teaspoon of granulated sugar or simple syrup now. You can always add more later if needed.
Step 3: Shake It Up!
This is where the magic happens! Fill your shaker almost to the top with ice. Secure the lid tightly, and then I shake vigorously for about 15-20 seconds. You want the outside of the shaker to feel really cold, almost frosty. This not only chills the drink perfectly but also emulsifies the cream, giving it that wonderfully smooth and velvety texture.
- Fill with Ice: Add ice cubes to the shaker until it’s about three-quarters full.
- Shake Vigorously: Hold the shaker with both hands and shake with purpose until the exterior is icy cold.
Step 4: Strain and Serve
Once your drink is perfectly chilled and mixed, it’s time to pour it into your waiting, frosty martini glass. I always use a fine-mesh strainer over the shaker’s built-in strainer to catch any tiny ice shards or undissolved cocoa powder, ensuring a perfectly smooth pour.
- Retrieve Glass: Take your chilled martini glass from the freezer.
- Strain: Remove the lid from the shaker and, using the built-in strainer or a separate fine-mesh strainer, pour the Red Velvet Martini into your chilled glass.
Step 5: Garnish with Panache
Now for the final flourish! This is your chance to make your martini truly Instagram-worthy. I love to get creative with garnishes, as they add both visual appeal and an extra touch of flavor.
- Whipped Cream & Shavings: Top with a generous dollop of whipped cream (dairy or non-dairy) and sprinkle with chocolate shavings or red velvet sprinkles.
- Fruit Accent: For a pop of color, I sometimes balance a fresh raspberry or strawberry on the rim.
- Mini Treat: For the ultimate indulgence, consider a mini red velvet cupcake on the side of the glass. It’s a showstopper!
Serve immediately and enjoy your stunning, zero-proof Red Velvet Martini!
Tips & Suggestions
I’ve made this Red Velvet Martini countless times, and over the years, I’ve picked up a few tricks that I love to share to help you make yours absolutely perfect. These little details can elevate your drink from good to truly unforgettable!
Achieving the Perfect Chill
This is my number one tip for any martini: temperature is everything! I always tell people to think “ice cold.”
- Pre-chill Everything: Beyond just the glass, try to chill your red velvet syrup, cream, and milk in the refrigerator before you even start. The colder your ingredients are, the less dilution you’ll get from the ice in the shaker, resulting in a richer, more concentrated flavor.
- Plenty of Ice: Don’t be shy with the ice in your shaker. Use fresh, good-quality ice cubes and fill the shaker almost to the brim. The more ice, the colder your drink will get, and the less it will water down during shaking.
Customizing Your Martini
The beauty of making your own drinks is that you can tailor them exactly to your preferences. Don’t be afraid to experiment!
- Sweetness Adjustment: My taste for sweetness can vary, and yours might too! Always taste a small drop of your mix before shaking with ice. You can easily add more simple syrup or granulated sugar dissolved in a tiny bit of hot water if you want it sweeter.
- Color Intensity: If you’re using my homemade red velvet base, you can adjust the vibrancy of the red. Start with a few drops of red food coloring and add more until you reach your desired shade. Gel food coloring often gives the best, most intense color.
- Creaminess Factor: If you prefer an even richer, thicker martini, increase the amount of heavy cream slightly. For a lighter version, you can reduce the cream or use a bit more milk.
Presentation is Key
We drink with our eyes first, especially with such a visually appealing drink!
- Rim the Glass: For an extra special touch, I love to rim the glass. You can use a mixture of sugar and a tiny pinch of cocoa powder, or even red velvet cake crumbs for a truly immersive experience. Just moisten the rim with a lemon wedge or a little simple syrup, then dip it into your chosen coating.
- Garnish Galore: Beyond the suggestions in the recipe, consider a small square of red velvet brownie or a festive cookie alongside the glass for a dessert-like presentation.
Flavor Variations to Explore
Once you’ve mastered the classic, why not play with some twists?
- Minty Velvet: For a holiday spin, add a tiny drop of peppermint extract (start with just one drop, it’s potent!) or garnish with a mini candy cane.
- Berry Velvet: A splash of cherry or raspberry juice can add another layer of fruity tartness that complements the red velvet beautifully.
- Espresso Kick: For a more grown-up flavor, a tiny pinch of instant espresso powder can deepen the cocoa notes without making the drink taste like coffee.
Batching for a Crowd
If you’re hosting a party, making individual martinis can be time-consuming. Here’s my trick:
- Premix the Base: Combine all the liquid ingredients (red velvet syrup, cream, milk, vanilla, cocoa) in a large pitcher or jar, but do not add ice. Stir well and keep it chilled in the refrigerator.
- Shake Individually: When ready to serve, simply pour the pre-mixed base into a shaker filled with ice and shake vigorously for each martini. This keeps the drinks perfectly chilled and fresh without being watered down by melting ice in the pitcher.
Remember, this is a fun, non-alcoholic treat, so let your creativity shine! Enjoy crafting and sipping your stunning Red Velvet Martini.
Storage
When it comes to beverages, especially creamy ones like our Red Velvet Martini, freshness is truly best. I always advise enjoying this delightful drink right after it’s prepared to savor its optimal flavor and texture. However, I understand that sometimes you might want to prepare components in advance or have a little leftover, so here are my best storage tips.
Prepared Red Velvet Martini
- Immediate Consumption is Best: My strongest recommendation is to consume your Red Velvet Martini immediately after it’s made. The texture and temperature are at their peak right after shaking, and the drink is beautifully emulsified.
- Why Not Store Prepared? Once ice has been introduced and the drink has been shaken, it begins to dilute as the ice melts. If you store a fully prepared martini, it will become watery and lose its vibrant flavor and creamy consistency over time. The whipped cream garnish will also deflate and dissolve.
Unmixed Ingredients (for make-ahead convenience)
This is where you can be strategic if you’re planning a gathering or want to enjoy this martini throughout the week without the fuss of measuring every time.
- Red Velvet Syrup/Base:
- Commercial Syrup: Store commercial red velvet syrup according to the manufacturer’s instructions, typically in a cool, dark pantry or refrigerator once opened. It usually has a long shelf life.
- Homemade Base: If you’re using my homemade red velvet base (cocoa, sugar, food coloring, vanilla), you can mix a larger batch of this concentrate and store it in an airtight container or jar in the refrigerator for up to 5-7 days. Just give it a good stir before using.
- Cream and Milk: Keep your heavy cream and milk (dairy or non-dairy) in their original containers, stored in the coldest part of your refrigerator, usually on a lower shelf. Always check the expiration dates.
- Combined Liquid Base (without ice): For ultimate convenience, you can pre-mix all the liquid ingredients for the martini (red velvet syrup/base, cream, milk, vanilla, extra cocoa) in a pitcher or airtight container.
- Storage: Store this combined liquid base in the refrigerator. I wouldn’t keep it for more than 2-3 days, as the cream can start to separate or go off.
- Preparation: When you’re ready to enjoy, just give the mixture a good stir, pour the desired amount into a shaker filled with ice, and shake vigorously before straining into your chilled martini glass. This method ensures a fresh, perfectly chilled martini every time!
Garnishes
- Whipped Cream: Always prepare whipped cream just before serving for the best texture and appearance. It deflates quickly once made.
- Chocolate Shavings/Sprinkles: Store these in airtight containers at room temperature (or refrigerated for chocolate, if your kitchen is warm) until ready to use.
- Fresh Fruit: Keep raspberries or strawberries refrigerated and wash them right before garnishing.
By preparing components in advance, you can quickly whip up a fresh Red Velvet Martini whenever the craving strikes, ensuring that perfect velvety texture and rich flavor every single time!
Final Thoughts
So there you have it, my friends! We’ve journeyed together to create something truly exceptional. The Red Velvet Martini is so much more than just a beautiful glass; it’s a celebration in itself, a delightful sip of pure indulgence. I simply adore how this recipe captures all the beloved notes of a classic red velvet cake – the cocoa, the subtle tang, and that luxurious creamy finish – but in a wonderfully refreshing, non-alcoholic alternative. It’s the perfect statement for any gathering, a sweet treat for a quiet evening, or simply a charming way to brighten your day without any spirits. Trust me, once you experience the captivating charm and exquisite taste of this Red Velvet Martini, you’ll understand why it’s a absolute must-try. I’m confident you’ll cherish this unique and utterly delicious creation as much as I do!

Red Velvet Martini (Non-Alcoholic): Sweet & Festive
- Total Time: 15 minutes
- Yield: 1 serving 1x
Description
Experience the joy of a Red Velvet Martini, a vibrant non-alcoholic treat that captures the rich flavors of red velvet cake in a glass. Perfect for celebrations or a decadent pick-me-up, this mocktail is indulgent and surprisingly easy to make.
Ingredients
- Red Velvet Syrup or Mix
- 1 tablespoon unsweetened cocoa powder
- 2 tablespoons granulated sugar
- Splash of hot water
- Few drops of red food coloring
- Dash of vanilla extract
- 1.5 ounces heavy cream or half-and-half
- Full-fat coconut cream (dairy-free option)
- Oat milk or almond milk (dairy-free options)
- Splash of milk (any kind)
- 1/4 teaspoon vanilla extract
- Pinch of unsweetened cocoa powder
- Sweetener (to taste)
- Whipped cream (dairy or non-dairy)
- Chocolate shavings or mini chocolate chips
- Red velvet sprinkles or festive edible glitter
- Fresh raspberry or strawberry
- Mini red velvet cupcake
Instructions
- Step 1: Gather and Chill Your Essentials – Chill martini glasses in the freezer for at least 15-20 minutes. Prepare ingredients by measuring out red velvet syrup, cream, milk, vanilla extract, and any additional cocoa powder or sweetener. Ensure you have plenty of good quality ice cubes ready for your shaker.
- Step 2: Combine in the Shaker – Pour 2 ounces of red velvet syrup into the shaker. Add 1.5 ounces of heavy cream. Pour in 1 ounce of milk. Add 1/4 teaspoon of vanilla extract. If desired, add a pinch of unsweetened cocoa powder. Taste and sweeten if necessary.
- Step 3: Shake It Up! – Fill the shaker almost to the top with ice. Secure the lid tightly and shake vigorously for about 15-20 seconds until the outside of the shaker feels cold.
- Step 4: Strain and Serve – Retrieve your chilled martini glass from the freezer. Strain the mixture into the glass using a fine-mesh strainer to catch any ice shards or undissolved cocoa powder.
- Step 5: Garnish with Panache – Top with whipped cream and sprinkle with chocolate shavings or red velvet sprinkles. Optionally, balance a fresh raspberry or strawberry on the rim and serve with a mini red velvet cupcake on the side.
- Prep Time: 15 mins
- Cook Time: 0 mins
- Category: Beverage
- Method: Mixing
- Cuisine: American
Nutrition
- Serving Size: 1 martini
- Calories: 300
- Sugar: 25 g
- Sodium: 50 mg
- Fat: 20 g
- Saturated Fat: 12 g
- Unsaturated Fat: 8 g
- Trans Fat: 0 g
- Carbohydrates: 30 g
- Fiber: 1 g
- Protein: 3 g
- Cholesterol: 50 mg
Keywords: For the best flavor, chill all ingredients before mixing. Adjust sweetness to your preference and feel free to experiment with garnishes for a personalized touch.