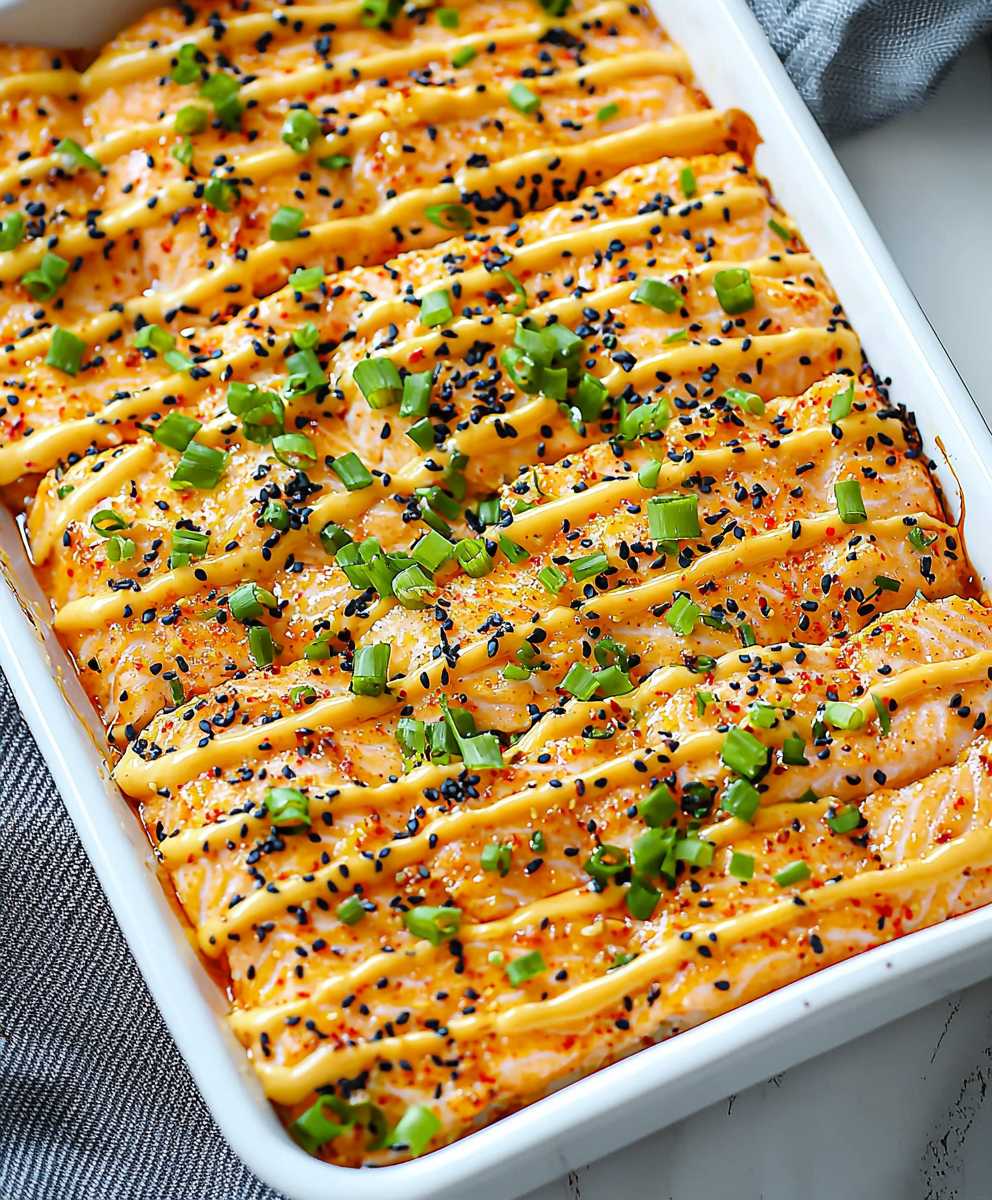
Salmon sushi bake: Prepare to be amazed! Imagine all the delightful flavors of your favorite sushi, deconstructed and transformed into a warm, comforting, and incredibly easy-to-make casserole. This isn’t just dinner; it’s an experience, a culinary adventure that will have everyone begging for seconds. Forget complicated sushi rolling techniques; this recipe brings the essence of sushi to your table with minimal effort and maximum flavor.
While not a traditional Japanese dish with centuries of history, the salmon sushi bake has quickly gained popularity as a modern, accessible twist on classic sushi. It cleverly captures the essence of Japanese cuisine, adapting it to suit the home cook’s needs and preferences. Think of it as a delicious fusion, blending the familiar comfort of a baked dish with the fresh, vibrant flavors of sushi.
What makes this dish so irresistible? It’s the perfect combination of textures and tastes. The creamy, savory salmon topping, often mixed with mayonnaise and sriracha for a delightful kick, sits atop a bed of perfectly seasoned sushi rice. The contrast between the warm, rich topping and the slightly tangy rice is simply divine. Plus, it’s incredibly convenient! Whether you’re feeding a crowd or looking for a satisfying weeknight meal, the salmon sushi bake is a guaranteed crowd-pleaser that’s both delicious and easy to prepare.

Ingredients:
- For the Sushi Rice:
- 2 cups sushi rice
- 2 1/4 cups water
- 1/4 cup rice vinegar
- 2 tablespoons sugar
- 1 teaspoon salt
- For the Salmon Mixture:
- 1.5 lbs sushi-grade salmon, skin removed and finely diced
- 1/4 cup mayonnaise (Japanese mayo, like Kewpie, is preferred)
- 2 tablespoons sriracha (adjust to your spice preference)
- 1 tablespoon soy sauce
- 1 teaspoon sesame oil
- 1 tablespoon masago or tobiko (optional, for added texture and flavor)
- 1 green onion, thinly sliced
- For the Toppings:
- Avocado, sliced
- Cucumber, thinly sliced
- Sesame seeds (black and white)
- Nori seaweed sheets, cut into squares or strips
- Spicy mayo (optional, for drizzling)
- Eel sauce (optional, for drizzling)
- Green onions, thinly sliced (for garnish)
Preparing the Sushi Rice:
- Rinse the Rice: Place the sushi rice in a fine-mesh sieve and rinse under cold running water until the water runs clear. This usually takes about 3-4 minutes. This step is crucial for removing excess starch, which prevents the rice from becoming too sticky.
- Cook the Rice: Combine the rinsed rice and 2 1/4 cups of water in a medium saucepan. Bring to a boil over high heat. Once boiling, reduce the heat to low, cover tightly, and simmer for 18 minutes. It’s important not to lift the lid during this time, as you want to trap the steam to cook the rice evenly.
- Rest the Rice: After 18 minutes, remove the saucepan from the heat and let it stand, covered, for 10 minutes. This allows the rice to fully absorb the remaining moisture and become perfectly fluffy. Again, resist the urge to peek!
- Prepare the Sushi Vinegar: While the rice is resting, combine the rice vinegar, sugar, and salt in a small saucepan. Heat over low heat, stirring constantly, until the sugar and salt are completely dissolved. Don’t let it boil! You just want to warm it enough to dissolve the solids.
- Season the Rice: Gently transfer the cooked rice to a large, non-metallic bowl (a wooden sushi rice tub, or hangiri, is ideal, but any large bowl will work). Pour the sushi vinegar mixture over the rice. Using a rice paddle or a wooden spoon, gently cut and fold the vinegar into the rice. Be careful not to mash the rice grains. You want to separate them while evenly distributing the vinegar. Fan the rice with a fan or a piece of cardboard while mixing to help cool it down quickly. This helps the rice achieve a glossy sheen and prevents it from becoming mushy. Continue mixing and fanning until the rice is cooled to room temperature.
Preparing the Salmon Mixture:
- Prepare the Salmon: Ensure your sushi-grade salmon is very fresh and has been properly handled. Remove any skin and pin bones. Finely dice the salmon into small, even pieces. The smaller the pieces, the better it will mix with the other ingredients.
- Combine Ingredients: In a medium bowl, combine the diced salmon, mayonnaise (Kewpie is highly recommended for its richer flavor), sriracha, soy sauce, sesame oil, masago or tobiko (if using), and sliced green onion.
- Mix Gently: Gently mix all the ingredients together until well combined. Be careful not to overmix, as this can make the salmon mixture mushy. You want to maintain some texture.
- Taste and Adjust: Taste the salmon mixture and adjust the seasoning as needed. You may want to add more sriracha for extra spice, or a touch more soy sauce for saltiness. Remember that the rice is relatively plain, so the salmon mixture should be flavorful.
Assembling and Baking the Sushi Bake:
- Preheat the Oven: Preheat your oven to 350°F (175°C).
- Prepare the Baking Dish: Lightly grease a 9×13 inch baking dish or a similar-sized oven-safe dish. This will prevent the rice from sticking to the bottom.
- Layer the Rice: Spread the prepared sushi rice evenly over the bottom of the baking dish. Gently press down on the rice to create a firm, even layer. You want it to be compact enough to hold its shape when you cut into the bake.
- Layer the Salmon Mixture: Spread the salmon mixture evenly over the layer of sushi rice. Make sure the salmon mixture covers the entire surface of the rice.
- Bake: Bake in the preheated oven for 15-20 minutes, or until the salmon mixture is heated through and slightly browned on top. Keep a close eye on it to prevent it from burning. The goal is to warm the salmon and meld the flavors together, not to cook the salmon further.
- Broil (Optional): For a more browned and slightly crispy top, you can broil the sushi bake for the last 1-2 minutes of cooking time. Watch it very carefully, as it can burn quickly under the broiler.
- Cool Slightly: Remove the sushi bake from the oven and let it cool slightly for about 5-10 minutes before serving. This will make it easier to cut and serve.
Serving and Enjoying:
- Prepare the Toppings: While the sushi bake is cooling, prepare your toppings. Slice the avocado and cucumber. Have the sesame seeds, nori sheets, spicy mayo, and eel sauce ready to go.
- Cut and Serve: Cut the sushi bake into squares or rectangles.
- Assemble Individual Servings: Serve each portion with a square or strip of nori seaweed. Let your guests assemble their own bites by placing a spoonful of the sushi bake onto the nori, then topping with avocado, cucumber, sesame seeds, spicy mayo, eel sauce, and green onions.
- Enjoy! Enjoy your delicious and customizable salmon sushi bake! The combination of the warm, flavorful salmon, the slightly sweet rice, and the fresh toppings is truly irresistible.
Tips and Variations:
- Spice Level: Adjust the amount of sriracha in the salmon mixture to control the spice level. If you prefer a milder flavor, you can use less sriracha or omit it altogether.
- Salmon Substitute: If you’re not a fan of salmon, you can substitute it with other sushi-grade fish, such as tuna or yellowtail. You can also use cooked shrimp or crab meat.
- Vegetarian Option: For a vegetarian version, you can use marinated tofu or avocado instead of salmon.
- Rice Cooker: If you have a rice cooker, you can use it to cook the sushi rice. Follow the manufacturer’s instructions for cooking sushi rice.
- Make Ahead: You can prepare the sushi rice and salmon mixture ahead of time. Store them separately in the refrigerator until ready to assemble and bake.
- Leftovers: Leftovers can be stored in the refrigerator for up to 2 days. Reheat in the microwave or oven before serving.
- Adding Crunch: For added crunch, consider adding tempura flakes (also known as tenkasu) to the salmon mixture or as a topping.
- Different Mayonnaise: While Kewpie mayo is preferred, regular mayonnaise can be used in a pinch. Consider adding a small amount of rice vinegar or lemon juice to regular mayo to mimic the tanginess of Kewpie.
- Nori Preparation: Lightly toasting the nori sheets before serving can enhance their flavor and crispness. You can quickly toast them over a gas flame or in a dry skillet.
Conclusion:
This Salmon Sushi Bake isn’t just another recipe; it’s a flavor explosion waiting to happen! The creamy, savory salmon combined with the perfectly seasoned rice and the satisfying crunch of the nori makes it an absolute winner. I truly believe this is a must-try dish for anyone who loves sushi but wants a quicker, easier, and more budget-friendly way to enjoy those incredible flavors. It’s the kind of meal that will impress your friends and family without you having to spend hours in the kitchen.
Why is this Salmon Sushi Bake a must-try? Because it’s incredibly versatile, satisfying, and packed with umami. It’s a fantastic way to introduce sushi flavors to those who might be hesitant to try raw fish, and it’s a guaranteed crowd-pleaser at potlucks and gatherings. Plus, the leftovers (if there are any!) are just as delicious the next day.
But the fun doesn’t stop there! Feel free to get creative with your toppings and serving suggestions. For a spicier kick, drizzle some sriracha mayo over the top before serving. If you’re looking for a lighter option, try serving it with a side of edamame or a refreshing cucumber salad. You could even add some avocado slices for extra creaminess and healthy fats.
Serving Suggestions and Variations:
* Spicy Salmon Sushi Bake: Mix a tablespoon of sriracha into your mayonnaise for a spicy kick.
* Avocado Topping: Add sliced avocado on top after baking for extra creaminess.
* Vegetarian Option: Substitute the salmon with seasoned tofu or mushrooms for a vegetarian-friendly version.
* Individual Servings: Bake the mixture in individual ramekins for a more elegant presentation.
* Deconstructed Sushi Bake: Serve the rice and salmon mixture separately with nori sheets on the side, allowing everyone to create their own “sushi bake bites.”
I’ve personally made this Salmon Sushi Bake countless times, and each time it’s a hit. I’ve experimented with different toppings and variations, and I’m always amazed at how adaptable it is. It’s become a staple in my household, and I’m confident it will become one in yours too.
Don’t be intimidated by the seemingly long list of ingredients. Most of them are pantry staples, and the preparation is surprisingly simple. The key is to use high-quality salmon and to not overcook the rice. Follow the instructions carefully, and you’ll be rewarded with a delicious and satisfying meal.
So, what are you waiting for? Grab your ingredients, preheat your oven, and get ready to experience the magic of this Salmon Sushi Bake. I promise you won’t be disappointed.
And most importantly, I want to hear about your experience! Did you try the recipe? What variations did you make? What did your family and friends think? Share your photos and stories in the comments below. I can’t wait to see your creations and hear your feedback. Happy baking! Let me know if you have any questions, and I’ll do my best to answer them. Enjoy!
Salmon Sushi Bake: The Ultimate Guide to Making It at Home
Deconstructed sushi in a baking dish! This Salmon Sushi Bake features layers of seasoned sushi rice, spicy salmon, and your favorite toppings for a fun and flavorful meal.
Ingredients
- 2 cups sushi rice
- 2 1/4 cups water
- 1/4 cup rice vinegar
- 2 tablespoons sugar
- 1 teaspoon salt
- 1.5 lbs sushi-grade salmon, skin removed and finely diced
- 1/4 cup mayonnaise (Japanese mayo, like Kewpie, is preferred)
- 2 tablespoons sriracha (adjust to your spice preference)
- 1 tablespoon soy sauce
- 1 teaspoon sesame oil
- 1 tablespoon masago or tobiko (optional, for added texture and flavor)
- 1 green onion, thinly sliced
- Avocado, sliced
- Cucumber, thinly sliced
- Sesame seeds (black and white)
- Nori seaweed sheets, cut into squares or strips
- Spicy mayo (optional, for drizzling)
- Eel sauce (optional, for drizzling)
- Green onions, thinly sliced (for garnish)
Instructions
- Rinse the Rice: Place the sushi rice in a fine-mesh sieve and rinse under cold running water until the water runs clear (3-4 minutes).
- Cook the Rice: Combine rinsed rice and water in a saucepan. Bring to a boil, then reduce heat to low, cover, and simmer for 18 minutes.
- Rest the Rice: Remove from heat and let stand, covered, for 10 minutes.
- Prepare Sushi Vinegar: Combine rice vinegar, sugar, and salt in a small saucepan. Heat over low heat, stirring until dissolved. Do not boil.
- Season the Rice: Gently transfer the cooked rice to a large, non-metallic bowl. Pour the sushi vinegar mixture over the rice. Using a rice paddle or a wooden spoon, gently cut and fold the vinegar into the rice. Fan the rice with a fan or a piece of cardboard while mixing to help cool it down quickly. Continue mixing and fanning until the rice is cooled to room temperature.
- Prepare the Salmon: Ensure your sushi-grade salmon is very fresh and has been properly handled. Remove any skin and pin bones. Finely dice the salmon into small, even pieces.
- Combine Salmon Ingredients: In a medium bowl, combine diced salmon, mayonnaise, sriracha, soy sauce, sesame oil, masago/tobiko (if using), and sliced green onion.
- Mix Gently: Gently mix all the ingredients together until well combined. Be careful not to overmix, as this can make the salmon mixture mushy.
- Taste and Adjust: Taste the salmon mixture and adjust the seasoning as needed.
- Preheat Oven: Preheat oven to 350°F (175°C).
- Prepare Baking Dish: Lightly grease a 9×13 inch baking dish.
- Layer the Rice: Spread the prepared sushi rice evenly over the bottom of the baking dish. Gently press down on the rice to create a firm, even layer.
- Layer the Salmon Mixture: Spread the salmon mixture evenly over the layer of sushi rice.
- Bake: Bake in the preheated oven for 15-20 minutes, or until the salmon mixture is heated through and slightly browned on top.
- Broil (Optional): For a more browned and slightly crispy top, you can broil the sushi bake for the last 1-2 minutes of cooking time. Watch it very carefully, as it can burn quickly under the broiler.
- Cool Slightly: Remove the sushi bake from the oven and let it cool slightly for about 5-10 minutes before serving.
- Prepare Toppings: While the sushi bake is cooling, prepare your toppings. Slice the avocado and cucumber. Have the sesame seeds, nori sheets, spicy mayo, and eel sauce ready to go.
- Cut and Serve: Cut the sushi bake into squares or rectangles.
- Assemble Individual Servings: Serve each portion with a square or strip of nori seaweed. Let your guests assemble their own bites by placing a spoonful of the sushi bake onto the nori, then topping with avocado, cucumber, sesame seeds, spicy mayo, eel sauce, and green onions.
- Enjoy!
Notes
- Spice Level: Adjust the amount of sriracha in the salmon mixture to control the spice level.
- Salmon Substitute: If you’re not a fan of salmon, you can substitute it with other sushi-grade fish, such as tuna or yellowtail. You can also use cooked shrimp or crab meat.
- Vegetarian Option: For a vegetarian version, you can use marinated tofu or avocado instead of salmon.
- Rice Cooker: If you have a rice cooker, you can use it to cook the sushi rice. Follow the manufacturer’s instructions for cooking sushi rice.
- Make Ahead: You can prepare the sushi rice and salmon mixture ahead of time. Store them separately in the refrigerator until ready to assemble and bake.
- Leftovers: Leftovers can be stored in the refrigerator for up to 2 days. Reheat in the microwave or oven before serving.
- Adding Crunch: For added crunch, consider adding tempura flakes (also known as tenkasu) to the salmon mixture or as a topping.
- Different Mayonnaise: While Kewpie mayo is preferred, regular mayonnaise can be used in a pinch. Consider adding a small amount of rice vinegar or lemon juice to regular mayo to mimic the tanginess of Kewpie.
- Nori Preparation: Lightly toasting the nori sheets before serving can enhance their flavor and crispness. You can quickly toast them over a gas flame or in a dry skillet.