Salted Caramel Butter Bars Tasty Irresistible – just hearing those words evokes a feeling of pure culinary bliss, doesn’t it? I’m incredibly excited to share with you a recipe that promises to transform your kitchen into a beacon of sweet and salty perfection. These aren’t just any ordinary baked goods; they are a symphony of textures and flavors that will captivate your senses from the very first bite.
The phenomenon of salted caramel itself took the dessert world by storm, evolving from a gourmet secret in French confectioneries to a beloved staple in homes everywhere. It’s a testament to the magic that happens when the contrasting notes of rich, sweet caramel meet the delicate cut of sea salt, creating an irresistible depth of flavor. This classic combination finds its ultimate expression in these delightful bars, offering a sophisticated twist on traditional home baking that feels both nostalgic and utterly modern.
Why You’ll Fall Head Over Heels for These Bars
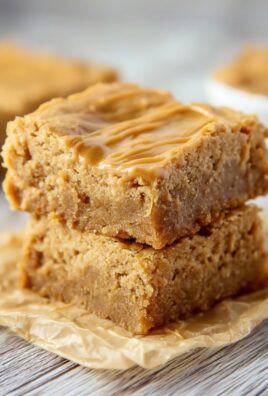
What makes these particular bars truly special is the perfect balance they strike. Imagine a tender, buttery shortbread crust that melts in your mouth, generously topped with a thick, gooey layer of homemade caramel, all finished with a sprinkle of flaky sea salt that enhances every single decadent flavor. The chewiness of the caramel against the crumbly base creates an utterly addictive experience. I assure you, once you taste one, you’ll agree that these Salted Caramel Butter Bars Tasty Irresistible are a treat you’ll want to make again and again for every occasion, from cozy family nights to impressive gatherings. They are simple to prepare yet deliver an undeniably gourmet result that will have everyone asking for the recipe.

Ingredients:
- For the Shortbread Crust and Crumb Topping:
- 1 cup (2 sticks or 226g) unsalted butter, softened to room temperature
- ½ cup (100g) granulated sugar
- 2 cups (240g) all-purpose flour, spooned and leveled
- ½ teaspoon fine sea salt
- 1 teaspoon pure vanilla extract
- For the Salted Caramel Filling:
- 1 cup (200g) granulated sugar
- ¼ cup (60ml) water
- ½ cup (1 stick or 113g) unsalted butter, cut into 8-10 pieces, softened to room temperature
- ½ cup (120ml) heavy cream, warmed slightly (can be microwaved for 30 seconds or gently heated on the stovetop)
- 1 teaspoon pure vanilla extract
- 1 teaspoon flaky sea salt, plus more for sprinkling (e.g., Maldon)
Preparing the Shortbread Crust and Crumb Topping
- First things first, let’s get our oven ready. Preheat your oven to 350°F (175°C). While it’s heating, grab a 9×13 inch baking pan. For easy removal later, I highly recommend lining the pan with parchment paper, leaving an overhang on the longer sides. This acts like little handles, making it a breeze to lift the entire batch of Salted Caramel Butter Bars Tasty Irresistible out of the pan once they’ve cooled. Just make sure the parchment paper sits smoothly in the bottom and up the sides.
- Now, let’s make that glorious shortbread base. In a large mixing bowl, either with a stand mixer fitted with the paddle attachment or using a hand mixer, cream together the softened unsalted butter and granulated sugar. You want to beat this mixture until it’s light and fluffy, usually about 2-3 minutes. Scrape down the sides of the bowl occasionally to ensure everything is evenly combined. This creaming process incorporates air, which contributes to a tender crust.
- Next, in a separate medium bowl, whisk together your all-purpose flour and the ½ teaspoon of fine sea salt. This ensures the salt is evenly distributed throughout the dry ingredients. Gradually add this dry mixture to the butter and sugar mixture, mixing on low speed until just combined. Be careful not to overmix here; we’re looking for a crumbly, sandy texture. Then, stir in the 1 teaspoon of pure vanilla extract. The dough will look like coarse crumbs, almost like wet sand, but it should hold together if you squeeze a bit in your hand. This is exactly the consistency we want for both our crust and our topping.
- Take about two-thirds of this delicious crumbly mixture (roughly 2 cups) and firmly press it into the bottom of your prepared 9×13 inch baking pan. Use your fingers, the bottom of a flat glass, or a small offset spatula to create an even, compact layer.
The key to a good shortbread crust is pressing it down firmly and evenly.
An even thickness ensures even baking. The remaining one-third of the crumb mixture (about 1 cup) will be reserved for our topping later. Set that aside for now.
- Pop the pan with the pressed crust into your preheated oven and bake for 15-20 minutes, or until the edges are just lightly golden brown. This pre-baking step is crucial; it helps the shortbread crust set up nicely and prevents it from becoming soggy once the caramel is added. When it comes out, it will smell heavenly, a truly irresistible aroma of butter and sweetness. Remove it from the oven and set it aside to cool slightly while we prepare our magnificent salted caramel filling. Keep the oven on!
Making the Salted Caramel Filling
- This is where the magic truly happens, creating the heart of our Salted Caramel Butter Bars Tasty Irresistible. In a heavy-bottomed saucepan (a light-colored one is best so you can easily see the caramel’s color change), combine the 1 cup of granulated sugar and ¼ cup of water. Stir briefly just to moisten all the sugar, then stop stirring.
Resist the urge to stir once it starts to boil!
Placing a lid on the saucepan for the first few minutes of boiling can help wash down any sugar crystals from the sides, preventing crystallization, or you can brush down the sides with a wet pastry brush.
- Place the saucepan over medium-high heat and bring the mixture to a boil. Watch it very carefully. The sugar will first dissolve, then begin to bubble vigorously, and slowly start to change color around the edges. It will progress from clear to pale amber, then golden, and finally a rich, deep amber color. This process can take anywhere from 8 to 12 minutes, depending on your stovetop. Patience is key here. Do not walk away! A darker caramel will have a deeper, more complex flavor, but be careful not to burn it, as burnt caramel is bitter and unusable.
- As soon as the caramel reaches that beautiful deep amber hue, immediately remove the saucepan from the heat. Carefully, yet swiftly, add the softened butter pieces, one by one, whisking continuously. The mixture will bubble up violently and steam quite a bit, so be cautious! This is normal. Keep whisking until all the butter has melted and is fully incorporated. The butter will help stabilize the caramel and give it that rich, buttery flavor we all adore.
- Now, slowly and carefully pour in the warmed heavy cream, whisking constantly as you pour. Again, the mixture will bubble up and steam aggressively. Do not be alarmed! Just keep whisking until the caramel is smooth and lump-free. If you find any stubborn lumps of hardened caramel, you can return the saucepan to very low heat for a minute or two, continuing to whisk gently, until they dissolve.
The caramel will transform into a luscious, smooth, and glossy sauce.
- Finally, stir in the 1 teaspoon of pure vanilla extract and the 1 teaspoon of flaky sea salt. Taste a tiny bit (carefully, it’s hot!) and adjust the salt if you like. I love a good balance of sweet and salty in my Salted Caramel Butter Bars, so don’t be shy with that flaky salt. The vanilla adds a beautiful depth of flavor. Congratulations, you’ve just made homemade salted caramel! Set it aside for a moment to cool slightly, allowing it to thicken just a touch while we prepare for assembly.
Assembling and Baking the Bars
- Retrieve your slightly cooled, pre-baked shortbread crust from step 5. Carefully pour the warm, glorious salted caramel filling evenly over the crust. Use an offset spatula or the back of a spoon to spread it all the way to the edges, creating a uniform layer. The smell at this stage is absolutely heavenly – a preview of the Salted Caramel Butter Bars Tasty Irresistible experience to come.
- Now, take the reserved one-third of the crumb mixture (from step 4) and sprinkle it evenly over the caramel layer. You can gently crumble it between your fingers to ensure a nice distribution. This crumb topping will bake into a delightful, slightly crispy texture that perfectly complements the chewy caramel and tender shortbread.
Don’t press it down; let it sit lightly on top.
- Carefully place the pan back into your preheated 350°F (175°C) oven. Bake for an additional 20-25 minutes, or until the crumb topping is beautifully golden brown and the caramel underneath is visibly bubbling around the edges. The aroma filling your kitchen at this point will be truly incredible, a testament to the deliciousness that is about to emerge. Every moment in the oven builds anticipation for these irresistible treats.
- Once baked, carefully remove the pan from the oven.
This is perhaps the hardest part of the entire recipe: resisting the urge to dig in immediately!
Let the bars cool completely in the pan on a wire rack at room temperature. This is absolutely critical for the caramel to set properly. If you try to cut them too soon, the caramel will be too soft and messy. This cooling process can take anywhere from 2 to 3 hours. For even cleaner cuts and a firmer caramel, I recommend chilling the cooled bars in the refrigerator for at least another hour, or even overnight. Patience here will be rewarded with perfect Salted Caramel Butter Bars Tasty Irresistible slices.
- Once thoroughly cooled and chilled (if you chose to refrigerate), use the parchment paper overhang to carefully lift the entire slab of bars out of the pan and onto a cutting board. Using a sharp knife, preferably one that has been run under hot water and wiped dry (to help with clean cuts through the caramel), slice the bars into your desired size. I usually go for 24 squares (6 rows by 4 rows) or 32 smaller bites. For an extra touch of gourmet appeal and to truly highlight the name, sprinkle a little extra flaky sea salt over the top of the cut bars just before serving. This final sprinkle adds a beautiful visual and an extra pop of salty contrast.
- Store any leftover Salted Caramel Butter Bars Tasty Irresistible in an airtight container at room temperature for up to 3 days, or in the refrigerator for up to a week. They are wonderful at room temperature, but if you prefer a firmer caramel, store them chilled. They also freeze beautifully for up to 2-3 months. Just thaw them at room temperature before enjoying.
These bars are truly an indulgent delight, perfect for sharing (or keeping all to yourself!).
Enjoy every single crumb of these sweet and salty wonders!

Conclusion:
And there you have it! We’ve reached the sweet end of our journey, and I genuinely hope you’re feeling as excited as I am about trying out this incredible recipe. What makes these bars an absolute must-try isn’t just their decadent flavor profile, it’s the harmonious dance between textures and temperatures that truly sets them apart. Imagine a rich, crumbly, melt-in-your-mouth shortbread crust, providing the perfect foundation. Piled high on top is a luscious, chewy, golden caramel, infused with just the right amount of salt to cut through the sweetness and awaken every single one of your taste buds. This isn’t just a dessert; it’s an experience, a moment of pure bliss that promises to deliver comfort and indulgence in every single bite. I truly believe that once you try these, they’ll earn a permanent spot in your baking repertoire, becoming your go-to whenever you need a guaranteed crowd-pleaser or a personal pick-me-up.
The beauty of this recipe lies in its ability to impress without demanding hours of intricate work. You get that gourmet, bakery-quality taste and appearance right from your own kitchen, which is incredibly satisfying.
The combination of sweet, salty, and buttery is simply unparalleled,
creating a flavor bomb that manages to be both complex and incredibly comforting. Each component plays a vital role, from the flaky sea salt sprinkled over the top, which isn’t just for show but provides that essential pop of briny goodness, to the tender, buttery base that grounds the rich caramel. You’ll discover why these are truly the Salted Caramel Butter Bars Tasty Irresistible treat you’ve been searching for, fulfilling every sweet and salty craving imaginable with profound satisfaction.
Now, let’s talk about how to enjoy these masterpieces. While they are utterly divine at room temperature, allowing the caramel to be perfectly chewy and the crust slightly firm, I have to confess a personal favorite: serving them slightly warm. A quick zap in the microwave for 10-15 seconds transforms the caramel into a gooey, molten dream, perfect for spooning over a generous scoop of good quality vanilla bean ice cream. The contrast between the warm, soft bar and the cold, creamy ice cream is simply out of this world! They also pair wonderfully with a strong cup of coffee or a comforting mug of hot tea, making for an exquisite afternoon treat. For a truly decadent brunch item, you could even serve them alongside a fruit platter to balance the richness.
Feeling adventurous? These bars are incredibly versatile and lend themselves beautifully to variations. Consider adding a sprinkle of toasted pecans or walnuts over the caramel layer before baking for an added nutty crunch. Or, for the chocolate lovers out there, a drizzle of melted dark chocolate or even white chocolate over the finished bars once cooled would be absolutely divine, adding another layer of sweetness and complexity. You could also experiment with different types of flaky sea salt – a smoked sea salt could add an intriguing depth of flavor. For those who enjoy a hint of spice, a tiny pinch of cinnamon or cardamom in the shortbread crust could offer an unexpected twist.
Don’t be afraid to make them your own!
That’s the joy of home baking, after all – personalizing recipes to suit your unique taste. Imagine a version with a hint of espresso powder in the crust for a coffee-caramel experience! The possibilities are truly endless, and I encourage you to get creative.
So, what are you waiting for? I wholeheartedly encourage you to roll up your sleeves, preheat your oven, and dive into making these incredible Salted Caramel Butter Bars. I promise you, the smiles and happy sighs they will elicit from anyone who tastes them will be more than worth the effort. It’s a recipe that brings joy, comfort, and an undeniable sense of accomplishment. Once you’ve whipped up your batch, I would absolutely love to hear about your experience! Did you stick to the original, or did you add your own creative twist? How did your family and friends react? Please, don’t hesitate to share your stories, photos, and any brilliant variations you came up with. Connecting with fellow baking enthusiasts is one of my greatest pleasures.
Happy baking, and get ready to indulge in pure salted caramel bliss!
Salted Caramel Butter Bars
Salted Caramel Butter Bars are a truly irresistible treat, featuring a tender, buttery shortbread crust topped with a gooey, sweet-and-salty caramel filling, finished with a delightful crumb topping and a sprinkle of flaky sea salt. This classic combination creates a symphony of textures and flavors that will captivate your senses, perfect for any occasion.
Ingredients
Instructions
Important Information
Nutrition Facts (Per Serving)
It is important to consider this information as approximate and not to use it as definitive health advice.
Allergy Information
Please check ingredients for potential allergens and consult a health professional if in doubt.