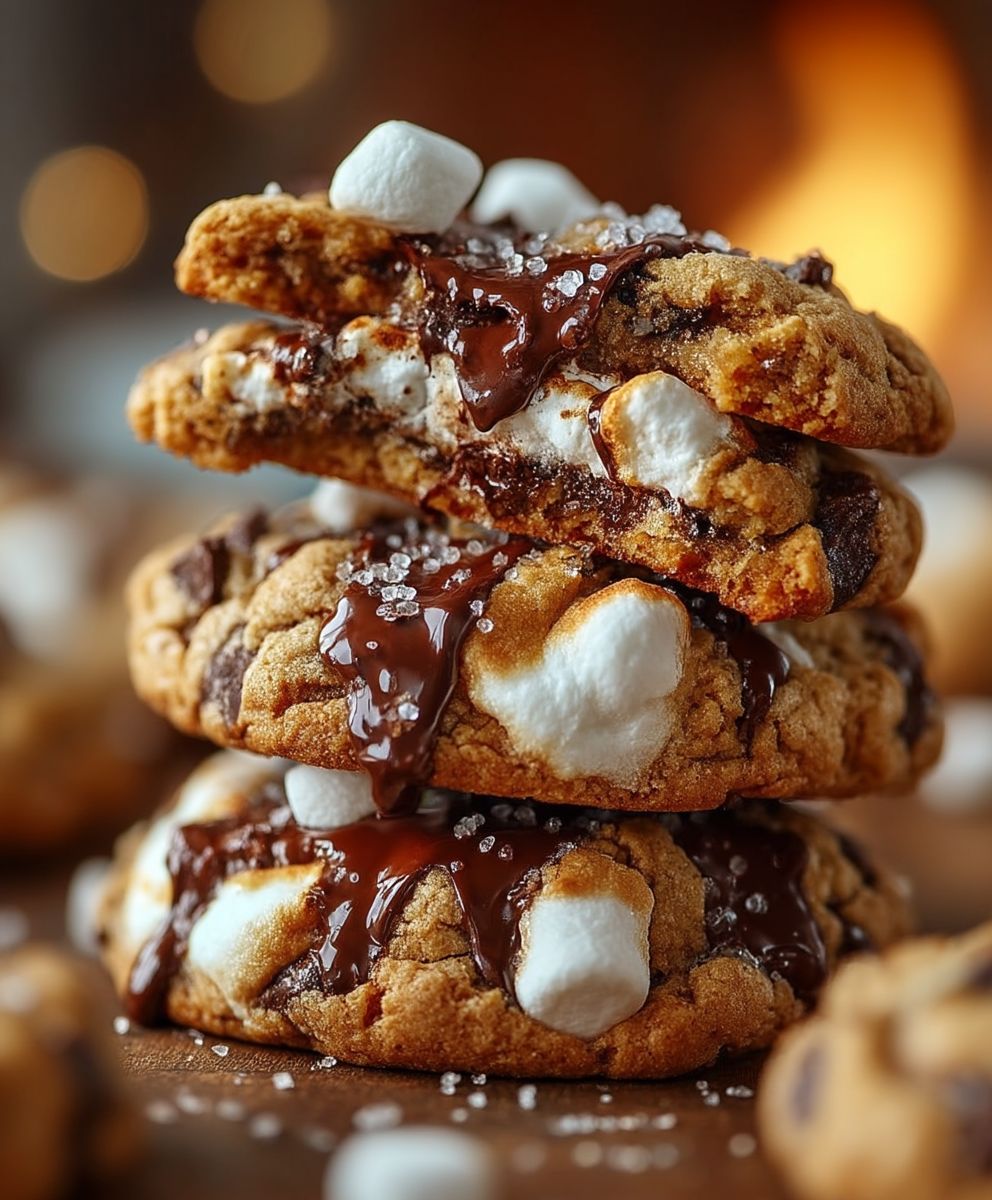
S’mores Cookies: Imagine sinking your teeth into a warm, gooey cookie that perfectly captures the essence of a campfire treat. That’s exactly what you get with these incredible S’mores Cookies! Forget the sticky fingers and smoky clothes; now you can enjoy the iconic flavor combination of graham crackers, melted chocolate, and toasted marshmallows in a convenient, delicious cookie form.
The s’more, a beloved American tradition, has its roots in the Girl Scout movement of the early 20th century. The first known published recipe appeared in the 1927 Girl Scout handbook, “Tramping and Trailing with the Girl Scouts.” Since then, it has become a quintessential symbol of summer nights, campfires, and shared moments of joy. But what if you could enjoy that same nostalgic flavor without the hassle of building a fire?
That’s where these S’mores Cookies come in! People adore this dessert because it combines the comforting crunch of a graham cracker, the rich sweetness of chocolate, and the fluffy, caramelized goodness of a toasted marshmallow. The texture is simply divine – a soft, chewy cookie base with pockets of melted chocolate and gooey marshmallow. Plus, they’re incredibly easy to make, making them perfect for a quick weeknight treat or a fun baking project with the kids. Get ready to experience the magic of s’mores in every single bite!

Ingredients:
- 1 cup (2 sticks) unsalted butter, softened
- ¾ cup granulated sugar
- ¾ cup packed light brown sugar
- 2 large eggs
- 1 teaspoon vanilla extract
- 2 ¼ cups all-purpose flour
- 1 teaspoon baking soda
- 1 teaspoon salt
- 1 cup graham cracker crumbs (about 14 full graham crackers)
- 1 ½ cups semi-sweet chocolate chips
- 1 ½ cups mini marshmallows
- Optional: Coarse sea salt, for sprinkling
Preparing the Dough:
- Cream the Butter and Sugars: In a large bowl (or the bowl of your stand mixer), cream together the softened butter, granulated sugar, and brown sugar until light and fluffy. This usually takes about 3-5 minutes. Make sure to scrape down the sides of the bowl occasionally to ensure everything is evenly mixed. I like to use a stand mixer for this, but a hand mixer works just as well!
- Add Eggs and Vanilla: Beat in the eggs one at a time, mixing well after each addition. Then, stir in the vanilla extract. The mixture should be smooth and creamy at this point.
- Combine Dry Ingredients: In a separate medium bowl, whisk together the all-purpose flour, baking soda, and salt. This ensures that the baking soda and salt are evenly distributed throughout the flour, which is crucial for the cookies to rise properly and have a balanced flavor.
- Incorporate Dry Ingredients into Wet Ingredients: Gradually add the dry ingredients to the wet ingredients, mixing on low speed until just combined. Be careful not to overmix, as this can lead to tough cookies. Overmixing develops the gluten in the flour, resulting in a less tender cookie.
- Add Graham Cracker Crumbs: Stir in the graham cracker crumbs until evenly distributed throughout the dough. The graham cracker crumbs add that signature s’mores flavor and a delightful texture to the cookies.
- Fold in Chocolate Chips: Gently fold in the semi-sweet chocolate chips. Make sure they are evenly distributed throughout the dough. I prefer semi-sweet, but you can use milk chocolate or dark chocolate chips if you prefer!
- Chill the Dough: Cover the bowl with plastic wrap and chill the dough in the refrigerator for at least 30 minutes. Chilling the dough helps to prevent the cookies from spreading too much during baking and also allows the flavors to meld together. You can chill the dough for up to 24 hours if you want to prepare it in advance.
Baking the Cookies:
- Preheat Oven: Preheat your oven to 375°F (190°C). Line baking sheets with parchment paper or silicone baking mats. Parchment paper helps prevent the cookies from sticking and makes cleanup a breeze.
- Scoop the Dough: Use a cookie scoop or spoon to drop rounded tablespoons of dough onto the prepared baking sheets, leaving about 2 inches between each cookie. This allows the cookies to spread without running into each other.
- Add Marshmallows: Gently press a few mini marshmallows into the top of each cookie. Don’t overcrowd the cookies with marshmallows, as they will expand during baking.
- Bake: Bake for 8-10 minutes, or until the edges are golden brown and the marshmallows are lightly toasted. Keep a close eye on the cookies, as the marshmallows can burn quickly.
- Cool: Remove the baking sheets from the oven and let the cookies cool on the baking sheets for a few minutes before transferring them to a wire rack to cool completely. This allows the cookies to firm up slightly and prevents them from breaking when you move them.
- Optional: Sprinkle with coarse sea salt while the cookies are still warm. The salt enhances the sweetness of the cookies and adds a delightful salty-sweet contrast.
Tips and Variations:
- For extra gooey marshmallows: Add the marshmallows during the last 2 minutes of baking. This will keep them soft and gooey without burning.
- For a deeper graham cracker flavor: Use honey graham crackers instead of regular graham crackers.
- For a chocolatey twist: Add 1/4 cup of cocoa powder to the dry ingredients.
- For a campfire flavor: Use a kitchen torch to lightly toast the marshmallows after baking. Be careful not to burn them!
- Storage: Store the cookies in an airtight container at room temperature for up to 3 days.
- Freezing: You can freeze the cookie dough for up to 2 months. Scoop the dough into balls and place them on a baking sheet lined with parchment paper. Freeze for 30 minutes, then transfer the frozen dough balls to a freezer bag. When ready to bake, bake from frozen, adding a few extra minutes to the baking time.
Troubleshooting:
- Cookies spreading too much: Make sure your butter is not too soft. It should be softened but still cool to the touch. Also, chilling the dough for a longer period of time can help prevent spreading.
- Cookies are too dry: Make sure you are not overbaking the cookies. They should be slightly soft in the center when you remove them from the oven.
- Marshmallows are burning: Add the marshmallows during the last 2 minutes of baking or tent the baking sheet with foil.
Serving Suggestions:
- Serve the cookies warm with a glass of milk or a scoop of vanilla ice cream.
- Pack them in lunchboxes for a sweet treat.
- Bring them to a potluck or party.
- Give them as a homemade gift.
Nutritional Information (approximate, per cookie):
- Calories: 250
- Fat: 14g
- Saturated Fat: 9g
- Cholesterol: 45mg
- Sodium: 150mg
- Carbohydrates: 30g
- Sugar: 18g
- Protein: 2g
Enjoy your delicious S’mores Cookies!
Conclusion:
So there you have it! These S’mores Cookies are truly a must-try for anyone who loves the classic campfire treat. The combination of the chewy cookie base, the gooey melted chocolate, and the perfectly toasted marshmallows creates a symphony of flavors and textures that will have you reaching for another one before you even finish the first. I know, I know, I’m biased, but trust me on this one!
What makes these cookies so special is their ability to capture the essence of a s’more without the mess and fuss of a campfire. They’re perfect for a cozy night in, a fun baking project with the kids, or even a potluck where you want to impress everyone with your baking skills. Plus, they’re incredibly easy to make, even for beginner bakers. The recipe is straightforward, and the results are consistently delicious.
But the best part? You can totally customize these cookies to your liking! Feeling adventurous? Try using different types of chocolate, like dark chocolate for a richer flavor or white chocolate for a sweeter twist. You could even add a sprinkle of sea salt on top to enhance the sweetness and create a delightful salty-sweet combination.
For serving suggestions, these cookies are fantastic on their own, warm from the oven. But if you want to take things to the next level, try serving them with a scoop of vanilla ice cream. The cold ice cream against the warm, gooey cookie is pure heaven! You could also crumble them over a bowl of yogurt or use them as a base for a mini s’mores sundae.
And don’t forget about variations! If you’re not a fan of graham crackers, you can substitute them with other types of cookies, like shortbread or even chocolate chip cookies. You can also experiment with different types of marshmallows, like flavored marshmallows or mini marshmallows. Get creative and have fun with it!
I’m absolutely confident that you’ll love these S’mores Cookies as much as I do. They’re the perfect combination of nostalgia, comfort, and deliciousness. They are also a great way to use up leftover marshmallows!
So, what are you waiting for? Grab your ingredients, preheat your oven, and get ready to bake up a batch of these irresistible treats. I promise you won’t regret it. And when you do, please, please, please share your experience with me! I’d love to hear what you think of the recipe, what variations you tried, and how much everyone enjoyed them. You can leave a comment below, tag me on social media, or even send me an email. I’m always eager to hear from my fellow bakers and food lovers.
Happy baking, and enjoy your delicious S’mores Cookies! I can’t wait to hear all about your baking adventures. And remember, the most important ingredient is always love!
Smores Cookies: Delicious Marshmallow Chocolate Recipe
Soft and chewy S'mores Cookies packed with graham cracker crumbs, chocolate chips, and gooey marshmallows. The perfect campfire treat without the campfire!
Ingredients
Instructions
Recipe Notes
- For extra gooey marshmallows: Add the marshmallows during the last 2 minutes of baking.
- For a deeper graham cracker flavor: Use honey graham crackers instead of regular graham crackers.
- For a chocolatey twist: Add 1/4 cup of cocoa powder to the dry ingredients.
- For a campfire flavor: Use a kitchen torch to lightly toast the marshmallows after baking. Be careful not to burn them!
- Storage: Store the cookies in an airtight container at room temperature for up to 3 days.
- Freezing: You can freeze the cookie dough for up to 2 months. Scoop the dough into balls and place them on a baking sheet lined with parchment paper. Freeze for 30 minutes, then transfer the frozen dough balls to a freezer bag. When ready to bake, bake from frozen, adding a few extra minutes to the baking time.
- Cookies spreading too much: Make sure your butter is not too soft. It should be softened but still cool to the touch. Also, chilling the dough for a longer period of time can help prevent spreading.
- Cookies are too dry: Make sure you are not overbaking the cookies. They should be slightly soft in the center when you remove them from the oven.
- Marshmallows are burning: Add the marshmallows during the last 2 minutes of baking or tent the baking sheet with foil.