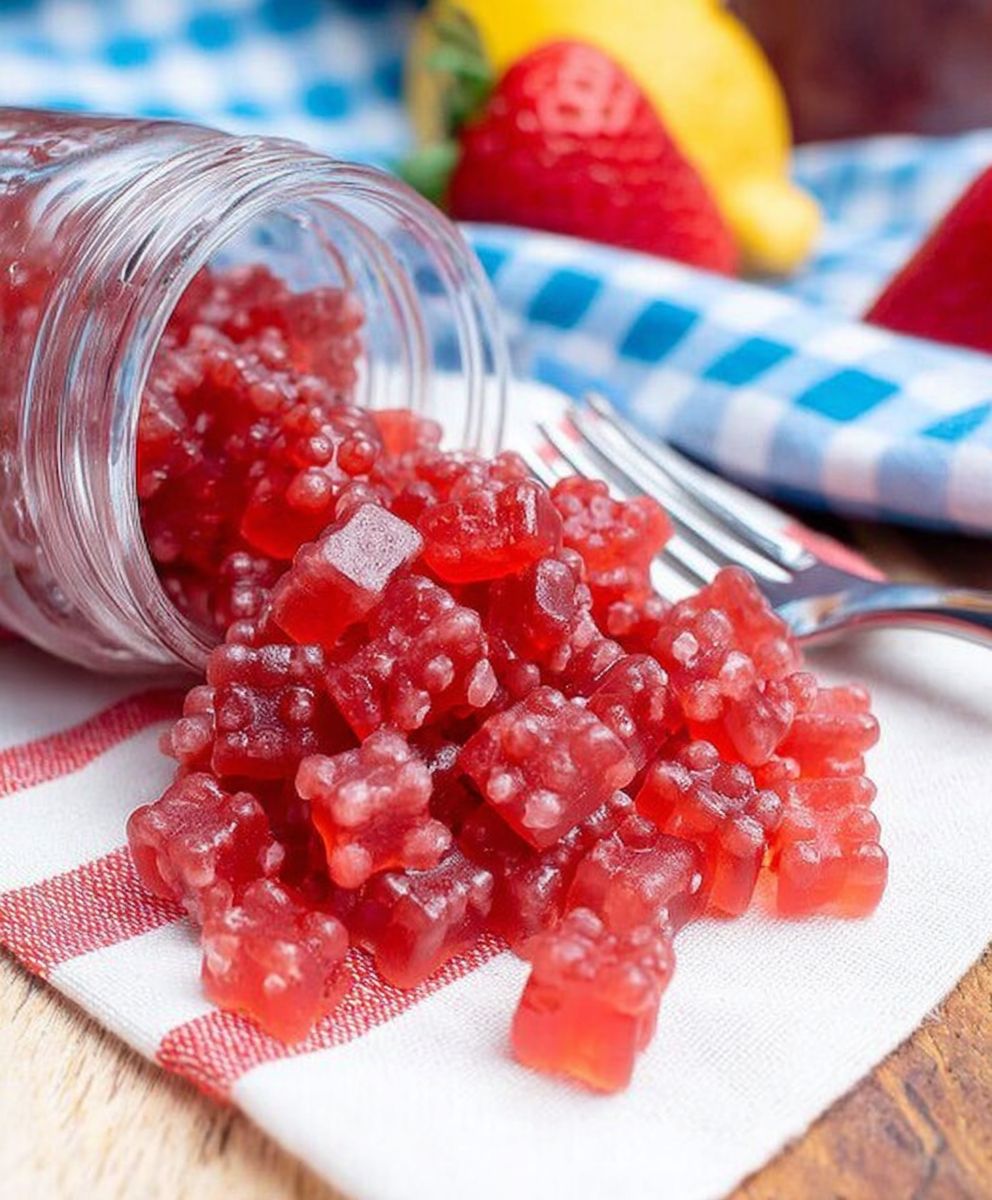
Strawberry Gummies Homemade are a delightful treat that brings joy to both kids and adults alike! Imagine biting into a chewy, bursting-with-flavor gummy, knowing that it’s made with wholesome ingredients right in your own kitchen. Forget the store-bought versions loaded with artificial colors and preservatives; with this recipe, you’re in complete control.
Gummies, in general, have a fascinating history, evolving from medicinal pastilles to the sweet confections we know and love today. While the exact origins of fruit-flavored gummies are debated, their popularity exploded in the 20th century, becoming a staple in candy aisles worldwide. But why settle for mass-produced when you can create something truly special?
People adore gummies for their satisfying chewiness and concentrated fruity flavor. They’re a perfect little pick-me-up, a sweet reward, or a fun project to do with the family. And when you make Strawberry Gummies Homemade, you elevate the experience to a whole new level. The fresh strawberry flavor shines through, creating a taste that’s far superior to anything you can buy. Plus, the process is surprisingly simple and incredibly rewarding. Get ready to enjoy a batch of these irresistible, homemade delights!

Ingredients:
- 6 ounces strawberry flavored gelatin (like Jell-O)
- 1/2 cup cold water
- 1/4 cup unflavored gelatin (about 2 packets)
- 1/4 cup light corn syrup (optional, for shine and smoother texture)
- Strawberry extract or flavoring (optional, for enhanced strawberry flavor)
- Granulated sugar, for coating (optional)
- Cooking spray or coconut oil, for greasing molds
Preparing the Gelatin Mixture:
- Bloom the Unflavored Gelatin: In a medium-sized, heat-safe bowl, pour the cold water. Sprinkle the unflavored gelatin evenly over the water. Let it sit undisturbed for about 5-10 minutes. This process, called blooming, allows the gelatin granules to absorb the water and soften, which is crucial for achieving the right gummy texture. You’ll notice the mixture becoming thick and slightly cloudy.
- Combine the Gelatins: Add the strawberry flavored gelatin to the bloomed unflavored gelatin. The strawberry gelatin will provide the primary flavor and color for your gummies.
- Add Corn Syrup (Optional): If you’re using corn syrup, add it to the gelatin mixture now. Corn syrup helps to create a smoother, less brittle texture in the finished gummies and also adds a nice shine. If you prefer a less sweet gummy, you can omit the corn syrup.
- Flavor Enhancement (Optional): If you want to boost the strawberry flavor, add a few drops of strawberry extract or flavoring to the mixture. Be careful not to add too much, as extracts can be quite potent. Start with a small amount and taste as you go.
Melting and Dissolving the Gelatin:
- Microwave Method: Place the bowl with the gelatin mixture in the microwave. Heat in 30-second intervals, stirring well after each interval, until the gelatin is completely dissolved. Be very careful not to overheat the gelatin, as this can affect its setting properties. The mixture should be smooth and clear, with no visible granules. This usually takes about 1-2 minutes total, depending on your microwave’s power.
- Stovetop Method: Alternatively, you can melt the gelatin mixture on the stovetop. Pour the mixture into a small saucepan. Heat over low heat, stirring constantly, until the gelatin is completely dissolved. Again, be careful not to overheat the mixture. The goal is to gently melt the gelatin, not to cook it.
- Check for Undissolved Granules: After melting, carefully inspect the mixture to ensure that all the gelatin granules have dissolved. If you see any undissolved granules, continue heating and stirring gently until they are gone. Undissolved granules can result in a grainy texture in the finished gummies.
- Remove Any Foam: Sometimes, a layer of foam can form on the surface of the melted gelatin mixture. Use a spoon to gently skim off any foam. This will help to create clearer, more visually appealing gummies.
Pouring and Setting the Gummies:
- Prepare Your Molds: Lightly grease your gummy molds with cooking spray or coconut oil. This will prevent the gummies from sticking and make them easier to remove. Silicone molds work best, as they are flexible and allow for easy release. If you don’t have molds, you can use a baking dish lined with parchment paper.
- Pour the Gelatin Mixture: Carefully pour the melted gelatin mixture into your prepared molds. If you’re using a baking dish, pour the mixture evenly into the dish.
- Remove Air Bubbles: Gently tap the molds or baking dish on the counter to release any trapped air bubbles. This will help to create smoother, more uniform gummies. You can also use a toothpick to pop any visible air bubbles on the surface.
- Refrigerate to Set: Place the molds or baking dish in the refrigerator and let the gummies set for at least 2-3 hours, or preferably overnight. The longer they set, the firmer they will become.
Demolding and Finishing the Gummies:
- Check for Firmness: Before demolding, check to make sure the gummies are firm to the touch. If they are still soft or sticky, return them to the refrigerator for a longer setting time.
- Demold the Gummies: Once the gummies are firm, carefully remove them from the molds. If you’re using silicone molds, you can gently push the gummies out from the bottom. If you’re using a baking dish, lift the parchment paper out of the dish and use a knife or cookie cutter to cut the gummies into desired shapes.
- Sugar Coating (Optional): If you want to add a sweet and slightly crunchy coating to your gummies, place some granulated sugar in a shallow dish. Roll each gummy in the sugar until it is evenly coated.
- Storage: Store the finished gummies in an airtight container in the refrigerator. They will keep for up to a week. Keep in mind that homemade gummies tend to be softer than store-bought gummies, so they may become slightly sticky over time.
Tips and Variations:
- Adjusting Sweetness: You can adjust the sweetness of the gummies by adding more or less sugar or corn syrup. Taste the gelatin mixture before pouring it into the molds and adjust accordingly.
- Using Different Flavors: Experiment with different flavors of gelatin to create a variety of gummy flavors. You can also use fruit juice or purees in place of some of the water for a more natural flavor.
- Adding Citric Acid: For a tangy twist, add a pinch of citric acid to the gelatin mixture. This will give the gummies a slightly sour flavor that complements the sweetness.
- Vegan Gummies: To make vegan gummies, use agar-agar powder instead of gelatin. Agar-agar is a plant-based gelling agent that is derived from seaweed. You’ll need to adjust the amount of agar-agar based on the specific recipe you’re using.
- Layered Gummies: Create layered gummies by pouring different flavored gelatin mixtures into the molds in layers. Allow each layer to set slightly before adding the next layer.
- Gummy Bears: Use gummy bear molds for the classic gummy bear shape. These are readily available online and in many kitchen supply stores.
- Preventing Stickiness: To prevent the gummies from becoming too sticky, you can toss them in a mixture of cornstarch and powdered sugar after they have been demolded.
- Adding Vitamins: You can add powdered vitamins to the gelatin mixture to create vitamin-enriched gummies. This is a great way to sneak in some extra nutrients for kids (and adults!).
- Infusing with Herbs: For a more sophisticated flavor, try infusing the water with herbs like mint or lavender before adding the gelatin.
- Using Honey: You can substitute honey for corn syrup, but it will impart a distinct honey flavor to the gummies.
Troubleshooting:
- Gummies are too soft: This usually means that not enough gelatin was used, or that the gummies were not refrigerated long enough. Try adding more gelatin to the mixture next time, and make sure to refrigerate the gummies for at least 3 hours, or preferably overnight.
- Gummies are too hard: This can happen if the gelatin mixture was overheated, or if too much gelatin was used. Be careful not to overheat the gelatin mixture, and adjust the amount of gelatin accordingly.
- Gummies are sticky: This can be caused by high humidity or by not using enough sugar coating. Store the gummies in an airtight container in the refrigerator, and toss them in a mixture of cornstarch and powdered sugar if they are still sticky.
- Gummies are grainy: This is usually caused by undissolved gelatin granules. Make sure to completely dissolve the gelatin before pouring the mixture into the molds.
Enjoy your homemade strawberry gummies! They are a fun and delicious treat that you can customize to your liking.
Conclusion:
And there you have it! These homemade Strawberry Gummies are so much more than just a sweet treat; they’re a burst of summer sunshine in every bite, a healthier alternative to store-bought candies, and a fun project you can easily tackle in your own kitchen. I truly believe this recipe is a must-try for anyone looking for a delicious, wholesome, and satisfying snack.
Why, you ask? Well, beyond the obvious deliciousness of fresh strawberry flavor, these gummies are incredibly versatile. You control the ingredients, meaning you can adjust the sweetness to your liking, use organic strawberries, or even swap out the gelatin for a vegan alternative like agar-agar to cater to dietary restrictions. Plus, the vibrant color and irresistible aroma will have everyone, from kids to adults, reaching for more.
But the real magic lies in the simplicity. Forget complicated techniques and hard-to-find ingredients. This recipe is straightforward and foolproof, perfect for beginner cooks and seasoned bakers alike. The satisfaction of creating something so delightful from scratch is truly rewarding. And let’s be honest, who can resist the allure of a chewy, fruity gummy that’s actually good for you (or at least, better than the processed stuff)?
Now, let’s talk serving suggestions and variations! These Strawberry Gummies are fantastic on their own, of course, but don’t be afraid to get creative. Imagine adding a touch of lemon zest for a tangy twist, or a few fresh mint leaves for a refreshing kick. For a more sophisticated flavor profile, try incorporating a splash of balsamic vinegar – it might sound strange, but it enhances the strawberry flavor beautifully!
You can also experiment with different molds to create fun and whimsical shapes. Think stars, hearts, bears, or even dinosaurs! This is a great way to get kids involved in the process and make the gummies even more appealing. And if you’re feeling adventurous, why not try layering different fruit flavors to create a rainbow effect? The possibilities are endless!
Beyond snacking, these gummies can also be used in creative ways. Chop them up and sprinkle them over yogurt or granola for a fruity breakfast boost. Use them as a topping for ice cream or cupcakes for a touch of homemade goodness. Or, package them up in small jars and give them as thoughtful and personalized gifts.
I’m so excited for you to try this recipe and experience the joy of homemade Strawberry Gummies for yourself. I truly believe you’ll be amazed at how easy and rewarding it is to create these little bursts of happiness.
So, what are you waiting for? Gather your ingredients, put on your apron, and get ready to embark on a gummy-making adventure! And most importantly, don’t forget to share your creations with me! I’d love to see your photos, hear about your variations, and learn about your experience. Tag me on social media using #HomemadeStrawberryGummies or leave a comment below. I can’t wait to see what you come up with! Happy gummy-making!
Strawberry Gummies Homemade: Easy Recipe & Guide
Fun and easy homemade strawberry gummies! Customize the flavor and sweetness to your liking with this simple recipe.
Ingredients
Instructions
Recipe Notes
- Adjust sweetness by adding more or less sugar or corn syrup.
- Experiment with different flavors of gelatin, fruit juice, or purees.
- Add a pinch of citric acid for a tangy twist.
- For vegan gummies, use agar-agar powder instead of gelatin.
- Create layered gummies by pouring different flavored gelatin mixtures into the molds in layers.
- Use gummy bear molds for the classic gummy bear shape.
- Prevent stickiness by tossing gummies in a mixture of cornstarch and powdered sugar.
- Add powdered vitamins to create vitamin-enriched gummies.
- Infuse water with herbs like mint or lavender for a more sophisticated flavor.
- Substitute honey for corn syrup, but it will impart a distinct honey flavor.