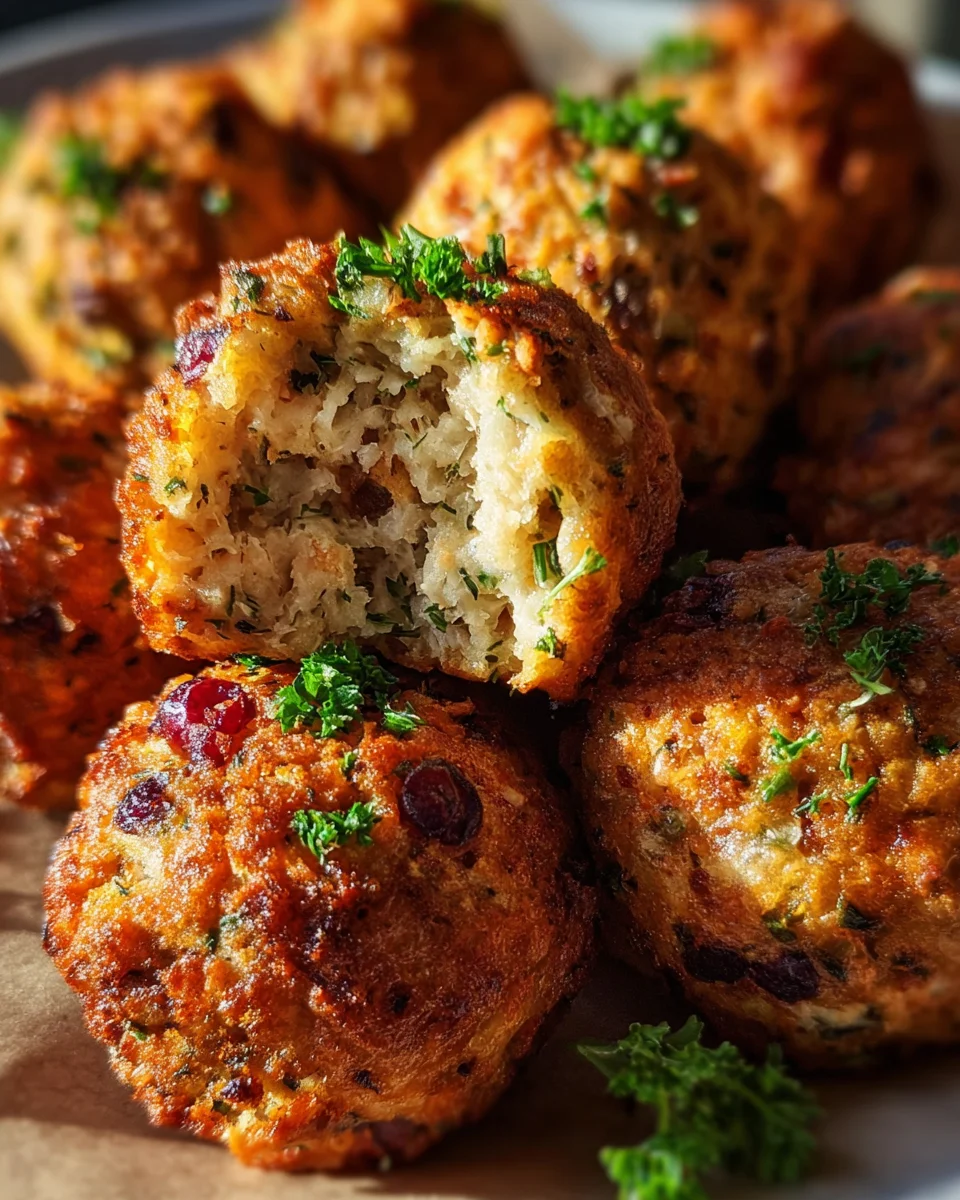
Thanksgiving Stuffing Balls are here to revolutionize your holiday table, offering a delightful twist on a timeless classic that promises to become an instant family favorite. If you’ve ever found yourself wishing for more of those coveted crispy, golden edges from your holiday stuffing, or longed for a simpler, less messy way to serve this beloved side dish, then you are absolutely in for a treat. Stuffing, a staple of Thanksgiving dinners for generations, brings warmth and nostalgic flavors to our celebrations, a tradition dating back centuries to when it was first used to enhance the flavor and moisture of roasted fowl, making it an indispensable part of our festive feasts.
However, achieving that perfectly uniform texture and desired crispness throughout a large traditional stuffing can often be a challenge. That’s precisely where these ingenious individual portions truly shine! Each ball bakes to golden perfection, ensuring every guest enjoys the ideal balance of a savory, moist interior with a satisfyingly crisp crust – truly the best of both worlds. Not only do they offer unparalleled convenience for serving, eliminating the need to scoop from a communal dish, but they also beautifully elevate the presentation of your holiday spread with their charming, bite-sized appeal. Prepare yourself for rave reviews and an effortless way to enjoy all the beloved flavors without any of the fuss, making these Thanksgiving Stuffing Balls an absolute game-changer for your festive feast.

Ingredients:
-
1 large loaf (about 16-20 ounces) stale bread: For truly exceptional Thanksgiving Stuffing Balls, I always recommend a good quality bread. Think sourdough, challah, brioche, or even a classic white sandwich bread for nostalgia. The key here is stale bread, as fresh bread will result in gummy stuffing. If your bread isn’t stale, you can cube it and spread it on baking sheets, then bake at a low temperature (around 250°F / 120°C) for 15-20 minutes, or until dried out but not toasted. You’re looking for about 8-10 cups of cubed bread.
-
1 cup unsalted butter: This is a generous amount, but trust me, it’s essential for flavor and moisture, especially when you’re aiming for that rich, classic taste in your Thanksgiving Stuffing Balls. Unsalted butter gives you control over the final seasoning of your dish.
-
2 large yellow onions: Diced finely. Onions are the aromatic backbone of any great stuffing, providing a sweet and pungent depth that cooks down beautifully.
-
4 stalks celery: Diced finely. Celery adds a subtle peppery note and a lovely texture, which holds up well even after mixing and baking.
-
4-6 cloves garlic: Minced. Garlic brings a wonderful warmth and pungency. Adjust the amount to your preference; I tend to be generous with garlic!
-
1 pound breakfast sausage (optional): Choose a mild or sage-flavored sausage if you’re using it. This is an optional but highly recommended addition, bringing incredible savory depth and a touch of fat that makes the Thanksgiving Stuffing Balls extra moist and flavorful. If you omit the sausage, you might want to add a little more butter or olive oil during the sautéing process.
-
2 cups fresh chicken or vegetable broth: Warmed slightly. This is the primary liquid that binds everything together and moistens the bread. Having it warm helps the bread absorb it more readily. You might need a little more or less depending on the dryness of your bread.
-
2 large eggs: Lightly beaten. Eggs act as a binder, helping the Thanksgiving Stuffing Balls hold their shape during baking and giving them a slightly richer texture.
-
1/4 cup fresh sage, finely chopped: Sage is the quintessential herb for Thanksgiving stuffing, offering an earthy, slightly peppery, and incredibly aromatic flavor. Fresh is always best here!
-
2 tablespoons fresh thyme leaves, finely chopped: Thyme adds a delicate, slightly minty, and peppery note that complements the sage perfectly.
-
1 tablespoon fresh rosemary, finely chopped (optional, use sparingly): Rosemary is strong, so use it judiciously. It adds a wonderful piney aroma, but too much can overpower the other flavors.
-
1/2 cup fresh parsley, finely chopped: Parsley brightens up the entire dish with its fresh, herbaceous notes. It’s a great balancing herb.
-
1 teaspoon salt, or to taste: Remember that broth and sausage might already contain salt, so season gradually.
-
1/2 teaspoon black pepper, or to taste: Freshly ground pepper makes a big difference.
-
Optional additions for extra texture and flavor:
- 1/2 cup dried cranberries: For a touch of sweetness and tartness.
- 1/2 cup chopped pecans or walnuts: For a delightful crunch.
- Zest of 1 orange: To brighten the flavor profile and add an unexpected aromatic twist.
Preparing Your Ingredients
-
Cube the bread: Begin by cutting your stale bread into 1/2 to 3/4-inch cubes. The size is important because too small, and they might become mushy; too large, and they won’t bind well. I usually aim for uniform pieces so they absorb moisture evenly. Spread them out on a large baking sheet and set aside. If your bread isn’t stale enough, this is the perfect time to pop it into a low oven (250°F / 120°C) for about 15-20 minutes until they feel dry and firm, but not browned. This step is crucial for Thanksgiving Stuffing Balls that hold their shape and have a pleasant texture.
-
Dice the vegetables: Finely dice your yellow onions and celery. Aim for pieces that are roughly the same size, about 1/4-inch, so they cook evenly. This also ensures a smooth texture in your finished stuffing. Mince the garlic cloves. For the fresh herbs, give them a good rinse, pat them dry, and then finely chop them. Having everything prepped and ready, a culinary technique often referred to as “mise en place,” will make the rest of the cooking process incredibly smooth and enjoyable.
-
Warm the broth and beat the eggs: Gently warm your chicken or vegetable broth in a small saucepan or microwave. It doesn’t need to be boiling, just warm enough to be readily absorbed by the bread. In a separate small bowl, lightly beat your two large eggs. These small preparatory steps ensure that when it’s time to combine, everything is at an optimal temperature and consistency for the best results.
Sautéing the Aromatics and Sausage
-
Cook the sausage (if using): If you’re incorporating breakfast sausage, heat a large, heavy-bottomed skillet or Dutch oven over medium heat. Add the sausage and break it up with a spoon as it cooks. Stir frequently to ensure even browning. You want it nicely browned and crumbled. This step develops a rich, savory base for your Thanksgiving Stuffing Balls. Once cooked through, use a slotted spoon to transfer the cooked sausage to a large mixing bowl, leaving any rendered fat in the skillet. The rendered fat is pure flavor!
-
Sauté the vegetables: To the same skillet with the rendered sausage fat (or if not using sausage, add 1/2 cup of your butter), add the diced onions and celery. Sauté over medium heat, stirring occasionally, for 8-10 minutes, or until the vegetables have softened and become translucent. They should smell incredibly fragrant and sweet. Don’t rush this step; properly softened aromatics are fundamental to the depth of flavor in your Thanksgiving Stuffing Balls.
-
Add garlic and remaining butter: Once the onions and celery are soft, add the minced garlic to the skillet. Cook for another minute, stirring constantly, until the garlic is fragrant. Be careful not to burn it, as burnt garlic can taste bitter. Now, add the remaining 1/2 cup of unsalted butter to the skillet. Allow it to melt completely, stirring it into the vegetables. This additional butter adds a luxurious richness and helps carry all those wonderful flavors. Scrape up any browned bits from the bottom of the pan as the butter melts; these are intensely flavorful and contribute significantly to the overall taste.
-
Combine cooked aromatics with sausage: Carefully transfer the sautéed onion, celery, garlic, and melted butter mixture from the skillet into the large mixing bowl with the cooked sausage (if used). If you opted out of sausage, simply transfer the vegetable mixture to your large mixing bowl. Make sure to get all those buttery juices!
Mixing the Stuffing Base
-
Add bread and herbs to the bowl: Add your cubed stale bread to the large mixing bowl with the sautéed vegetables and sausage. Sprinkle in all of your fresh chopped herbs: sage, thyme, rosemary (if using), and parsley. If you’re including any optional additions like dried cranberries, chopped nuts, or orange zest, add them now as well. I find that getting your hands in there is the best way to gently combine everything evenly, ensuring every cube of bread gets coated with those delicious herbs.
-
Moisten with broth: Gradually pour the warm chicken or vegetable broth over the bread mixture. Start with about 1 1/2 cups, and then use your hands or a large spoon to gently toss and mix. You want the bread cubes to absorb the liquid, but not become soggy. Add more broth, a quarter cup at a time, if the mixture still feels too dry. The goal is for the bread to be thoroughly moistened but still hold its structure. The texture should be uniformly damp, not swimming in liquid. This is a critical step for perfect Thanksgiving Stuffing Balls – too dry and they’ll crumble, too wet and they’ll be dense.
-
Incorporate the eggs and season: Pour the lightly beaten eggs over the moistened stuffing mixture. Mix thoroughly until the eggs are well incorporated. The eggs will act as a binder, helping your stuffing balls hold their shape during baking. Now, it’s time to season! Add 1 teaspoon of salt and 1/2 teaspoon of black pepper. Gently mix again. I always recommend tasting a small spoonful of the raw mixture at this point to adjust seasonings. Remember, the flavors will concentrate during baking, but you want a good base. If you added sausage, be mindful of its salt content.
Forming the Thanksgiving Stuffing Balls
-
Prepare for shaping: Lightly grease a large baking sheet with butter or cooking spray. Preheat your oven to 375°F (190°C). Having your baking sheet ready and your oven preheated ensures a smooth transition from forming to baking. The consistency of your stuffing mixture is paramount here. It should be moist enough to hold its shape when squeezed, but not dripping wet. If it feels too dry, add another splash of warm broth. If it feels too wet, you can mix in a few tablespoons of dry breadcrumbs to absorb excess moisture.
-
Shape the stuffing balls: Take about 2-3 tablespoons of the stuffing mixture and gently compress it in your hands to form a firm ball. Aim for a size roughly equivalent to a golf ball or a small meatball. The key is to pack them firmly enough so they don’t fall apart during cooking, but not so tightly that they become dense and heavy. Place each formed ball onto the prepared baking sheet, leaving about an inch of space between each one to allow for even air circulation and browning. Continue until all the stuffing mixture is used. This process is quite therapeutic, and it’s where your Thanksgiving Stuffing Balls truly come to life!
Consistency is Key
I find that a consistent size for your Thanksgiving Stuffing Balls is incredibly important for even cooking. If some are large and some are small, the smaller ones will be overcooked and dry while the larger ones might still be soft in the center. Take a moment to ensure they’re all relatively uniform. This attention to detail will pay off when you bite into perfectly cooked, golden-brown stuffing balls.
Baking Your Thanksgiving Stuffing Balls
-
Bake until golden and crispy: Transfer the baking sheet of Thanksgiving Stuffing Balls to your preheated oven. Bake for 25-35 minutes, or until the balls are beautifully golden brown and crispy on the outside, and heated through in the center. The exact baking time will depend on your oven and the size of your balls. Around the 20-minute mark, you might want to gently turn them over to ensure even browning on all sides. The hallmark of a great stuffing ball is that delightful textural contrast between a crispy exterior and a tender, moist interior. Keep an eye on them, as ovens vary, and we don’t want them to dry out.
-
Check for doneness: To confirm they are done, you can insert a thin skewer or knife into the center of one of the larger balls. It should come out hot to the touch. The internal temperature should reach about 165°F (74°C) if you want to be precise, especially if your stuffing contains meat or eggs. Visually, look for that enticing deep golden-brown color and a firm exterior. You’ll also notice the incredible aroma filling your kitchen – that’s your cue that they’re almost ready!
Optional: Pan-Frying for Extra Crispiness
If you’re looking for an even crispier exterior, or want to make these ahead and reheat them with a fresh crunch, you can pan-fry them after baking.
-
Prepare for frying: Heat about 1-2 tablespoons of olive oil or butter in a large non-stick skillet over medium-high heat. You want enough fat to coat the bottom of the pan. Make sure the pan is hot before adding the stuffing balls.
-
Fry the stuffing balls: Carefully place the baked Thanksgiving Stuffing Balls into the hot skillet, ensuring not to overcrowd the pan. Work in batches if necessary. Fry for 2-3 minutes per side, turning occasionally, until they achieve an even deeper golden-brown color and an extra-crispy crust. This method really elevates the texture and adds another layer of delicious flavor. Once done, remove them from the skillet and place them on a plate lined with paper towels to absorb any excess oil.
Why Pan-Fry?
I absolutely adore the texture that pan-frying adds to Thanksgiving Stuffing Balls. It creates an irresistible crunch that contrasts beautifully with the soft interior. It’s a fantastic option if you’re making them in advance and want to refresh them right before serving, ensuring they taste as fresh and vibrant as possible.
Serving Suggestions and Tips
-
Serve immediately: These Thanksgiving Stuffing Balls are best served warm, straight from the oven or skillet. They make a fantastic addition to your Thanksgiving feast, a delightful side dish for any roast chicken or pork, or even a unique appetizer. The individual portions are incredibly convenient and eliminate the need for scooping from a large casserole. I love seeing everyone grab their own perfectly portioned ball of stuffing!
-
Garnish (optional): For an extra touch of freshness and visual appeal, consider garnishing your finished Thanksgiving Stuffing Balls with a sprinkle of fresh chopped parsley or a few tiny sage leaves just before serving. A small bowl of cranberry sauce or gravy served alongside is also a wonderful idea for dipping.
-
Make-ahead option: You can prepare the stuffing mixture, form the balls, and arrange them on a baking sheet up to one day in advance. Cover the baking sheet tightly with plastic wrap and refrigerate. When ready to bake, remove them from the fridge about 30 minutes beforehand to come closer to room temperature, then bake as directed, adding a few extra minutes to the baking time if they are still very cold. This is a huge time-saver for a busy Thanksgiving day!
-
Freezing instructions: These Thanksgiving Stuffing Balls also freeze beautifully. Once baked and cooled completely, arrange them in a single layer on a baking sheet and freeze until solid. Then, transfer the frozen balls to a freezer-safe bag or container for up to 2-3 months. To reheat, bake from frozen at 350°F (175°C) for 20-30 minutes, or until heated through and crispy. This makes them a fantastic option for having a taste of Thanksgiving any time of year.
-
Flavor variations: Feel free to experiment with other additions to customize your Thanksgiving Stuffing Balls. Try adding chopped mushrooms, finely diced apples, roasted chestnuts, or even a splash of sherry or white wine to the broth for an extra layer of complexity. The beauty of stuffing is its versatility, and these individual balls are a perfect canvas for your culinary creativity. Each bite should be a delightful explosion of classic holiday flavors!
Enjoy creating these festive and flavorful Thanksgiving Stuffing Balls! They truly are a delightful twist on a holiday classic.
Ingredients:
-
1 large loaf (about 16-20 ounces) stale bread: For truly exceptional Thanksgiving Stuffing Balls, I always recommend a good quality bread. Think sourdough, challah, brioche, or even a classic white sandwich bread for nostalgia. The key here is stale bread, as fresh bread will result in gummy stuffing. If your bread isn’t stale, you can cube it and spread it on baking sheets, then bake at a low temperature (around 250°F / 120°C) for 15-20 minutes, or until dried out but not toasted. You’re looking for about 8-10 cups of cubed bread, which comes from about 1 to 1.5 pounds of bread depending on its density. I find that a mix of different breads, perhaps some crusty artisan bread combined with a softer challah, adds wonderful complexity and texture to the final Thanksgiving Stuffing Balls.
-
1 cup unsalted butter: This is a generous amount, but trust me, it’s essential for flavor and moisture, especially when you’re aiming for that rich, classic taste in your Thanksgiving Stuffing Balls. Unsalted butter gives you control over the final seasoning of your dish. I prefer unsalted so I can add salt to my taste, especially since some broths and sausages can be quite salty. This butter will be used for sautéing the aromatics and contributing to the overall richness of the stuffing mixture.
-
2 large yellow onions: Diced finely. Onions are the aromatic backbone of any great stuffing, providing a sweet and pungent depth that cooks down beautifully. Aim for a fine, even dice, as this ensures they soften uniformly and blend seamlessly into the stuffing without large, crunchy pieces. They release a wonderful sweetness as they cook, which is crucial for balancing the savory elements.
-
4 stalks celery: Diced finely. Celery adds a subtle peppery note and a lovely texture, which holds up well even after mixing and baking. Like the onions, a fine, even dice is preferred for consistent texture throughout your Thanksgiving Stuffing Balls. The slight bitterness of the celery also helps to cut through the richness of the butter and sausage.
-
4-6 cloves garlic: Minced. Garlic brings a wonderful warmth and pungency. Adjust the amount to your preference; I tend to be generous with garlic! Freshly minced garlic provides a much more vibrant flavor than pre-minced jarred garlic, which can sometimes have a slightly metallic taste. This pungent aromatic is key to that comforting, savory stuffing profile.
-
1 pound breakfast sausage (optional): Choose a mild or sage-flavored sausage if you’re using it. This is an optional but highly recommended addition, bringing incredible savory depth and a touch of fat that makes the Thanksgiving Stuffing Balls extra moist and flavorful. If you omit the sausage, you might want to add a little more butter or olive oil during the sautéing process to compensate for the lost fat and flavor. Pork sausage is traditional, but a chicken or turkey sausage could also work for a lighter option.
-
2 cups fresh chicken or vegetable broth: Warmed slightly. This is the primary liquid that binds everything together and moistens the bread. Having it warm helps the bread absorb it more readily and more evenly. You might need a little more or less depending on the dryness and type of your bread, so always have a little extra on hand. A good quality broth will significantly enhance the overall flavor of your Thanksgiving Stuffing Balls.
-
2 large eggs: Lightly beaten. Eggs act as a binder, helping the Thanksgiving Stuffing Balls hold their shape during baking and giving them a slightly richer texture. They provide structural integrity, preventing the balls from crumbling apart when handled or served. They also contribute a subtle custardy softness to the interior.
-
1/4 cup fresh sage, finely chopped: Sage is the quintessential herb for Thanksgiving stuffing, offering an earthy, slightly peppery, and incredibly aromatic flavor. Fresh is always best here! Its distinctive aroma evokes the very essence of holiday cooking and is non-negotiable for authentic Thanksgiving Stuffing Balls.
-
2 tablespoons fresh thyme leaves, finely chopped: Thyme adds a delicate, slightly minty, and peppery note that complements the sage perfectly. Its subtle earthiness rounds out the herb profile without overpowering the main flavors. Like sage, fresh thyme provides a much brighter and more nuanced flavor than its dried counterpart.
-
1 tablespoon fresh rosemary, finely chopped (optional, use sparingly): Rosemary is strong, so use it judiciously. It adds a wonderful piney aroma, but too much can overpower the other flavors. If you’re a fan of its robust character, a small amount can add a sophisticated touch to your Thanksgiving Stuffing Balls, but remember, a little goes a long way!
-
1/2 cup fresh parsley, finely chopped: Parsley brightens up the entire dish with its fresh, herbaceous notes. It’s a great balancing herb that adds a pop of color and a clean finish to the rich flavors. I find that flat-leaf parsley has a more pronounced flavor than curly parsley.
-
1 teaspoon salt, or to taste: Remember that broth and sausage might already contain salt, so season gradually. It’s always easier to add more salt than to remove it! I recommend tasting as you go to ensure perfect seasoning for your Thanksgiving Stuffing Balls.
-
1/2 teaspoon black pepper, or to taste: Freshly ground pepper makes a big difference in flavor compared to pre-ground pepper. It adds a subtle warmth and spice that elevates all the other ingredients.
-
Optional additions for extra texture and flavor: These are fantastic ways to customize your Thanksgiving Stuffing Balls and add extra layers of deliciousness.
- 1/2 cup dried cranberries: For a touch of sweetness and tartness that cuts through the richness.
- 1/2 cup chopped pecans or walnuts: For a delightful crunch and nutty flavor. Toasting them lightly before adding can enhance their flavor significantly.
- Zest of 1 orange: To brighten the flavor profile and add an unexpected aromatic twist. The citrus notes pair beautifully with sage and cranberries.
- 1/2 cup sliced mushrooms, sautéed: For an earthy, umami depth that complements the savory flavors.
- 1/4 cup dry sherry or white wine: Added with the broth, this can enhance the complexity of the liquid base.
Preparing Your Ingredients
Before diving into the cooking, taking a few moments to properly prepare all your ingredients, known as “mise en place,” will make the entire process smoother and more enjoyable. It ensures you have everything you need exactly when you need it, which is especially helpful when making a multi-component dish like these Thanksgiving Stuffing Balls.
-
Cube the bread: Begin by cutting your stale bread into 1/2 to 3/4-inch cubes. The size is important because too small, and they might become mushy; too large, and they won’t bind well or absorb moisture evenly. I usually aim for uniform pieces so they absorb moisture consistently and result in evenly textured stuffing balls. Spread them out on a large baking sheet and set aside. If your bread isn’t stale enough – a common scenario if you just bought it – this is the perfect time to pop it into a low oven (250°F / 120°C) for about 15-20 minutes, or until they feel dried out and firm, but not browned or toasted. This step is crucial for Thanksgiving Stuffing Balls that hold their shape and have a pleasant, not gummy, texture. Properly dried bread is the foundation of excellent stuffing.
-
Dice the vegetables and mince garlic: Finely dice your yellow onions and celery. Aim for pieces that are roughly the same size, about 1/4-inch, so they cook evenly and integrate seamlessly into the stuffing mixture. Smaller pieces also ensure that every bite of your Thanksgiving Stuffing Balls gets a taste of these essential aromatics. Mince the garlic cloves as finely as possible. For the fresh herbs, give them a good rinse under cold water, pat them thoroughly dry with paper towels (excess moisture can dilute flavors), and then finely chop them. Having everything prepped and ready will allow you to move through the cooking steps efficiently.
-
Warm the broth and beat the eggs: Gently warm your chicken or vegetable broth in a small saucepan over low heat, or in the microwave. It doesn’t need to be boiling, just warm enough to be readily absorbed by the bread cubes. Warm broth also helps to bloom the flavors of the herbs and spices. In a separate small bowl, lightly beat your two large eggs with a fork or whisk until the yolks and whites are just combined. These small preparatory steps ensure that when it’s time to combine, everything is at an optimal temperature and consistency for the best results, leading to perfectly bound and flavorful Thanksgiving Stuffing Balls.
Sautéing the Aromatics and Sausage
This phase is where the foundational flavors of your Thanksgiving Stuffing Balls truly begin to develop. Taking your time here will yield a much richer and more complex stuffing.
-
Cook the sausage (if using): If you’re incorporating breakfast sausage, heat a large, heavy-bottomed skillet or Dutch oven over medium heat. Add the sausage and immediately begin breaking it up with a sturdy spoon or spatula as it cooks. Stir frequently to ensure even browning and to break it into small, uniform crumbles. You want it nicely browned and cooked through, with no pink remaining. This step develops a rich, savory base that will infuse the entire batch of your Thanksgiving Stuffing Balls. Once cooked through, use a slotted spoon to transfer the cooked sausage to your large mixing bowl, leaving any rendered fat in the skillet. The rendered fat is liquid gold – pure flavor that will be used to sauté your vegetables and enhance their taste profile!
-
Sauté the vegetables: To the same skillet with the rendered sausage fat (or if not using sausage, add 1/2 cup of your butter), add the diced onions and celery. Sauté over medium heat, stirring occasionally, for 8-10 minutes, or until the vegetables have softened, become translucent, and are very fragrant. They should smell incredibly sweet and aromatic. If they start to stick, you can add a tablespoon or two of water or broth to deglaze the pan. Don’t rush this step; properly softened aromatics are fundamental to the depth of flavor in your Thanksgiving Stuffing Balls. Raw or undercooked vegetables can leave an unpleasant crunch or sharpness in the final product.
-
Add garlic and remaining butter: Once the onions and celery are soft and translucent, add the minced garlic to the skillet. Cook for just another minute, stirring constantly, until the garlic is fragrant. Be very careful not to burn the garlic, as burnt garlic can turn bitter and ruin the flavor of your stuffing. Now, add the remaining 1/2 cup of unsalted butter to the skillet. Allow it to melt completely, stirring it into the vegetables. This additional butter adds a luxurious richness and helps carry all those wonderful flavors. As the butter melts, make sure to scrape up any browned bits (fond) from the bottom of the pan; these are intensely flavorful and contribute significantly to the overall taste profile of your Thanksgiving Stuffing Balls.
-
Combine cooked aromatics with sausage: Carefully transfer the sautéed onion, celery, garlic, and melted butter mixture from the skillet into the large mixing bowl with the cooked sausage (if you used it). If you opted out of sausage, simply transfer the aromatic vegetable mixture directly to your large mixing bowl. Make sure to scrape out every last drop of those delicious buttery juices from the skillet, as they are essential for the rich flavor of your stuffing.
Mixing the Stuffing Base
This is where all your prepped ingredients come together to form the heart of your Thanksgiving Stuffing Balls. The mixing process is crucial for achieving the right texture and even distribution of flavor.
-
Add bread and herbs to the bowl: Add your cubed stale bread to the large mixing bowl with the sautéed vegetables and sausage. Sprinkle in all of your fresh chopped herbs: sage, thyme, rosemary (if using), and parsley. If you’re including any optional additions like dried cranberries, chopped nuts (such as pecans or walnuts), or orange zest, add them now as well. I find that getting your hands in there is the best way to gently combine everything evenly, ensuring every single cube of bread gets coated with those delicious, fragrant herbs and savory vegetables. Toss gently to avoid crushing the bread too much, but ensure everything is well distributed.
-
Moisten with broth: Gradually pour the warm chicken or vegetable broth over the bread mixture. Start with about 1 1/2 cups, and then use your hands (my preferred method for best feel) or a large spoon to gently toss and mix. You want the bread cubes to absorb the liquid, but not become soggy or mushy. Continue adding more broth, a quarter cup at a time, if the mixture still feels too dry. The goal is for the bread to be thoroughly moistened but still hold its structure. The texture should be uniformly damp and slightly sticky, not swimming in liquid. Squeeze a handful; if it holds together but still feels light, you’re on the right track. This is a critical step for perfect Thanksgiving Stuffing Balls – too dry and they’ll crumble, too wet and they’ll be dense and heavy.
-
Incorporate the eggs and season: Pour the lightly beaten eggs evenly over the moistened stuffing mixture. Mix thoroughly until the eggs are well incorporated and no streaks of egg are visible. The eggs will act as a vital binder, helping your stuffing balls hold their shape during baking and contributing to their internal tenderness. Now, it’s time to season! Add 1 teaspoon of salt and 1/2 teaspoon of freshly ground black pepper. Gently mix again to distribute the seasonings. I always recommend tasting a small spoonful of the raw mixture at this point to adjust seasonings. Remember, the flavors will concentrate slightly during baking, but you want a good base. If you added sausage or used a salty broth, be mindful of their existing salt content and adjust accordingly.
Forming the Thanksgiving Stuffing Balls
This is the fun part, where your mixture transforms into individual, bake-ready Thanksgiving Stuffing Balls!
-
Prepare for shaping: Lightly grease a large baking sheet with butter or cooking spray. Preheat your oven to 375°F (190°C). Having your baking sheet ready and your oven preheated ensures a smooth transition from forming to baking, preventing the balls from sitting around too long before cooking. The consistency of your stuffing mixture is paramount here. It should be moist enough to hold its shape firmly when squeezed, but not dripping wet. If it feels too dry and crumbly, add another splash of warm broth, mixing it in thoroughly. If, by chance, it feels too wet and isn’t holding its shape, you can mix in a few tablespoons of plain dry breadcrumbs or panko to absorb excess moisture. A well-balanced consistency makes for beautifully formed and delicious Thanksgiving Stuffing Balls.
-
Shape the stuffing balls: Take about 2-3 tablespoons of the stuffing mixture (or use a small ice cream scoop for consistency) and gently compress it in your hands to form a firm, round ball. Aim for a size roughly equivalent to a golf ball or a small meatball, typically about 1.5 to 2 inches in diameter. The key is to pack them firmly enough so they don’t fall apart during cooking, but not so tightly that they become dense and heavy. Over-compacting can lead to a tough interior. Place each formed ball onto the prepared baking sheet, leaving about an inch of space between each one to allow for even air circulation and proper browning on all sides. Continue until all the stuffing mixture is used. This process is quite therapeutic, and it’s where your Thanksgiving Stuffing Balls truly come to life, transforming from a loose mixture into appealing individual servings.
Consistency is Key
I find that a consistent size for your Thanksgiving Stuffing Balls is incredibly important for even cooking. If some are large and some are small, the smaller ones will be overcooked and potentially dry, while the larger ones might still be soft or undercooked in the center. Taking a moment to ensure they’re all relatively uniform in size will pay off when you bite into perfectly cooked, golden-brown stuffing balls. It also ensures they look lovely and professional on your serving platter.
Baking Your Thanksgiving Stuffing Balls
This is where the magic happens, and your kitchen will fill with the most incredible holiday aromas!
-
Bake until golden and crispy: Transfer the baking sheet of Thanksgiving Stuffing Balls to your preheated oven. Bake for 25-35 minutes, or until the balls are beautifully golden brown and crispy on the outside, and heated through in the center. The exact baking time will depend on your specific oven, the size of your balls, and how crispy you prefer them. Around the 20-minute mark, you might want to gently turn them over with tongs to ensure even browning and crispness on all sides. The hallmark of a great stuffing ball is that delightful textural contrast between a crispy, savory exterior and a tender, moist interior. Keep a close eye on them, as ovens vary, and we don’t want them to dry out. A rich golden color is your visual cue for perfection.
-
Check for doneness: To confirm they are done, you can insert a thin skewer or knife into the center of one of the larger balls. It should come out hot to the touch. If you’re concerned about food safety, especially if your stuffing contains meat or eggs, the internal temperature should reach about 165°F (74°C). Visually, look for that enticing deep golden-brown color all around and a firm, slightly yielding exterior. You’ll also notice the incredible, comforting aroma filling your kitchen – that’s often your best cue that they’re perfectly cooked and ready to be devoured!
Optional: Pan-Frying for Extra Crispiness
If you’re looking for an even crispier exterior, or want to make these ahead and reheat them with a fresh crunch, a quick pan-fry after baking is a fantastic addition.
-
Prepare for frying: Heat about 1-2 tablespoons of olive oil or butter (or a mix of both for flavor) in a large non-stick skillet or cast-iron pan over medium-high heat. You want enough fat to coat the bottom of the pan generously. Make sure the pan is sufficiently hot before adding the stuffing balls; a good test is to flick a tiny drop of water into the pan – if it sizzles immediately, it’s ready. This high heat will quickly create a crisp crust.
-
Fry the stuffing balls: Carefully place the baked Thanksgiving Stuffing Balls into the hot skillet, ensuring not to overcrowd the pan. Give them space to brown evenly; work in batches if necessary. Fry for 2-3 minutes per side, turning occasionally with tongs, until they achieve an even deeper golden-brown color and an extra-crispy crust all around. This method truly elevates the texture, creating an irresistible crunch that contrasts beautifully with the soft, flavorful interior, and adds another layer of delicious, slightly nutty fried flavor. Once done, remove them from the skillet and place them on a plate lined with paper towels to absorb any excess oil, ensuring they remain perfectly crisp.
Why Pan-Fry?
I absolutely adore the texture that pan-frying adds to Thanksgiving Stuffing Balls. While baking provides a good crisp, a quick finish in a hot pan takes them to another level of textural perfection, creating an irresistible crunch that contrasts beautifully with the soft, herb-infused interior. It’s also a fantastic option if you’re making them in advance and want to refresh them right before serving, ensuring they taste as fresh, warm, and vibrantly crispy as possible.
Serving Suggestions and Tips
Once your Thanksgiving Stuffing Balls are cooked to perfection, the only thing left is to enjoy them!
-
Serve immediately: These Thanksgiving Stuffing Balls are best served warm, straight from the oven or skillet. The warmth truly brings out all the aromatic flavors. They make a fantastic, individual-portioned addition to your Thanksgiving feast, a delightful side dish for any roast chicken, turkey, or pork dinner, or even a unique and elegant appetizer for a cocktail party. The individual portions are incredibly convenient and eliminate the need for scooping from a large casserole, making serving a breeze. I love seeing everyone grab their own perfectly portioned ball of savory goodness!
-
Garnish (optional): For an extra touch of freshness and visual appeal, consider garnishing your finished Thanksgiving Stuffing Balls with a sprinkle of fresh chopped parsley or a few tiny, whole sage leaves just before serving. This adds a vibrant color contrast and reinforces the herbaceous notes. A small bowl of homemade cranberry sauce, a rich mushroom gravy, or classic turkey gravy served alongside is also a wonderful idea for dipping, allowing guests to customize each bite.
-
Make-ahead option: You can prepare the stuffing mixture, form the balls, and arrange them on a baking sheet up to one day in advance. This is a brilliant strategy for reducing stress on a busy holiday! Cover the baking sheet tightly with plastic wrap and refrigerate. When ready to bake, remove them from the fridge about 30 minutes beforehand to allow them to come closer to room temperature, which promotes more even cooking. Then, bake as directed, adding a few extra minutes (typically 5-10 minutes) to the baking time if they are still very cold. This make-ahead capability makes Thanksgiving Stuffing Balls a practical and delicious choice.
-
Freezing instructions: These Thanksgiving Stuffing Balls also freeze beautifully, making them perfect for meal prep or enjoying a taste of the holidays anytime. Once baked and cooled completely, arrange them in a single layer on a baking sheet and freeze until solid (this prevents them from sticking together). Then, transfer the frozen balls to a freezer-safe zip-top bag or airtight container for up to 2-3 months. To reheat, you can bake them directly from frozen at 350°F (175°C) for 20-30 minutes, or until heated through and crispy. If you desire extra crispness, a quick pan-fry after baking is ideal. This makes them a fantastic, convenient option for having a taste of Thanksgiving any time of year.
-
Flavor variations: Feel free to experiment with other delicious additions to customize your Thanksgiving Stuffing Balls to your personal taste. Try adding finely diced apples for a touch of sweetness and tartness, roasted chestnuts for a delicate nutty flavor, chopped cooked mushrooms for an earthy umami depth, or even a splash of dry sherry or white wine to the broth for an extra layer of complexity. You could also experiment with different spice blends like poultry seasoning for a classic taste, or a pinch of smoked paprika for a smoky twist. The beauty of stuffing is its versatility, and these individual balls are a perfect canvas for your culinary creativity. Each bite should be a delightful explosion of classic holiday flavors, tailored just for you!
Enjoy creating these festive and flavorful Thanksgiving Stuffing Balls! They truly are a delightful and incredibly satisfying twist on a holiday classic.
Conclusion:
And so, we arrive at the culmination of our culinary journey with these remarkable stuffing balls. I truly believe that this recipe is an absolute must-try for anyone seeking to elevate their holiday table, or simply looking for a comforting, flavor-packed side dish any time of year. What makes these Thanksgiving Stuffing Balls truly stand out is their perfect balance: a gloriously crisp, golden exterior that gives way to a moist, aromatic, and deeply savory interior. Each bite delivers that quintessential stuffing experience—the earthy sage, the tender bread, the subtle sweetness of onion and celery, all perfectly bound together. They offer all the beloved flavors of traditional stuffing but with an irresistible individual portion appeal, making serving effortless and presentation utterly charming. Forget the struggle of scooping from a large baking dish; these beautiful balls are ready to impress, ensuring everyone gets a perfect bite every single time. Their convenience means less fuss on a busy holiday, freeing you up to enjoy more precious moments with your loved ones, all while serving something truly spectacular.
But the magic doesn’t stop at the holiday table! While they are undoubtedly a star alongside turkey and gravy, these stuffing balls are incredibly versatile. Let me share some fantastic serving suggestions and variations to spark your culinary imagination:
Serving Suggestions Beyond the Holiday Feast:
- Appetizer Perfection: Serve them warm on a platter with toothpicks alongside a homemade cranberry dipping sauce or a savory mushroom gravy for an elegant starter at any gathering. They are an instant crowd-pleaser and disappear fast!
- Weeknight Sidekick: Pair them with a simple roasted chicken, pork chops, or even a hearty vegetarian lentil loaf for a comforting weeknight meal that feels a little extra special.
- Brunch Star: Imagine these next to scrambled eggs and crispy bacon, or as part of a savory brunch spread. The flavors meld wonderfully with breakfast staples.
- Salad Topper: Cube any leftovers and toss them into a warm autumn salad with mixed greens, roasted vegetables, and a light vinaigrette for an unexpected texture and flavor boost.
Creative Variations to Make Them Your Own:
One of my favorite things about cooking is the ability to personalize a recipe, and this one lends itself beautifully to customization. Don’t be afraid to experiment!
- Add Some Protein: For a heartier ball, consider incorporating finely crumbled and cooked sausage (sage sausage works wonderfully!), crispy bacon bits, or even diced cooked chicken. Just ensure any additions are pre-cooked and cooled before mixing them in.
- Fruity & Nutty Touches: Stir in a handful of dried cranberries, chopped apples, or toasted pecans/walnuts for a delightful mix of sweet, tart, and crunchy textures. These additions introduce wonderful layers of flavor.
- Cheesy Indulgence: Fold in a cup of shredded Gruyère, sharp cheddar, or Parmesan cheese to the mixture before forming the balls. The cheese will melt beautifully, adding an irresistible richness and a slightly gooey center.
- Herbaceous Adventures: While sage is key, feel free to enhance the herb profile with fresh rosemary, thyme, or a hint of marjoram. Fresh herbs always make a huge difference in the vibrancy of the dish.
- Spicy Kick: For those who love a bit of heat, a pinch of red pepper flakes or a dash of your favorite hot sauce can add an exciting dimension to the savory flavors.
- Vegetarian/Vegan Adaptations: If you’re catering to dietary needs, simply swap the chicken broth for a rich vegetable broth and use a plant-based butter or olive oil. The results are equally delicious and satisfying.
I genuinely hope you feel inspired to give this recipe a try. There’s a profound joy in creating something delicious with your own hands, especially when it brings smiles to the faces around your table. These Thanksgiving Stuffing Balls are more than just a dish; they’re a celebration of flavor, comfort, and togetherness. So, go ahead, preheat your oven, gather your ingredients, and embark on this delightful cooking adventure. I am so confident you’ll love them as much as I do. Once you’ve made them, I would absolutely love to hear about your experience! What variations did you try? How did your family and friends react? Please share your stories, tips, and even photos in the comments below. Your feedback and creativity truly inspire me and our entire cooking community. Happy cooking, and bon appétit!
Thanksgiving Stuffing Balls
Revolutionize your holiday table with these easy and delicious Thanksgiving Stuffing Balls! Each individual portion bakes to golden perfection, offering a crispy exterior and a savory, moist interior without the fuss of traditional stuffing. Perfect for a convenient and elegant side dish.
Ingredients
Instructions
Important Information
Nutrition Facts (Per Serving)
It is important to consider this information as approximate and not to use it as definitive health advice.
Allergy Information
Please check ingredients for potential allergens and consult a health professional if in doubt.