Never Fail Fruit Cake Old Fashioned Style
I know, I know. Fruit cake often gets a bad rap, but trust me when I say this isn’t the dry, crumbly kind you might be imagining. This is the good stuff! I’m absolutely thrilled to share with you my recipe for the Never Fail Fruit Cake Old Fashioned Style, and it truly lives up to its wonderful name.
What makes this particular fruit cake so special? It’s all about that perfect balance of incredibly moist texture and rich, comforting flavor. We’re talking about a dense, beautifully spiced cake absolutely brimming with a generous mix of plump, dried fruits and crunchy nuts. It’s a hearty, satisfying slice that just sings with traditional charm and warmth, without any hint of dryness.
You’ll fall in love with this recipe because it takes all the guesswork out of making a truly magnificent fruit cake. It’s surprisingly simple to prepare, and the result is a show-stopping dessert that’s perfect for holiday celebrations, thoughtful gifts, or simply a cozy treat with a cup of tea. It keeps beautifully, often getting even better with a little time, and we’ve ensured it’s made with delicious non-alcohol alternatives so everyone can enjoy its delightful taste. Get ready to bake a new family favorite!

Ingredient Notes
Hello, fellow bakers! To truly achieve a “Never Fail” Old-Fashioned Fruit Cake, the quality and preparation of your ingredients are paramount. This isn’t just any cake; it’s a labor of love that rewards you with rich, moist deliciousness that only gets better with time. Let’s dive into what makes this classic so special.
The Dried Fruits: The Heart of Your Cake
- Mixed Dried Fruit: This typically includes raisins, sultanas (golden raisins), currants, and candied citrus peel. For an old-fashioned feel, I love a good blend. Aim for plump, moist fruits. If yours seem a bit dry, you can soak them overnight in hot brewed tea, orange juice, or even a non-alcoholic rum or brandy extract mixed with water. This infusion step is fantastic for adding moisture and depth of flavor!
- Glace Cherries: Opt for good quality, vibrant red and green glace cherries. I always halve or quarter them to ensure they’re well distributed throughout the cake.
- Preparation is Key: Before adding to the batter, always toss your dried fruits (and nuts!) with a tablespoon or two of the flour from your recipe. This crucial step helps prevent them from sinking to the bottom during baking, ensuring every slice has a lovely distribution. Trust me, this is a “never fail” secret!
Flour and Leavening
- All-Purpose Flour: Standard all-purpose flour works wonderfully. I always recommend sifting it with your spices and leavening agents (baking powder or soda, if called for) to ensure an even mix and a lighter crumb.
- Spices: This is where the old-fashioned magic truly happens! Ground cinnamon, nutmeg, allspice, and a touch of cloves are essential for that warm, festive aroma and taste. Feel free to adjust quantities to your personal preference, but don’t skimp on these warming spices.
Fats and Sweeteners
- Butter: Unsalted butter is my go-to. Ensure it’s softened to room temperature for proper creaming with the sugar. This creates air pockets, contributing to the cake’s texture. Margarine can be used, but butter offers superior flavor.
- Brown Sugar: Dark brown sugar is preferred over white granulated sugar in old-fashioned fruit cakes. Its molasses content adds incredible moisture, depth of flavor, and a beautiful caramel hue to the cake. Light brown sugar is also acceptable.
Eggs and Liquid
- Large Eggs: These act as a binder and add richness. Ensure they’re at room temperature, as they’ll emulsify better with the creamed butter and sugar.
- Liquid for Moisture: Traditionally, a splash of brandy or rum would be used. For our “never fail” non-alcoholic version, I highly recommend using freshly squeezed orange juice, apple juice, or even strong brewed black tea. These liquids provide the necessary moisture and help activate the spices, without the alcohol. Non-alcoholic rum or brandy extracts are also fantastic for capturing that classic flavor profile.
Nuts (Optional, but Recommended)
- Pecans, Walnuts, or Almonds: Chopped nuts add a lovely crunch and richness. I usually go for pecans or walnuts, roughly chopped. Just like the fruits, give them a light dusting of flour to prevent sinking.
By paying attention to these ingredient notes, you’re already on your way to a truly never-fail, old-fashioned fruit cake that will impress everyone!
Step-by-Step Instructions
Making a “Never Fail” Old-Fashioned Fruit Cake is a patient process, but each step is straightforward and contributes to the final, delicious result. Follow these instructions carefully, and you’ll be rewarded with a magnificent cake!
- Prepare Your Tin: First things first, prepare your cake tin. For a fruit cake, I always recommend a 9-inch round or 8-inch square tin, at least 3 inches deep. Grease it well, then line the bottom and sides with a double layer of parchment paper. Allow the paper to extend about 2 inches above the rim of the tin. This extra height helps protect the cake from over-browning and ensures it bakes evenly. Preheat your oven to a low temperature, around 300°F (150°C).
- Soak Your Fruits (Optional, but Recommended): If your dried fruits seem a little dry, or you simply want to enhance their flavor, place all your dried fruits (raisins, currants, mixed peel, glace cherries) in a bowl. Pour over your chosen non-alcoholic liquid – enough to just cover them. Let them soak for at least a few hours, or preferably overnight, stirring occasionally. Drain them well before the next step, reserving any liquid.
- Combine Dry Ingredients and Prepare Fruits: In a large bowl, whisk together your sifted all-purpose flour, ground spices (cinnamon, nutmeg, allspice, cloves), and a pinch of salt. Set aside. In another bowl, add your soaked (and drained) or unsoaked dried fruits and chopped nuts. Toss them with 1-2 tablespoons of the flour mixture until they are lightly coated. This is that “never fail” trick to prevent sinking!
- Cream Butter and Sugar: In a very large mixing bowl, using an electric mixer, cream the softened butter and brown sugar together until light, fluffy, and pale in color. This process incorporates air, which is crucial for the cake’s texture.
- Add Eggs Gradually: Beat in the eggs one at a time, mixing well after each addition. If the mixture looks like it might curdle, add a tablespoon of the flour mixture with each egg. Continue beating until the mixture is smooth and well combined.
- Fold in Dry Ingredients and Fruits: Gradually add the remaining dry ingredient mixture to the wet mixture, alternating with your chosen non-alcoholic liquid (fruit juice, tea, or reserved soaking liquid). Mix on low speed or by hand with a spatula until just combined. Be careful not to overmix; overmixing can lead to a tough cake.
- Gently Fold in Fruits and Nuts: Now, gently fold in your flour-dusted dried fruits and nuts until they are evenly distributed throughout the batter. Again, do this gently to avoid crushing the fruits and overworking the batter.
- Fill the Tin: Spoon the batter into your prepared cake tin, smoothing the top with the back of a spoon. Create a slight dip in the center; this helps the cake bake flat rather than domed.
- Slow Bake: Place the cake in the preheated oven. Bake for approximately 2.5 to 3.5 hours, or even longer, depending on your oven and the depth of your tin. The “never fail” rule for fruit cakes is low and slow! Check for doneness by inserting a long skewer into the center of the cake; it should come out clean. If the top starts to brown too much, loosely tent it with aluminum foil.
- Cooling: Once baked, let the cake cool in the tin on a wire rack for at least 30 minutes, or even an hour. This allows the cake to set properly. Then, carefully remove it from the tin, peel off the parchment paper, and let it cool completely on the wire rack.
Congratulations! You’ve successfully baked a beautiful “Never Fail” Old-Fashioned Fruit Cake!
Tips & Suggestions
Achieving a truly “Never Fail” Old-Fashioned Fruit Cake goes beyond just following the steps. Here are some of my favorite tips and suggestions to ensure your fruit cake is perfect every single time, embodying that rich, traditional goodness:
- Don’t Rush the Soaking: If you choose to soak your fruits, give them ample time. Overnight is ideal. This ensures they plump up beautifully, infusing the cake with extra moisture and flavor, which is key to a “never fail” moist fruit cake.
- Flour Your Fruits and Nuts: I can’t stress this enough! Tossing your dried fruits and nuts with a tablespoon or two of flour from the recipe is a crucial step. It creates a barrier that helps them suspend evenly in the batter rather than sinking to the bottom during baking. This is a classic “never fail” technique!
- Low and Slow Baking is Non-Negotiable: Fruit cakes require a long, slow bake at a lower temperature. This prevents the edges from burning while the center remains raw. It’s the secret to a perfectly cooked, moist, and evenly baked cake. Be patient; it’s worth the wait!
- Proper Tin Preparation: Lining your cake tin with a double layer of parchment paper, extending above the rim, is vital. It acts as insulation, protecting the edges of the cake from drying out and over-browning, a common pitfall in fruit cake baking.
- Test for Doneness Reliably: A fruit cake is very dense, so testing for doneness requires a long skewer or thin metal rod. Insert it into the very center of the cake. If it comes out clean, your cake is ready. If there’s wet batter, give it more time.
- Maturity for Flavor: Old-fashioned fruit cakes are renowned for improving with age. The flavors meld and deepen over time, and the cake becomes even more moist. While delicious fresh, try to let it “mature” for at least a week or two if you can resist!
- “Feeding” Your Cake (Non-Alcoholic Style): To keep your cake wonderfully moist and enhance its flavor during storage, you can “feed” it. Once a week, after the cake has completely cooled, poke a few holes in the top with a skewer and brush it lightly with your chosen non-alcoholic liquid (e.g., orange juice, apple juice, strong cold tea, or non-alcoholic rum/brandy extract). Wrap it up again tightly after each feeding. This practice is a classic way to ensure a truly “never fail” moist fruit cake.
- Don’t Overmix: When adding the dry ingredients and then the fruits and nuts, mix only until just combined. Overmixing develops the gluten in the flour, leading to a tougher, denser cake.
- Vary Your Fruits and Nuts: Feel free to experiment with different combinations of dried fruits (apricots, cranberries, figs) and nuts (almonds, cashews). Just ensure the total weight remains consistent.
By incorporating these tried-and-true tips, your “Never Fail” Old-Fashioned Fruit Cake will be a delicious triumph every time you bake it!
Storage
One of the many wonderful qualities of a “Never Fail” Old-Fashioned Fruit Cake is its incredible shelf life. Proper storage is key to maintaining its moisture, enhancing its flavor, and ensuring it truly lives up to its “never fail” promise for weeks, or even months! Here’s how I store mine:
Initial Cooling
- Cool Completely: Before attempting to store your fruit cake, it is absolutely essential that it cools down completely to room temperature. This can take several hours, or even overnight, due to its density. Storing a warm cake will create condensation, leading to mold and a soggy cake – definitely not “never fail” territory!
Short-Term Storage (Up to a Few Weeks)
- Wrap It Up: Once completely cool, wrap the entire cake tightly in several layers of plastic wrap, followed by a layer of aluminum foil. The goal is to create an airtight seal to prevent moisture loss.
- Airtight Container: Place the wrapped cake in an airtight container or a large zip-top bag. This adds an extra layer of protection against air exposure.
- Cool, Dark Place: Store the wrapped cake in a cool, dark pantry or cupboard. There’s no need to refrigerate a fruit cake for short-term storage, as the high sugar and fruit content acts as a natural preservative.
- “Feeding” (Optional): If you like, you can “feed” your cake once a week (as mentioned in the tips section) by unwrapping it, poking holes with a skewer, brushing with a non-alcoholic liquid (like fruit juice or strong brewed tea), and then re-wrapping it tightly. This keeps it incredibly moist and enhances the flavors.
Long-Term Storage (Months)
- Freezing for Longevity: Fruit cakes freeze exceptionally well. After cooling and wrapping it tightly in plastic wrap and foil (as described above), place it in a freezer-safe airtight container or bag.
- Freezer Life: Your “Never Fail” Fruit Cake can be stored in the freezer for up to a year. Thaw it completely in the refrigerator overnight, then bring it to room temperature before serving. You can also “feed” it after thawing if desired.
Important Considerations for “Never Fail” Storage
- Moisture is Key: The biggest enemy of a fruit cake is dryness. Always ensure your cake is wrapped as airtight as possible. If it starts to dry out, a gentle “feeding” with your chosen non-alcoholic liquid can often revive it.
- Check for Mold: While fruit cakes have a long shelf life, always visually inspect your cake before serving, especially if it’s been stored for a long time.
By following these storage guidelines, your “Never Fail” Old-Fashioned Fruit Cake will remain a delicious treat for a long time, ready to be enjoyed whenever a craving strikes!

Final Thoughts
Well, my friend, we’ve reached the sweet conclusion of our baking adventure! I can confidently say that creating this Never Fail Fruit Cake Old Fashioned Style is more than just following steps; it’s an invitation to bring warmth, tradition, and truly remarkable flavor into your home. This isn’t just any fruit cake; it’s the fruit cake you’ve always dreamed of – robust, comforting, and utterly delightful, perfect with your favorite tea or coffee, and made with love (and perhaps some delicious non-alcohol alternatives for soaking, if you choose!).
Its “never fail” promise means you can approach your oven with confidence, knowing you’re about to pull out a masterpiece. The “old-fashioned style” ensures every bite is a nostalgic journey back to simpler, sweeter times. So go ahead, embrace the joy of baking and share the magic of your own homemade Never Fail Fruit Cake Old Fashioned Style. I promise, it’s worth every moment!
The Best Never Fail Old Fashioned Fruit Cake Recipe
- Total Time: 45 minute
- Yield: 1 cake
Description
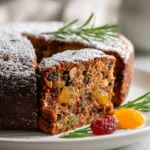
This Never Fail Fruit Cake Old Fashioned Style is a moist, richly flavored cake filled with a delightful mix of dried fruits and nuts. Perfect for holiday celebrations or cozy treats, this cake only gets better with time!
Ingredients
- Mixed Dried Fruit (raisins, sultanas, currants, candied citrus peel)
- Glace Cherries (halved or quartered)
- All-Purpose Flour
- Ground Cinnamon
- Ground Nutmeg
- Ground Allspice
- Ground Cloves
- Unsalted Butter (softened to room temperature)
- Dark Brown Sugar
- Large Eggs (at room temperature)
- Non-alcoholic liquid (freshly squeezed orange juice, apple juice, or strong brewed black tea)
- Pecans (chopped)
- Walnuts (chopped)
- Almonds (chopped)
Instructions
- Prepare your cake tin by greasing it well and lining the bottom and sides with a double layer of parchment paper, extending about 2 inches above the rim. Preheat your oven to 300°F (150°C).
- If desired, soak your dried fruits in a non-alcoholic liquid to enhance their flavor and moisture for at least a few hours or overnight. Drain well before using.
- In a large bowl, whisk together the sifted all-purpose flour, ground spices, and a pinch of salt. Set aside.
- In another bowl, toss the soaked (and drained) or unsoaked dried fruits and chopped nuts with 1-2 tablespoons of the flour mixture until lightly coated.
- In a very large mixing bowl, cream the softened butter and brown sugar together until light and fluffy.
- Beat in the eggs one at a time, mixing well after each addition. If the mixture looks like it might curdle, add a tablespoon of the flour mixture with each egg.
- Gradually add the remaining dry ingredient mixture to the wet mixture, alternating with your chosen non-alcoholic liquid, mixing until just combined.
- Gently fold in the flour-dusted dried fruits and nuts until evenly distributed throughout the batter.
- Spoon the batter into your prepared cake tin, smoothing the top and creating a slight dip in the center.
- Place the cake in the preheated oven and bake for approximately 2.5 to 3.5 hours, checking for doneness with a skewer.
- Once baked, let the cake cool in the tin for at least 30 minutes before transferring it to a wire rack to cool completely.
- Prep Time: 30 mins
- Cook Time: 2.5 to 3.5 hours
- Category: Dessert
- Method: Baking
- Cuisine: American
Nutrition
- Serving Size: 1 slice
- Calories: 350
- Sugar: 25 g
- Sodium: 150 mg
- Fat: 15 g
- Saturated Fat: 8 g
- Unsaturated Fat: 5 g
- Trans Fat: 0 g
- Carbohydrates: 50 g
- Fiber: 2 g
- Protein: 5 g
- Cholesterol: 70 mg
Keywords: For best results, soak your fruits overnight and ensure to toss them with flour to prevent sinking. Low and slow baking is essential for a moist cake, and consider 'feeding' your cake with non-alcoholic liquid during storage to maintain moisture.