Yogurt Bagels Air Fryer: Get ready to revolutionize your breakfast routine! Imagine biting into a perfectly chewy bagel, warm and inviting, but without the hours of kneading and proofing. Sounds too good to be true? It’s not! This recipe unlocks the secret to incredibly delicious bagels using just two simple ingredients and the magic of your air fryer.
Bagels, with their rich history rooted in Jewish communities of Eastern Europe, have become a beloved staple worldwide. Traditionally boiled and then baked, achieving that signature chewy texture required time and skill. But what if you could capture that same delightful experience in a fraction of the time, with minimal effort? That’s where the air fryer comes in!
People adore bagels for their satisfying chewiness, their versatility as a blank canvas for endless toppings, and their comforting familiarity. This Yogurt Bagels Air Fryer recipe takes all the things we love about bagels and makes them incredibly accessible. The combination of Greek yogurt and self-rising flour creates a dough that’s easy to work with and yields a surprisingly authentic bagel texture. Plus, the air fryer ensures a perfectly golden-brown exterior and a soft, chewy interior every single time. Get ready to enjoy fresh, homemade bagels in minutes – you’ll never buy store-bought again!

Ingredients:
- 1 cup (240g) plain Greek yogurt, non-fat or low-fat
- 1 ½ cups (180g) self-rising flour, plus more for dusting
- 1 large egg, beaten (for egg wash)
- Everything bagel seasoning, sesame seeds, poppy seeds, or any desired toppings
- Optional: 1 teaspoon honey or maple syrup (for a touch of sweetness)
- Optional: Pinch of salt (if using regular flour instead of self-rising)
Preparing the Dough:
Okay, let’s get started! This is the fun part where we transform simple ingredients into bagel dough. Don’t be intimidated; it’s surprisingly easy.
- Combine Yogurt and Flour: In a large bowl, add the Greek yogurt and self-rising flour. If you’re using regular flour instead of self-rising, add a pinch of salt here. The salt helps to enhance the flavor.
- Mix Until Combined: Using a spatula or wooden spoon, mix the yogurt and flour together until a shaggy dough forms. It will look quite dry at first, but keep mixing!
- Knead the Dough: Turn the dough out onto a lightly floured surface. Knead the dough for about 5-7 minutes, or until it becomes smooth and elastic. Don’t over-knead, as this can make the bagels tough. The dough should be slightly sticky, but manageable. If it’s too sticky, add a little more flour, a tablespoon at a time.
- Form a Ball: Once the dough is smooth and elastic, form it into a ball.
Shaping the Bagels:
Now comes the bagel magic! Shaping them is easier than you think. There are a couple of methods you can use, so pick the one you find easiest.
- Divide the Dough: Using a sharp knife or dough cutter, divide the dough into 4 equal pieces.
- Roll into Ropes: Roll each piece of dough into a rope about 8-10 inches long.
- Form the Bagels (Method 1: The Loop): Bring the ends of the rope together to form a circle, overlapping the ends by about an inch. Press the overlapping ends firmly together to seal the bagel. Make sure the seal is secure, or the bagels might come apart during cooking.
- Form the Bagels (Method 2: The Hole): Roll each piece of dough into a ball. Use your thumb to poke a hole through the center of the ball. Gently stretch and shape the hole until it’s about 1-1.5 inches in diameter. This method creates a more traditional bagel shape.
- Perfecting the Shape: Gently reshape the bagels if needed to make them round and even.
Preparing for the Air Fryer:
Almost there! A little prep work ensures perfectly cooked bagels.
- Egg Wash: In a small bowl, whisk the egg. This will give the bagels a beautiful golden-brown color and help the toppings adhere.
- Brush with Egg Wash: Brush the tops and sides of each bagel with the beaten egg. Be generous!
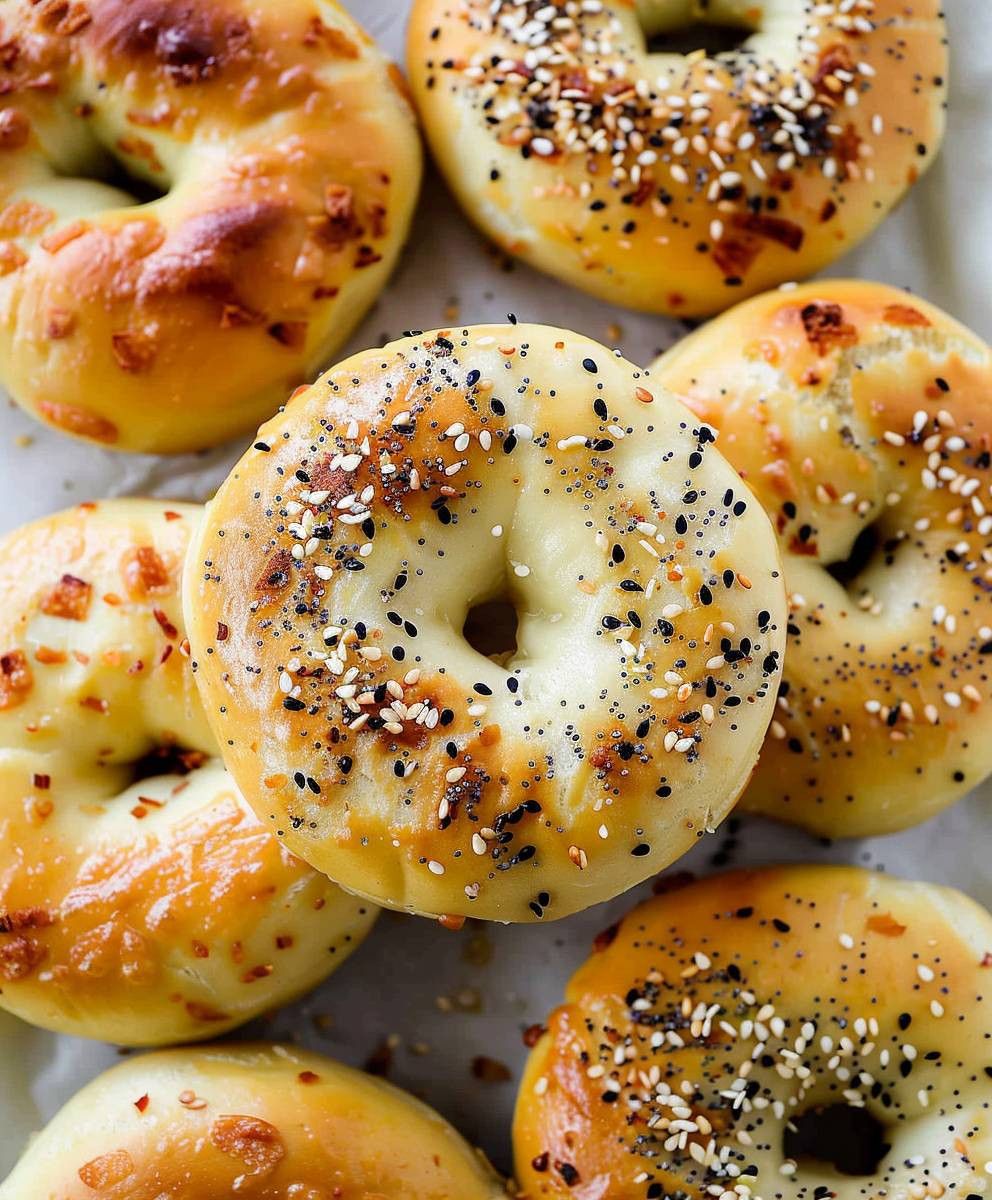
- Add Toppings: Sprinkle the bagels with your desired toppings. Everything bagel seasoning is a classic choice, but sesame seeds, poppy seeds, dried onion flakes, garlic flakes, or even a sprinkle of coarse salt are all delicious options. Press the toppings gently into the egg wash to help them stick.
Air Frying the Bagels:
The air fryer is the secret to these quick and easy bagels. It gives them a wonderfully chewy texture and a slightly crispy exterior.
- Preheat the Air Fryer: Preheat your air fryer to 350°F (175°C) for 3-5 minutes. This helps ensure even cooking.
- Prepare the Air Fryer Basket: Lightly grease the air fryer basket with cooking spray or line it with parchment paper. This prevents the bagels from sticking.
- Place Bagels in the Air Fryer: Place the bagels in the air fryer basket, leaving some space between them to allow for proper air circulation. You may need to cook them in batches, depending on the size of your air fryer.
- Air Fry: Air fry for 12-15 minutes, or until the bagels are golden brown and cooked through. The exact cooking time will vary depending on your air fryer, so keep an eye on them.
- Check for Doneness: To check for doneness, insert a toothpick into the center of a bagel. If it comes out clean, the bagel is cooked through.
- Flip (Optional): For even browning, you can flip the bagels halfway through the cooking time.
Cooling and Serving:
Patience is key! Letting the bagels cool slightly before slicing and enjoying will prevent them from being too gummy.
- Cool Slightly: Remove the bagels from the air fryer and let them cool on a wire rack for at least 10-15 minutes.
- Slice and Serve: Once the bagels are cool enough to handle, slice them in half horizontally.
- Enjoy! Serve the bagels with your favorite toppings, such as cream cheese, butter, avocado, or smoked salmon. They’re also delicious toasted!
Tips and Variations:
Want to customize your bagels? Here are some ideas to get you started.
- Sweet Bagels: Add 1-2 tablespoons of sugar or honey to the dough for a sweeter bagel. You can also add cinnamon or other spices.
- Savory Bagels: Add shredded cheese, chopped herbs, or sun-dried tomatoes to the dough for a savory bagel.
- Gluten-Free Bagels: Use a gluten-free self-rising flour blend to make gluten-free bagels. Keep in mind that the texture may be slightly different.
- Different Toppings: Get creative with your toppings! Try everything bagel seasoning, sesame seeds, poppy seeds, dried onion flakes, garlic flakes, coarse salt, or even a sprinkle of Parmesan cheese.
- Add-ins: Mix in blueberries, chocolate chips, or dried cranberries for a fun twist.
- Experiment with Yogurt: While Greek yogurt is recommended, you can experiment with other types of yogurt, such as Icelandic yogurt (Skyr) or even flavored yogurt (just be mindful of the sugar content).
- Storage: Store leftover bagels in an airtight container at room temperature for up to 2 days, or in the refrigerator for up to 5 days. You can also freeze them for longer storage.
- Reheating: To reheat bagels, toast them in a toaster or toaster oven, or air fry them for a few minutes until warmed through.
Troubleshooting:
Sometimes things don’t go exactly as planned. Here are some common issues and how to fix them:
- Bagels are too dense: This could be due to over-kneading the dough or using too much flour. Be careful not to overwork the dough, and add flour gradually until it reaches the right consistency.
- Bagels are too sticky: This could be due to using too much yogurt or not enough flour. Add flour a tablespoon at a time until the dough is manageable.
- Bagels are not browning: Make sure your air fryer is preheated properly. You can also brush the bagels with a little melted butter or oil before air frying to help them brown.
- Bagels are coming apart during cooking: Make sure you seal the ends of the dough firmly together when shaping the bagels.
Enjoy your homemade yogurt bagels!
Conclusion:
So, there you have it! This Yogurt Bagels Air Fryer recipe is truly a game-changer. I know, I know, another bagel recipe? But trust me on this one. The simplicity of the ingredients combined with the speed and convenience of the air fryer makes this a must-try, even if you’re a seasoned baker. You’re getting that satisfying bagel chewiness without all the fuss of traditional methods. Plus, the clean-up is a breeze!
Why is this recipe a must-try? Well, first and foremost, it’s incredibly easy. We’re talking minimal ingredients and straightforward instructions. Even if you’ve never baked a bagel in your life, you can absolutely nail this. Second, it’s fast! The air fryer works its magic, delivering perfectly cooked bagels in a fraction of the time compared to oven baking. And third, it’s versatile. You can customize these bagels to your heart’s content, making them sweet or savory depending on your mood.
Now, let’s talk serving suggestions and variations. The possibilities are endless! For a classic breakfast, slice one open and spread it with cream cheese and smoked salmon. Or, try a smear of avocado and a sprinkle of everything bagel seasoning. If you’re feeling adventurous, make a breakfast sandwich with eggs, cheese, and your favorite breakfast meat. For a sweeter treat, top your bagel with Nutella and sliced bananas, or a dollop of peanut butter and a drizzle of honey. You could even add blueberries or chocolate chips to the dough before air frying for a truly decadent experience.
Want to get even more creative? Experiment with different toppings before air frying. Sesame seeds, poppy seeds, dried onion flakes, or even a sprinkle of parmesan cheese can add a delicious layer of flavor and texture. You can also try using different types of yogurt. Greek yogurt will give you a slightly tangier flavor, while flavored yogurts can add a subtle sweetness. Just be mindful of the sugar content if you’re using flavored yogurt, as it may affect the browning of the bagels.
Don’t be afraid to play around with the recipe and make it your own. That’s the beauty of cooking, right? It’s all about experimenting and finding what works best for you. I’ve found that adding a tablespoon of honey to the dough gives the bagels a slightly sweeter flavor and a beautiful golden-brown crust. You could also try adding a pinch of salt to the dough to enhance the overall flavor.
I’m so excited for you to try this recipe! I truly believe you’ll love how easy and delicious these Yogurt Bagels Air Fryer are. Once you’ve given it a go, I’d absolutely love to hear about your experience. Did you try any variations? What toppings did you use? What did you serve them with? Share your photos and comments below! Let’s create a community of bagel-loving air fryer enthusiasts!
So, go ahead, grab your ingredients, fire up your air fryer, and get ready to enjoy some homemade bagels that are sure to impress. Happy baking!
Yogurt Bagels Air Fryer: The Easiest Recipe You'll Ever Make
Easy 2-ingredient bagels made with Greek yogurt and self-rising flour, air-fried to golden-brown perfection. Customize with your favorite toppings!
Ingredients
Instructions
Recipe Notes
- Don’t over-knead the dough.
- Make sure the bagel seal is secure to prevent them from coming apart.
- Air fryer cooking times may vary.
- Store leftover bagels in an airtight container at room temperature for up to 2 days, or in the refrigerator for up to 5 days. You can also freeze them for longer storage.
- To reheat bagels, toast them in a toaster or toaster oven, or air fry them for a few minutes until warmed through.